I would like to say right away that this guide to removing the steering wheel was given using the example of a VAZ 2121 Niva, that is, an old-style model. But in fact, the procedure for performing this repair is almost the same, so this instruction is quite suitable for other modifications of the Niva, such as 21213 and 21214. In order to perform this procedure without any problems, you will need a tool such as:
- Phillips screwdriver
- Vorotok
- Head 24
- Extension
First, from the bottom side of the steering wheel, you need to unscrew the bolts that secure the trim (horn button), as shown in the photo below:
They are on both sides. Then remove this cover:
Next, it is advisable to turn the steering wheel all the way to the left, so that later it will be more convenient to unscrew the fastening nut:
When you have dealt with this, you can try to pull the steering wheel towards you from the reverse side to try to remove it from the splines. If this cannot be done, then you can spray it with penetrating lubricant and then hit it with your hands from opposite sides of the steering wheel. Usually this can be done without any problems:
If you need to replace the steering wheel on a Niva, then the price of a new one is about 1000 rubles, if you consider the factory version. If you choose from other manufacturers, then the prices are different, starting from 600 rubles, but the quality is not always better than the original.
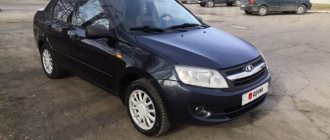
Removing the steering wheel of a Niva Chevrolet car
We remove the steering wheel when removing the steering column and for other repair work.
Remove the key from the ignition switch.
Turn the steering wheel until the steering shaft locking device is activated.
Using a felt-tip pen, we apply marks on the instrument panel and on the steering wheel. Disconnect the negative terminal from the battery.
We evenly pry off the horn switch cover on three sides
Use a screwdriver to press the clamp on the horn switch wire block.
Disconnect the wire block from the connector located in the steering wheel hub.
Using a 24mm socket with an extension, unscrew, but not completely, the nut securing the steering wheel to the steering shaft.
While rocking, pull the steering wheel towards you in order to remove it from the steering shaft splines
If the steering wheel sits tightly, then the assistant pulls the steering wheel along the axis of the steering column, and strikes the end of the steering shaft with a hammer through a soft metal drift.
Finally unscrew the steering wheel fastening nut.
Removing the steering wheel
We install the steering wheel in the reverse order, following the marks.
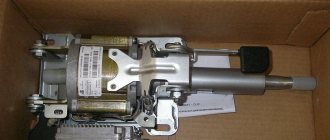
Steering column from Priora Niva
As all Niva drivers know, the driving position of the Niva is far from optimal. Because of my long legs, I have to move the seat far back, but at the same time I don’t have enough hands. We have to place the back much more vertically than we would like. And the pants on the inner thighs near the knees constantly got dirty from the close proximity to the steering wheel. Therefore, I decided to “crank” the adjustable steering column from the VAZ-2115.
For this I purchased this:
The steering wheel with a long hub - it seems to me that it is from Turkey, but the seller claimed that these are now used on classics. Don't know.
The telescopic shaft is from Vectra A, but you can also use one from 21213. I was afraid that not everything would work out, so I didn’t touch the original parts, so that in case of failure, I could return everything to its place and get home (everything was done at a friend’s place on the other side of town )
Well, and the steering column itself:
I also had to buy a small old-style steering driveshaft from 2121.
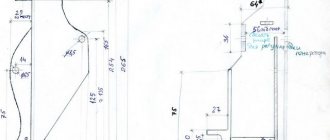
After I disassembled the old steering column and tried on a new one in its place, it immediately became clear that welding was indispensable: — the holes for fasteners at 2115 are narrower than 4 centimeters; — on top of the new column there is a semicircular stamping that rests on the dashboard and does not allow the column to be screwed on properly.
We decided to use L-shaped brackets made from 50-gauge angle to build new fastenings without significantly damaging the original design:
As a result, the fastening platform became level with the top point of the semicircular stamping. It is also possible to move the column slightly towards you (which is what we had to do in the end, because it is very difficult to immediately determine how it will be more convenient for you, especially holding all this “economy” in weight):
How to remove the steering wheel of a VAZ-2123
We remove the steering wheel when removing the steering column and for other repair work.
Remove the key from the ignition switch.
Turn the steering wheel until the steering shaft locking device is activated.
Using a felt-tip pen, we apply marks on the instrument panel and on the steering wheel.
Disconnect the negative terminal from the battery.
1Pry the horn switch cover evenly on three sides
Use a screwdriver to press the clamp on the horn switch wire block.
Disconnect the wire block from the connector located in the steering wheel hub.
Using a 24mm socket with an extension, unscrew, but not completely, the nut securing the steering wheel to the steering shaft.
While rocking, pull the steering wheel towards you in order to remove it from the steering shaft splines
If the steering wheel sits tightly, then the assistant pulls the steering wheel along the axis of the steering column, and strikes the end of the steering shaft with a hammer through a soft metal drift.
Operating principle of EUR and power steering
Before installing the amplifier in the VAZ 2121 with your own hands, let's look at the operating principle of the systems, starting with the power steering. When the steering wheel is in the central position, it is fixed using centering springs. In this position, the liquid circulates through all elements of the system, provided that the distributor is positioned correctly. In this case, the power steering pump operates in enhanced mode, which is due to the need to pump fluid through the system. Moreover, it always functions, regardless of whether the steering wheel is turning or not.
When the steering wheel is turned, the spool moves, as a result of which the element blocks the drain lines and liquid begins to flow into one of the cylinders. In this case, the piston, as well as the rod, are exposed to oil under pressure, which leads to the rotation of the wheel, as well as the housing, in a certain direction. The spool overtakes the device body when it stops moving, which indicates that the driver has completed the turning maneuver. In this case, the spool returns to its original position, and then the hose opens to drain the liquid.
As for the principle of operation of the electric power steering, the amplifier itself is mounted on the steering shaft of the vehicle. Its component parts are connected to each other using a torsion shaft, with an installed engine speed reading controller. When the driver turns the steering wheel, the torsion shaft twists, which is detected by the torque sensor. In accordance with the information received from the torque, speed and engine speed controller, the control module determines the compensation force, as a result of which it sends a command to the amplifier electric motor.
Removing and installing the Chevrolet Niva steering wheel
Tools:
- Flat head screwdriver
- Socket wrench
- Extension for socket wrench
- Head for socket wrench 24
Note: We carry out the work when removing the steering column switches, steering column or when replacing the steering wheel.
1. Having removed the key from the ignition switch, turn the steering wheel until the steering shaft locking device is activated.
2. We apply installation marks to the instrument panel and steering wheel. Disconnect the negative cable terminal from the battery terminal.
3. Use a slotted screwdriver to pry off the horn switch cover.
4. We move it away from the steering wheel.
5. Disconnect the wire block from the connector located in the steering wheel hub.
6. Using a 24" socket with an extension, loosen the nut securing the steering wheel to the upper steering shaft.
7. While rocking, pull the steering wheel toward you in order to remove it from the steering shaft splines.
Helpful advice: The steering wheel sits very tightly on the shaft splines, so do not completely unscrew the wheel fastening nut: if there is a sharp impact during removal, the steering wheel, jumping off the splines, can cause injury. For ease of reinstallation, mark the position of the steering wheel relative to the shaft.
8. If you cannot move the steering wheel with your hands, an assistant pulls the steering wheel up along the axis of the steering column, and strikes the end of the steering shaft with a hammer through a soft metal drift (in the event of a sudden break of the steering wheel, the nut will protect workers from injury).
9. Finally unscrew the nut and remove the steering wheel.
10. We install the steering wheel in the reverse order, focusing on the installation marks.
The article is missing:
- High-quality photos of repairs
Source: Chevrolet niva device, operation, maintenance and repair. Publishing house "Behind the wheel"
Steering column from Priora Niva
53 customers chose this product
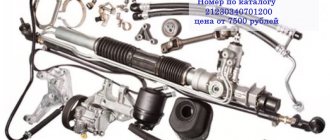
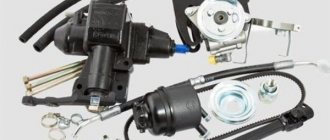
Today, the main focus in car production is on traffic safety and driving. The rapid electronicization of the modern car has made it possible to introduce new components and systems to achieve the above task. A striking example of this is the electric power steering. The main difficulty in their production is the creation and development of the Kaluga gearbox in serial production. Since electric amplifiers for Lada Niva 4x4 cars are temporarily or permanently discontinued, the MotorRing online store offers you an alternative in the form of an EUR from a Lada Priora car with a complete installation kit. This kit is installed in standard places without any modifications. The kit includes everything needed for installation. The installation of this EUR can be carried out at any installation center, or by the car owner independently; we do not oblige the installation to be carried out at certified installation centers. The main advantage of the installation is that the steering column becomes adjustable in height, as on Lada Priora cars.
Equipment:
From installing this EUR kit, in addition to comfortable control, you get a steering column from Lada Priora, which will aesthetically fit into the interior of your car.
Note! By installing the EUR, you are making changes to the steering, the reliability of which you need to be completely sure of. The online store Motorring.ru sells EUR ONLY manufactured in Kaluga . Such power steering units are installed on the AVTOVAZ assembly line.
Some online stores sell EUR manufactured in Kizlyar or EUR made in Korea, which AVTOVAZ refused due to the possible spontaneous steering of a car with such an EUR. Such EUR, as a rule, are sold at prices of 1000-5000 rubles. cheaper.
We kindly ask you not to risk your safety!
Weight, kg: 15.3 Dimensions, cm: 53 x 46 x 28 Volume, m3: 0.06826
Modern car - How to remove the steering wheel on a Chevrolet Niva, pros and cons, opinion of motorists
How to remove the steering wheel on a Chevrolet Niva
Rails and crossbars for Chevrolet Niva
Rails and crossbars for Chevrolet Niva
The Chevrolet Niva is one of our popular SUVs and worthily occupies the niche of compact SUVs. Due to its compactness, the Chevrolet Niva has a small trunk, only 320 liters. Of course, the amount of luggage space can probably be increased to 650 liters by folding the rear seats of the car. But this will be acceptable for traveling as a couple, or if you are planning a vacation with friends or family.
Difficulties in replacement
Many users often have questions when replacing an old steering wheel with a new one. Here are the answers to the most common ones.
Question 1: Are mounts suitable for different models?
Answer: The mounts are identical, so the Priora 2 SE steering wheel is recommended for use on older models as well.
Question 2: I removed the steering wheel, but now I can’t put the new one back, it doesn’t work manually, what should I do?
Answer: If the part has been dismantled, then it can also be installed back. The steering wheel is installed by pressing your hands towards the shaft, without using tools like a hammer, but everything may not work out on the first try. There is no need to make sharp pushes of the steering wheel; a simple smooth press will be enough.
Question 3: Are additional components needed for the mechanism besides the steering wheel?
Answer: Yes, you still need to purchase a steering cable of the same model. Its installation is carried out similarly to the old version.
Question 4: The steering wheel is stuck after installation, what should I do?
Answer: Most likely, the steering cable is installed incorrectly. Disassemble the structure and reassemble it, adjusting the position of the cable in advance.
Yes, it is possible, but you need to have some experience; if you have the slightest doubt about your abilities, it would be better to resort to the services of a technical assistance station.
Before you start dismantling any machine, you first need to prepare it a little:
- Align the steering wheel so that the car moves straight;
- Remove the key from the ignition switch and lock the steering wheel;
- Deactivate the negative terminal on the battery.
That's it, all that remains is to wait two or three minutes. The pause is needed so that the capacitor in the control system is completely discharged. The electrical circuit must be de-energized, avoiding short circuits.
What you need
Some tools will be needed, in particular, keys and screwdrivers. Their specific models depend on what exactly you plan to work with. Different brands of cars require different types of keys.
Step-by-step instruction
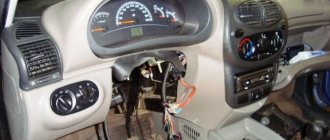
Before removing the airbag, it is worth understanding what version of it we are talking about and what model of car you plan to perform the task with.
Remove the airbag from the steering wheel
Let's consider the situation using the example of the Lada Priora car; in other models there may be minor differences (some examples are given below in the corresponding section), but the general essence is the same. Having carried out the preliminary preparation described above, we proceed as follows:
Turn the ignition key to the right. It is necessary that the lock opens so that the steering wheel can turn freely left and right. You cannot remove the key from the ignition, otherwise the steering wheel will lock; On the Priora-4, the steering wheel is spoked, and to remove the cushion, you need to tighten two countersunk bolts on the sides. A T27 sprocket key is suitable for this. With the steering wheel straight, first tighten the bolt on the left side
We turn the rotor 180 degrees and unscrew the other bolt. When both bolts are unscrewed, you need to pull the pillow towards you. It is important to be careful if the bolts are too tight - damage to the plugs is possible.
- Moving the pillow aside, holding the airbag with one hand, separate the plug from the middle of the device. You must first unclick the latch upwards, then remove the connector from bottom to top from the base;
- Now the signal wire is removed;
- You can remove the steering wheel itself, but do not forget to put the wheels straight before doing so so that the steering wheel is installed on the spokes in the same position;
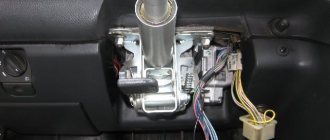
- The steering column turn switch is being replaced, we are putting the parts back together.
Remove passenger
First you need to remove the glove compartment, then unscrew the existing protection in the same way with a Phillips screwdriver; when you see two bolts, unscrew them successfully, pry the plug off from above, and remove the wiring.
Remove other pillows
To remove the side airbag, you first need to disconnect the front seat assembly, the seat back. The safety fasteners are unscrewed. In principle, that’s all, you can remove it. And then screw it in and install everything back (if necessary, placing a new one in place of the old pillow).
Chevrolet Niva | Removing and installing a steering wheel with an airbag
Cars are equipped with safety systems (SRS), including airbags and seat belt tensioners. Before working around the shock sensors, instrument panel and steering column, first disconnect the negative and then the positive terminals from the battery and wait 2 minutes. This will prevent unauthorized deployment of airbags and seat belt pretensioners, which could cause personal injury.
Remove the steering wheel as follows:
Turn off the ignition, disconnect the ground wire from the battery and wait 2 minutes before carrying out further work.
Set the wheels to drive straight.
On 1996 and 1997 models, release the clips on the sides and remove the center pad from the steering wheel.
Rice. 13.1. Loosening the screw securing the airbag to the steering wheel
On models since 1998, loosen the screws securing the airbag to the steering wheel and located on the sides at the rear of the steering wheel (Fig. 13.1).
Loosen each screw until the tab on the screw comes out of the housing.
Rice. 13.2. Disconnecting the airbag electrical connector on models since 1998
Secrets of the mechanism
Steering gear mechanism
In addition, the force is affected by the ball joints and their condition. The VAZ 2121 has four supports, and damage or breakage of even one will lead to poor performance of the entire steering mechanism. Periodic monitoring of the condition of the boots, timely routine replacement of ball boots, and the use of high-quality spare parts have a positive effect on both the reduction of steering effort and the handling of the Niva 2121 as a whole. When replacing new ball joints, it is necessary to check the amount of lubrication and the integrity of the boot, since the leakage of the cap significantly reduces the service life of the unit and causes an increase in friction.
A significant influence is exerted by the two front wheels, which rub against the road surface when cornering. The laws of physics and the principles of driving a vehicle cannot eliminate this factor.
In the VAZ steering gearbox, the bipod shaft is equipped with two supports with bronze bushings, the friction between the shaft and the body is increased. Bronze bushings (sliding bearings), due to the fact that the friction coefficient in the steel-bronze pair is quite low. But it is still insufficient to achieve minimal resistance, so great importance is attached to the presence of a sufficient amount of grease in the steering gearbox. On the other hand, it is possible to use needle roller bearings instead of bronze bushings.
The fundamental factor in the operation of the rolling pair is the reduction in the contact area of the moving parts, since the shaft does not touch the supports, but rotates in the housing by means of needles. Only rolling resistance occurs, which significantly reduces the drag coefficient and, accordingly, reduces the force on the steering column.
In addition, the resource of parts and the durability of the steering mechanism increases. Since bronze bushings take the load over the entire surface, and needle bearings only along the rolling line. The hardened steel needles used are capable of withstanding heavy loads occurring in the steering mechanism, depending on the operating conditions of the VAZ 2121.
In the pendulum arm, the plain bearings can also be replaced by rolling bearings. This will increase the sharpness of control, make it easier to control and will contribute to the reliability and durability of the steering mechanism. Periodic monitoring of the condition of the anthers and pins connecting to the rack will increase the service life of parts and maintain the ease of control of the Niva 2121.
Application of the listed methods and compliance with the rules of periodic monitoring and maintenance will achieve certain results:
- The effort on the steering wheel is reduced at different speeds, when maneuvering in reverse and while parking. This increases the safety of vehicle operation.
- The level of shock transmitted from the wheels to the steering wheel on uneven roads is reduced. The worm gearbox plays a role in this, which reduces the transmission of vibrations and shocks.
- The service life of loaded parts increases, which increases the durability and reliability of the steering gear. If the bronze bushings are replaced with rolling bearings, which have a longer service life and allow you to save the seats.
- The efficiency of the steering gear and the steering mechanism as a whole increases significantly, which helps to increase the service life.
- The force on the steering wheel is reduced, which has a positive effect on driving a VAZ car.
What does the Kalina steering system consist of?
The steering wheel is one of the main parts of the entire mechanism. It is located on the splines of the steering shaft and is secured there with a locking nut. This ensures maximum reliability of the wheel fit and reduces the likelihood of damage.
At the same time, the steering shaft itself is not an integral element, but consists of several parts - the upper and intermediate parts. Its rotation is carried out thanks to two bearings installed inside the steering column tube, on which the ignition switch with an anti-theft system is located. The steering column is assembled with an engine gearbox and an electric power steering control unit.
Protection from dust and dirt is provided by a decorative steering column cover mounted on the front of the panel. Its dismantling is carried out using a Phillips screwdriver. The normal functioning of the amplifier depends on the speed of the vehicle.
One of the parts of the column is the steering shaft driveshaft. Finding it is quite easy; to do this you will need to remove the casing. The steering shaft cardan softens vibration and makes steering safe.
Brackets are attached to the steering column tube using hinges, and their lower part is attached to the body with studs and special nuts. The top bracket has a mechanism that allows you to fix the column in different positions. When the lever is moved to the lower position, the angle of inclination of the column changes, and when it is moved up, it is fixed.
The rack and pinion steering mechanism consists of a housing, a rack and a drive gear. It is secured to the engine compartment crossbar using two steel brackets on rubber supports. The steering rod is attached to the racks, part of which are the steering ends, as well as adjusting bushings.
Car steering mechanism