FakeHeader
Comments 28
If it were possible to give a minus, I would give 3 minuses
It feels like you're installing it for the first time. Didn't say anything about the shock sensor. What's the problem with just mounting the block? On the classics, hemorrhoids are locks! It would be better if he told us the specifics of installing the TsZ drives in the rear doors and trunk.
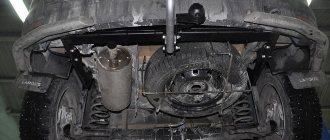
The signaling system doesn’t really help the Lada, especially if there are no protection tins underneath, it bit the gene and the quack fell asleep before they could wake up)))
Who has a battery in the trunk? how do you bite?!
In the VAZ family, when you remove the wires from the generator, the car is de-energized, if you bluntly bite them, the effect is the same, the power from the battery goes to the generator, it is closed and distributed throughout the car
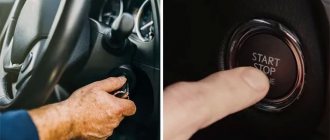
There is no point in blocking the ignition on a carb car: apply +12V to terminal B of the coil, and start it up. For the starter, the picture is similar: I undocked a very convenient joint in the area of the battery, applied +12V to the wire from the battery - and that was it.
The only reasonable way to block a carb engine is to block the fuel supply. For this purpose I had an electric valve in the gas tank area, hidden. Until the secret is pressed, there is no fuel supply. The engine will start, run for 2-3 minutes using fuel in the float chamber, and stall. If you drive right away, it will travel about 50 meters. To be more convincing, until the secret is pressed, the device does its best to pretend that there is no gasoline: the needle is at zero, the fuel lamp is on. This is achieved by breaking the fuel indicator circuit and shorting the remaining lamp to ground. When the secret is pressed, the device operates normally. The button is not latched, it is self-locking and resets when the ignition is turned off.
Subtleties of engine control
If autostart is not used, the alarm should not read data from the engine. Otherwise, it is necessary to implement control that allows you to turn off the starter at the right time. The control itself is usually carried out like this:
- The signal can read the value of the supply voltage;
- The cord from the generator is connected to the terminal of the VAZ-2107 tidy - the control cable can be connected to this terminal;
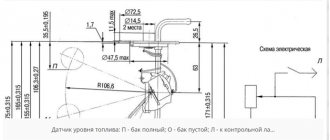
- It is best to control the launch using the tachometer, for which the alarm will still need to be configured.
The third option is preferable. The cord is not connected directly to the tachometer terminal, but through a capacitor and resistor:
Generator and tachometer outputs
Direct connection is used for “generator” control.
In practice, only one control method can be used. First, installation and connection are performed, then the system is configured.
Car alarm equipment
The basic alarm package chosen for self-installation depends on its type and functionality. The hierarchy of car alarms for different classes of cars will look like this:
As the owner of an affordable car model and limited financial resources, it is quite reasonable to limit ourselves to an alarm system with one-way, dynamic communication in the following configuration:
- central alarm control unit;
- 2 control key fobs (main, additional);
- multi-level shock sensor;
- internal alarm LED;
- service button “Valet”;
- complete set of installation wires;
- block with additional relay.
A mid-level car, close to its older business class brother, will undoubtedly require a two-way alarm system with conversational coding and telematics capabilities:
- main control alarm unit;
- 2 control key fobs (five-button, programmable key fob with LCD display, additional control key fob);
- ready-made sets of connectors with wires;
- multi-level shock sensor;
- powerful sound source – siren;
- complete, high-quality transceiver, modular design (with antenna, set of switching wires);
- indicator of the general state of the security system;
- machine engine temperature sensor;
- service switch “Valet”;
- a complete, working set of connectors and wires.
Satellite alarm system for business class cars is additionally equipped with:
- CAN and LIN modules for connecting all car alarm systems with the vehicle's electrical circuit during its installation;
- high-quality navigation GPS/GLONASS module;
- stable GSM communication module;
- secret tracking beacons with independent GSM and GPS/GLONASS communication.
Having chosen one of the listed options for a self-installed alarm system, you must thoroughly study both the user instructions and the recommendations for its installation. The option of first breaking it and then sorting it out is fraught with big problems.
How to install an alarm yourself
Having purchased the necessary alarm kit and having thoroughly worked through all the instructions attached to it, without losing even a bit of enthusiasm, you can begin the process of assembling it on the car. It is necessary to open the alarm installation instructions and lay out the entire delivery set in strict order, not forgetting the devices, tools and plastic ties with insulating tape necessary for installation:
- prepare before you start installing a car alarm yourself;
- high quality digital multimeter - no probes or test lamps;
- do not disconnect the battery (if you have a radio with an encrypted code, the electronics of the car's airbags will show an error in the system, which will require contacting a service center to remove it);
- outline the installation location (machine security system status indicator, “Valet” service switch);
- turn off the interior light fuse (this will prevent accidental discharge of the battery during installation work);
- Be sure to open the windows in the car doors - there are often cases of involuntary locking yourself inside the car when installing equipment yourself.
Initial stage of work
Reliable car protector
You can install an alarm on a VAZ 2107 using an awl, a drill, a chisel, a drill, screwdrivers, a file, wire cutters, a tester, and electrical tape.
Before installing and connecting the alarm, an electric lock is installed on the front door. It should be remembered that the alarm can be connected from the negative and positive polarity of the sensor. However, not every installation of this type provides this opportunity. The first case is characterized by connecting the black wire to the body, and the white wire to the sensor with negative polarity.
Before installing the electric lock on the rear doors, please note that you will initially need to bend the electric lock rod into the shape of the letters “V” or “Z” with your own hands, and then cut it off. There is little space available for such work, so experts recommend proceeding carefully.
The important points in this matter are the following.
- Dismantling door trim where activators are to be installed. It is recommended to have several caps in stock, as they break easily.
- Electric locks are installed taking into account the minimum load that will be placed on them during operation.
- The location of the drive rod is parallel to the standard rod. When carrying out this work on the front doors, you will need to attach the rod with the activator to its outer side, making a mark using an awl. Then 2 holes are made.
- Routing wires through rubber bushings.
- The holes in the rack and the door are made coaxial, taking into account the dimensions of the bushings. Otherwise, the hole is made using a file.
Checking the quality of the installation performed
- when arming the car, it must give light and sound signals, according to the instructions;
- open all windows and turn on the alarm;
- try to open the doors from the inside. The alarm should go off;
- similarly check all the remaining doors, hood and trunk;
Choosing an anti-theft system
There is a large selection of alarm systems on the security systems market that will provide a high level of security. But the VAZ-2106 has some features, and therefore it is necessary to select a suitable system so that it works 100%.
The standard anti-theft system kit consists of:
- alarm unit;
- sirens;
- activator;
- set of wires.
Who to trust to install an alarm system
Professional experience and knowledge of the smallest nuances of the entire technological process do not leave the slightest chance for amateurish enthusiasm and an amateurish approach to the serious and responsible work of a security alarm installer.
There is also a third, most interested party in this confrontation. The side that, with its technical preparedness, quite successfully resists both the latest gadgets of technological progress and the skills of professional installers of auto security equipment.
There is no point in risking your health or the integrity of expensive property for the sake of a momentary process of self-affirmation. It’s easier and more reliable to trust specialists. Another question is if you are well versed in electronics and you fully comply with the recommendations of this article and the connection diagram indicated in the instruction manual, then this process will not seem difficult to you.
With the growing number of car thefts, now almost every second car has an anti-theft system, or as everyone is used to calling it, an alarm system. This device blocks the car's locks and, when attempting to open them or cause physical damage to the car, makes corresponding sounds that attract the attention of the car owner or the police. In addition, the alarm may include special devices that block the engine from starting without the owner.
Car alarm connection points for Lada Granta 2022, automatic transmission, Starline A93 2can2lin
Ignition switch: +12 – brown ign 1 – blue/black acc – pink starter – connect to the gray connector at the bottom of the fuse box, the outermost red
From the can doors , brake pedal , engine running . When activating the comfort function, be sure to allow control of the standard security system.
Instrument panel: turns – blue and blue/black c an h – pink/green c an l – yellow/blue
LIN bus - red/green to the gap (white/green towards the connector, white towards the car) in the harness from the driver's door
trunk - black/blue from the trunk, diode in the gap hood - standard limit switch white/black, diode in the gap
The keyless bypass was trained not when the ignition was turned on, but rather when it was attempted to start (before starting, both learning methods gave an error). The engine had a mass air flow sensor.
Passage under the hood through the plastic plug of the clutch pedal.
How does a car alarm work?
First of all, after you have purchased the desired type of alarm, you must carefully study the attached instructions. Very often, many mistakes are made already at the first stage - these are thoughts that can be installed without instructions, based on one’s own knowledge. However, this is not so, you can and should read the instructions, it also contains a special connection diagram.
The simplest feedback alarm system necessarily includes the following elements:
- Alarm control unit . This is a kind of center that is responsible for the entire operation of the anti-theft system. It consists of a special microcircuit whose task is to receive, process and transmit signals to the performing organs. The location of such a device is chosen by the driver himself, but the most optimal is under the dashboard. This choice is due to the fact that there it will not be so accessible to intruders and the fact that there is a large amount of factory electrical wiring, along with which you can wire the alarm and not spoil the car’s interior with it.
- Antenna . This is a small device made in the form of a box, which is usually placed under the rearview mirror in the car. The main requirement for its installation is that it does not have contact with the car body, and the wires going to it remain with a small margin.
- Shock sensor . This device resembles the same antenna and has a special light bulb. It is installed in the center of the car floor and rigidly attached to the body. This location will be the most successful, since its work will be evenly distributed throughout the entire car body. The main feature of this sensor is the presence of special adjustment screws with which you can adjust the sensitivity of the device.
- Control button . This small button resembles a regular doorbell, only of the smallest size. It needs to be placed discreetly, and at the same time, you should be able to press it conveniently. This device allows you to completely disable the alarm if you suddenly lose the control panel or the system has a malfunction that prevents you from starting the engine or opening the doors.
- Siren or megaphone . There is no point in talking about the significance of this device, since it has long been known to everyone. It must be placed in the engine compartment with the bowl facing down to prevent water from getting inside the device. The siren wires must be routed in such a way that they cannot be approached even under the car.
These are the most famous elements of any simple alarm system. However, if you pay attention to other types of anti-theft systems, they have broader capabilities. The price, however, will increase significantly, and the connection method will become more complicated.
Features of standard electrical wiring
First you need to clarify what exactly needs to be connected if the installation is performed without autorun:
- Ignition control;
- Power supply for the alarm itself;
- Door switches;
- Handbrake switch;
- Signal lamps (2 wires).
As you can see, the number of elements here is kept to a minimum. But even using this, that is, a minimum set of points, will allow you to quickly connect a turbo timer. Simply, in cars of the 2107 family, the ignition support relay is installed as standard. And you need to use this.
Look at the diagram and you will understand what we are talking about:
In general, the figure shows all the important elements:
- Ignition support relay.
- Outputs for light signaling (blue and black-blue). The 8-pin connector is located in the steering column.
- Door control wire. It is located in the side tunnel near the clutch pedal.
Make T-branches and connect any signaling. By the way, the power supply to the lamps (second photo) is connected through fuses. Which is true for any car, not just the VAZ-2107.
How to connect an alarm with your own hands?
First of all, the control unit is installed, then it is necessary to connect it. The minus can be secured with a bolt on the car body, and it is recommended to look for the plus either on the hazard warning button or on the ignition switch. The most reliable option is to consider connecting the plus directly to the battery, but be prepared for the fact that the wire may not be enough and you will have to look for an additional element.
As for lighting, there are two options:
The most difficult stage in connecting an alarm system can be considered the inclusion of central locking drives in the circuit. This is due to the fact that the design of many locks can vary markedly. Before connecting the control unit to the locks, carefully study the electrical diagram of your car. It is quite possible that you will need to connect not to the drives themselves, but to the drive control unit. Many cars have additional contact pins for this case. The location of the unit can become very unexpected and inconvenient and in some cases, drivers end up connecting wires to the central locking control button. If your car does not have lock actuators at all, then you will have to purchase your own. Currently, the design of many cars provides for this possibility.
Tapping into wires
Next to the driver's door, there are two wire harnesses running right along the floor. One of them has a cable coming from the parking brake and two wires to the turn signals. The second harness contains the door switch cable. This is where you need to start connecting. To do this, remove the sill trim along with the side panel. They are attached using self-tapping screws that must be unscrewed. Having done this, you can see the wiring harness shown in the photo:
This harness goes to the dashboard. We are interested in the door switch cable. If a 1N5401 diode is inserted into the wire break, the current should flow towards the limit switches. And the second diode 1N4001 is connected as shown in the figure.
The following figure shows the second harness:
At the same time, taps are made from the blue cables and the cords are pulled to the place where the alarm will be installed. And the handbrake wire is cut, and a 1N4001 diode is soldered into the cut with the cathode towards the switch.
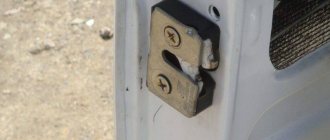
Connecting a contact group to door locks
The door opening and closing drives may have different designs, but they have corresponding terminals, which can be used to determine that they are intended for the anti-theft system. The complexity of the process lies in the complexity of the circuit, which involves connecting the interior lighting system to the doors. In this case, try to study the diagram as carefully as possible and avoid making basic mistakes.
Door lock wires, like all other alarm wires, are not recommended to be installed outside. Firstly, it does not look quite aesthetically pleasing and the wires will be more often exposed to external influences. Secondly, such a wiring arrangement will easily “give away” the location of the alarm control unit, which will make the task easier for car thieves.
The connection points must be insulated using dielectric tape. This will protect the circuit from accidental short circuits, which could result in spontaneous unlocking of the doors or fire in the electrical wiring.
Sound signal device
The sound signal on the VAZ 2107 comes in the following versions:
- Two separate signals: type S-304 (low tone) and S-305 (high tone). Mounting - on the bracket, to the left of the radiator.
- The only non-separable signal of type 20.3721-01, one tone, with a built-in relay. Mounting is on a bracket outside the radiator, immediately behind the decorative grille.
The operation diagram of the sound signal is as follows: two wires are connected to the sound signal itself. The red wire is “plus”. This part of the circuit is constantly energized. The gray-black wire is “ground, minus”; in the normal state it is de-energized, and current begins to flow through it when shorted. The photo clearly shows the color of the wires and two separate signals with brackets.
The “negative” part of the chain is long. When you press the central steering wheel button, the spring contacts close. They are located in the switch housing under the steering wheel.
The slip ring is attached to the back of the steering wheel. Its task is to ensure good contact through friction and provide a signal whenever the steering wheel is turned. Therefore, the ring must be lubricated with conductive graphite lubricant to avoid wear.
Then, the current is transmitted through the wire as part of the engine compartment harness to the switch and relay mounting block. The location of the horn relay (switch) is third on the right (if you are sitting behind the wheel).
Horn relay functions:
- The length of wires and current losses in them are reduced.
- With the help of a relay, a button with a small current can control a circuit with a large load.
Sometimes the circuit does not provide a relay; instead, a jumper that is connected “directly” works. In the case of a single signal 20.3721-01, this is justified, since it has a built-in relay. If there are two “snails”, it is advisable to install a relay to improve operation.
After the relay, the current passes through fuse F7. The new mounting blocks have a 20 A flag-type fuse, yellow. Older units have 16 A fuses. Their lifespan is often insufficient, since this fuse also serves in the cooling fan circuit.
Further, after leaving the mounting block as part of the wiring harness of the engine compartment, the “negative” wire goes directly to the sound signal.
Installing trunk or hood opening drives
This operation is performed last and will not be difficult, since it has a small number of contact pins, which cannot be confused with anything. Connection is made both to standard terminals and to new ones. In the case of the latter, you will have to install them yourself, having first studied the electrical circuit of the car.
Signal and central locking, VAZ-2110
This review discusses how to connect an alarm system to the central locking of the following cars: VAZ-21099, as well as 2110 and 2115. There are three standard connection schemes: for central locking controlled by negative polarity, positive and variable. But different cars have their own nuances. Sometimes it is necessary to add a fuse to the “+12 Volt” wire, sometimes, on the contrary, this is not required. VAZ locks, in turn, belong to the simplest type, the first. But the standard scheme published on the Internet is not suitable for them.
Alarm adjustment
After you have installed all the components of the anti-theft system, you can begin making adjustments. The entire setup of the alarm system comes down to adjusting the shock sensor. There are special adjustment screws on it, by rotating which you can adjust the sensitivity of the alarm to the influences exerted on the car body. When unscrewing the screw a certain distance, you need to hit the car body with your palm, thereby assessing the level of sensitivity. After adjusting the sensitivity, reprogram the alarm control unit. How to do this is written in the instructions for the anti-theft system.
This completes the installation of the alarm and its adjustment. Good luck on the roads!
Settings
Only autorun functions can be configured. To activate programming mode:
The optimal settings for VAZ - 2115.2114 will be the following: function 12 - set to value 3, function 11 - value 4, function 9 - value 3. To select value 4, press and hold the third button until the melody is played. After playing, press it again.
To check the correct connections, perform the following steps:
At the same time, the alarm indicator should blink.
Source