The new generation of Lada Priora cars is equipped with a more modern dashboard, which provides a standard place for placing a multimedia system or on-board computer. This design feature is actively used by some car enthusiasts when making modifications. We are talking about installing a tablet in Priora.
This solution allows you to significantly expand the functionality of the multimedia system, using the device as a navigator, on-board computer, or monitor. Listen to music, watch movies, the possibilities are almost endless. For installation, you can use a device from any manufacturer, but you should remember that products with a screen diagonal of 7 inches are most suitable.
Options for installing a tablet in Priora
There are several options for installing a tablet in Priora 2:
- an option when the mobile device is installed and powered from its own built-in battery;
- when the built-in battery is removed and power is supplied from the vehicle's on-board network.
In the first situation, installation occurs much faster than in the second case. However, a significant disadvantage is that the tablet battery, when exposed to sub-zero temperatures in winter, will quickly lose its capacity or even fail. In addition, there is a possibility that in the hot season, when the car interior heats up, the battery may ignite (remember the story with tablet computers and spontaneous combustion of Samsung batteries). As a result, the car can burn out completely.
The second option involves independently modifying the tablet and resoldering some contacts. The point is that the tablet is powered directly from the battery in the car, so it can be turned on and off at any time, regardless of whether the radio is active or not. This approach provides a number of advantages, but it is more complex in implementation than the first, above-mentioned approach.
Which option to use - decide for yourself, it all depends on the level of preparation and the desire to delve into the essence of the issue in detail.
Automatically turn on the tablet
To automate the processes of turning on and off, I recommend installing the Tasker application for Android. In this case, you won’t have to waste time on unnecessary button presses.
I welcome everyone to my page!
So I came up with this idea, the idea of installing a tablet in Kalina 2. I admit, this idea was born in my head from the moment I found out that this could be done. So I bought everything I needed and off I went. BUT! Many topics have already been created about this, but none of them have highlighted the pitfalls and obstacles that arise when performing this installation. I’ll try to mention them in this post. So, I ordered a console for installing multimedia + 1DIN frame for Lada Priora on the motorring.ru website.
Next, I decided to vibrate the console from the inside, so that Kalina has enough elements that rattle and creak)).
And here is the first stumbling block on our way. I wanted to remove the battery from the tablet and, using a voltage stabilizer, supply power to the battery controller. BUT! I couldn’t start the tablet without a battery, I used a voltmeter to select the voltage on the stub, but it didn’t help. The tablet shows me the logo and goes out. Anyone who knows a good solution, please help! For now, I have lengthened the battery wire so that if a solution is found, I can get rid of it.
Then, I solder a wire to the GPS and WiFi contacts, because... foil vibration will create a screen for the signal. The wire is +-30 cm long. While no power solution has been found, I disassembled the USB 2.1A car charger and connected it to a button that will turn off the 12V power supply from the charger.
To lock and turn on the tablet, I chose a button without locking and also connected it to a wire soldered to the contacts for turning on the tablet.
We fix the tablet in the console. On the sides of the window for the screen, glue two layers of double-sided tape. This is in order to correctly install the tablet screen so that it does not go away when it is fixed. Also, this allows the tablet screen to not touch the frame of the console window.
Obstacle 2. Many who installed the tablet in Kalina 2 did not mention that the screen of the 7-inch tablet is slightly higher in height than the console window. I solved this using software from the Market, which allows you to change the area of the active screen, cutting it to the desired size, turning off the sensor in an unnecessary area.
In the hole for the solar radiation sensor, I cold-welded a plug purchased at the car market.
The tablet must be firmly fixed to the console. To do this, we take a perforated strip from construction rubbish in the basement and attach it to the console ears.
Now we carry everything into the car for final installation in its place. And here is the biggest problem that I solved with paint. Internal air duct. Everyone unanimously repeats how easy it is to remove. NO FUCK! It cannot be removed so easily; those locking washers dug their teeth into the panel stud so strongly that no methods helped me remove the air duct without loss. I had to break it to get it out. The air duct from the deluxe installed without any problems. Everything is installed and looks like this.
The tablet is connected to the GU via bluetooth, which allows you to maintain audio quality and control the tablet from the GU. Well, that's all! All the work was done in one weekend. I'm pleased with the result, but still the issue of nutrition and getting rid of the battery remains an issue. I look forward to your advice and comments
Thank you for your attention
Price tag: 8,000 ₽ Mileage: 50,000 km
Installing a tablet in Priora 2
The new generation of Lada Priora cars is equipped with a more modern dashboard, which provides a standard place for placing a multimedia system or on-board computer. This design feature is actively used by some car enthusiasts when making modifications. We are talking about installing a tablet in Priora.
This solution allows you to significantly expand the functionality of the multimedia system, using the device as a navigator, on-board computer, or monitor. Listen to music, watch movies, the possibilities are almost endless. For installation, you can use a device from any manufacturer, but you should remember that products with a screen diagonal of 7 inches are most suitable.
To watch online, click on the video ⤵
Tablet in Priory 2 ||| multimedia instead of on-board vehicle Read more
Budget installation of a tablet in Lada Priora 2 Read more
Diary of Lada Priora 2. Entry 37. Tablet in Priora instead of BC. More details
LADA Priora 3 Luxury. TABLET (installation, configuration) More details
Installing a tablet in a Priora is the easiest way! More details
installing a tablet on a Priora 2 7-inch Read more
INSTALLING A CONSOLE for multimedia on PRIOR PANEL 1 / VISOR / + TABLET / 8000 thousand rubles! More details
TEYES CC2 4+64G IN PRIOR 2 SE AMT HATCHBACK INSTALLING MMC MULTIMEDIA TEYES CC2 4+64G 7 INCH. More details
Installation of 1 din radio in Grantu standard and norm
What is needed to install a radio in a VAZ 2190:
- The radio itself is also the head unit;
- flat screwdriver;
- Straight arms.
Abbreviations and symbols in the text:
- GU – head unit;
- MMS – multimedia system;
- DIN (din) – installation size for acoustics in a car.
Step-by-step instructions for installing the head unit
- a narrow flat screwdriver or plastic spatula for installing acoustics;
- 1-din radio with frame.
The seat in Grant is designed for 1 din. To work with large 2-din sizes, you will need to cut out the partition and install a decorative frame.
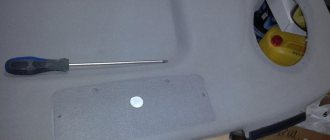
Step 1 . Using a flat-head screwdriver, remove the plastic plug for the radio. To do this, carefully pry it around the edges and pull it towards you.
The placeholder for the radio is installed from the factory.
Step 2 . On the back of the plug there is a mount for ISO connectors. There are two connectors: music power and wires for the speakers.
Step 3 . If necessary, connect an adapter for your radio to the ISO. Usually it comes included .
If an adapter is not needed , proceed to step 4.
If an adapter is needed for acoustics, it is included in the kit. Example in the picture.
Step 4 . We remove the glove compartment. Holding the glove compartment clamps in the upper position, forcefully lower the glove compartment down.
Overcoming resistance, we pull the lid towards ourselves - the glove compartment is removed.
Removing the glove box on a Grant is easy when you know where its latches are located.
Step 5 . We climb under the panel in the area of the front right passenger's feet with a flashlight. Behind the felt on top we find a thick black wire - at its end there is a plug for the factory antenna.
We extend the plug to the installation location of the radio.
Here we are looking for the antenna wire.
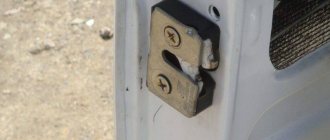
Step 6 . We install metal slides for the radio. a screwdriver to bend the fastenings of the slide at the top and bottom to ensure secure fastening.
These fasteners secure the slide into the panel opening.
Step 7 . We connect the power connectors, speakers, antennas to the radio. We insert it into the slide all the way. We attach a decorative plastic frame.
What to do if the length of the wires and antenna is not enough
To get by without extending the wires , you will have to suffer:
- We put our hand under the panel in the glove compartment area;
- We put the radio in the slide and connect it to the plugs;
- We blindly connect the power, the connector for the speakers, the wires for the amplifier, and the antenna.
Connecting a tablet through a car amplifier
There are two options here:
- If your car has a standard audio system, then it can be replaced using an external amplifier and a tablet.
- If you have a removable radio, then you can use it as an amplifier and connect it to the tablet.
I used the first option.
Replacing a stock stereo system with a tablet requires connecting an external amplifier. The fact is that the tablet cannot be directly connected to the speakers. The audio output is for headphones only. That's why an amplifier is needed. I chose 4 channel because my car has four speakers. I have the amplifier installed under the front passenger seat, but it can be installed almost anywhere, such as in the trunk of a car, but I think that is too far from the battery. I chose a location under the passenger seat to limit cable length. The seat will have to be removed, but it's really not difficult. Google how this is done in your car.
The amplifier will be powered directly from the battery. To do this, you need to run fairly thick wires from the car battery. Read the amplifier's instruction manual to determine the required cable size. There are amplifiers that come with wires for connection. You can also save money and go buy such a wire yourself.
I chose the cheapest amp I could find. I rarely listen to music, mostly audio books, so the sound quality didn't bother me too much.
Tools and materials
You will need a ferrule crimper on the end of each wire. I have tips that have heat shrink cambric. Not a bad option and looks very professional.
- Wire Stripper/Crimping Tool
- Soldering iron (recommended)
- Screwdrivers
- Drill
- Knife with cutting blades
- Tablet from car dock (I chose Samsung Galaxy Tab 7+)
- 1/4" Lexan sheet (approx. 10"x6")
- Dye
- 1-1/4" circle cutter
- 3/8" drill
- Amplifier
- Car Audio Adapter
- 12 V plug into cigarette lighter
- Wire - thick-walled to the amplifier
- Wire - for speaker signals
- Gaskets
- Insulating tape
- Scotch
Connecting the tablet to the car’s on-board network (important note)
You need to connect two devices to the on-board network - a tablet and an amplifier. Of course, they can also be connected through the cigarette lighter, but this option can only be considered temporary. To avoid short circuits and ensure stable power supply, it must be connected directly to the battery.
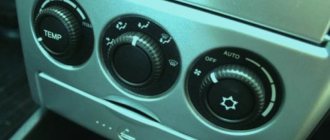
Dashboard
The torpedo has a great influence on the interior of the entire cabin. And if we compare the tidy of the Kalina with the classic Zhiguli models, then the Togliatti engineers have stepped far forward, but they are still very far from ideal. To produce torpedoes, the factory uses very low quality plastic. This negatively affected the performance of the instrument panel. The colors fade over time, the plastic itself becomes covered with small cracks, and the entire torpedo begins to make unpleasant sounds when moving. You can improve the appearance of the dashboard and get rid of extraneous sounds yourself, for this you need:
- Disassemble the torpedo and glue all the places where the plastic comes into contact with metal, foam rubber or other insulating material.
- If necessary, secure all electrical wiring harnesses with plastic clamps.
- Secure the air ducts that direct the flow from the heater.
- Replace all plastic fasteners with new ones.
- You can also make changes to the color scheme of the torpedo along the way by covering it with a special film. If the hands grow from the right place, this procedure is not difficult to perform on your own.
- Installing a “Grant” central tunnel with cup holders will significantly improve the appearance and add more practicality. The tunnel has a different color from the original instrument panel, this can be corrected by covering it with vinyl film. There are also no holes for the electronic mirror adjustment unit. They will need to be made separately or find another place for installation.
- By installing an armrest between the front seats, you will significantly reduce fatigue from driving a car over long distances. The armrest is also an additional niche for various small items.
Functions and principle of operation
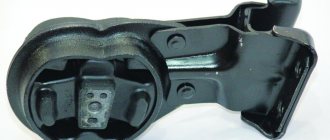
The rear axle reducer (RAG) is part of the vehicle transmission. This unit changes the direction and increases the value of torque, which is transmitted from the driveshaft to the axle shafts of the drive wheels . The engine rotates at high speed (from 500 to 5 thousand revolutions per minute), and the task of all transmission elements is to transform the direction and angular speed of the rotational movement of the motor and ensure the efficient operation of the drive wheels.
The gearbox is designed to enhance the torque transmitted from the driveshaft to the axle shafts of the drive wheels
Technical characteristics of the gearbox
The VAZ 2103 gearbox is suitable for any “classic” VAZ model, but engine performance may change after installing a “non-original” gearbox. This is due to the design features of such a gearbox.
Gear ratio
Each type of REM installed on the VAZ 2101–2107 is characterized by its own gear ratio. The lower the value of this indicator, the more “speedy” the gearbox is. For example, the gear ratio of a “penny” RZM is 4.3; a gearbox with a gear ratio of 4.44 is installed on a “two”, i.e. the VAZ 2102 is a slower car compared to the VAZ 2101. The VAZ 2103 gearbox has a gear ratio of 4, 1, i.e. the speed indicators of this model are higher than those of the “kopek” and “two”. The fastest of the “classic” REMs is the unit for the VAZ 2106: its gear ratio is 3.9.
Video: a simple way to determine the gear ratio of any gearbox
Number of teeth
The gear ratio of the RZM is related to the number of teeth on the gears of the main pair. On a “three-piece” RZM, the drive shaft has 10 teeth, the driven one - 41. The gear ratio is calculated by dividing the second indicator by the first, i.e. 41/10 = 4.1.
The number of teeth can be determined by the gearbox markings. For example, in the inscription “VAZ 2103 1041 4537”:
- VAZ 2103 - gearbox type;
- 10 and 41 - the number of teeth of the drive and driven shafts, respectively;
- 4537 — number of the final drive gear set.
Consequences of installing a non-standard gearbox
You should know that installing a “faster” REM does not mean an automatic increase in vehicle speed. For example, if on a VAZ 2103, instead of the “native” gearbox with a gear ratio of 4.1, you use a VAZ 2106 unit with a gear ratio of 3.9, then the car will become 5% “faster” and the same 5% “weaker”. It means that:
- effective torque will decrease by 5%;
- to accelerate to a certain speed, fewer engine revolutions will be required, i.e., to accelerate, for example, to 120 km/h, 3900 rpm will be enough, instead of 4400. The problem is that now the engine may not have enough power to spin up to 3900 rpm.
Thus, if you installed a non-standard RZM with a different gear ratio on a VAZ 2103, then in order to maintain the dynamic performance of the car, a proportional change in engine power will be required.
Any gearbox can be installed: if it is normal, it will not hum with any gearbox. However, you need to take into account the gear ratio: if you set it with a lower number, the car will be faster, but it will go slower. And vice versa - if you set it with a larger number, it will take longer to accelerate, but go faster. The speedometer readings also change. Don’t forget about the traffic cops: it’s better to install the same one as it should be, and it’s better for the engine.
genchik64
https://vaz-2106.ru/forum/lofiversion/index.php/t5261–600.html
Sucker
To make such a simple holder, you will need a suction cup, used for attaching toys to the windshield, as well as a stationery pin. This is perhaps the easiest way to make a holder; even girls can cope with this task. The suction cup connects to the clothespin. The resulting structure is installed on the deflector. The phone is attached to the suction cup.
To hold a more massive tablet you will have to use 2 of these mounts. The advantage of such a holder is its convenience; it can also be removed if necessary; it will not take up much space in the glove compartment.
Visor for Priora (for installing a tablet)
Hello everyone from the auto city of Togliatti! I would like to bring up for general discussion the idea of installing the Visor we made on the panel of the Priora 1 for installing a tablet as a multimedia system. Show in full…
Like everyone else, I often had to use a navigator in a smartphone, installing it using all sorts of devices on suction cups, Velcro and other fasteners. from which, when leaving the car, it was then necessary to remove it, unhook it, etc. Therefore, the idea came up to install the tablet as a permanent multimedia device! The idea itself is certainly not new, since the Internet is full of guys who have successfully installed a tablet in their car. I had the task of making a certain “Visor” to install a tablet in it. Naturally, it would be comfortable and look decent! Many can say. There is also a Luxury Priora with a panel and an installed navigator. But this is not my option. I don’t want to offend the owners of such Priora, but I don’t like how the panel of the Priora 2 looks. Although the taste and color, as they say. But I liked the way the Console on Kalina 2 “Lux” looked. Taking on the design, we produced a canopy that can easily be mounted on the panel yourself. Moreover, they made it look as if it came from the manufacturer’s factory.
After you mount the Visor on the car panel and install our prepared tablet with special software. On board your car you now have:
1. Navigator (you can install two or three different navigation applications). GPS and Glance support. Works without the Internet.
2. Engine diagnostics (using ELM327 adapter). Engine operating parameters are displayed on the tablet monitor.
3. Video and music (playing most formats; a tablet can do this better than car radios).
4. Internet. (4G via 2 Sim cards or via WI-FI)
5. Online TV with many (66) TV channels via 4G.
6. The tablet supports two SIM cards. so you can take calls without being distracted from the road! You can answer by installing a hands-free device on the visor.
7. Install the SD card and download music and videos onto it. We watch and listen to everything we “pump up”.
8. Warning about speed cameras and their location. (databases are updated). A graphic and audio warning of the presence of cameras is displayed on the monitor screen in advance of the camera itself.
Well, if we install an active hub. the one here you can hook everything. What do you have enough imagination for? from external drives to rear camera and perimeter cameras. ))) The sound is output to the AUX input of the radio or via Bluetooth (if supported by the radio). I didn't even expect that the sound could be so high quality. it all depends on the quality of the recorded audio and video sound.
folloart
Installing a Tablet in a car @planshet_v_avto95 Instagram Profile Photos and Videos
- Navigation
- Home All
- fashion
- film, music & books
- food & drink
- home decor
- fitness
- travel
- girls & beauty
- funny
- photography
- men's fashion
- art
- animal
- cars
- sport
- Fashion
- Language
- English
- Russian
- About
- About us
- Privacy Policy
- Help&FAQ
- Search
@planshet_v_avto95
I am preparing and installing the tablet in the car. You can connect to the tablet: rear camera. view, hub for flash drives, navigation, and much more 2019-04-15 19:00:35 We installed a Samsung Tab E 9.6 tablet, it has everything for ease of control.
71 2019-04-15 16:49:42
Priora 1 installed a nexus 7 tablet with a rear view camera. Works perfect. The frame for the tablet can be purchased separately
68 2019-04-15 08:10:25 50 2019-04-06 07:02:06
Repost @pomosh_troinie by @media.repost: Friends! Today is the 3rd day of the Marathon of Good Hearts - “8 Days of Kindness”. It’s disappointing that the collection hasn’t moved, it’s at a standstill
( 2 ratings, average 4.5 out of 5 )
Which tablet to put in Priora 2
As mentioned above, the main and basic requirement for a tablet computer is the size of its screen. In our case, this figure should be 7 inches. If we talk about specific device models, the most popular of them are:
- Samsung Galaxy Tab 3 (with 7.0 screen);
- more budget models from Lenovo (for example, the A3500 product).
The second requirement for the device is the ability to recharge it using a standard USB cord. The third, but important parameter is the quality of the device’s battery. Please note that when installed in a car, the battery of a mobile device will be subject to aggressive external influences in the form of heat or cold, and temperature changes.
Noise in car speakers when charging and playing from a tablet
I didn't like the idea of connecting the headphone cable at the top of the tablet. The docking station connector has contacts for connecting audio. I purchased a cable that allowed me to charge the tablet and also play audio through the same cable. However, when testing this cable in the car, I was unable to get rid of the noise when charging and powering the amplifier at the same time. The main reason is the quality of the 12V - 5V adapter. Those that are inserted into the cigarette lighter are absolutely not suitable, but high-quality ones cost $20-40.
After that, I bought a Bluetooth audio receiver and connected it to the amplifier. This option worked great, and I was able to use audio without connecting a second cable. However, the sound was not as high quality as using an audio cable. Therefore, to save time and effort, I would recommend connecting only using a headphone cable. This is the best option.
It would also be possible to use a car radio with Bluetooth (for example JVC KD-SD80BT) and send sound to the speakers through it.
Installing a tablet in Priora 2
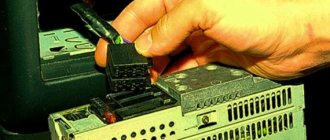
To complete the work, you will need a flat-head screwdriver, a durable utility knife, and a small amount of soundproofing or sealing material. The first step is to remove the on-board computer from the car's dashboard. To do this, you need to remove the panel visor, which is attached to it using clips (pry up the edge of the visor with a flat screwdriver and pull it towards you). Remove the BC from the case, disconnect the contact wires that are connected to it.
Prepare a tablet of the required size. We unscrew the mounting plate, turn it over and secure it so that the tablet can be installed on it (we first glue the places of contact between the device and the metal with some anti-vibration material). We place the device at the place of future installation, analyze the dimensions, as well as how much plastic of the top and side panels needs to be trimmed. Using a utility knife, cut the required amount of plastic. We connect the USB charging cable to the electronic device and connect it to the radio. We connect the audio output of the device to the AUX connector on the radio. We install the visor back. To do this, we lean it against the fastening points and tap its body in several places so that the latches are fixed and firmly hold the part in the grooves of the panel.
Here is a simple and very useful way to install a tablet in a Priora with your own hands.
Mounting a tablet in a car
I had no problems securing the tablet. I simply removed the part of the dashboard where the built-in CD radio was located. If you don't know how to do this, read the manual, look up instructions on the Internet.
If you want to mount the tablet somewhere on the dashboard, here are a few ways to mount the tablet in the car with your own hands.
I measured and cut a piece of plastic slightly larger than the hole where the radio was. This kind of plastic can be found in the store.
To secure the plastic in place, I attached it along the back with epoxy glue. This material is excellent for fastening objects of complex shapes.
Lada Priora Sedan Coriander › Logbook › Installing the tablet Priora 2 restyling part 2
Quite by accident I came across a link, and then another one. This is exactly what I was looking for, downloaded the psd sources and edited them to suit my interior, made new icons and attached the basin logo.
I will give a link to all the sources below, you can change something to suit yourself. Now what is needed: 1. Ruth is right
The Kingo root program is excellent for MTK processors. I think everyone knows why root rights are needed.
2. Custom recovery
With its help you can install zip archives and patches and programs. In this case, the boot animation will be replaced. It should be installed in accordance with the device model.
3.Total Launcher
This is probably the most customizable launcher of all, you can customize absolutely everything, an irreplaceable thing.
4. Tasker
A program for programming tasks on a tablet, useful for setting up the camera.
5.Torque
In addition to the program itself, you also need to download widgets and themes. I started with boot animation. This is an animation when the tablet is turned on, the task is to put the VAZ logo in its place. To do this, use ES Explorer to go to system/media/ and delete bootanimation.zip; files with the startup sound can also be deleted. Then we go along the path system/bin/ and rename the bootanimation file to bootanimation.bk - this is the standard Android animation file, by renaming it we disable it. Now you need to replace the logo when you turn it on. To do this, you need to download the update_bootscreen.zip archive from the link below and install it from custom recovery. Now when you turn it on you will have this image:
Now setting up the launcher. We install Total Launcher, make it the default, immediately set landscape orientation in the parameters and hide the navigation buttons and the status bar, you also need to disable scrolling of tables and editing with a long press. In settings - Screen - change the wallpaper of the lock screen and desktop, I changed it to neutral, took the background under the skin.
Lada Priora Sedan Sold › Logbook › Easy tablet installation
Hello everyone, so I decided to buy and install a tablet computer in the Priora instead of the standard on-board computer. For this, I bought a tablet, not the most expensive, but quite decent in terms of parameters and functionality, the Supra M725G tablet. Having read many articles about installation and problems associated with installing the tablet it was decided to do everything, as they say, spontaneously and without much preparation. Actually, the goal so far was to install the tablet so that it would charge and produce sound (maybe not the best yet) to the head unit. Well, how to remove the visor from the panel, I think many already know, it can be removed, I’ll say it’s quite difficult, but the main thing, as they say, is not to screw up, we pull towards ourselves and push up a little towards me, starting from the front and then the back. Next, we unscrew the two screws securing the on-board computer and take it out. We DO NOT remove it far from it; we will still need a fastening that is screwed to it with two screws. We unscrew them and remove such a piece of hardware.
source
Lighting
The Kalina's interior lighting leaves much to be desired. Only the front part of the machine is equipped with a lamp. The back row does not have any lighting devices. An LED strip will help fill the back row with light. It can be powered from the front lamp, and the wiring can be laid under the ceiling card. For convenience, you can install a separate switch in the rear row area so that passengers can turn it on themselves.
Tuning the Lada Kalina with your own hands will take a little time, but by doing so you will reduce the cost of its implementation. By making changes to problematic parts of the car, you thereby improve the impression of the entire car as a whole.
Things to remember
- When installing the holder (especially if it is installed on the dashboard on a bracket), we must not forget about safety precautions. The bracket should not be too long, the tablet should not be too close to the steering wheel, or at the same level with it, because this way the driver will certainly touch it when he next reaches for the gearshift lever. In the event of an emergency, this seemingly insignificant moment may well become the cause of an accident.
- A tablet built into the front seat headrest could cause injury to the rear passenger. If this person is not fastened, then in the event of sudden braking or an impact, he will be thrown forward, face-first directly onto the headrest. If there is a tablet in the headrest, its fragments will cause cuts to the passenger (this point is especially relevant for tablets whose display is covered with glass with a so-called oleophobic coating, rather than plastic).
Where is the tablet attached?
- The first option: the device is mounted on the dashboard, to the right of the steering wheel (or to the left, if the steering wheel in the car is located on the right). There are many ways to mount a tablet in this place, some of which will be discussed below. Many car enthusiasts prefer to follow the path of least resistance and simply buy a tablet holder in a store. The problem is that it is not always possible to find holders in the store for a specific tablet model and a specific car brand. This is why car owners often have to make holders themselves.
- The second option is also possible: the tablet is mounted in the headrest of one of the front seats. It is clear that in this case it will be used mainly by passengers, and not by the driver. In this article we will talk about attaching “driver” tablets.
Norm of life from LADA Granta sedan
The car in the “norm” version already gives an idea of comfort. Electric power steering in the base - coupled with a shortened steering rack - improves the quality of vehicle control. The car listens better to the driver in city modes and on the highway, the steering wheel returns to the zero position more readily after completing a turn. The cable drive gearbox also adds comfort. Thanks to the German gear selection mechanism, made with pinpoint precision, gear shifting is brought to the level of European analogues. This is confirmed both by the conclusion of Ricardo experts and by numerous reviews from consumers and journalists. A people's car must be strong and durable. Therefore, when developing the LADA Granta sedan, special attention was paid to reliability and quality. As a result, the first scheduled service for 2000 km disappeared from the service book of the Lada Granta sedan - and this is an indicator of increased reliability.