The body structure of the VAZ-2109 car is made in the form of a metal frame. The frame is welded from stamped parts by spot welding.
Therefore, you can change individual body elements without passing through other places. On a VAZ 2109, the radiator frame is replaced when cracks appear on it.
Since the engine mount is installed at the bottom of the frame, when it is loosened, the engine itself sags. Replacing the VAZ 2109 radiator frame can be done easily and on your own.
Replacement
To carry out repair work, you need to prepare tools, materials, power tools:
- complete set of keys;
- locksmith - chisel, hammer;
- electric welding machine;
- electrodes dia. 2 mm;
- drill;
- drill dia. 5-6 mm;
- a grinder with a grinding wheel, have a metal disc in stock;
- primer;
- paint;
- solvent;
- aerosol can with anti-gravel composition in black Body 950;
- cotton gloves;
- canvas mittens;
- rags;
- fire extinguisher – you need to check the expiration date;
- plastic containers for 6-7 liters, they can be made from 10 liter canisters;
- safety glasses;
- tassels;
- moisture-resistant sandpaper.
Preparing the machine
Replacing the lower cross member of the VAZ 2109 radiator frame
Place the vehicle on a level surface:
- Open the hood.
- Open the expansion tank cap.
- Place a container under the cooling radiator and open the drain plug.
- Drain the antifreeze.
- Place the second prepared container under the engine and drain the antifreeze from it.
- After this, install and tighten the plugs.
- Disconnect both terminals from the battery.
- Remove the battery.
- Place wheel chocks under the rear wheels.
TIP: BEFORE LIFTING THE FRONT, IT IS ADVISIBLE TO REMOVE THE WHEELS. SINCE WHEN WELDING, A SPARK CAN ACHIEVE THE RUBBER CYLINDERS.
- Raise the front of the car with a jack.
- Install standard supports.
- Align the front part of the body level. You can apply a level.
- Remove the front decorative grille.
- Unscrew the headlight mounts from the engine compartment and disconnect the terminals.
- Take them out and put them on a rack in the garage.
- Unscrew the upper radiator mounting. First remove the electrical wiring terminals from the fan and remove the wires as far as possible from the intended work area. If possible, wrap the wires with tarpaulin.
- Tilt the radiator towards the engine and unscrew the clamps securing the pipes.
- Remove the pipes. Move them away from the front end.
- Remove the radiator and fan assembly.
- Remove the radiator inserts from the lower channel.
Preparing the frame
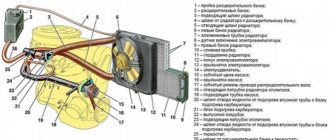
VAZ 2109 radiator frame panel
When carrying out work by one car enthusiast, it is necessary to prepare the purchased parts:
- Clean the frame parts from transport primer. Pay special attention to welding points and bends.
- Use welding to weld the joints.
- Clean with a grinder. If necessary, straighten.
- Apply a solvent with a brush to degrease the metal.
- It is necessary to prime the internal parts first, since after they are installed from the engine they become inaccessible.
- After checking these parts on site, mark them.
- Connect them together with clamps.
- Carry out welding work to connect them. Start welding parts from the top and gradually move to the bottom.
- Clean welded joints.
- Strip the front of the frame down to metal.
- Cover with primer, then paint with one coat of paint.
- The sealant is applied.
While the parts are drying, you need to cut off the old frame.
Removing the old frame
NOTE: BEFORE CUTTING, YOU MUST CHOOSE A SEVEN BLOCK OF WOODEN AND CUT TO THE SIZE OF THE SPACE FROM LEFT TO RIGHT. MAKE FRAME MARKS ON THE BAR, IN THE INSTALLATION POSITIONS AND IN THE MIDDLE OF THE FRAME. TO PREVENT SPARKS FROM WELDING ON IMPORTANT PARTS, PUT A SHEET OF METAL IN FRONT OF THE ENGINE AND COVER THE ENGINE WITH A TARP. AFTER THIS, PROCEED WITH CUTTING.
- Using an electric drill, drill out the spot welds at the fastening points. The outer part of the frame is welded to the side members (see Replacing the front side member on a VAZ on your own).
- Now use a chisel to cut off the remaining weld seams.
NOTE. IF IT DOESN’T FOLLOW POORLY, PUT A CUT-OFF DISC ON THE GRINDER. CAREFULLY, WITH GREAT CAUTION WHEN CUTTING, TRIM THE WELDING POINTS.
- Remove old frame.
After cutting the frame, inspect the internal surfaces of the engine compartment. If necessary, correct any detected defects. Apply primer and sealant.
Installing a new frame
- Try on the new painted frame.
NOTE. ON THE VAZ 2109 THE RADIATOR FRAME IS ALREADY PAINTED.
- Install the rail.
- If all the marks marked on the strip coincide with it, then you need to mark the welding places with a broker.
- If there is a discrepancy, the frame must be trimmed (adjusted). Try it on again.
- Only after making sure that the installation is correct, drill the holes.
- Make points in place by welding (bait).
Step aside and inspect the work being done. Since if the radiator frame is installed incorrectly, the structural operation of the lighting fixtures will be disrupted, the engine mounting location may be displaced. Consequently, the proper operation of the entire vehicle system will be disrupted.
- After inspection and testing, weld all joints.
- Lower the hood, check its closure, and, if necessary, make a small straightening.
- Wait until the parts to be welded have cooled down a bit.
- Using a grinder and sandpaper, clean the welded joints.
- Perform putty work on all welded joints.
NOTE: WHEN CLEANING, IT IS PREFERABLE TO WET THE METAL WITH WATER TO PREVENT ITS HEATING.
- Use primer to paint the front part of the radiator grille.
- Treat with aerosol sealants from a can.
- Paint the frame twice.
- Only after this can you begin assembly. Reassemble in reverse order.
Replace the radiator frame yourself. This should be done only after a complete, detailed study of the video or photo.
It is also necessary to read the instructions for carrying out the work. Take all precautions to avoid causing a fire or increasing the cost of repairs.
Attentive attention to welding activities and working with power tools is the key to safety. Correctly, technically competent repairs guarantee high-quality operation of the vehicle.
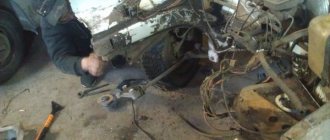
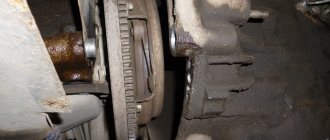
Now we are planning to replace the radiator frame. The reason for the replacement was a crack in the hole for the radiator on the right in the place of the front airbag (it was welded by someone), overcooked pieces of patches on the bottom in the area of the crab fastenings, and general rotting of the entire structure as a whole. The car received a blow in the area where the front engine mount was mounted, the right mudguard was displaced, and, it seems to me, there was a problem with the right front spar. All this needs to be considered in detail and a solution planned.
Replacing the front panel is one of the most important moments for us, on which the appearance of the car, the gaps and the correct fit of the main parts that assemble the entire front of the car will directly depend. These parts are: the face assembly itself (radiator frame + radiator frame panel), both headlights, two wings and a hood. And by the time welding begins, all these spare parts will need to be available.
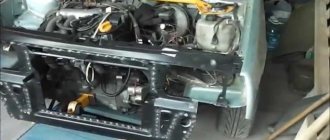
There are a few additional important points: the problem of the front fascia fitting perfectly with the short-wing mudguards, which are shaped a little differently than the modern stock long-winging fascia. Also, the old fender mounting brackets do not line up with the holes in the long fenders themselves. There are also issues with the headlights. They measured the sports, they become bulging forward. Will need to be customized. At the beginning of the process of working on all this, we removed the wheels, both struts, rack, rods, i.e. Completely freed up the engine compartment. Thus, we plan to process, prime the engine compartment and the muzzle welded to it together, and paint it all at once.
Let's divide our work into several main stages: 1. Cutting the front panel 2. Preparing and welding the front panel into one piece 3. Preparing the engine compartment 4. Welding the front panel and fitting the external parts of the front end
Stage 1. Cutting the front panel
There was nothing particularly complicated or unusual about the front panel section. The main thing we wanted was to see if we could leave or change the lower panel fastenings to the mudguards. It turned out that it needed to be changed.
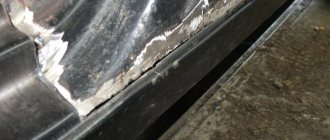
The VAZ-2109 is a car that is not distinguished by a strong body; iron quickly succumbs to corrosion, and almost all body parts rust. Replacing the front spar is required when its metal is rotten in different places; the part is also replaced if it is severely deformed after an impact (accident).
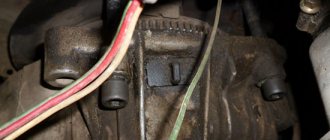
The practical part is removing the generator, disassembling it, repairing it and reinstalling it.
Due to the fact that the generator is located under the hood of the car, it is necessary to turn off the engine, turn the steering wheel to the right all the way and open the hood. The electric generator on VAZ 2108 - 15 cars is installed in front of the engine, in the lower left corner of the engine compartment, between the engine and the cooling radiator.
Before dismantling the generator, it is necessary to disconnect the ground from the battery, i.e. negative contact.
Replacing VAZ generator brushes
Before removing the generator itself, in order not to do unnecessary work, we remove the charging relay from the generator housing and check the production of the generator brushes.
The charging relay is installed in the rear of the generator housing, and is attached to it with two bolts. To unscrew them you will need a Phillips screwdriver. When unscrewing the bolts, be careful not to drop them on the crankcase guard, otherwise getting them out of there will be one big problem. To remove the relay, you need to disconnect the wire, the “female” contact. After removing the charging relay and visually inspecting the brushes, we decide to purchase a new generator voltage regulator relay or reinstall the dismantled one, depending on the wear of the brushes. For their normal operation, a brush length of at least 4 cm is required. Now we proceed directly to removing the electric generator from the engine.
- We disconnect the wires from the generator - as a rule, they are red and consist of two groups of wires, red. One group consists of two wires and is attached with a nut to a bolt on the rear wall of the generator. The other group consists of one wire and is connected to the generator terminal via a male-female contact, also on the rear wall of the generator.
- To remove the generator from the engine, you need to unscrew two nuts and one bolt in the following sequence: unscrew the nut attached to the generator belt tensioner bar (at the top of the generator), unscrew the bolt securing the tensioner bar to the engine block and remove it. The last step is to unscrew the nut from the bolt securing the generator bracket to the engine block.
- The generator mounting bracket is located at the bottom of the engine block, directly below the generator. After unscrewing this nut, you need to remove the generator belt from the generator pulley itself.
- The generator mounting bolt should be pushed to the left, out of the bracket, until it stops against the body shell or the generator’s mud protection.
- On the right wheel side, you need to unscrew the two screws that secure the dust protection of the generator to the car body.
- If the generator mounting bolt still rests against any body parts, you should press on the engine with one hand, and at the same time pull out the bolt with the other hand.
Purpose of the spar
The spar is a load-bearing body element, which is a beam, serves as the basis for fastening the components and components of the car, and also plays the role of a shock absorber, softening the impact, absorbing deformation. The “nine” is equipped with paired front and rear spars; these body elements experience significant load.
If a car can move without problems with a dented fender and a rusty door, then the car should not be driven with a deformed front spar (PL).
If this part is damaged, quite serious problems may arise:
- tires will quickly begin to be eaten away;
- the car is poorly controlled;
- the body loses strength and collapses.
If the condition of the spar is not the most critical, it can be welded, the geometry can be corrected on a special stand (slipway); in case of severe deformation or if there are cracks, the body element should be replaced. But it should immediately be noted that it is very difficult to do such work with your own hands - here it is important to accurately install the part, you must use welding. If the body element is installed incorrectly, the geometry of the body will be disrupted and the work will have to be redone.
Strengthening and modernization
Strengthening or tuning the body of a VAZ 2109 according to the instructions should be carried out only if the owner is well versed in the design features of the car, has an appropriate understanding of the device, and knows the technical data on weight and other parameters. Otherwise, it is better to entrust the modernization work to professionals at the service station. True, the price of their services in these matters is too high, but you will be satisfied with the result.
So, tuning a VAZ 2109 car is, first of all, upgrading its body. The process always begins with this, and only after that the power unit and other components of the machine are brought to the desired state.
The need for reinforcement at “nine” and the quality of life indicator
It’s interesting that many owners of the “Nine” install modern amplification components more for the sake of beauty. This cannot in any way be a plus for reinforcement, since for the most part such elements can only provide decorative benefits.
On the contrary, if the goal of tuning is primarily to strengthen the body, TK*, spacers, rods and gussets can be selected accordingly. They will significantly strengthen the frame and increase its ability to withstand external influences.
TK* - tubular roll cage
Strengthening, as mentioned at the beginning of the article, is a mandatory procedure. By installing longitudinal and transverse reinforcing elements into the body structure, you can achieve a significant increase in the rigidity of the body frame, and this is already very good. The integrity of the original design obtained at the factory will be maintained and at the same time the corresponding torsional rigidity parameters will increase. At the same time, the weight of the car will practically not increase.
No matter how rigid the body is, it will have weak, vulnerable areas. Even if, under the influence of external forces, these places receive only microscopic damage, over time this will inevitably develop into a big problem.
The cost of the front side members of the VAZ-2109
The right front spar is very similar in design to the left one, but the parts are not interchangeable, they seem to be a mirror image of each other. Body parts for the “nine” are sold in almost every specialized auto store; you can buy a front spar for an average price of 1,800 to 2,200 rubles.
You can also purchase a PL repair insert; it can be useful if the entire body part does not change and needs to be repaired. The average cost of an insert on the right or left side is 800-1000 rubles, like the spars themselves, the repair inserts from the “nine” are identical and fit on models 2108, 21099, 2113-14-15. There are no side member reinforcements as such for the front part of the body on the VAZ-2108-09-099; rigidity is added to it by the lower radiator frame (“TV”), which is a connector and is welded in front between the left and right load-bearing parts of the body, and the front wing mudguards.
Radiator frame
Replacing the radiator frame on a VAZ 2109
The radiator frame has two parts:
- external,
- internal.
Note: When purchasing frames, you must inspect them. They do not have packaging, and loading and unloading is done manually. Therefore, they may have concavities and damage to the metal.
The main reasons for the destruction of the front spar
As noted above, the submarine bends from impact and rusts over time. The following also have a destructive effect on this body element:
- constant engine vibrations, especially if the engine or gearbox mounts are loose;
- driving a car on bad roads;
- extreme driving.
Since the side members are practically the skeleton of the body, a large load falls on them. All vibrations and shocks are transmitted to these elements; as a result, the body parts cannot withstand, become deformed, and cracks appear on them.
How to replace the front spar on a Nine
Replacing the front side members 2108-09 must be done on a slipway; in a regular car service without special equipment, it is very difficult to perform such work, and in some cases it is simply impossible.
Before starting body repairs, it is necessary to partially disassemble the car, remove from the car:
- front optics and bumper;
- hood;
- radiator grille;
- expansion tank;
- radiator;
- front wing (on the side where the submarine changes);
If the car's hardware is sufficiently rusty that you have to additionally change (repair) other body elements, you may have to remove the gearbox and engine.
The body repair itself is performed in the following order:
- the old spar is cut off (usually using a grinder or a gas cutter) so that the new part “falls” into place better, a beveled cut is made;
- the new submarine is cleaned of transportation soil;
- At the seat, rust, dust and dirt are removed from the metal; a grinder is used for this. A good result can be achieved by using a sandblasting machine; to remove traces of corrosion, a rust converter is needed;
- The new spar is butt welded, first tackling it in several places. Before final welding, the geometry of the body is checked; if the work is not done on a stand, the correct installation of the part is verified using control points:
- after welding work, the metal surface is cleaned again, degreased, the weld seam is treated with mastic, and primer is applied;
- After the primer has completely dried, the replaced body part is painted in the color of the body, and the car is assembled.
As a rule, one body element on a car is rarely changed; along with the submarine, a new “TV”, upper radiator frame, and panels (mud flaps) of the front wings have to be installed. And the front spar on the nine is not always completely changed; most often it is cut off along the “glass”.
Sequencing
First, we’ll tell you how to replace this part yourself. You will need to prepare the car - sequentially disassemble it from the engine compartment so that you have access to the radiator. Dismantle it and the old part. Next you need to do:
- Sand the new part (it is covered with shipping primer) and re-paint it with automotive primer. Do this only in advance, since later it will be impossible to do this work from the engine compartment.
- Use a chisel and hammer to remove the old grate.
- Clean the welding points, putty and coat with primer. Take measurements and weld the new frame. Place the weld points where they were.
- Paint the outside of the structure. It is advisable to additionally cover it with anti-gravel.
- Reassemble the car in reverse order.
Replacing the TV is extremely important, as if it is weak, it may sag and break. The cost of this work at a service station is quite high, so car enthusiasts often try to make the replacement themselves.
The cost of replacing the front side member of a VAZ-2108-09 in a car service center
Since replacing a submarine is not an easy job even for an average car service center, not all craftsmen undertake it, especially since not everyone is eager to begin restoring the body of a used Nine. Mostly, small auto repair shops carry out minor and medium body repairs, while large auto repair centers do not want to deal with domestic cars at all. Prices for body work from auto repair companies and private owners are most often approximate; often the final cost of the repairman is announced closer to the end of the repair. The fact is that “pitfalls” may unexpectedly appear, and as a result of their identification, the work is delayed and becomes more complex.
Some car service centers indicate two values in the price list at once - the upper and lower limits; in large cities or the capital, they charge from 3,500 to 9,000 rubles for replacing the front side member; usually, work from private repairmen in garages costs less. Often, along with the submarine, it is necessary to change the wing splash guard, sills, and repair the bottom; some auto repair shops note in their prices that the cost of repairs in the price list is indicated without painting.
Repair of the front side member of the VAZ-2109
The main reasons why submarines have to be repaired are the appearance of cracks on the body element. In some cases, the spar bursts in a circle, the metal rots through and through, if the part itself is not yet in a completely deplorable state, patches are put on it, and the iron is strengthened using spot welding. If the spar is pulled away as a result of an accident, it is pulled out on a stand. You can try to pull out the submarine without a slipway; in garage or field conditions, craftsmen carry out a similar operation using a strong metal chain, a hand winch and some kind of support, for example, wood.
In this case, the rear beam must be fixed so that the car does not move forward; it should be pulled carefully, constantly checking for deformation of the rear axle. If the beam bends due to excessive force, it will have to be replaced. Only professionals can say whether it is worth repairing a car after damage to the spar; in some cases it is easier to sell the car for spare parts than to restore it.