Replacing thresholds
From a practical point of view, a car is not just a means of transportation, but also an integral element of the life of a modern business person. The good external aesthetic appearance of the car is quickly lost, so replacing the thresholds of the VAZ 2109 is an absolutely necessary technical manipulation. We should also not forget that the threshold is not only a static element of the car, but also a functional one. Replacing thresholds for a VAZ 2109 is not difficult, and if you have the desire, you can do everything yourself.
What affects wear
The active destruction of the external and internal parts of car boxes is caused by a combination of poor-quality anti-corrosion treatment coupled with urban operating conditions in winter:
- reagents;
- constant exposure to water;
- temperature changes;
- high humidity.
Most believe that the thresholds on the 2109 were made very poorly. Let us list the main causes and consequences of rapid corrosion of VAZ cars:
- Poor quality factory painting of VAZ body elements. Moisture gets under the paint, quickly starting the corrosion process. In practice, box repairs are needed after 10 years of operation.
- Lack of modern anti-corrosion treatment technologies. A striking example of proper processing is the galvanized body of the Audi 80 from the late 80s and early 90s. Such cars are still in service today. Whereas VAZ 00-x is already rare.
- Poor waterproofing. Water quickly enters the internal threshold (connector) and remains there all year round. Salt from the city road “finishes off” the metal.
- Poor design of drainage holes for removing water from the body.
- Disadvantages of the interior heating system.
Fixed
Everything happens differently with them. First, space around the thresholds is freed up, because you will have to remove doors, seats, and floor coverings.
If the deformations are small, then the dents can be corrected in various ways. For more serious damage, accompanied by creases, you will have to cut out a window for the anvil to support the metal during straightening.
Having leveled the surface, a suitable piece of metal is welded onto the window. You can make transverse cuts and separate the welds. The metal is bent and straightened using an anvil.
Preparatory work before replacement
It is more convenient to carry out a preliminary inspection of the car and replacement of the box in a garage with a pit.
You will need a powerful inverter-type welding machine and a grinder with a metal disc. If you really want to do the body work, you can do it yourself by renting it or buying it and resale it.
Then you can begin the preliminary stage of work on replacing body sills:
- It is necessary to pre-treat new body parts, since the main problem is corrosion. Practice has shown that the first priority is protection from water. Epoxy primer does not allow moisture and air to pass through. Soil in the form of an aerosol is best suited for processing.
- The doors need to be removed. The VAZ 2109 will need a pair of keys and the help of a partner.
- Pieces of steel profile should be welded diagonally to the doorways. The resulting design will prevent a situation where, when removing the remains of rotten boxes, the car body “collapses” under its own weight due to loss of rigidity.
- The new box is being measured. You should also mark the approximate boundaries along which the obsolete threshold is removed.
The final part of replacing the threshold
The final part is this:
- carrying out a complete cleaning;
- applying putty;
- performing complete sealing of all welding seams (assemblies).
After the above technical manipulations, you can safely move on to painting the threshold and installing the car doors in their original place. From a practical point of view, replacing the threshold with your own hands is not difficult, the main thing is not to forget that there are instructions. However, a well-known fact is that any theory must be fueled by practice; in this particular case, it is enough to use photos and videos - materials that will significantly expand the current range of understanding of the entire process. The price for replacing a car threshold yourself is formal and close to zero.
Algorithm of actions for complete replacement
Despite the rotten body, the car can serve its owner faithfully for years, since black steel has a serious margin of safety.
Let's consider the algorithm of actions step by step:
- The outer part of the rotted threshold is cut out along the upper edge with a grinder.
- At the bottom, the remaining metal is removed with a chisel.
- The amplifier is stripped down to the first layer at the contact welding points.
- Using a grinder, carefully go over the welding points across the amplifier. If everything is done correctly, the amplifier is quite easily separated from the welding points with a chisel.
- The threshold connector is removed. To do this, use a chisel or grinder.
We repair removable thresholds
They should be removed first. The screws are unscrewed with a screwdriver, and straightening is carried out on a workbench or other hard surface.
After that we install them on the car. You should be careful here, since each model has its own characteristics of this type of work. If the removable threshold is rotten, then it is simply replaced with a new analogue.
Installation and operation of the tool
Step 1
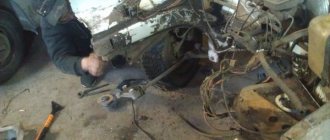
First, we disassemble the engine compartment: drain the antifreeze, and then remove the radiator itself. The doors also need to be removed, if everything there is completely rotten, then you can simply tear it off, cut off the flanges with a grinder, to which the TV was welded.
Threshold repair
We cut off the rear panel, as well as the wings. Using welding and patches, we weld holes in the mudguards (if any), install flanges made of fresh metal, to which the TV will later be welded. In the video where mechanics are doing car body repairs, you can see everything in more detail and “live.”
Step 2
We install and weld new mudguard reinforcements; it would be good to use roofing iron for this. Next comes the fitting of new parts: rear and front fenders, TV threshold and hood. These elements should be secured using self-tapping screws. This is where we need a set of drills. Now comes the difficult cooking process. After the wings, TV and threshold are “seated” on the screws, you can start welding. The TV should be painted in advance, because once it sits firmly, it will no longer be possible to apply the color properly.
Step 3
To perform the following operations, I needed to hoist the car onto the tipper. Restoring the geometry of the car body will take quite some time. This procedure is carried out using a slipway on which the car itself is mounted. Special clamps ensure reliable fastening, and power posts provide a certain force for alignment. It is better to perform this part in a car repair shop.
Step 4
Let's move on to cooking the bottom. We use patches and attach them to the front and rear floors using a welding machine. We weld all jacks, connectors and floor reinforcements. The thickness of the metal of the car body significantly affects the welding process, and for each model it is necessary to select the time separately. Using a paint sprayer, we coat all cavities of the car with an anti-corrosion mixture.
Properly applying a vinyl decal to a vehicle is no easy task. Our article has a detailed description of this process.
You will find the software necessary to check the possibility of tuning cars at https://avtopolza.ru/tyuning-russkix-avto/tyuning-russkix-avtomobilej-v-rezhime-onlajn/ link.
Step 5
In my case, the arches were completely rotten. Mechanics advise not to suffer or digest them, but simply buy and install new body elements. But if you are in the mood for repairs, then this is also quite possible. Spray resin is a good coating for arches, but even it will not save them in the future. Rust will get through it too. There are also other anticorrosive mixtures. The choice depends on the budget and experience with this or that material.
We hope this instruction will help you in repairing the body of your car and after the final stage - painting, it will shine like new.
Sources:
https://bumper.guru/klassicheskie-modeli-vaz/tyuning/zamena-porogov-vaz-2109.html https://infokuzov.ru/remont/porogi-vaz-2109 https://avtopolza.ru/tyuning- russkix-avto/remont-rzhavyx-elementov-kuzova-poshagovaya-instrukciya/
How to choose a part: average prices
Since the latest front-wheel drive VAZ has not been produced since 2012, there are almost no original body parts on the market. What remains is the cooperative body iron. The main advantage of the option is that the price of the door sills is nowhere lower at 2109. The main disadvantage is the inaccurate fit of dimensions, which requires adjustment of parts. As a result, a more highly qualified technician is required to carry out repair work.
Iron elements for thresholds
Depending on the supplier, the price of thresholds and repair kits for the VAZ 2109 may vary. Body parts for VAZ from (Naberezhnye Chelny) are considered the most inexpensive branded ones. Also, the production of some spare parts is still ongoing in Togliatti, traditionally the retail price is a little more expensive, with a premium for the original. The manufacturer from Rostov is quoted at prices on par with Nachalo. The cost of a set for both sides of the nine varies between 2000 - 2500 rubles.
Plastic covers
The price of a set of plastic trims for the VAZ 2108 is from 700 rubles for the standard version. Sellers estimate a plastic set of tuned overlays in a sporty style at 2000 - 3000 rubles. Of course, plastic is available to match any car color. If a car with severe corrosion is planned for sale, the sill trim is sealed with polyurethane sealant to give it a marketable appearance. The achieved decorative effect allows you to profitably sell the car.
How to replace the thresholds of a VAZ 2109 with your own hands
If a significant part of the thresholds is damaged by corrosion, then there are no options other than completely replacing these body elements. To carry out repair work you will need the following list of tools and materials:
- semi-automatic welding machine;
- new thresholds;
- Bulgarian;
- drill;
- sandpaper;
- putty and primer;
- anti-corrosion compound (mastic).
Features of replacement and preparation for it
When planning body repairs, you need to understand that the design of the VAZ 2109 thresholds consists of the following elements:
- outer box;
- inner box;
- amplifier
The outer and inner boxes are the outer walls of the threshold. The outer element goes outside and is located under the door, and the inner one is located in the cabin. The amplifier is an element located between two boxes inside. Most often, the outer frame is subject to corrosion, and when replacing thresholds, this particular body part is in mind.
Even though new parts are used when replacing thresholds, they still require preparation. From the factory they are covered with shipping primer, which must be cleaned before installation, i.e. the metal must shine. This is done using sandpaper or grinder attachments. After cleaning, the elements are degreased and coated with epoxy primer.
The final preparation of the thresholds comes down to drilling holes with a diameter of 5–7 mm for welding in the places where the parts adhere to the body.
Preparatory procedures also include the dismantling of doors, aluminum sill trims and interior elements (seats, floor covering, etc.). Before the immediate start of work on removing the old thresholds, a metal corner is welded to the racks from inside the cabin. It will provide rigidity to the body and prevent it from deforming after cutting off the thresholds.
Step-by-step replacement instructions
Having prepared everything you need, you can begin the repair. The procedure consists of the following steps:
- Place the new threshold on top of the old one and outline it with a marker.
Video: replacing thresholds on a VAZ 2109
Damage to the sills by corrosion on the VAZ “Nine” is common. These body elements can be replaced by every car owner who knows how to use an angle grinder and semi-automatic welding. If you don’t have such experience, then it’s better to trust the specialists. Only in this case can one hope for high-quality repair work and a long service life of the thresholds.
Why do thresholds wear out?
Thresholds are load-bearing elements that provide the body with additional rigidity. Due to the fact that these parts are located in the lower part of the body, they are constantly exposed to negative factors:
All this significantly reduces the service life of the thresholds. In addition, the mediocre quality of painting and anti-corrosion treatment of body elements from the factory leads to the fact that almost every owner of a “Nine” is faced with the need to replace the thresholds on their car.
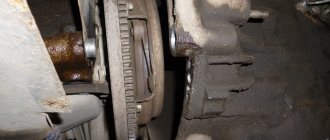
Signs of the need to replace thresholds on a VAZ 2109
The appearance of even small areas of corrosion on the thresholds is the first sign that these body elements need to be paid attention to.
At first glance, such areas may seem harmless, but if you examine them in more detail and clean them, it may turn out that under the layer of paint there is a serious source of corrosion or completely rotten metal.
It is important not to miss the moment when replacing the threshold is still possible. It often happens that the threshold rots around the perimeter and there is simply no need to weld a new part. In this case, more serious and labor-intensive body work will be required.
Threshold repair options
Repair of the body elements in question can be performed in two ways:
- welding patches;
- complete replacement of parts.
The first option requires less effort and financial investment. However, this is where its advantages end. If you follow the recommendations of specialists, then repairing the load-bearing part of the body with patches is not the best option. This is due to the fragility of such repairs.
It will not be possible to completely remove corrosion with partial repairs, and its further spread will lead to new rust and holes.
If you do not have the opportunity to completely replace the thresholds or the body element in question has minimal damage, you can partially replace the damaged area. To do this, you need to cut out the rotten place, clean the metal as best as possible from corrosion and weld a patch of body metal of the required thickness or use a repair insert.
After this, the threshold is carefully protected from corrosion in order to maintain its integrity for as long as possible.
Car threshold repair
TransTechService body centers invite car owners to carry out professional repairs of car thresholds.
TransTechService body centers invite car owners to carry out professional repairs of car thresholds. We work in 8 cities of the Volga region, provide a full range of body repair services and efficiently solve any problems.
Causes and types of damage to thresholds
The threshold of a car is a rather vulnerable part, prone to deformation for a variety of reasons:
- exposure to road chemicals and even frost;
- ingress of gravel, sand, etc.;
- incorrect installation of the jack;
- incorrect parking;
- road accident;
All this causes damage to the paintwork, the appearance of dents, tears, deep scratches, and rusting areas. These defects require prompt elimination: otherwise, metal corrosion occurs at the site of damage, up to the formation of through holes.
Carrying out repairs
There are several types of thresholds, and depending on this (as well as the nature of the damage), their repair is carried out using different methods.
Removable elements
Working with this type of threshold is relatively simple. Such elements are secured to the side members with bolts/screws and, if necessary, can be easily dismantled for repairs. If there are dents, it is carried out by drawing or straightening. In case of pitting corrosion (areas less than 2 mm), the lesions are treated and welded. Severe corrosion damage, as well as tears in removable thresholds, usually require replacement.
Fixed elements
Fixed sills are present in the body structure of most modern cars and are its load-bearing part. They are welded to the body and therefore can only be removed for replacement. Repair is carried out as follows:
- small dents are removed using PDR technology: painting the part after this is not required;
- distortions and medium dents are eliminated with a tool for working with hidden cavities - a spotter;
- significant deformations require direct access, for which one/several holes are formed in the threshold using welding equipment. After this, the dents are leveled with a straightening tool, and patches are applied to the holes;
- Repairing car thresholds from rust is carried out in several ways. Non-through areas are cleaned, puttied, treated with anti-corrosion primer and painted. Micro-sized pitting corrosion is eliminated in a similar way to removable thresholds. In case of extensive rust, the damaged area is cut out and replaced with part of another threshold or a sheet of metal, which is given the required shape.
Plastic elements
Repair of plastic thresholds is rarely performed, since in most cases it is not advisable: it is easier and cheaper to replace. However, for minor damage it can be carried out:
- dents are removed by heating with an industrial hair dryer;
- scratches are cleaned and locally painted.
What does the device consist of?
The purpose of thresholds, popularly boxes, as a composite load-bearing element of the body is to prevent torsional deformation in the middle part. Severe destruction of the boxes is fraught with irreversible loss of geometry - the body begins to “walk”. The nine has a lightweight and simplified body. Therefore, even a spar that miraculously did not have time to rot will not save the situation. The car's steering becomes unpredictable. The structure of the structure is quite simple. The main load during movement is taken by amplifiers (two on each side - large and small), welded to the outer part of the box structure. The amplifiers are welded to the A-pillar, B-pillar and floor. Additional structural rigidity is provided by connectors that are welded to the bottom.
Dimensions
Factory thresholds on the VAZ 2109 are supplied with a 1 mm thick reinforcement. Only 0.8 mm samples are available for sale. Despite its flimsy appearance compared to the factory model, such an amplifier is quite acceptable for providing the required rigidity. Especially taking into account the remaining service life of the VAZ 2109.
Also, on all new VAZ body parts, the size may differ from the factory one, so in most cases the part needs to be adjusted at the installation site.
Are there any differences between the thresholds of VAZ 2109, 21099 and 2108
Thresholds, amplifiers and connectors from VAZ 2109/2109/21099 to 2115 are completely identical. Since the 2108 body is a two-door version of the nine, the dimensions of the component boxes are slightly different. In turn, all elements of the VAZ 2108 threshold are compatible with the coupe of later years of production - 2113. In terms of workmanship, front-wheel drive Samaras of later years of production are more susceptible to corrosion. According to reviews from owners, a systematic deterioration in the quality of bodies began in the 1990s.
Treatment with anti-corrosion agents
All work related to the repair of thresholds must be completed by treating all surfaces with special compounds to prevent the formation of corrosion. Anticorrosives made on a bitumen basis are best suited for this. In addition to rust, such protection will help against the effects of other unfavorable factors - the effects of gravel and small stones.
Some vehicle manufacturers protect the internal parts of the sills from rust with simple foam for installation work. This can be done efficiently at the factory, but for self-repair it is better not to use this method. The fact is that the foam will fill all the insides of the threshold, blocking the access of air there. Moisture will begin to accumulate in these areas, promoting the development of corrosion.
Correct welding sequence
Safety on the road depends on how well the car is repaired. Remember that the modern rhythm of movement implies serious dynamic loads on the body. Therefore, carrying out work on the body requires compliance with a given technological process.
The process of welding thresholds, close to factory conditions, step by step:
- Holes for welding with a diameter of 7 mm are drilled on the connectors.
- The amplifier is being adjusted and overcooked.
- The seams and welding points under the platform for installing the outer part of the box are cleaned.
- The doors are temporarily installed, the threshold is additionally adjusted to the front and rear fenders. The recess should match the embossing on the wing, and the doors should open freely.
- The element is fixed (some bodybuilders use homemade clamps) and welded with an overlap of about 20 mm over the old parts hammered in with a hammer.
- The surface is treated with a grinding wheel, putty with fiberglass is applied and painted. Replacement is complete.