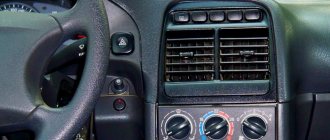
Usually, newbies who have driven (or just started driving) a VAZ 2114 for the first winter season turn to car service centers with this question. The fact is that the car has such an unpleasant feature (here we say hello to the engineers of the Volga Automobile Plant), such as a problem with the operation of the stove. Moreover, for some it appeared in the very first winter after purchasing a new car at a car dealership.
Stove design and diagram
The heating system for the interior of a VAZ 2114 car, both with an injector and a carburetor, is a heater that is connected to the engine. The coolant is coolant, which heats up as it passes through the power unit. The heater's task is to distribute the resulting heat evenly throughout the cabin.
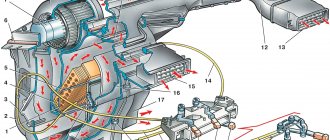
Heater diagram VAZ 2114
After passing through the engine cooling system, the heated antifreeze enters the heater radiator. A fan blows on a hot radiator. Thus, warm air enters the car interior. With the help of deflectors and dampers, the direction and intensity of the air flow is regulated. The stove on the VAZ 2114 can operate in several heating modes.
Installation of an additional heating device in a VAZ-2114 car
Any additional device that is installed in a car is designed to enhance the power of a stationary unit, which alone is unable to function as the motorist desires. The same rule applies to the second heater, which is often installed in the interior of domestic vehicles. The second stove, which will be located inside the VAZ-2114 interior, will be able to optimize the process of warming up the car, especially in cases where it is incredibly cold outside. In the material below we will consider the types of various additional heaters that can be installed in the VAZ-2114. We will learn about the advantages and disadvantages of this type of insulation, which is quite possible to do with your own hands.
Main causes of malfunction
Like any device, the stove can break.
The stove on the VAZ 2114 is characterized by the following malfunctions:
- Leaking air ducts. Heat loss is possible at the joints of the air ducts.
- Radiator leak. If there is a hole in it, it should be replaced.
- Air may stop blowing if the radiator is clogged. In this case, it needs to be cleaned.
New and old radiators
- The air may stop blowing if some air duct hose is clogged. Leaves, grass and other debris can get caught in it. After removing debris, the stove pipes should allow air to pass well.
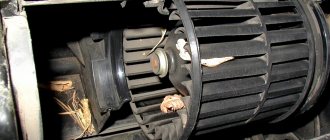
- The heater does not turn on; the heater motor may be faulty. The motor failure is due to a faulty fuse. The repair consists of replacing the blown fuse with a new one.
Car heater motor
If the VAZ 2114 stove does not work, then the cause of the problem may be in the wires through which there is weak contact, as well as in the resistor.
Purpose of the additional heater
The additional stove on the VAZ-2114 is most often of interest to motorists living in the northern regions of the country. However, recently there has been a trend that even cars “living” in the middle zone are equipped with it. As a rule, this type of car owner includes those who want to drive with greater comfort in a fully warmed-up car, and those who do not want to waste time optimizing the operation of a standard device.
The example will consider options for devices that will directly interact with the cooling system of the power unit. Maximizing the benefit of the device will be the built-in electric fan, through which the hot air flow is distributed throughout the vehicle interior. It is worth noting that such a device can be purchased at a car dealership or, if you have free time, you can make it yourself.
If a motorist does not know the required dimensions of the device and believes that absolutely any additional stove can fit into the interior of a VAZ-2114, then this is not so. It is preferable to choose a unit that will not be more than 33 cm in width, 20 cm in height, and 25 cm in depth. Therefore, it is best to opt for an oversized product that can fit between the front seats or under the passenger seat.
If you consider an additional stove, you can pay attention to the quality products of the companies TechnoMaster, Helios, Xeros and Eberspächer.
Repair work
Knowing the structure of the stove, it is easy to repair. Before starting repairs, it is necessary to remove the wire from ground and drain the coolant.
Repair consists of the following steps:
- First you need to remove the instrument panel and carefully disconnect the air pipe through which air enters the cabin.
- Next, you should check the electrical system: resistor wires, electric motor, fan. In addition, you need to check the outlet and inlet hoses of the faucet.
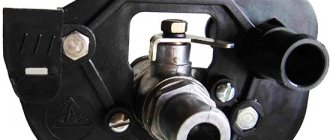
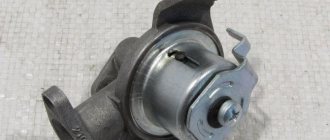
- Next, you should unscrew the two nuts from the shield that secure the faucet.
- Then you need to remove the seal from the tap pipes.
- Next, the nuts are unscrewed, with which the stove is attached to the body.
- Now you can remove the stove.
- Having completed the necessary repairs and adjustments, the heater is reinstalled in the reverse order.
After repairs, you should check the operation of the heating system. It should turn on as soon as the engine starts.
Heater repair at VAZ
Heater maintenance
To ensure that the VAZ-2114 heater heats well in winter, carry out maintenance of the heater before the cold weather:
- Remove it from the car.
- Disassemble and clean.
- Check the functionality of the dampers, seal their ends with sealants.
- Seal the joints with sealant.
- Flush the radiator.
- After assembly, adjust the drive cables so that when moving the sliders, the valves and the tap become in their extreme positions.
These measures are enough for the heating system to function normally in winter, providing warmth to the car interior.
Finally, we note that the reasons for the poor operation of the stove were discussed above, but it still continues to function. But this unit also has breakdowns and then the stove fails and stops working completely. Such reasons include breakdown of the radiator, leaks at the joints of the pipes, fan malfunction (open circuit, exhausted motor life or burnout).
Replacement instructions
The radiator is a replaceable unit, so if it is faulty, it needs to be replaced.
The replacement procedure consists of the following steps:
- First of all, you need to drain the coolant.
- Next you need to dismantle the dashboard. You can remove not the entire tidy, but only part of it to get to the radiator. How to remove the panel is described in the operating instructions.
- Before replacing, it is necessary to disconnect all wires and hoses that go to the radiator.
- Then you need to unscrew the fasteners and dismantle the unit.
- The removed radiator must be cleaned if it is clogged. If it leaks, it needs to be changed. Assembly should be carried out in the reverse order (video author - VChSLV).
Let's not warm ourselves in the cold
The harm to the body from carbon monoxide (CO) is beyond doubt even among the most ardent skeptics. Even a very low concentration of CO in the air - about 1% - can be fatal. The fact is that the combination of carbon monoxide with hemoglobin in the blood blocks the supply of oxygen to the cells of the brain and spinal cord. Oxygen starvation occurs, that is, suffocation, which leads to death. Poisoning occurs unnoticed - the increased concentration of CO in the blood causes drowsiness and the person, having warmed up in the warmth, falls asleep, risking not waking up. However, it is not at all necessary to sleep: by inhaling poisoned air for a long time, you can simply lose consciousness, and the ability to save yourself in this case, alas, falls catastrophically.
Let us remind you once again that the danger of fatal poisoning is especially high if you decide to warm up in the winter or autumn cold by turning on the stove and engine in a confined space - for example, in a closed garage (everyone most likely knows about this, since this situation has happened many times played out in detective series and films). However, not everyone knows that the risk of CO poisoning also exists when warming up in a car parked on the street. It is enough to choose a quiet, low place for parking, closed on several sides (by dense vegetation or the walls of buildings). In calm weather, the possibility of exhaust gases entering the interior of your car increases significantly - and it won’t be long before you get poisoned. This is especially true for those who like to have winter “dates in the car” - they put the car in a secluded place, turn up the heat, melodious music flows from the radio, a pleasant companion is nearby... And the result of such get-togethers can be the most disastrous. And it’s good if it only ends with a severe headache and nausea.
Basic aspects of tuning
Car tuning is not only about illuminating the dashboard with LEDs. Tuning the VAZ 2114 stove is required in situations where cold air blows from the sides of the stove, or the interior is heated unevenly.
To do this, you need to remove the side cover on the gas pedal side. The clamps holding the throttle cable should be loosened. Then you need to pull it back and tighten the clamp. Next, you should install the damper control levers. From this moment on, warm side air should blow, warming the driver and passengers in the cabin.
Heating system repair
At the second stage of tuning, it is necessary to ensure that air coming from outside passes through the heater. The operation of the damper and the tap is carried out by the operation of one engine. It should be ensured that it does not control the damper. To do this, the right cover of the torpedo is removed, and then the one located on the right is disconnected and pulled from the two temperature control cables from the engine. The damper should be in its maximum position. The cable should be tightened and the excess should be trimmed.
Modification of the pipe is required if the air flow from the left deflector is too weak. It needs to be forcibly strengthened. To do this, you need to install a fan with a diameter of about 50 mm in the pipe. You can use a computer fan. First you need to remove the deflector. Then, having made a hole of the appropriate size, insert the cooler and seal it. Next, the pipe with the cooler needs to be returned to its place and the power supply restored.
You can connect the fan directly to the heater contacts. However, in this case, in order for it to work, you need to turn on the ignition.
If you properly modify the stove, it will work more efficiently. This will improve the comfortable conditions in the cabin of any car, both VAZ 2114 and UAZ. LED lighting will give the panel a beautiful appearance, especially at night.
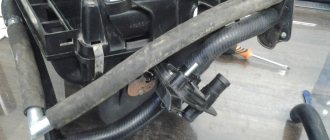
Installation of a second (cabin) heater
Installing a second stove is not easy; you will have to place the unit in the chosen location, depressurize the engine cooling system, and activate the durite hoses (by inserting them into the SOD section).
Then you should use a drill to make several holes in the engine shield, the diameter of which would not exceed 19 mm, after which you can carefully lay the pipes, placing them directly under the floor covering. The pipes must be secured with clamps on the new unit.
After that, there will be more than 2 liters of antifreeze in the expansion tank, you will have to remove the resulting air pockets. If necessary, control buttons for the new unit can be placed on the vehicle panel.
If you install an additional heater, the flow of antifreeze passing through it will be regulated by a standard pump. Therefore, an additional pump for the VAZ-2114 stove will be able to optimize the heating process of the interior and make the operation of the second heating device more productive.
As a rule, by installing a new heating device in the interior of a VAZ-2114, the interior of the car will be able to warm up to a comfortable temperature twice as quickly, in addition, importantly, the constantly cold zone in the area of the feet of passengers sitting in the rear will be constantly warm.
True, along with the advantages, there are also disadvantages, because the antifreeze will begin to heat up more slowly, and an additional source of noise will appear in the cabin.
Video “Reconstruction of the VAZ heating system”
This video explains how to make the cabin warmer and therefore more comfortable (the author of the video is Alex ZW).
Good day! In general, the stove had been leaking for a very long time, and not so long ago it started leaking, so that all the antifreeze was dumped into nowhere. And since I had to take off the panel, I decided to glue the panel. So, let's begin! What do we need
1. DAAZ heater radiator 2. Set of pipes for the BRT heater tap 3. Clamps 4. Felix antifreeze 5 kg 5. Vibro Shummoff 1.5 sheet 6. Shummoff Shummoff P8 sheet
Work: not a big digression, how many times I am surprised by AvtoVAZ engineers, as Samaravodians know, the steering column is attached to the panel strip, and so, I tightened the front nuts, I climb further and see the nuts, only cut off, %;:;№№;№ :#% YOU by the leg! Why the hell do you do that? where is the logic? Why not cut off all 4 then...
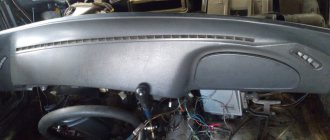
It was not possible to remove the panel completely, having unscrewed everything that could be unscrewed, I moved the panel away from the panel and somehow pulled the heater radiator out of the heater body, and THIS appeared to my eyes
I think ok, after 160 thousand miles the first, as it seems to me, replacement of the heater, so I think this is normal. Next, I decided to stick my hand into the stove body, I think the foliage is garbage, and I’ll wipe off the dust, and what do you think? there's antifreeze! and some kind of slurry from the mud of leaves and other hats
Installation of additional components
Owners of the domestic VAZ-2114 most often decide to install a second heating device because the standard device is not of very high quality. The VAZ-2114 stove is small and, importantly, not airtight. The valves do not function entirely correctly; the faucet is not able to open to full power. If a car owner wants an exceptionally comfortable temperature in the cabin during the cold season, he will have to constantly open and close the tap, and most likely the pump will soon fail. The optimal additional pump for the VAZ-2114 stove is a turbo version with greater performance. You can install a Bosch pump (it must be installed at the outlet of the stove).
If the heater radiator on a VAZ-2114 car fails, a copper unit can be installed in its place. In foreign-made cars, an electric hair dryer is installed that preheats the air, due to which the antifreeze quickly heats up and streams of warm air begin to flow into the cabin almost instantly. As for the VAZ-2114, its small-volume heater “forces” cold air flows to pass through the radiator, which is why the antifreeze itself cools down greatly.
Instead of thinking about replacing the cabin filter, it is more prudent to install an additional radiator in the car that can warm up the air coming from the street in advance. You can purchase a radiator that comes with an air conditioner. It is best to buy a unit that is ideally sized. After installing the new device, everything should be laid with isolon, which will guarantee complete tightness.
As practice shows, an additional pump is needed solely to warm up the car when the power unit is activated. After some time has passed, it must be turned off, because pressure will be present in the system, and the antifreeze will warm up at that time. After installing the second heater in the VAZ-2114, it can be quite hot in the cabin; good ventilation of the cabin will not hurt. It would be prudent to install a faucet at the inlet of the second radiator.
Kia Rio
But with this model you will have to seriously tinker. Since the deflector is attached to screws that are hidden by the visor. It must first be removed.
The tools you will need are Phillips and slotted screwdrivers, a flashlight and a construction spatula.
The process involves some combination of activities. Watch in detail how this work is done in the video.
Video: removing the instrument panel visor on a Kia Rio
;
Only then can you remove the central deflector. It is attached to pistons and screws. Two screws at the top, two pistons at the top and one at the bottom. After the deflector is removed, you need to disconnect the plug.
Before dismantling the left deflector, remove the left panel and the panel under which the fuse box is located. The deflector is attached to the side with two self-tapping screws. Before dismantling the right panel, open the glove compartment and remove the right panel, unscrew the screws. Now, by prying with a screwdriver, you can remove the deflector.
Why the stove does not work or does not heat the air
If the stove fails, it either does not work at all, or it works but does not heat the air. In the first case, first check the fan wiring, starting with fuse F7. If the fuse is blown, replace it. Then they check the relay, which may not turn on the first time or only when the engine is warm. In this case, the relay is replaced with a new one.
Then the serviceability of the electric motor is assessed. To do this, power is directly supplied to its contacts from the battery. If the electric motor starts to operate at maximum speed, then it is in good condition. Otherwise, it will need to be repaired or replaced.