The engine fuel system is a “blood” network. The main element of this system is the fuel pump, which, like a heart, pumps gasoline from the gas tank to the engine. If for some reason this pump stops working, then it is no longer possible to start the engine. Let's look at the main reasons why the fuel pump on the Lada Kalina/Granta/Priora does not work.
Pinout BN VAZ 2113, 2114, 2115
— block headlights; — gearmotors for headlight cleaners*; - fog lights*; — ambient temperature sensor; - sound signals; — engine compartment lamp switch; — electric motor of the engine cooling system fan; — generator; — low oil level indicator sensor; — washer fluid level sensor; — front brake pad wear sensor; — wire tips connected to the common windshield washer pump**; — windshield washer pump; — headlight washer pump*; — wire ends for connecting to the rear window washer pump on VAZ-2113 and VAZ-2114 cars; — low oil pressure indicator sensor; — engine compartment lighting lamp; — wire lug for connecting to the wiring harness of the engine control system; — gear motor for windshield wiper; — starter; — a block connected to the wiring harness of the ignition system on carburetor cars; — coolant temperature indicator sensor; — reversing light switch; — low brake fluid level indicator sensor; - accumulator battery; — low coolant level indicator sensor; — relay for turning on fog lights; - mounting block; — brake light switch; — plug socket for a portable lamp; — hydrocorrector scale illumination lamp; — switch for the parking brake indicator lamp; — block for connecting a backlight lamp; — switch for instrument lighting lamps; - Understeering's shifter; - hazard warning switch; — front seat heating element relay; — ignition switch; — rear fog light circuit fuse; - fuse for the front seat heating elements; — door lock circuit fuse; — front ashtray illumination lamp; — ignition relay; - cigarette lighter; — glove box lighting lamp; — switch for the glove compartment lighting lamp; — heater fan electric motor; — additional resistor for the heater electric motor; — heater fan switch; - heater switch illumination lamp; — lamp for illuminating the heater levers; — gear motors for electric windows of the front doors; — power window switch for the right front door (located in the right door); — gear motors for locking front door locks; — wires for connecting to the right front speaker; — gearmotors for locking rear doors; — wires for connecting to the right rear speaker; — door lock control unit; — wires for connection to radio equipment; — headlight cleaner switch*; — rear window heating element switch; — relay for turning on the rear fog lights; — block for connection to the heating element of the right front seat; — rear fog light switch; — switch for the heating element of the right front seat; — fog light switch*; — switch for external lighting lamps; — left front seat heating element switch; — block for connection to the heating element of the left front seat; — wires for connecting to the left front speaker; — power window switch for the left front door (located in the left door); — power window switch for the right front door (located in the left door); — wires for connecting to the left rear speaker; — side direction indicators; — courtesy light switches on the front door pillars; — courtesy light switches on the rear door pillars; - lampshade; — ceiling lamp for individual interior lighting; — block for connecting to the wiring harness of the electric fuel pump; — trunk light switch; — instrument cluster; — trunk lighting lamp; — display unit of the on-board control system; - trip computer*; — block for connecting the wiring harness of the engine control system; — rear exterior lights; — rear interior lights; — pads for connecting to the rear window heating element; — license plate lights; — additional brake signal located on the spoiler.
What are the main advantages and disadvantages of the pump?
Initially, the design features of this unit will seem simple. However, in order to understand in detail the principle of operation of the unit, it is necessary to proceed to an explanation of the following aspects.
The situation is interesting in that the fuel tank in the Lada Kalina is placed by the developers under the bottom in the rear of the car. It is connected to the fuel rail under the hood via lines. To be able to supply gasoline at a given pressure parameter, you will need an efficient and high-performance gasoline pump.
The main advantages of the fuel system pump unit are considered to be:
- timely provision of injection elements with the required volume of fuel, regardless of the engine operating mode;
- simple design and decent resource;
- high safety, because the fuel pump stops functioning as soon as the engine stops.
Next, let's look at the main disadvantages that this unit has acquired:
- noise during operation;
- need for constant cooling;
- sensitivity to fuel quality indicators.
It is the use of substandard gasoline in combination with untimely replacement of the filter that can guarantee the failure of this expensive unit. There is a situation when the engine does not pump. In this case, you need to know how to check it and, if necessary, how to remove it.
Advantages and disadvantages of a fuel pump
Despite its apparent simplicity, understanding the purpose of the fuel pump requires some explanation. The fact is that in most cases, this also applies to cars of the Lada Kalina family, the gas tank is located on the opposite side of the car from the engine. Therefore, efficient operation of the fuel pump is required to ensure that the fuel travels a significant distance at the required pressure.
The design of the Lada Kalina uses an electric fuel pump as a more modern and efficient device.
Among the main advantages of a fuel pump are several:
- ensuring the supply of the required amount of fuel taking into account the needs of the engine;
- high reliability and simplicity of design;
- high level of safety, since the pump stops working immediately after the engine stops.
At the same time, the electric fuel pump has a number of disadvantages that can affect its operation:
- noise during operation;
- need for cooling;
- demands on fuel quality.
It is the use of low-quality gasoline and untimely replacement of fuel filters that lead to a decrease in performance or failure of the gasoline pump.
Return to contents
- Checking and adjusting the headlights, replacing the low beam lamp on the Lada Kalina-2
Replacing the fuel pump on Kalina
Welcome! Fuel pump - is responsible for supplying fuel from the tank to the car engine; if it fails, fuel stops being supplied to the engine and therefore the car will not start, or over time it may simply start to work worse and in this case the car will twitch when driving and it will lose dynamics (the fuel pump in such a situation will still pump fuel into the engine, but it will do it very much), besides this, the fuel pump no longer serves anything, although if you think about it, it goes first together with the Fuel Level Sensor , secondly, there is still a mesh on it that cleans gasoline from dirt, so we can say, thanks to the gas pump, we also find out how much fuel is left in the tank and even before this fuel goes into the engine, it is cleared of small particles of dirt, by the way, we will give advice, If you don’t want to change the fuel pump very often, then try never to bring the gasoline in the tank to the very minimum and especially do not drive the car until it runs out of gas (Only do this in rare cases or because of the situation), otherwise such trains will not lead to anything good and soon the fuel pump (this is its second name) will become unusable.
Note! To replace this pump on a car, you will need a set of tools in which: Screwdrivers will be lying around, a hammer and a drift, but in principle, the help of screwdrivers will be enough (But this is only if you don’t have a hammer with a drift, if you do, be sure to take them)!
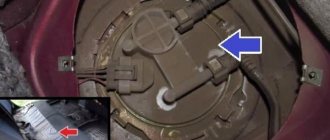
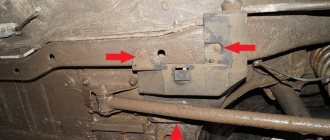
Where is the fuel pump located? It is installed inside the tank and through fuel pipes it pumps fuel from the tank to the car's engine, but not all people know where the tank is located on front-wheel drive cars, let's explain briefly, on classics many people even saw it when the trunk was opened (It's just that on classics it's in installed in the most visible place and if the trunk is not covered with a trim, as for example on a VAZ 2101 car this is done, there is no trim unlike the same 2107, for example, then the gas tank can be easily seen), but with regards to front-wheel drive, the gas tank is located under the bottom , and the fuel pump is inserted into it from above, so in order to get to the pump it will be enough to remove the rear seat cushion and then, by folding back the standard carpet and unscrewing the fuel pump flap (Indicated by a red arrow), you will immediately see the pump itself, for clarity it is indicated by a blue arrow in the photo below:
When should you change the fuel pump? As soon as the car begins to drive poorly (twitches, does not accelerate at all at high speeds, etc.), then you need to think about the pump, besides, by the way, it will also make a lot of noise (you will understand this right away), so if you lose power and If there is an extraneous sound, then you should think about replacing the fuel pump with a new one, but before you change any part, you can check it for functionality, to learn more about how to understand that the fuel pump has failed, read the article: “Checking the pressure in the power system on a VAZ” and be sure to also watch the video in this article that says everything.
Changing the mesh with your own hands
So, the mesh located in the fuel pump is forced to constantly come into contact with dust and dirt, because the pump itself is located between the seats, and dust constantly settles on its body.
That is why experienced motorists are not lazy to wipe the pump body with a damp cloth from time to time to avoid untimely clogging of the system.
Motorists advise carrying out such work every 45,000 - 50,000 km. mileage, this is exactly the time during which the Kalina mesh wears out. Of course, this work is classified as dusty, but, in principle, it is not as difficult as it seems, it can be done alone, in half an hour - an hour.
https://xn--80aal0a.xn--80asehdb/do-my-self/repair/repair-lada-granta/2699-kak-snyat-benzonasos-na-lada-granta-kalina-priora-svoimi-rukami. htmlhttps://ladaprofi.ru/lada-kalina/kak-bystro-snyat-benzonasos-na-lade-kaline.htmlhttps://vaz-russia.com/remont-vaz-1117-kalina-universal/zamena-benzonasosa- na-kaline.htmlhttps://carfrance.ru/kak-zamenit-benzonasos-na-lada-kalina-svoimi-rukami/https://mylada.net/remont/zamena-setochki-benzonasosa-na-kaline.html
Procedure for servicing the fuel pump, possible malfunctions
You should not always resort to immediate replacement of the Kalina fuel pump, because first you can repair it. But for this you need to select the right tool in advance.
For this device, two parameters are usually monitored: operating pressure and operating performance. After removing the device, you can check the current consumption at rated and full load. But for such measurements you will need a specialized stand.
The initial point of control will be the voltage of the connector that supplies the fuel pump from the vehicle’s on-board power system. Not only should it be equal to 12 V or even slightly exceed this value, but also when the machine is operating, the noise of the operating device should be clearly audible.
The disadvantage of this control method is the inability to detect unreliable contact in the electrical circuit on the way to the connector. Any loose connection in the fuse box, fuel pump relay, will result in the 12 V received at the terminals upstream of the pump showing the same 12 V. But a working pump will receive only a few volts and will not be able to work normally.
Also, a malfunction in such a situation may be a breakdown of the fuel pump relay. This malfunction is easy to diagnose, since special symbols are displayed on the instrument panel, which allows the driver to see an error in the operation of this part.
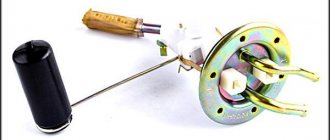
Fuel pump parts disassembled
Checking the pressure created consists of monitoring this parameter in the pump pumping mode, when it turns on after turning the key for 1.5-2 seconds to add fuel to the pipeline system. For Lada Kalina this figure is 0.8-1.2 kgf/cm2. If the pressure turns out to be underestimated, then you should look for the cause of this phenomenon, checking each link in turn: filter, mesh, fuel pump. Ultimately, the part that prevents the pressure from quickly building up to normal will be replaced.
One of the malfunctions of the fuel pump is the rapid loss of pressure in the fuel line after stopping the engine. Moreover, this malfunction should also be diagnosed correctly, because there may be several reasons for the pressure drop. This is a weak nozzle of the power system, and a check valve of the pump, and the pressure regulator itself.
Rapidly falling pressure will cause uncertain or long engine starting, which is especially important at sub-zero temperatures. Despite a generally serviceable power supply and ignition system, starting the engine in cold weather may simply discharge your battery or prevent the engine from starting at all.
So, if it is nevertheless determined that the fuel pump is not working or the fuel filter needs to be replaced (the work operations are largely the same), then the necessary work must be carried out in the following order:
Relieve pressure in the fuel line. To do this, simply let the car sit for 30 minutes after the last start. To be more sure, after turning off the power to the fuel pump, you need to briefly start the engine to exhaust the gasoline in the fuel line. Be sure to turn off the power to the car by disconnecting the negative terminal on the battery. Provide access to the gas tank hatch
To do this, recline the rear seats and, having unscrewed 4 self-tapping screws with a Phillips screwdriver, carefully open the hatch, preventing possible contaminants from entering the tank. Disconnect the electrical connector from the plastic fuel module cover and
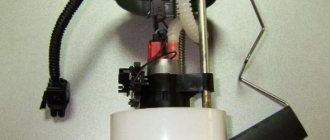
The process of removing an electric fuel pump with your own hands
fuel pipes from the cover. Work should be carried out without applying unnecessary force to avoid breaking the plastic parts of the cover. Remove the retaining ring, which will require a special puller. If you use a handy tool, you need to be patient.
You can begin dismantling the pump block by carefully lifting the structure up. Care must be taken as the float can easily be damaged. When removing, you need to tilt the entire block slightly, pulling it diagonally. If the fuel pump does not work and needs to be replaced, installing the new mechanism should be done in the reverse order. Before installing a new pump, it is advisable to fill it with fuel, since a dry fluid supercharger may not be able to pump fuel to start the pump. The fuel pump is not a suction device, but only a pressure device.
Checking the fuel pump Lada Priora
On the Lada Priora, the fuel pump relay and its fuse are located in an additional mounting block near the left foot of the front passenger. The fuse is marked F3 (15A), and the relay is K2.
First of all, we check the fuel pump fuse, and if necessary, replace it with a similar new one. We check the wiring and the fuel pump itself in the same way as on Lada Kalina and Lada Granta cars (see above).
As a reminder, don't forget to change your fuel filter regularly.
Schematic electrical diagrams, connecting devices and pinouts of connectors
The fuel pump on a car is designed to supply fuel to the combustion chamber. Its operation is controlled using a relay. On a VAZ (depending on the model), the fuel supply unit can be electrical or mechanical - it all depends on the fuel supply system. On a fuel-injected car, the fuel pump is located in the tank. When the ignition is turned on, voltage is supplied to the terminals of the unit and it begins to pump fuel. If the required pressure is created in the system, the relay automatically turns off the fuel pump - the engine is ready to start.
When the ignition is turned on, the relay creates pressure in the fuel lines by turning on the fuel pump (BN) for a couple of seconds. After this, the BN will work either when the engine is cranked by the starter, or when the engine is running.
Sometimes this system needs repairs - there is nothing complicated here, and the editors of the 2Skhema.ru website will tell you how to do it yourself. Let's start with the BN pinout, then we will indicate it on the diagrams and at the end there will be instructions for replacing the fuel supply elements.
Pinout BN VAZ 2108, 2109, 21099
The fuel pump activation relay (2) is shown by an arrow.
1 — nozzles; 2 — spark plugs; 3 — ignition module; 4 — diagnostic block; 5 - controller; 6 — block connected to the instrument panel harness; 7 - main relay; 8 - main relay fuse; 9 — electric fan relay; 10 — controller power supply fuse; 11- electric fuel pump relay; 12 — fuel pump power circuit fuse; 13 — mass air flow sensor; 14 — throttle position sensor; 15 — coolant temperature sensor; 16 — idle speed regulator; 17 — knock sensor; 18 — crankshaft position sensor; 19- oxygen sensor; 20- APS control unit; 21 — APS status indicator; 22 — speed sensor; 23 — electric fuel pump with fuel level sensor; 24 — solenoid valve for purge of the adsorber; 25 — block connected to the ignition system harness; 26 — instrument cluster; 27 — ignition relay; 28 — ignition switch; 29 — mounting block; 30 — electric fan of the cooling system;
A - to terminal “B+” of the generator; B - block connected to block K of the ignition system harness; C - block connected to block L of the ignition system harness; D - wire connected to the interior lamp switch; E - wire connected to the white and black wires disconnected from the interior lamp switch; F - to the “+” terminal of the battery; G1, G2 - grounding points; K - block connected to block B of the front harness; L — block connected to block C of the front harness.
On “nines” with a mechanical fuel pump, the most common malfunction is wear of the fuel pump diaphragm, as a result of which gasoline will leak through the drainage hole in the housing when it operates. The second reason for the failure of such a fuel pump is wear of the pusher, which transmits force from the camshaft cam to the fuel pump drive lever.
Replacing the fuel pump relay
The Kalina fuel pump relay is located in the cabin just below the dashboard near the air duct grille. To access the fuel pump relay, you need to remove the cover by prying it off with a regular flat-head screwdriver.
How to remove the fuel pump relay? Before replacing the relay, you should check the fuse box, which is located next to the gear lever and the ashtray. By opening the cover, you can visually evaluate the fuel pump fuse based on the integrity of the jumper. To remove parts, it is convenient to use tweezers, which can firmly and accurately fix the fuse.
While maintaining the integrity of the jumper, for final confirmation of operability, the part must be tested with an ohmmeter, since the point of contact of the wire with the legs may be open. If the fuel pump fuse is good, then the relay is not working. There are some nuances here. The fuel pump relay is removed using a socket wrench.
Checking the fuel pump Lada Kalina/Granta
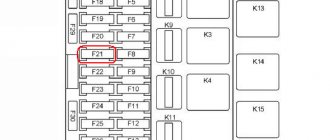
If after turning the ignition key there is no buzzing sound from the fuel pump, then the first thing to check is the fuel pump fuse and relay. In the Lada Kalina and Lada Granta mounting block, the fuel pump fuse is F21 (15A), and the fuel pump relay is K12. If the fuse is good, do the following:
- Turn on the ignition
- Remove the fuel pump relay
- Apply +12V to pin No. 11 of the diagnostic block, or place a jumper between 87 and 30 relay pins
- Check by ear that the fuel pump is turned on
If the fuel pump does not turn off, then check:
- Wiring and contacts between the fuel pump and the diagnostic block/fuel pump relay. To do this, check the voltage at the fuel pump chip using a test lamp or multimeter.
- There is no connection between the fuel pump and the vehicle ground. Apply the mixture to the fuel pump (located under the rear seat).
- The fuel pump is faulty. To check it, apply +12V directly to the contacts of the fuel pump (Attention! Remaining gasoline may ignite from a spark!).
In rare cases, the fuel pump does not work due to:
- ECU (controller) malfunction
- alarm malfunctions
Checking the serviceability of the fuel pump on the injector
When, when you turn the ignition key, you hear a slight buzzing, a slight hum, this is how the fuel pump works, pumping gasoline creates pressure in the system. If, when you try to start, there are no such signs of the fuel pump working, then you can assume a malfunction of the electrics, the pump itself or its individual parts. Therefore, let’s look at how you can check the operation of a gas pump using a step-by-step logical chain. Starting from whether power is supplied to the fuel pump and ending with whether the fuel pump pumps at all, and if so, what pressure is created in the fuel rail.
Step 1: Checking the fuse
Checking the fuel pump fuse involves inspecting the integrity of the conductive plate and, if broken, replacing it. But if there is no new fuse, then wind one strand of copper wire around the fuse contacts. If it burns out again, it means the problem may be in the wiring.
Stage 2: Checking the relay
To check the fuel pump relay, remove it from the socket and connect a 12 volt light bulb according to the diagram. If the light bulb works, the relay itself is also working properly. An alternative is to use a multimeter in ohmmeter mode to measure the resistance of the relay coil winding. One probe is connected to terminal 85, and the other to 86. The device will show a break if the relay has failed.
Make sure that the terminals are not oxidized - this will negatively affect the power supply to the fuel pump engine!
Stage 3. Checking the power supply to the BN
Checking the fuel pump voltage is done using a multimeter. The probes of the measuring device in voltmeter mode (from 0-20 volts) must be connected to the power terminals of the fuel pump. Turn on the ignition and take readings on the device. 12-12.5 volts is normal operating voltage. If there is voltage, but the pump does not work, check the electric motor.
Stage 4. Checking the fuel pump motor
To prevent damage to the electric motor, we supply 12 volts directly from the battery to the fuel pump terminals. It works - we check its performance, check valve, measure the pressure with a pressure gauge. If it doesn’t work, check the coil for a break.
When voltage is applied to the terminals of the gasoline pump, does it not work? Let's check the stator winding: take a tester (multimeter) and switch it to ohmmeter mode, it should show resistance, otherwise there is a problem with the winding and it needs to be replaced. If there is a resistance reading, the problem may be that there is a short winding on the fuel pump body. The tester probe goes to the positive terminal, the second one goes to the body. If it shorts, there will be no break.
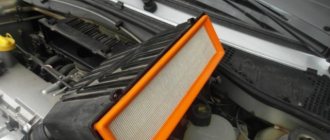
Step 5. Checking the coarse filter
By removing the coarse filter (see vehicle technical documentation) from the fuel pump, you can even visually determine how dirty it is. If there is a large amount of deposits, it is recommended to replace the filters; if the problem occurs on the road, use a brush and gasoline to clean it.
Step 6: Check the check valve
The check valve must constantly prevent the movement of liquid in the opposite direction. During operation, its performance decreases, which reduces its technical characteristics.
1 way. Checking the check valve involves measuring the pressure with a pressure gauge. It needs to be connected to that part of the system that is directly involved in supplying fuel to the internal combustion engine. Pressure readings should not exceed 3 kg/sq.m. see (true for passenger cars). And when the engine is stopped, the pressure should not drop sharply.
How to check the functionality of the pump?
If the engine is absolutely “dead”, follow this algorithm:
- Turn on the ignition without turning the starter. A working electric fuel pump should respond with a quiet but distinct buzzing sound coming from the rear row of seats. If there is no sound, go to the next step.
- Using the car's operating instructions, find the number of the fuse that protects the pump's power circuit. Try replacing it; if unsuccessful, check the wiring and clean the contacts from oxides.
- If previous manipulations did not produce results, you need to measure the fuel pressure in the fuel rail.
Pressure measurement is also practiced when identifying symptoms of insufficient fuel supplied to the cylinders of the power unit.
To take measurements and compare signs of a breakdown with a fuel pump or other element, you need to reset the initial fuel pressure in the system, no matter how low it turns out to be.
If the pressure is below normal, proceed to find out the reasons according to the recommendations:
- There are pressure surges in the range of 0.2...0.3 Bar at idle - look for a problem in the filters. Surely the coarse mesh or secondary element is clogged.
- Use pliers to pinch the return line hose coming out of the RTD. The gasoline pressure should increase to 5 Bar, with the new pump - to 6 Bar. If the readings are 4 Bar or lower, the cause should be sought in the regulator or the pumping unit itself.
- The best way to identify a fuel pump malfunction is to exclude other parts of the system and take a measurement directly at the outlet fitting. If the pressure gauge shows 5 Bar, the unit is working properly and you need to change the RTD, which dumps half of the fuel into the tank.
To measure the pressure at the outlet of the electric fuel pump, you will need to remove the rear seat, dismantle the service hatch and connect a pressure gauge to the supply fitting of the unit. Here you may need adapters in the form of plastic clamps or threaded tubes.
Before changing the pressure regulator, make sure that the gas lines and filters are of normal capacity. Due to refueling with low-quality fuel, even the flow area of 8–10 mm tubes can become clogged. Then the pressure gauge on the ramp and pump will show different values, and the RTD will regularly drain excess fuel into the tank.
How to maintain the pump and what are its main breakdowns?
The power system unit in Lada Kalina does not always require its own replacement. Sometimes you can get away with repairs. For this purpose, you will need to first stock up on the necessary tools.
Diagnosis of a node is carried out by monitoring its two main parameters:
- working pressure;
- productivity.
After dismantling the device, it would be useful to measure its rated current and a similar indicator during maximum load. To carry out these measurements, you will need to place the pumping unit on a special stand.
The first stage of monitoring is measuring the voltage at the power connector, which is connected directly to the network. This indicator should be 12 Volts. The working pump makes a characteristic noise. The disadvantage of this method is the possibility of incorrect readings from the diagnostic device if there is a weak contact in the pump switching circuit. In fact, the operating voltage can be significantly lower than the indicated 12 Volts, and the device will show exactly this value.
One of the reasons why the pump stops functioning is the failure of the control relay. This breakdown is very easy to diagnose. There is a special symbol on the instrument panel that gives a signal to the driver of the Lada Kalina if a designated malfunction occurs in the system.
The relay block is located inside the cabin. Serviceable components make characteristic clicking noises during operation. Replacing the relay is painfully simple. Here you just need to find it among other “brothers”.
Pressure diagnostics involves monitoring its parameter during the pumping mode. It occurs after turning on the ignition. In this case, the pump is activated for approximately 2 seconds to replenish the circuit with fuel. The value of such pressure in the LADA Kalina system is 0.8-1.2 kgf/cm2. When the indicated parameter turns out to be underestimated, it is recommended to search for the cause. Here it is necessary to follow the sequence of checks, moving from one link to another. We check the filter element, then the mesh, and then the pump.
Among the common malfunctions is the fact that the operating pressure in the line is lost immediately after the pump (that is, the engine) stops; in this case, the pump does not pump fuel. This breakdown will need to be determined correctly, since there are quite a lot of reasons causing the pressure to decrease. You need to know how to check the system. Among the “suspected” components are: a loose injector valve, a non-functioning check valve on the pump, and a pressure level regulator. Intensively decreasing pressure can cause difficulties in starting the engine. This point is especially relevant in winter.
When, based on the diagnostic results, it is determined that it is necessary to replace the pump, if it does not pump, or the filter (the manipulations are almost identical), in the LADA Kalina car, the actions are carried out according to the algorithm below. Next, we will tell you how to remove and replace the element in case of a malfunction.
- We remove the pressure level inside the fuel rail. To this end, we start the engine and look for the required fuse in the mounting block, which is responsible for the functionality of this unit. We remove the insert from the socket and wait until the engine has completely used up the fuel, after which it stops.
- Now we de-energize the network by removing the terminals from the battery contacts.
- We provide access to the fuel pump hatch. In the cabin, remove the stern seat cushion. We see the manhole cover. We dismantle it by unscrewing 4 screws (we stock up on the appropriate screwdriver).
- Disconnect the LADA Kalina block with wires from the pump connector.
- We unscrew the fasteners of the fuel lines from the pump module and remove them from the fittings.
- We use a special puller to remove the retaining ring. You can do without the indicated device, but it will take more time.
- Now we remove the pump module from the landing niche in the tank. We avoid the risk of damaging the float by “pulling” the entire structure diagonally and upward.
- We install a new pumping unit using the reverse algorithm.
How does the regulator (RDT) work?
The fuel system has a fuel pressure regulator. This injection system component is a conventional diaphragm valve. Its task is to maintain a constant level of pressure in the line and ramp, regardless of the operating mode of the motor. The pressure generated by the pump is maintained within 3.7-3.9 bar. If the upper threshold value is exceeded for some reason, the valve immediately directs excess fuel into the tank. When the fuel pressure is insufficient, the RTD is not able to increase it. If the valve fails, it can itself cause a decrease in pressure.
The operating features of the power supply system are discussed in detail in the diagram below.
To correctly diagnose the fuel pressure regulator, you will need to familiarize yourself in detail with the algorithm of operation of the injection system.
- When the ignition is turned on, the fuel supply pump (item 6) comes into operation. It creates the required pressure in the ramp (item 2) and the line. If after a few seconds the starter is not turned on, the on-board controller gives a command to turn off the pump power circuit.
- First, the fuel passes through filters designed for coarse and fine (item 7) cleaning. Next, it is sent to the fuel pressure regulator, after which it is supplied through the line (pos. 4) to the ramp and injectors (pos. 3).
- The start and further operation of the LADA Kalina 8 valve engine is characterized by fuel combustion. It is sprayed into the manifold by means of nozzles, after which, mixing with air in a certain proportion, it is directed into the engine chambers, where combustion occurs.
At idle speed, the RTD dumps the overwhelming share of fuel into the tank (position 5), because consumption is insignificant, and the pressure generated by the pump is constantly high.
REPLACEMENT GUIDE
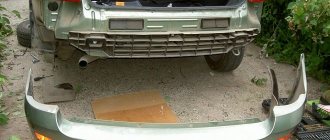
Let's look at how to change the fuel pump yourself using the Hyundai Solaris as an example.
- Unscrew the mounting bolts and remove the rear seat cushion.
- Cut off the sealant with a utility knife.
- Remove the power plug.
- Using pliers, loosen the self-tightening clamp and remove the gasoline vapor removal hose to the adsorber.
- Remove the fuel supply hose.
- Release the ventilation hose going to the gasoline vapor adsorber from the bracket.
- Unscrew the fastening screws and remove the pressure plate.
- Pull out the fuel module.
- Remove the rubber seal.
- Disconnect the power plugs.
- We recommend removing the FLS to avoid damaging it during module disassembly.
- Remove the fuel pipe tip stopper.
- Remove the tube and O-ring.
- Press the latches of the metal guides, and then separate the parts of the housing.
- Release the latches and pull out the filter element housing complete with regulator and fuel pump.
- Unclip the fuel pump clamps.
- It is advisable to install a clean mesh on a new fuel pump. At this stage, all you have to do is assemble all the elements in the reverse order of removal.
How to dismantle the fuel pump
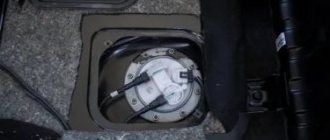
There is a gas tank under the rear seat of Kalina-2. Fold the seat cushion up and then remove the split sections of the carpet located above the hatch. To make the issue easier to understand, here is a drawing:
Screenshot of the VAZ-2192/94 parts catalog
The part marked “3” is a hatch that protects the pump. First, the hatch needs to be dismantled, for which four screws “1” are unscrewed. The unit itself, referred to as the “fuel pump module,” is attached to the tank with a clamping ring “5”:
Parts catalog VAZ-2192/94, fuel tank
The steps to dismantle module “6” are illustrated in the photo:
We unscrewed the screws and removed the hatch. You need to disconnect the wire connector by pressing the lock. We remove both hoses. We unscrew the ring.
Any of the considered actions does not require special qualifications:
- The four self-tapping screws are unscrewed with a Phillips screwdriver;
- The wired connector is disconnected by squeezing the plastic latch;
- By squeezing the lock buttons, remove the fuel hose from each fitting;
- By prying the protrusions on the ring with a flat screwdriver, they try to unscrew it.
When pulling the fuel pump module upward, it is easy to damage the level indicator sensor. To prevent this in practice, the module is tilted away from the cross.
Remove the plastic module from the tank
We hope no questions arise here.
The module has been removed, what next?
Having disengaged the four latches, the module cover is disconnected from the “glass”. Then, the “glass” can be cleaned, the pump screen can be replaced, and so on. Details are illustrated in the photo:
The mesh will be fixed in front of the intake hole
The module is assembled in the reverse order. And when installing it in place, you need to make sure that the plastic protrusion coincides with the slot on the tank:
Fuel pump module assembly
Here are a couple more tips:
- Do not turn on the pump motor “in the air” (the windings overheat);
- The module is replaced together with the sealing ring, which must be included in the kit.
In a Lada Kalina car, as in any other, you can observe the following effect: symptoms indicate that the fuel pump is not working, but its engine is humming. Then you need to clean or replace the mesh (discussed above).
There are various folk tips for repair and tuning. One sounds like this: the pump is cleaned without dismantling it, but simply by turning on the electric motor in reverse polarity. It is this advice that is not recommended to be followed.
Troubleshooting the Kalina fuel pump
If the electrics are working correctly, the fuel pump remains the object of close study. Replacing the fuel pump assembly is an extreme, and not at all mandatory, measure.
Electrical diagram for connecting a fuel pump
If the fuel pump does not turn on during normal electrical operation, remove the device to check the fuel pump. To check the functionality of the fuel pump, you need to remove the cover, which is located in the rear of the car, and remove the unit itself.
If the pump does not pump or pumps intermittently, it may be necessary to replace the Kalina fuel pump mesh. We remove the cover, disconnect the hoses and wires, use screwdrivers to press out the retaining ring and gain access to the pump. The device itself is located in the gas tank and takes gasoline directly from the tank.
What is a fuel pump
The gasoline pump is a key component of the power system; its job is to ensure an uninterrupted, timely supply of fuel to the system. In each model, the design and location of the fuel pump is unique; for the Lada Kalina, this device is located on the opposite side of the power unit.
On the one hand, this arrangement allows you to benefit from the technical capabilities of the machine, but on the other hand, the device requires more powerful operation than models in which the fuel pump is located closer to the engine.
In order for Kalina’s fuel pump to cope with its job, it is presented in an electric version. Its advantages are:
- simplicity of design;
- good fuel supply;
- safety.
But, as one might expect, Kalina’s electrics are not yet a strong point; they often break down, which is the main disadvantage.
In addition, the disadvantages of the Lada Kalina gas pump include increased noise levels, sensitivity to the quality of gasoline, and the fact that it requires cooling.
The issue of high-quality gasoline in our country, unfortunately, still remains unresolved; this is one of the reasons why the fuel system of the Lada Kalina fails.
Filters become clogged, which disrupts the operation of the entire mechanism and ultimately leads to pump failure.
This is why filters, or meshes as they are also called, need to be changed regularly.
We’ll talk about this, but first, let’s figure out what malfunctions happen with the Kalina fuel pump?
Types of faults:
- One of the most common pump malfunctions is a rapid decrease in pressure after the engine starts. This fact indicates serious violations that can be caused either by a valve defect or a breakdown of the pressure level regulator; it is quite possible that the injectors are also clogged. A sharp drop in pressure leads to problems in starting the engine, which, if the breakdown is not corrected, can even lead to engine failure.
- It also happens that the engine loses power, or the engine does not start at all, even when cold or hot. All this happens when a membrane or spring breaks, a rod wears out, or filters become clogged, and the latter happens more often than anything else.
- In any case, having discovered that there is something wrong with the fuel system, you should first check the condition of the filters, because, due to low-quality gasoline, they become clogged quite quickly, and it is better to change them in a timely manner, without waiting for problems. Now let’s talk about how to change the mesh from the pump yourself.