Next you need to connect the EUR. The connection diagram is as follows:
Connecting the small black EUR block
1 orange +12 after the ignition switch - white block pin 4 and to the EUR diagnostic LED +12
2 brown - tachometer - white block pin 8
3 gray speed sensor - red block pin 3
4 white-pink - on the EUR diagnostic LED there - ground
5 yellow-black - K-line to the diagnostic block (does not affect operation)
6 green is not used, although also on the diagnostic block
7 brown mass - to mass
Large gray block EUR connection
1 red thick wire + to the battery to the positive terminal
2 black thick wire - to the battery at the negative terminal or to the car body
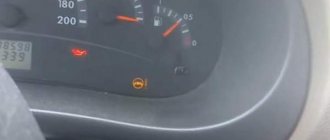
The EUR diagnostic LED was installed in the instrument panel
Since the production of the VAZ-2114, it has been planned to install additional control kits. These are such as power steering and electric power steering, but they are not included with the new car. So, every motorist would not refuse to have one of these systems to simplify driving.
Video about installing electric power steering on a VAZ family car
The video will tell you how to install electric power steering on a car, and also tell you about some of the nuances and subtleties of the process.
Installing electric power steering on a VAZ 2114
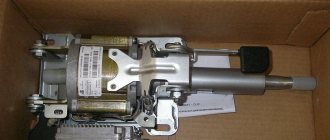
I rode my father’s viburnum and realized that there was no escaping progress, especially since I plan to change the rack by 3.2, or even 2.5 turns, and without an amplifier there will be no life at all. I bought it at Stinger. The kit includes everything you need: 1. The amplifier itself (a new model, not glitchy in short). 2. Adapter. 3. Steering shaft. 4. Wiring. From myself: 1. I don’t see any problems with the mechanics. 2. For electrical purposes, you need to look for a connection diagram.
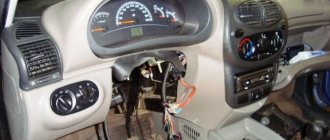
I started to disassemble: 1. Removed the steering casing (nothing complicated). 2. Disconnected and removed all switches (wipers and lights). 3. Removed the ignition switch (the first problem is that you need to unscrew the bolts with a chisel, since there are no edges (!). 4. Use a chisel to straighten the clamp securing the shaft and steering rack (at the engine shield). 5. Use a chisel to unscrew the two bolts securing the steering column (also quite inconvenient). the adapter is attached, I'll clamp it in a vice and knock it out through the sleeve). 10. Measured so that only a little bit came out of the nut and sawed it off (you can use a grinder, I made do with a saw and a file). EUR to the adapter (four nuts for 13 plus growers). 14. Replaced the ignition switch (I used hex bolts, it’s more convenient).
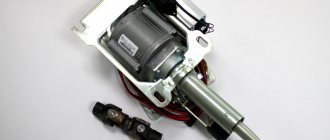
Photo: 1. Standard steering column without casing. 2. Steering column mount. 3. EUR in place).
Electrics
Mechanically: I bought: 1. Adapter for steering wheel (for Priora). 2. Steering column switch block (also from Priora) 3. Steering column cover from Priora (not yet available). I installed everything, although I haven’t figured out the sound signal yet, but I’ll do that one of these days)). Electrics: 1. Extended the power wires to the battery (plus with a fuse, minus just a wire). 2. Tightened the ground (black thin wire for controlling the power steering, screwed under the instrument cluster). 3. Connected the wires to the instrument cluster. 3.1. The orange wire from the red block to the first from the EUR block is double yellow-red (photo 2). 3.2 Gray + yellow wires from the red block to the third from the EUR-blue block (photo 4). 3.3 Brown-red from the white block to the second block from the EUR-brown block (photo 3). In photo 5 from bottom to top: 1. Yellow-red. 2. Brown. 3. Blue. 3.4 There are also wires there, for k-line and so on, I didn’t connect them (wiring for Priora is not provided in Samara). 4. Collected everything.
Now the feelings: 1. Yes, everything is super 2. At low speeds it’s just a fairy tale) 3. As the speed increases, it turns off and the car steers as before (that is, clear and intelligible feedback). 4. Unlike the early Kalinovsky EURs, this one, when turned off, does not betray its presence in any way (I don’t feel it at all).
Disadvantages: 1. Because of the adapter, the steering wheel dropped (not fatal, but still). 2. The bullet column has lengthened, the steering wheel has become closer to the driver (in principle, everything can be treated by adjusting the seat and I, at 186 cm, did not experience any inconvenience). 3. The steering wheel covers the instrument cluster.
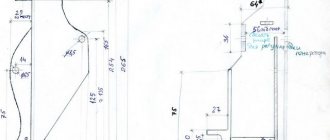
To the diagram: 1. Power steering harness; 2. EURU power supply circuit fuse; 3. Diagnostic contacts of the EURU harness; 4. EURU; 5,6,7 - connecting blocks of the electrical power steering harness, connected to the wires of the instrument panel harness, disconnected from the blocks to the instrument cluster; 8. Block (red) of the instrument panel harness to the instrument cluster; 9. Block (white) of the instrument panel harness to the instrument cluster; 10. Alarm block; 11. Ground terminal.
From myself: THE COLOR OF THE EUR WIRES MAY DIFFER.
1. Button: well, it’s not realistic to put it in its regular place, so I had to think about it. The task was to save the button, not to cut the wiring and place it in a convenient place - as a result, it is now on the panel. I am comfortable.
2. Tilt of the steering column: I placed washers under the far fasteners (which are closer to the engine compartment) of the EUR with an adapter, with them the angle of the steering column changed and the steering wheel no longer covered the instrument cluster.
How to install electric power steering on a VAZ 2114
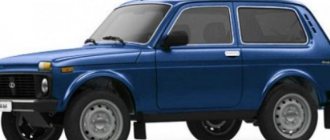
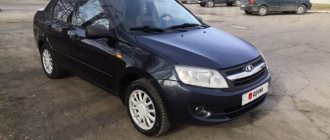
2001 was the year of the appearance of a new project from the domestic automaker AvtoVAZ. The model had two names - Samara-2 or VAZ 2114. In fact, it was an improved version of the well-known nine.
EUR kit
The modernization turned out to be very serious, affecting literally all components of the car. The steering system was no exception. Unlike many other models produced by AvtoVAZ, the 2114 offered a choice of two power steering units at once - hydraulic power steering and electric power steering.
Functionality check
How to make your life easier and install power steering or electric power steering in the field?
After you have connected all the elements of the system, you need to install the steering wheel and check the functionality of the mechanism. If you are satisfied with the work, then you need to assemble all the elements in the reverse order. After this, start the engine and try turning the steering wheel at low speed.
https://www.youtube.com/watch?v=vjwdqpR7BkE
In this case, the electric drive should work to help you turn the wheels in the desired direction. Then you need to accelerate the car. At high speed, the electric power steering on the VAZ-2114 should not work. Otherwise, you most likely made a mistake when connecting the wires coming from the sensors.
Types and advantages of power steering
The steering of the VAZ 2114 has undergone significant changes when compared with its predecessors in the form of the first generation Samara. Driving has become really better.
Installation kit
Customers had the opportunity to choose between electric power steering and power steering, that is, electric power steering and power steering. But how do these systems differ from each other, which one should you prefer and why? Let's try to figure this out.
Electric booster
Electric power steering operates using pulses of electrical current. This is a rather complex system in which each individual part has its own important role. Because of this, when at least one unit fails, the operation of the entire device is disrupted, it can completely stop working.
Electromechanical amplifier circuit
The task of the car owner whose car has an EUR installed is to constantly monitor the condition of the unit. A special controller is responsible for the operation of current pulses. With its help, the driver can independently set the degree of gain.
The EUR performs several tasks.
- It has a positive effect on handling, maneuverability, perfectly holds the car on the road, and allows you to feel the car. Remove the electric booster, and driving becomes a complete test of the driver's nerves and physical fitness.
- It copes well with temperature changes, which are especially typical for the Russian climate. Even extremely low temperatures do not affect the electric power steering, which allows the entire steering system of the car to adequately withstand such operating conditions.
- The power from the electric booster has a positive effect on fuel consumption. By adjusting the degree of gain, you thereby control the appetite of your car. So the appearance of EUR on the VAZ 2114 became a landmark event for the domestic automobile industry.
Power steering
The hydraulic booster includes a large number of elements that require not only constant monitoring, but also careful handling.
The operating principle of the power steering is based on the interaction of the steering with the oil fluid, which is contained in a special container. This is where the name of the type of amplifier comes from, since the work is based on the force of the working fluid.
Despite the rather complex technology, power steering is effective, safe, provides comfortable control, and allows you to control the behavior of the car even if the front wheels break down.
Alas, the hydraulic booster is not without its drawbacks. The main one is frequent breakdowns. They arise mainly due to leakage of working fluid.
The functions of the power steering are as follows:
- The car becomes more obedient, maneuvers well, and responds to the driver’s steering input;
- Provides softening of impacts on the steering wheel when passing difficult road sections. There are more than enough of these in our country;
- The hydraulic booster is ideal for regular driving on country roads. In this component, the electric amplifier is significantly inferior to the power steering;
- The driver feels the road better, makes timely decisions, and the system responds to them;
- Strengthening due to the working fluid allows you to reduce the number of revolutions of the steering wheel rim to perform maneuvers. This saves the driver's effort.
Ways to improve the power steering system
In addition to simply unscrewing the pump and then installing a new one, there are several other required processes. First of all, this is the creation of a vacuum in the hydraulic system, because otherwise it will function intermittently or not work at all. Also, it is imperative to restore the loss of hydraulic fluid, some of which leaked out while unscrewing the hoses. Of course, it is more efficient to pour liquid into a running car, but in this case this is impossible, since the battery is disconnected when changing the pump.
In order to increase the temperature of the hydraulic system, you can use a conventional hair dryer
However, you should also be careful here, because there is a risk of burning the tubes
In the same way, you can increase the temperature of the hydraulic fluid.
When choosing a fluid, you need to carefully study the markings on the label in order to choose the best option for your car.
As noted above, after disconnecting the hose from the power steering, it must be lowered into a container. The easiest way is to use a regular bottle as a container.
Next, we pour the leaked liquid back into the tank, and place the tube back into the bottle. Then you need to crank the starter so that the hydraulic fluid is driven through the system and poured back into the bottle. We perform this operation several times.
After this, we attach the tube with the reservoir, turn the starter again so that the liquid is again circulated through the system, it is advisable to move the steering wheel parallel to the left and right in order to develop the hydraulics after stagnation. It is strictly not recommended to start the engine because most likely due to high pressure the hydraulic tube will break and a complete leak of fluid will occur.
This completes the process of replacing and upgrading the power steering pump. You need to put the entire system back together and make sure that the barrel of hydraulic fluid is filled to the maximum. Next, you should start the engine and drive the car for several laps.
While driving, it is advisable to turn the steering wheel as much as possible when turning to make sure there are no problems. You can also ask another person to watch the front wheels while turning the steering wheel, because system malfunctions are more visible from the side.
Disadvantages of power steering and electric power steering
Many car owners prefer installing electric power steering on the VAZ 2114 as a replacement for the standard power steering. However, is such a decision justified from a practical point of view?
Connection
To answer this question, it is necessary to consider not only the positive aspects of this or that amplifier, which we have already done, but also point out their main disadvantages.
What is better for the VAZ 2114? Let's try to figure this out.
- The hydraulic booster does not allow additional fuel savings, but the efficiency of the electric booster is sometimes too low.
- The hydraulic booster has a weak element - the pump. He has to be checked regularly to monitor his condition. It so happens that on the VAZ 2114 this component is not reliable.
With this short list the list of shortcomings can be completed. But it is worth paying attention to some nuances.
Disassembling the steering control
Before installing the electric power steering on the VAZ-2114, the photo of which is given in the article, you need to perform several preparatory steps:
- Remove the steering wheel and the cover that covers the column.
- Remove the steering column switches.
- Disconnect the hazard warning button and disconnect the chip from the ignition switch.
- Completely disassemble the steering column.
The work is very tedious and boring, but you will complete it quite quickly. After unscrewing the top bolt securing the cardan to the column, completely free the mechanism. After this, dismantle the steering column and remove the cardan by unscrewing the bolt on the lower mount. It may be necessary to loosen the clamp located at the bottom of the cardan using a chisel.
Possible problems
Some drivers note that in a VAZ 2114 with a hydraulic booster, the control system becomes as if weightless. This can be confusing. When the gain is lost, the steering wheel has to be turned more often.
A fairly common problem caused by the fact that the hydraulic booster operates directly from the power unit. In order to correct the situation, the hydrach is connected not directly to the engine, but using a gain regulator. Another option is to use an amplifier with an electric drive function. Today, such a device is not difficult to find, and it costs relatively little.
Wiring
As for replacing the hydraulic booster with an electric booster, this is a more than possible option for improving the car. It is considered one of the simplest but most effective types of technical tuning. However, it is strongly not recommended to perform such operations yourself.
Choose specialized car services that specialize in technical modifications and tuning of the car. AvtoVAZ cars, which include the VAZ 2114, are beautiful because they are literally created for tuning. Many young drivers choose the “fourteenth” model as their first car. This is due to the wide possibilities for modification with minimal investment. This car lends itself perfectly to external tuning, and the current spare parts market makes it possible to improve the internal filling. This includes replacing the power steering with electric power steering.
Installation of EUR
How much does this pleasure cost?
And where can I get it? Ivan, this pleasure costs about 16 thousand rubles. I bought everything, who can install it?
Does Samara 2 have its own EUR or can it be installed from Kalina?
Hello Ivan! Which EUR kit should I buy for Priopa or Kalina?
If noticeable scratches appear on the body of your car, do not rush to have the car repainted at an auto service center. Small paint chips, cracks, scuffs and scratches can be repaired yourself using a regular can of paint.
A story article that talks about how a guy repaired the heater of a BAZ 2110. From it you will learn why the heater in this car can malfunction, how it can be repaired repair, and why it is better to immediately contact a car service.
The article will be useful to owners of the VAZ 2109. It is dedicated to repairing the gearbox. Here it is explained how the malfunction occurs, typical problems and how to fix them. You will learn how to determine that the oil has expired.
Electric power steering on the VAZ-2114 is installed only by the owners; none of the cars were equipped with such devices from the factory. But to increase comfort and improve control, motorists install electric amplifiers from Priora or Kalina.
Minor difficulties may arise during installation. But it will be much more difficult to pass the technical inspection. Essentially, you are tampering with the steering design, which is strictly prohibited by traffic rules. The driver has no right to make changes to either the steering or the brake system.
Electric power steering for VAZ 2114, its design, repair and replacement
From its very production, the steering system of the VAZ 2114 car assumed the possibility of installing power steering using an installation kit. This also applies to electric power steering or simply EUR.
This modification will make it easier to turn the car and increase comfortable handling. This is especially true for drivers who drive in the city most of the time.
The main difference between power steering (power steering) and electric power steering is that the strength (efficiency) of the former directly depends on the speed of the engine. At high speeds, turning the steering wheel is too easy. This affects both ride feel and handling.
To overcome such problems, the power steering is not connected directly to the motor, but using a gain regulator. This is exactly the functionality that an electric amplifier has. The operation of the electric power steering is not characterized by a direct connection between effort and motor power, which allows it to be used as much as necessary in a specific situation.
Electric power steering for VAZ 2114
For the VAZ 2114, a similar EUR is suitable as for the Lada Priora.
Additional advantages of using an electric booster instead of power steering:
- Less maintenance requirements (no need to monitor oil, connections).
- In cold weather there is no need to warm up, as when using power steering.
- Installing the EUR is much easier (no need to interfere with the engine compartment).
- High reliability.
- The only downside is the lower power, although on passenger cars like the VAZ 2114 this is not at all noticeable.
Is it worth installing electric power steering?
The answer is unique to each car enthusiast. On the one hand, turning the steering wheel becomes easy and the effect is really noticeable. On the other hand, in addition to the financial side of the issue (which is at least 15-20 thousand rubles), you will need to spend a whole day to install it. The choice is entirely yours, but if you decide, we will help you with the installation.
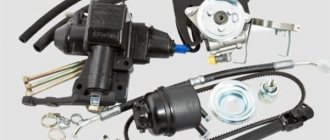
What do you need for installation?
- The electric amplifier itself;
- Control block;
- Promval;
- Wiring.
Installation instructions
Installing the main unit
When installing an electric power steering, it is necessary to take into account that it will be necessary to replace the steering column of the VAZ 2114 with an “electrically driven column”. To do this, let's start with the wiring. You will need to deal with the pads. There will be no need for any “twists”. There is a terminal in the block that we need to remove and insert into the block in the harness.
We insert the free terminal of the harness exactly into the place where the standard wire was. You don't need a special harness for this. Connect two 4 square wires to the battery. Don't forget to connect a 50A fuse. The “weak point” will connect to the tachometer, speed sensor, ground, K-line and wiring to the warning lamp.
Don't forget to check the presence of speedometer and tachometer signals.
- Remove the casing with switches and ignition switch.
- Unscrew the bolt on the rail and remove it. We need to determine how much larger the “native” part is than our new one.
- We install the shaft on the EUR. After this we attach the shaft itself in its place.
- Setting up the wiring. We stretch two cables to the battery from the passenger compartment, preferably through the left wing.
To conduct wiring you can:
- First remove the washer fluid reservoir.
- Take a solid wire and drag it through, trying to get to the hood.
- As soon as it appears near the hood, we attach our wires to it.
Location of mounts for electric power steering in a VAZ 2114
- We pull it out together with our wire.
- We connect the EUR electronics. There is a red connector under the instrument panel with an orange wire in it. It is to this that you need to connect the electric amplifier.
- Similar procedures must be done with the gray wire.
- We connect the power ends. In the battery we connect the pink one is a plus, and the black one is a minus.
The installation is now complete. If you did everything carefully according to the instructions, you will enjoy the ease of driving the VAZ 2114.
Adjusting the steering wheel position
If you don’t like the height and position of the steering wheel, then you will need to grind the edges of the shaft to the size you need or install gaskets between the plate and the body. It is worth remembering that the electric power steering is automatically switched off at speeds above 50 km/h, unlike the same power steering.
Installing electric power steering on your own is quite possible. You just have to remember that even for an experienced driver it will take a lot of time and effort. But for a lover of comfortable driving, the result will justify all costs and hopes.
Change of oil
So, opening the hood we can see the first and most noticeable element, which includes the power steering. In general, the remaining elements fit into the steering gear housing and are no longer distributed throughout the engine compartment and car body. We will also immediately need some kind of container into which we will drain the already used liquid. Anything can fit, even a bucket, even a canister. We do not recommend that you throw away the drained oil; it will be quite useful in some minor repairs just for lubrication. Under no circumstances should you add it to the already new oil of your VAZ 2114: the oil must be homogeneous. You also need to let the car engine cool down so that everything cools down and if the oil gets on your hands, it doesn’t burn your skin.
Now we need to drain the oil from the expansion tank. To do this, you need to uncork the lid and carefully pull out the hose that sticks out at the bottom of the tank.
In its place, you immediately need to insert the hose that is lowered into the container that we prepared in advance to drain the already used liquid. Now, under the influence of gravity, the oil will slowly ooze into our container.
The next step is to start the engine, and you immediately need to start turning the steering wheel from side to side so that the pump begins to pump oil through the system through the tank, and little of it will be poured into the container. This procedure must be done until the power steering stops working and the steering wheel stops moving. Thus, it turned out that there was no fluid left in the steering system of the VAZ 2114.
Now you need to immediately proceed to pouring new oil. We must turn off the engine and return to its place the hose that was originally at the bottom of the tank. Fill two-thirds of the oil tank level and start the engine. Now you need to turn the steering wheel again from side to side so that the power steering is pumped with oil and the air is released from the system.
That's all, this is exactly how the working fluid is replaced in the amplifier of a VAZ 2114 car. As you can see, there is nothing complicated about it, you can easily do it yourself and even without help. The oil must be selected carefully so that it is ideally suited to the design of this car.
The feasibility of installing EUR
Does it make sense to install power steering (power steering) or power steering on the “four”? In this case, it is impossible to give a universal answer, since it is unique for each motorist. Of course, with power steering or electric power steering, the process of turning the steering wheel will be easier, making driving more comfortable. But there is another side to the issue - firstly, the cost of the power steering or electric power steering kit, as well as the rather complicated installation of the system yourself. In general, it’s up to you to decide, but if you decide to install an electric booster on your car, we will help you with the installation.
Installation kit for electric power steering for the "four"
Troubleshooting
So, we have figured out the reasons that require adjustment or restoration of the power steering. If it is necessary to replace the power steering belt, disassemble and repair the rack, or replace the power steering as a whole, then it is better to entrust such tasks to specialists. But if the malfunctions are minor, then you can adjust and repair the unit yourself.
- So, how to repair the system yourself? In principle, replacing the drive belt is not particularly difficult, but it all depends on the design features of the vehicle. In some cars, the drive belt is responsible only for the operation of the amplifier. In others, for example, Renault cars, the drive belt is responsible for the alternator, amplifier, and air conditioning, so replacing it will require some knowledge. You can purchase a power steering repair kit and replace the filter element or consumables. The latter, by the way, does not need to be changed so often - the replacement principle is quite simple, the old oil is drained and new oil is poured in, and care must be taken to ensure that no air pockets arise in the system during the process.
- It often happens that consumable fluid leaves the system, in this case repair is also required. The leakage itself, as a rule, occurs through a poor connection of pipes, shafts or bearings. You need to carry out a thorough diagnosis of all pipes and, if necessary, repair the power steering pipes.
- One of the most common malfunctions of this unit is pump failure. If you do not want to immediately go to the store and pay money for a new pump, the old one must be dismantled and disassembled. All elements of the device are cleaned from dust and dirt. There is a possibility that the problem lies in wear on the internal components of the case; a drill with a special attachment will eliminate this problem.
- Replacing the oil seal or bearing will be important if these elements are worn out. Installation of parts is carried out in the reverse order of removal. If you don’t know how to remove the power steering, the service book for your car will help you figure it out. The design features of all vehicles are different, so the dismantling instructions may have certain differences (video author - Auto Fix Info).
Therefore, it is necessary to replace or repair a part only when signs of a malfunction are detected (and to avoid their occurrence, check the fluid level in the power steering from time to time).
- Do-it-yourself repair of a VAZ 2110 radiator How to repair a VAZ 2110 engine cooling radiator with your own hands
- Do-it-yourself repair of the lower arm of the front suspension of a VAZ
- Repairing a Zhigulva classic heater using the example of a VAZ 2107 Do-it-yourself VAZ stove repair
- DIY muffler repair
Detailed Installation Guide
So, if you decide to install electric power steering on a VAZ 2114, then you need to take into account that you will also have to replace the steering column itself. In particular, instead of a standard device, you will need to install a column with an electric drive; accordingly, our repair process will begin with the wiring. You will need to deal with all the connectors and connectors, because you must do everything beautifully, without any twisting of the wires. The block has a special terminal that you will need to remove and then install it on the connector in the harness.
The free terminal of this connector is installed in the place where the standard wiring ran; no special harnesses or adapters are required for this. You only need to connect two 4 square cables to the battery. To ensure the safety of this section of the electrical circuit, it is additionally necessary to install a 50 ampere safety element.
Next, using the so-called weak current, that is, not a power wire, you need to connect to the following elements:
- tachometer, used to display the number of revolutions of the engine crankshaft;
- a speed sensor used to indicate the speed of the vehicle;
- mass, that is, the car body;
- diagnostic K-line;
- as well as to the control light (the author of the video about installing the unit at home is the sokur64 channel).
After completing these steps, you will need to diagnose the presence of a tachometer signal, as well as a speedometer.
If there are signals, then the further installation procedure is as follows:
- The plastic casing on the steering column, where the switches are installed, as well as the ignition switch, is dismantled. To do this, you need to unscrew all the bolts that secure the protective cover.
- Then you need to unscrew the screw installed on the rail and dismantle it. At this point, you will need to determine how much the size of the assembly installed during production differs from the size that will be used.
- At the next stage, the shaft is mounted directly on the electric amplifier. After this, the shaft itself must be fixed at the installation site.
- The next step is to configure the electrical circuit. It is necessary to run two wires from the vehicle interior to the battery; alternatively, this can be done through the left fender. To do this, you must first dismantle the expansion tank of the washer system, and then, using the hardest and thickest wire, stretch it. You need to try to get to the engine compartment.
- When the end of the wire appears in the engine compartment, you need to attach the wiring to it. Next, both wires will need to be pulled out along with the wire itself.
- Having completed all these steps, we proceed to one of the main steps - connecting the electric amplifier electronics. Under the dashboard in the “four” there is a special red block, inside of which there is an orange cable. The EUR contact itself must be connected to this wire. The same actions are performed with the gray wire.
- Then the power ends are connected. Pink and black wires are connected to the battery, pink to the positive terminal, black to the negative. At this point, the installation process can be considered complete. Check the functionality of the installed system and, if necessary, adjust the device.
Photo gallery “Help in installing the EUR on a VAZ 2114”
1. Installation of the cardan when installing the power steering system 2. Assembly of the unit installed on the VAZ 2114 3. Connection of the device wiring to the on-board network 4. Assembling the steering column, replacing the facing linings
Connection to electrical equipment
Electric power steering in Lada
The electric power steering control unit takes a signal from the speed and crankshaft speed sensors. Connection to the vehicle electrical systems is carried out as follows:
- Disconnect the negative terminal from the battery.
- Locate the spare sockets in the fuse box. You need to connect the device through them. Find the reserve wire in the harness, connect the power supply to the electric power steering unit.
- If it is not possible to use backup sockets, then you need to power the electric amplifier from the ignition switch through a fuse. So that when the ignition is turned off, the electric drive does not work.
- The negative power wire must be connected to the car body.
At this point, the connection of the power section can be considered complete. Connecting controls is done as follows:
- The speed sensor must be connected to the right chip.
- The wire coming from the tachometer must be connected to the left chip.
- Install both chips on the electric power steering.
This completes the connection. You can install electric power steering on a VAZ-2114 with your own hands without any problems. But it’s better to do all this at a service station so that the technicians can issue you a document confirming the correct installation of the equipment. Only in this case will you get rid of problems during maintenance.
The nuances of adjusting the steering wheel position
If you are not satisfied with the position of the steering wheel or its height, this can be corrected by adjustment. To do this, it is necessary to grind the edges of the industrial shaft to the required dimensions or install gaskets between the device body and the plate. When making adjustments, you must remember that the EUR itself is automatically turned off when the vehicle speed exceeds 50 km/h.
Price issue
The cost of electric power steering for a VAZ 2114 car may vary, depending on the store where it is purchased, as well as the region of the country. On average, the price for a complete system set varies around 22-24 thousand rubles. On the Internet, you can search for stores where the EUR kit is sold on promotions - with a discount from the seller, you can purchase the unit for 20 thousand rubles.
Characteristics
The ESD serves to reduce the force applied to the steering wheel required for maneuvers.
It is optimal for the VAZ 2109 to install an electric amplifier borrowed from the Lada Priora. New AvtoVAZ models are produced on the basis of old ones, so the parts are perfect for nines that have not been produced for a long time.
When choosing an EUR for installation, make sure that it meets the following characteristics.
| Characteristic | Required parameters |
| Maximum compensating torque | 35 Nm |
| Average current consumption | 50 A (at a steering speed of 360 degrees/sec and 35 Nm of compensating torque) |
| Working temperature | In the range from -40 to +85 degrees Celsius |
| Device weight | 9.5 kilograms |
| engine's type | Reactive, inductive, electronically controlled |
| Number of phases | 3 |
| Direction of rotation | Reversible type |
| Gearbox type | Three-way, worm |
| Worm shaft material | Chrome steel 40x |
| Worm wheel material | Carbon fiber reinforced plastic UPA 6/30 2 |
ESD from Priora
The choice in favor of just such an electric amplifier for the VAZ 2109 is due to its advantages:
- Installation is quite easy;
- The ESD will require a small amount of energy to operate;
- Eco-friendly device;
- Adapts perfectly to AvtoVAZ classics, including nines;
- Allows you to drive comfortably even at high speeds.
https://youtube.com/watch?v=9QrnSpPu8HE