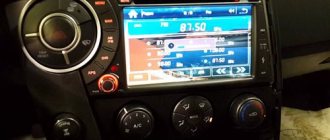
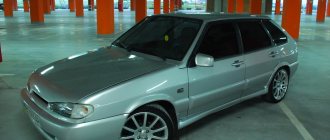
From its very production, the steering system of the VAZ 2114 car assumed the possibility of installing power steering using an installation kit. This also applies to electric power steering or simply EUR.
This modification will make it easier to turn the car and increase comfortable handling. This is especially true for drivers who drive in the city most of the time.
The main difference between power steering (power steering) and electric power steering is that the strength (efficiency) of the former directly depends on the speed of the engine. At high speeds, turning the steering wheel is too easy. This affects both ride feel and handling.
To overcome such problems, the power steering is not connected directly to the motor, but using a gain regulator. This is exactly the functionality that an electric amplifier has. The operation of the electric power steering is not characterized by a direct connection between effort and motor power, which allows it to be used as much as necessary in a specific situation.
For the VAZ 2114, a similar EUR is suitable as for the Lada Priora.
Additional advantages of using an electric booster instead of power steering:
- Less maintenance requirements (no need to monitor oil, connections).
- In cold weather there is no need to warm up, as when using power steering.
- Installing the EUR is much easier (no need to interfere with the engine compartment).
- High reliability.
- The only downside is the lower power, although on passenger cars like the VAZ 2114 this is not at all noticeable.
Installation instructions
When installing an electric power steering, it is necessary to take into account that it will be necessary to replace the steering column of the VAZ 2114 with an “electrically driven column”. To do this, let's start with the wiring. You will need to deal with the pads. There will be no need for any “twists”. There is a terminal in the block that we need to remove and insert into the block in the harness.
We insert the free terminal of the harness exactly into the place where the standard wire was. You don't need a special harness for this. Connect two 4 square wires to the battery. Don't forget to connect a 50A fuse. The “weak point” will connect to the tachometer, speed sensor, ground, K-line and wiring to the warning lamp. Don't forget to check the presence of speedometer and tachometer signals.
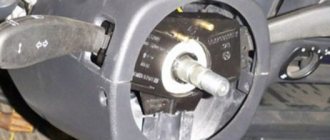
- Remove the casing with switches and ignition switch.
- Unscrew the bolt on the rail and remove it. We need to determine how much larger the “native” part is than our new one.
- We install the shaft on the EUR. After this we attach the shaft itself in its place.
- Setting up the wiring. We stretch two cables to the battery from the passenger compartment, preferably through the left wing. To conduct wiring you can:
- First remove the washer fluid reservoir.
- Take a solid wire and drag it through, trying to get to the hood.
- As soon as it appears near the hood, we attach our wires to it.
- We pull it out together with our wire.
- We connect the EUR electronics. There is a red connector under the instrument panel with an orange wire in it. It is to this that you need to connect the electric amplifier.
- Similar procedures must be done with the gray wire.
- We connect the power ends. In the battery we connect the pink one is a plus, and the black one is a minus.
The installation is now complete. If you did everything carefully according to the instructions, you will enjoy the ease of driving the VAZ 2114.
Senya 25 Nov 2008
yes. I just don’t know how to explain it in words. On the steering wheel, under the old-style switches, everything looks like on all 09.10 steering wheels. and for these new switches there are two wires stupidly sticking out there. and which are connected to a separate ring that is inserted between the steering wheel and the switch block. something like this. We did not find any similarities or the possibility of somehow swapping them without replacing the switch block. On sale in Auto 49 I saw steering wheels from Kalino/Prioro with two variations for different switches. Post edited by Senya: 25 November 2008 — 15:59
Adjusting the steering wheel position
If you don’t like the height and position of the steering wheel, then you will need to grind the edges of the shaft to the size you need or install gaskets between the plate and the body. It is worth remembering that the electric power steering is automatically switched off at speeds above 50 km/h, unlike the same power steering.
Installing electric power steering on your own is quite possible. You just have to remember that even for an experienced driver it will take a lot of time and effort. But for a lover of comfortable driving, the result will justify all costs and hopes.
Which steering wheel is suitable for 14?
Over 25 Nov 2008
Quote (Requiem for a Dream @ 11/24/2008, 13:27)
I want to change the original steering wheel on my 14th. I don’t want to install a Chinese city, but I don’t have money for a brand yet! I liked the steering wheel from Priora, it seems thicker than my original one and smaller in diameter. I came to the market to pick it up, but the sellers said that it was not suitable because... Is it designed for power steering? What do you think? Or maybe you can recommend something else from normal steering wheels?
you listen to them more, everything fits there, the relationship between the steering wheel and the hydraulic gear is something I don’t catch)
How to replace a steering wheel
The whole process is divided into several stages:
- Preparatory:
- Disconnect the battery by removing the negative terminal. If this is not done, a signal will sound when unscrewing the central nut with a screwdriver.
- Remove the ignition key from the lock.
- Lightly turn the steering wheel to lock the steering column.
- Place two marks: one on the steering wheel, the other on the dashboard so that they coincide in direction.
- Withdrawal.
- Installation.
Dismantling
To remove the steering wheel on a VAZ-2113, 2114, 2115 car, you need to:
- Using a flat-head screwdriver, pry off the plastic trim that is installed on the steering wheel cover. It is enough to press the latches. Act carefully so as not to break.
- Use a Phillips screwdriver to remove the two screws.
- Remove the cover.
- Place the socket head 24 on the knob and release the central nut.
Attention! For safety reasons, it is recommended not to completely unscrew the nut so that it does not injure the driver when removing it.
- Holding the steering wheel with your hands and rocking it to the sides, remove it from the central shaft.
- It happens that it is not possible to immediately disassemble the steering wheel. A hammer and a drift come to the rescue. Place a piece of metal against the end of the central shaft, then use sharp and gentle blows of a hammer on the drift to move the steering wheel.
Note! Help from a second person will be helpful. The process will speed up if an assistant pulls the steering wheel towards you at the moment of impact.
Installation
After removing the old steering wheel, you need to install a new part.
To install the steering wheel, you must:
- transfer the mark marked on the removable sample to the new copy;
- place the steering wheel on the central shaft so that the marks match;
- tighten the nut.
When choosing a product, you must carefully look at the compliance of the purchased item with the requirements of the manufacturer.
Installation and connection of the EUR steering wheel from Priora in VAZ 2113, 2114, 2115
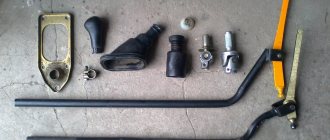
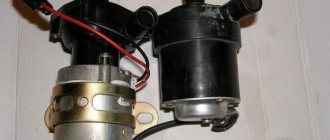
I rode my father’s viburnum and realized that there was no escaping progress, especially since I plan to change the rack by 3.2, or even 2.5 turns, and without an amplifier there will be no life at all. I bought it at Stinger. The kit includes everything you need: 1. The amplifier itself (a new model, not glitchy in short). 2. Adapter. 3. Steering shaft. 4. Wiring. From myself: 1. I don’t see any problems with the mechanics. 2. For electrical purposes, you need to look for a connection diagram.
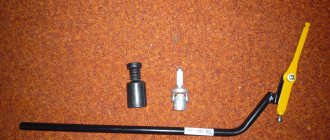
I started to disassemble: 1. Removed the steering casing (nothing complicated). 2. Disconnected and removed all switches (wipers and lights). 3. Removed the ignition switch (the first problem is that you need to unscrew the bolts with a chisel, since there are no edges (!). 4. Use a chisel to straighten the clamp securing the shaft and steering rack (at the engine shield). 5. Use a chisel to unscrew the two bolts securing the steering column (also quite inconvenient). the adapter is attached, I'll clamp it in a vice and knock it out through the sleeve). 10. Measured so that only a little bit came out of the nut and sawed it off (you can use a grinder, I made do with a saw and a file). EUR to the adapter (four nuts for 13 plus growers). 14. Replaced the ignition switch (I used hex bolts, it’s more convenient).
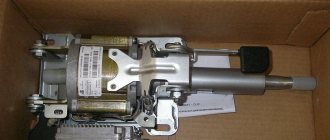
Photo: 1. Standard steering column without casing. 2. Steering column mount. 3. EUR in place).
Mechanically: I bought: 1. Adapter for steering wheel (for Priora). 2. Steering column switch block (also from Priora) 3. Steering column cover from Priora (not yet available). I installed everything, although I haven’t figured out the sound signal yet, but I’ll do that one of these days)). Electrics: 1. Extended the power wires to the battery (plus with a fuse, minus just a wire). 2. Tightened the ground (black thin wire for controlling the power steering, screwed under the instrument cluster). 3. Connected the wires to the instrument cluster. 3.1. The orange wire from the red block to the first from the EUR block is double yellow-red (photo 2). 3.2 Gray + yellow wires from the red block to the third from the EUR-blue block (photo 4). 3.3 Brown-red from the white block to the second block from the EUR-brown block (photo 3). In photo 5 from bottom to top: 1. Yellow-red. 2. Brown. 3. Blue. 3.4 There are also wires there, for k-line and so on, I didn’t connect them (wiring for Priora is not provided in Samara). 4. Collected everything.
Now the feelings: 1. Yes, everything is super 2. At low speeds it’s just a fairy tale) 3. As the speed increases, it turns off and the car steers as before (that is, clear and intelligible feedback). 4. Unlike the early Kalinovsky EURs, this one, when turned off, does not betray its presence in any way (I don’t feel it at all).
Disadvantages: 1. Because of the adapter, the steering wheel dropped (not fatal, but still). 2. The bullet column has lengthened, the steering wheel has become closer to the driver (in principle, everything can be treated by adjusting the seat and I, at 186 cm, did not experience any inconvenience). 3. The steering wheel covers the instrument cluster.
To the diagram: 1. Power steering harness; 2. EURU power supply circuit fuse; 3. Diagnostic contacts of the EURU harness; 4. EURU; 5,6,7 - connecting blocks of the electrical power steering harness, connected to the wires of the instrument panel harness, disconnected from the blocks to the instrument cluster; 8. Block (red) of the instrument panel harness to the instrument cluster; 9. Block (white) of the instrument panel harness to the instrument cluster; 10. Alarm block; 11. Ground terminal.
From myself: THE COLOR OF THE EUR WIRES MAY DIFFER.
1. Button: well, it’s not realistic to put it in its regular place, so I had to think about it. The task was to save the button, not to cut the wiring and place it in a convenient place - as a result, it is now on the panel. I am comfortable. 2. Tilt of the steering column: I placed washers under the far fasteners (which are closer to the engine compartment) of the EUR with an adapter, with them the angle of the steering column changed and the steering wheel stopped blocking the instrument cluster
https://www.drive2.ru/l/288230376152839628/, https://www.drive2.ru/l/4899916394579278194/, https://www.drive2.ru/l/4899916394579281273/
Installation of steering rod opening plugs in VAZ 2113, 2114, 2115
I have long dreamed of closing the steering linkage openings, and I came across factory plugs in a store.
We install electric power steering on a VAZ 2114 with our own hands
From its very production, the steering system of the VAZ 2114 car assumed the possibility of installing power steering using an installation kit. This also applies to electric power steering or simply EUR.
This modification will make it easier to turn the car and increase comfortable handling. This is especially true for drivers who drive in the city most of the time.
The main difference between power steering (power steering) and electric power steering is that the strength (efficiency) of the former directly depends on the speed of the engine. At high speeds, turning the steering wheel is too easy. This affects both ride feel and handling.
To overcome such problems, the power steering is not connected directly to the motor, but using a gain regulator. This is exactly the functionality that an electric amplifier has. The operation of the electric power steering is not characterized by a direct connection between effort and motor power, which allows it to be used as much as necessary in a specific situation.
For the VAZ 2114, a similar EUR is suitable as for the Lada Priora.
Additional advantages of using an electric booster instead of power steering:
- Less maintenance requirements (no need to monitor oil, connections).
- In cold weather there is no need to warm up, as when using power steering.
- Installing the EUR is much easier (no need to interfere with the engine compartment).
- High reliability.
- The only downside is the lower power, although on passenger cars like the VAZ 2114 this is not at all noticeable.
We install the steering wheel from Priora 2 on a VAZ 2114
The idea arose to change the steering wheel on the 4 to a more interesting one in appearance to match the interior of the cabin - I chose the steering wheel from the Priora 2 in eco leather with perforations with gray stitching to match the design of the seat upholstery and door cards, a good combination.
And in terms of tactile sensations, the steering wheel from the Priora is more pleasant (perhaps eco-leather gives such a thrill), due to the thicker steering wheel, the steering wheel coverage is better than on the relay from the VAZ 2114, in general, steering is a pleasure.
To switch to Priora, you had to buy the following steering wheel:
✔️ Steering column from Chevrolet Niva 2123 is simple (I took it assembled with a bracket - it will not be needed during installation) - 1500₽ + delivery ≈2000₽. ✔️ Steering column cable from Chevy Niva assembled with steering column switches - 1000₽ ✔️ Steering column cover from VAZ 2112 euros 500₽ you can get it from Priora, it will be a little more expensive. ✔️ Priora 2 steering wheel in eco leather with gray stitching, a dummy airbag along with it (I got it of not the best quality, it will be replaced with a better one without alteration in eco leather and stitching), lower gray insert - 5900₽ + delivery = 6300₽ Also on little things I had to buy an additional 2-pin chip to connect an audio signal from the cable to the steering wheel pad - it requires small terminals for connection!
You will need bolts for the ignition switch with a breakaway cap when installing it on a new steering column.
The installation process is not as complicated as the process of removing the steering column from 2114 with breakaway bolts that are attached under the steering column in 2 places, it was very difficult to knock them down and unscrew them (with the ignition switch it was much easier - 4 screws were quickly torn off with a chisel and a hammer) from the beginning I knocked it out with a chisel at approximately 45°, as much as possible, in the end one bolt came out easily, and with the second I had to use everything that was at hand - I used WD40, then the idea came to buy pliers so that it could be done better it was possible to clamp the head of the bolt and turn it (it’s not convenient to clamp it with flats), after the bolt was torn off a little with a chisel and hammer, I had to unscrew it gradually since the bolt was tight, having unscrewed it safely, I saw that it was bent in an arc, that’s why it didn’t give in twisting.
After unscrewing all the bolts and nuts securing the steering shaft bracket, I removed the shaft assembly from the steering column driveshaft by loosening the clamp on the steering shaft splines.
Then you need to sort out the steering columns, namely, remove the steering column assembly (shaft, pipe, adjustment lever) from the VAZ 2114 bracket, put it aside, and put the steering column from the Chevy Niva on the same bracket in the same composition; when installing it turns out that the steering column the shaft and pipe from the Chevy Niva will be approximately 3 cm longer than on the VAZ 2114; This will be exactly what is needed to install the steering wheel and steering column cable with switches and to achieve the correct position of the shift levers in relation to the steering wheel and thus it will be convenient to use them.
How to remove the steering wheel?
Dismantling the steering wheel on VAZ 2114 and 2115 is carried out using the same method. However, remember that according to the Code of Administrative Offenses, replacing a steering wheel with a steering wheel different from the original is considered illegal modification of the steering structure and vehicle control system. Such tuning falls under Part 2 of Article 12.5 of the Code of Administrative Offenses on driving a vehicle in the presence of malfunctions or conditions under which its operation is prohibited. Recently, traffic police officers have been quite zealous in catching violators of this article, so think carefully before embarking on the replacement process.
The standard VAZ 2114 steering wheel looks unattractive, so someone may want to replace it
Required Tools
To remove and then install a new steering wheel, you will need the following tools:
- new steering wheel (make sure the part you choose fits your car);
- set of screwdrivers with straight and Phillips slots;
- 24 mm socket head;
- pencil or marker;
- hammer (in some cases);
- a soft metal drift (included with the hammer);
- wire cores (in some cases).
Please note that after completing all the work, you will have to remove traces of a pencil or marker from the steering wheel cover and front panel. To avoid problems with subsequent cleaning, consider the coating material of these interior elements. You should not use permanent, or as they are also called, indelible markers, especially if the parts are covered with high-quality natural leather of a light shade. The easiest way to remove marker is water-based. But it is better to use a regular pencil: it can be erased with a regular eraser.
Steering wheel removal process
There is a signal inside the steering wheel that receives power from the battery, so the first thing you need to do is turn off the power to the car. To do this, you just need to disconnect the negative terminal. After this, you can safely begin the dismantling process.
- Remove the ignition key from the lock.
- Turn the steering wheel so that the system locking the steering shaft is activated. Your steering wheel is now locked in a straight position.
- In order to subsequently correctly install the new part while maintaining control accuracy, apply a mark to the steering wheel with a pencil. Place a similar mark on the dashboard right next to it.
- Using a straight screwdriver, pry the cover with the Lada inscription on the steering wheel and remove it. This element is attached using ordinary plastic clips, so removing it is not difficult. However, due to the thin plastic, the part breaks easily. If you plan to continue using your old steering wheel, be careful.
- Under the trim you will see two screws. They hold the steering wheel cover. Unscrew them using a Phillips screwdriver and then remove the cover.
- In the central part of the structure you will see a large nut. It should be unscrewed using a 24 mm socket.
- The steering wheel no longer holds anything. To remove it, grab the steering wheel with both hands and pull each side in turn. There's no point in trying. If the part has not been dismantled before, it will be quite difficult to move. Do not try to remove the part with one jerk: you may accidentally injure yourself.
- If attempts to remove the steering wheel using the method described in point 7 are unsuccessful, use a small hammer and drift. In addition to additional tools, you will need an assistant. One person from the pair should pull the steering wheel, and the second should hit the drift attached to the end of the steering shaft with a hammer.
Removing the steering wheel for VAZ 2114 and VAZ 2115
Experts recommend not turning off the central nut completely, as it can protect you from serious injury in the event of a sudden break of the steering wheel. Make several turns while performing step 6, and when the part comes off the steering shaft, unscrew it completely by hand.
Video: how to remove the steering wheel on VAZ 2114 and 2115 cars
In this simple way you can dismantle the steering wheel on a VAZ 2114 and VAZ 2115.