Fuel pump - is responsible for supplying fuel from the tank to the car engine; if it fails, fuel stops being supplied to the engine and therefore the car will not start, or over time it may simply start to work worse and in this case the car will twitch when driving and its dynamics will disappear.
In such a situation, the fuel pump will still pump fuel into the engine, but it will do so very much, besides this, the fuel pump no longer serves anything, although if you think about it, firstly it goes together with the Fuel Level Sensor, and secondly there is a grid on it There is still one that cleans gasoline from dirt. Therefore, we can say that thanks to the gas pump, we also find out how much fuel is left in the tank and even before this fuel goes into the engine, it is cleared of small particles of dirt.
If you do not want to change the fuel pump very often, then try not to bring the gasoline in the tank to the very minimum and especially do not drive the car until it runs out of gas (Only do this in rare cases or because of the situation), otherwise such trains will not lead to anything good and soon the fuel pump (this is its second name) will become unusable.
Note! To replace this pump on a car, you will need a set of tools in which: Screwdrivers will be lying around, a hammer and a drift, but in principle, the help of screwdrivers will be enough (But this is only if you don’t have a hammer with a drift, if you do, be sure to take them)!
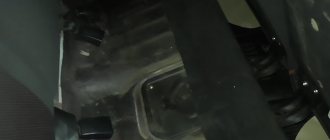
Where is the fuel pump located? It is installed inside the tank and through fuel pipes it pumps fuel from the tank to the car's engine, but not all people know where the tank is located on front-wheel drive cars, let's explain briefly, on classics many people even saw it when the trunk was opened (It's just that on classics it's in installed in the most visible place and if the trunk is not covered with a trim, as for example on a VAZ 2101 car this is done, there is no trim unlike the same 2107, for example, then the gas tank can be easily seen), but with regards to front-wheel drive, the gas tank is located under the bottom , and the fuel pump is inserted into it from above, so in order to get to the pump it will be enough to remove the rear seat cushion and then, by folding back the standard carpet and unscrewing the fuel pump flap (Indicated by a red arrow), you will immediately see the pump itself, for clarity it is indicated by a blue arrow in the photo below:
When should you change the fuel pump? As soon as the car begins to drive poorly (twitches, does not accelerate at all at high speeds, etc.), then you need to think about the pump, besides, by the way, it will also make a lot of noise (you will understand this right away), so if you lose power and If there is an extraneous sound, then you should think about replacing the fuel pump with a new one, but before you change any part, you can check it for functionality, to learn more about how to understand that the fuel pump has failed, read the article: “Checking the pressure in the power system on a VAZ” and be sure to also watch the video in this article that says everything.
Removing and installing the fuel pump Lada Kalina:
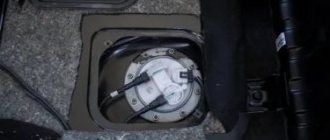
- Under the floor covering there will be a metal cover, black, as shown in the photo below. You need to unscrew 4 bolts on it:
- Next, when all the screws are unscrewed, you can safely remove it with a slight movement of your hand:
- After which the following picture opens, where we see the upper part of the Kalina fuel pump and all the fittings that are connected to it:
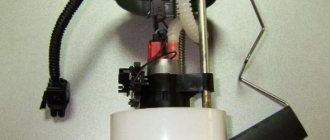
- Now you can begin to remove the wires and hoses and the fuel pump. First, disconnect the power plug, which is located on the left side. Push the plastic lock up a little and pull the plug to the side.
- Disconnect the fittings one by one. The lower one is removed as follows: with one hand we press on the metal locking clamp, and with the other hand or pliers we pull the fitting to the side:
- The top one is removed in the same way, only there is a slightly different latch - green. You need to press on it with one hand and pull the tip to the side with the other.
- It is advisable to clean everything around the fuel pump thoroughly so that when dismantling, no dust, dirt or other debris gets inside the tank.
- Next, you can begin to remove the large metal ring that secures the pump. The factory uses a special puller for these purposes, but you can do without unnecessary devices. Simply place a flat-head screwdriver on the end of the ring and slowly tap it in a counterclockwise direction with a hammer until the ring comes out of the mounting grooves.
- The Jonnesway screwdriver coped well with this test, its body remained intact and undamaged after numerous hammer blows! After the clip has popped out, it can be removed:
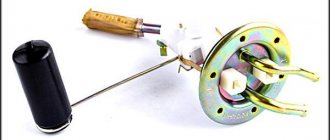
- Now you can start removing the fuel pump. Take it by the top and gently lift it up. You should be very careful not to bend the structure on which the float is attached. To do this, while lifting the pump (closer to the very top), tilt its upper part slightly towards the right rear door. And take it out, as if diagonally, so as not to catch the float.
- The photo below shows the result of the work done to remove the Kalina fuel pump:
If this part needs to be replaced, then install a new pump and perform the installation in the reverse order. Be sure to wipe the rubber and around the seat dry before doing this so that no debris gets into the tank.
To access the Lada Kalina fuel pump, you need to fold back the rear seat, remove the insulation (if any), and then begin dismantling the device.
Tool for the job
- Screwdriver with flat and Phillips blade.
- Hammer.
- Pliers.
Step-by-step work order
- Disconnect the negative terminal from the battery.
- We open access to the protective cover.
Raise the rear airbag up
Then unscrew the four bolts from the black metal cover located under the rear seat.
To avoid losing, we put the bolts in one place.
When the bolts are unscrewed, remove the cover to the side.
Under the decorative cover you can see the fuel pump and DUST!
- When the cover is removed, you will see a picture where the upper part of the fuel pump is visible, as well as the fittings that are connected to it.
- Now you can begin the dismantling itself, and first of all, disconnect the power wires. To do this, remove the plastic clamp on the block and pull it to the side.
- The next step is to disconnect the fittings; in order to remove them, you need to press on the metal clamp with one hand, and use the other hand to pull the fittings to the side using pliers.
- When dismantling the second tip, note that its retainer is made of green plastic, and in order for the fitting to leave the place of fixation, you need to press on it, and then pull the tip itself to the side with your other hand.
- Before you begin removing the fuel pump, you should thoroughly clean everything of dust and dirt to prevent any debris from getting into the fuel.
- When everything is clean, you can begin to dismantle the retaining ring that secures the fuel pump to the housing. To perform these manipulations, you can use a special puller, or using a flat screwdriver and a hammer, knock it counterclockwise from the mounting points.
- Use a hammer and screwdriver carefully so as not to damage the ring or fuel pump housing.
- Then, when the ring clip has popped out of its seat, you can take it out.
- Now is the time to start removing the fuel pump itself; to do this, you need to grab it by the top part and pull it up. In this case, you should be extremely careful so as not to bend the structure. Please note that the fuel pump is equipped with a special float indicating the amount of fuel in the gas tank, and in order not to knock it down, the fuel pump should be removed so as not to touch the body of the fuel tank.
- Here is a photo example of when the fuel pump has been successfully dismantled.
The block is marked with a red arrow, and the fittings with a green arrow.
Strikes should only be made on the ring.
Changing the mesh with your own hands
So, the mesh located in the fuel pump is forced to constantly come into contact with dust and dirt, because the pump itself is located between the seats, and dust constantly settles on its body.
That is why experienced motorists are not lazy to wipe the pump body with a damp cloth from time to time to avoid untimely clogging of the system.
To replace the mesh you need to go through several steps:
- The very first thing we do is buy a new filter.
- Raise the rear seats to provide access to the pump.
- We unscrew the four fasteners on the hatch cover to the pump and put it aside.
- Carefully remove the hoses. They are dismantled in the following way: press on the latch (you can use a screwdriver) and pry up the hose itself (with another screwdriver) in the direction of the arrow. We judiciously balance our strength so as not to break fragile parts and remove the hose. Unfasten the connector.
- We thoroughly wipe the pump from dust and continue to disassemble the structure. Remove the retaining ring. Let us warn you right away that the ring is difficult to remove, you will have to work hard here or even use a hammer, but again, do not overdo it.
- We remove the pump (in order not to flood the interior with gasoline, lay some unnecessary cloth).
The first part of the work is completed. Let's proceed to the most important part, disassembling the pump:
- There is a sensor and wires attached to the pump; you need to disconnect them.
- Next, we remove the intake tube and bend the clamps (there are 4 of them) in order to be able to remove the glass.
- We check the glass for dirt, if there is any, clean it.
- And now we’re doing what we did such a large-scale job for – we’re removing the mesh. She usually looks creepy. But don’t be scared, just replace it with a new one and assemble the system in reverse order.
REASONS FOR REPLACEMENT
Characteristic signs of a fuel pump malfunction:
Before you begin replacing the fuel pump, it is important to make sure that engine interruptions are related to the fuel supply and not to the ignition system, ECU, or power supply to the pump motor. It is necessary to measure the pressure in the fuel rail. If the value obtained at the time of interruptions in engine operation differs from the standard values, you can begin diagnosing the power system.
The symptoms described above can be caused not only by a faulty fuel pump, but also by a clogged mesh or fine fuel filter. Also, do not forget that the cause of interruptions in the fuel supply may be poor contact in the motor power supply circuit (torn wires, oxidation, etc.). For personal diagnostics, it is important to know the structure and operating principle of the fuel pump.
WHERE IS TN?
On the vast majority of passenger cars, the fuel pump is located inside the tank. A fuel pump with a coarse mesh, a fuel pressure regulator, a fuel level sensor and a critical fuel level sensor, and in some cars also a fine filter, are held inside the tank by the fuel section.
DESIGN FEATURES OF SOME VEHICLES
After reading the guide on how to replace the fuel pump yourself using the example of a specific car, you can easily replace it on any other car. But do not forget that in some cases the power system design will make adjustments to the replacement method.
For example, on the Ford Focus I and Chevrolet Cruze, there is no technological hole under the rear seat cushion for access to the fuel section cover, so to replace the mesh and the fuel pump itself, the tank will have to be removed. For ease of further maintenance, owners often cut holes above the fuel module themselves.
On the same Chevrolet Cruze, the manufacturer does not suggest a separate replacement of the motor and even the fuel filter (they are simply not in the catalog of original spare parts), so if the fuel pump fails, the fuel module will have to be replaced entirely. If you want to save money, you can pick up the engine, for example, from the related Opel Astra, but it will have to be adjusted a little. You can learn about this kind of design features from the repair and operation manual or from publications on specialized forums of the owners of your car model.
Tools
Replacement often requires only a socket with a wrench, Phillips and slotted screwdrivers, and pliers. In some cars, the cover of the service hole under the rear row of seats is mounted on a sealant, which will need to be cut off to access the fuel section (in most cases, the plug is screwed on with screws).
It is highly advisable to stock up on clean rags with which you can clean the hose connections and the section’s seat in the fuel tank. When replacing, it is important to prevent dust and dirt from getting inside the hoses and into the tank itself.
IMPORTANT POINTS
- After stopping the engine, pressure remains in the fuel lines for a long time. Before you begin manual replacement, the system must be emptied. To do this, you can pull out the fuel pump fuse with the engine running. Stopping the fuel supply will stop the engine, after which replacement can begin.
- Modern fuel hoses are secured with self-clamping fittings. To remove them, you need to press the clamps on the sides of the latches, after which the hose should come out of the fitting relatively easily.
- If the fuel pump is replaced in cold weather, you should be extremely careful when unsnapping the plastic clips and removing the electrical connectors. At sub-zero temperatures, plastic becomes very fragile.
- The fuel section must be removed with care, since the free exit will be hampered by the FLS float.
- When disassembling the fuel module and removing the fuel pump, pay attention to the presence of sealing collars, which must be installed during assembly without distortions or deformations.
- After you have replaced the fuel pump and installed all the elements back, turn on the ignition a couple of times so that the fuel pump pumps gasoline into the line and ramp. At this time, you can check the tightness of the connected hoses.
Many drivers immediately try to start the engine, and then complain that after replacing the fuel pump, the car does not start.
conclusions
All of the instructions described above are designed so that even the most unprepared car enthusiast can independently remove the fuel pump on his Lada Kalina; the most important thing is not to rush, do everything consistently and carefully!
The Lada-Kalina submersible fuel pump, as in other cars, is necessary to supply gasoline to the combustion chamber of the internal combustion engine. The pump is activated immediately when the ignition is turned on and maintains operating pressure until the car is turned off or the fuel runs out. The fuel pump is part of a module that includes a fuel pressure regulator, which changes the supply parameters when the driver operates the accelerator pedal. The module also contains a sensor that sends data to the dashboard, to the fuel level indicator. In addition, the design of the fuel filter includes a fine-mesh mesh for coarse fuel cleaning.
REPLACEMENT GUIDE
Let's look at how to change the fuel pump yourself using the Hyundai Solaris as an example.
- Unscrew the mounting bolts and remove the rear seat cushion.
- Cut off the sealant with a utility knife.
- Remove the power plug.
- Using pliers, loosen the self-tightening clamp and remove the gasoline vapor removal hose to the adsorber.
- Remove the fuel supply hose.
- Release the ventilation hose going to the gasoline vapor adsorber from the bracket.
- Unscrew the fastening screws and remove the pressure plate.
- Pull out the fuel module.
- Remove the rubber seal.
- Disconnect the power plugs.
- We recommend removing the FLS to avoid damaging it during module disassembly.
- Remove the fuel pipe tip stopper.
- Remove the tube and O-ring.
- Press the latches of the metal guides, and then separate the parts of the housing.
Fuel pump device
Modern cars use two types of fuel pumps - mechanical or electric. The former are used in carburetor engines, the latter in injection engines.
The mechanical pump is usually installed on the body of the gas tank, while the electric pump is installed inside the tank. Some automakers use both types of pumps at once.
Mechanical pump
The mechanical fuel pump is quite large. Its main elements are:
The fuel supply system of the VAZ 1118 Lada Kalina car has 2 stages of fuel filtration - coarse and fine cleaning. The first is a fine mesh made of plastic, the second is an “accordion” made of porous paper. Both cleaning elements gradually become clogged during operation and after a certain period of time require replacement. Many car enthusiasts perform this operation on their own, because it is quite simple. You too can take on this work once you have read the instructions for its implementation.
Signs of trouble
There are several signs by which you can determine that the Kalina fuel pump is not working:
- the car does not start or stalls almost immediately;
- “Kalina” twitches when moving;
- the car does not develop maximum speed;
- extraneous noise or grinding noise coming from the fuel tank.
Similar symptoms are also observed when the fuel filter is clogged. Therefore, before removing the fuel pump on the viburnum, first replace the filter element. If the “symptoms” do not disappear, repair or replace the fuel module.
Common fuel pump malfunctions on Kalina:
- interruptions in the power supply to the unit: the fuel pump relay may fail. In this case, a diagnostic icon will be displayed on the instrument panel. Also, a power failure may be due to a loose connection in the fuse box;
- Fuel system blockage: most often occurs due to poor quality fuel containing small debris and impurities. Excessive contamination of coarse and fine filters leads to fuel pump failure;
- contamination of the fuel injector: leads to the fact that the car spontaneously turns off at idle.
The types of malfunctions described above require replacement of the fuel pump. The only type of work available to the car owner is cleaning the filter mesh.
Selecting new filter elements
To purchase fuel purification system parts for VAZ 1117-19 models, you need to know what they look like:
- The coarse filter is a flat mesh bag made of chemically resistant plastic that captures large particles of 80-100 microns. In the center of the element there is a plastic fitting that fits onto the counterpart of the gasoline pump.
The mesh element is equipped with a pipe that fits onto the fuel pump fitting
The element is equipped with clamps for fastening fuel line connections
All modifications of the Lada Kalina, including the second generation, are equipped with absolutely identical filter elements - a “barrel” and a mesh catcher. The dimensions of the spare parts are also identical.
There are no tricks in choosing a coarse mesh - the parts are made according to a single sample and cost from 30 to 45 rubles. The only caution: in order not to purchase a low-quality product or a fake, contact well-established stores. Although the fuel pump mesh costs a penny, it plays an important role in the fuel system: it catches large debris that can quickly clog the filter paper of the next cleaning element.
In operation, the plastic case is not inferior to the metal one in terms of reliability.
The material from which secondary filters are made does not play a big role. What is important is the contents of the “barrel”, which cannot be seen or touched. Therefore, there are only 3 selection criteria:
- correspondence between the body dimensions and the diameter of the fittings;
- the presence of plastic clamps;
- brand (manufacturer).
The mounting clamp on the Kalina is designed for a case diameter of 56 mm
In order for the spare part to fit the mounting clamp, the case diameter must be 56 mm. The internal size of the gasoline pipes put on the fittings is 8 mm.
There are many different fuel filters sold in stores, and not all of them are equipped with clamps (in other cars, the hoses can be secured with clamps). The part for “Kalina” must have latches, otherwise the tubes cannot be secured.
A plastic latch secures the hose to the filter fitting
In the countries of the former USSR, the following manufacturers of gasoline filters have proven themselves best:
At the moment, second-generation Kalina machines are equipped with fine filters made of polyamide. But users are not very complimentary about the factory spare parts: after disassembly, it was discovered that the paper “accordion” was poorly glued to the body. As a result, half of the fuel passed through the gas pipeline without filtering. At the same time, based on the practice of isolated cases, it cannot be unequivocally stated that metal filters are better than plastic ones.
Inside the filter element there is porous paper that traps small particles
Table: cost of VAZ 1118 filters
| Brand name | BOSCH | FRAM | FILTRON | SCT Germany | UFI | MANN |
| Price in rubles as of autumn 2022 | 390 | 340 | 335 | 230 | 280 | 410 |
Video: comparison of cleaning elements from different brands
. — , , .
| 15:28, 29 1236 — | |
| ! LADA Kalina, Granta 1.6 04> 0 580 454 035_ | 18:24, |
| Lada Granta 2011> | 16:53, 10 |
| 0580454035 Bosch 0 580 454 035_ ! LADA Kalina, Granta 1.6 04> | 09:31, CAREX PARTS |
| ! LADA Kalina, Granta 1.6 04> 0 580 454 035_ Bosch 0580454035 | 14:06, Exist… |
| ! lada kalina, granta 1.6 04 Bosch .0580454035 0 580 454 035_ | 06:59, — … |
| 2190 () | 05:58, 4 |
| ! LADA Kalina, Granta 1.6 04> 0 580 454 035_ BOSCH 0580454035 | 13:12, |
| 0 580 454 035 LADA Kalina, Granta 1.6 04> | 04:34, 1001z |
| ! LADA Kalina, Granta 1.6 04> 0 580 454 035_ | 07:39, 11 Odin |
| ! LADA Kalina, Granta 1.6 04>: Bosch 0 580 454 035_ 0580454035 | 10:27, 7 |
| Granta 2011> | 22:02, 45 |
| ! LADA Kalina, Granta 1.6 04> Bosch 0 580 454 035 | 08:20, |
| 0 580 454 035_ ! LADA Kalina, Granta 1.6 04> | 09:08, 6 zzparts |
| LADA Kalina, Granta 1.6 04> 0 580 454 035 | 12:22, 7 V8 |
| ! LADA Kalina, Granta 1.6 04> 0 580 454 035_ BOSCH 0 580 454 035 | 09:48, 10 PARK-MOTORS |
| 2110-2112/Priora/Kalina/Granta. FENOX EFP35005O7 | 13:41, 10 PARK-MOTORS |
| 08:18, 12 EURORAZBOR | |
| . LADA 2108-099i WEEN 1920282 …2108-099i 3 210808099I AUTOLIFE42 , 3 | 19:31, 12 Autolife42 |
| ! Fiat, Opel, Honda, Kia, Nisan, Mitsubishi, Lada 88> 10-01349-SX_ STELLOX 1001349SX … 1 Kia Fiat Mitsubishi Opel Honda Nissan Kia Fiat Mitsubishi Opel Honda Nissan 1001349 1001349SX_ , 1 | 13:52, |
| 10:28, … | |
| WEEN | 05:58, 4 |
| Lada Largus 2011> | 16:53, 10 |
| renault logan bosch Noname .0 986 580 957 , 8-15 | 23:47, — … |
| (1,6 ) | 05:58, 4 |
| LADA .21010110601000 Oz_ | 06:26, — … |
| LADA | 07:13, — |
| . lada 2108-099i Ween .1920282 ..., 15,000. 210808099I , 2 | 06:02, — … |
| LADA 112, Samara | 22:24, |
| 21236. ()/ Bosch/ LADA … . ()/ Bosch/ LADA 4×4 2121 21236113900910 | 05:55, 4 |
| . LADA 2108-099i … . 2108 2108 210 21 ADSO1920282 2108099I , 1 | 11:04, 1001z |
| ! Fiat, Opel, Honda, Kia, Nisan, Mitsubishi, Lada 88> 10-01349-SX_ … 1-2 Kia Fiat Mitsubishi Opel Honda Nissan Kia Fiat Mitsubishi Opel Honda Nissan 1001349SX_ , 1-2 | 18:06, |
| 7.1.2 Lada Samara 1100-1500 86> … . ADARM7 11001500 , 1 | 07:27, 1001z |
| ! Fiat, Opel, Honda, Kia, Nisan, Mitsubishi, Lada 88> 10-01349-SX_ … 1 Kia Fiat Mitsubishi Opel Honda Nissan Kia Fiat Mitsubishi Opel Honda Nissan 1001349SX_ , 1 | 08:58, 11 Odin |
| 10-01349-SX Fiat, Opel, Honda, Kia, Nisan, Mitsubishi, Lada 88> … . Kia Fiat Mitsubishi Opel Honda Nissan Kia Fiat Mitsubishi Opel Honda Nissan ADARM1001349SX , 1 | 05:46, 1001z |
| ! Lada Samara 1100-1500 86> 7.21772.50.0_ Pierburg 721772500 … 86> 7.21772.50.0_ PIERBURG 721772500 11001500 | 16:40, 22 Exist… |
| 1001349SX Stellox 10-01349-SX_ ! Fiat, Opel, Honda, Kia, Nisan, Mitsubishi, Lada 88> … 1-2 Kia Fiat Mitsubishi Opel Honda Nissan Kia Fiat Mitsubishi Opel Honda Nissan 1001349 , 1-2 | 11:58, CAREX PARTS |
| ! Fiat, Opel, Honda, Kia, Nisan, Mitsubishi, Lada 88> 10-01349-SX_ Stellox 1001349SX …STELLOX 1001349SX Kia Fiat Mitsubishi Opel Honda Nissan Kia Fiat Mitsubishi Opel Honda Nissan 1001349SX_ | 14:45, Exist… |
| LADA: 112 15 95-, Kalina 16 04-, Samara 1300/1500 86- | 22:07, |
| 7.21772.50.0 Lada Samara 1100-1500 86> … . ADARM721772500 11001500 , 1 | 08:53, 1001z |
| LADA 112 (95-) Kalina (04-) Priora (2170, 2171, 2172) (08-) Samara (86-) ….72 2171 ADRODFP0105 | 22:19, |
| 721771500 Pierburg 7.21771.50.0_ ! Lada Niva 1.6 76-95/Toscana 2107 1.5 83-93 …-93 1-2 2107 2107 210 21 , 1-2 | 10:57, CAREX PARTS |
| WEEN WEEN 192-0001 , 3 | 10:58, 11 |
| LADA Kalina 1.4/1.6 16V 04-> ….17 1118 BAZ11194 BAZ1119 BAZ111 BAZ… | 22:07, |
| ! Lada Niva 1.6 76-95/Toscana 2107 1.5 83-93 7.21771.50.0_ Pierburg 721771500 …-93 7.21771.50.0_ PIERBURG 721771500 2107 2107 210 21 | 16:40, 22 Exist… |
| 2123. "bosh" LADA .212361139009 | 00:00, — … |
| 1111 LADA … 1111 LADA 1111110110601000 | 05:39, 4 |
| 2101 LADA … 2101 LADA 2101010110601000 | 05:39, 4 |
| 2108 LADA … 2108 LADA 2108080110601000 | 05:39, 4 |
| 2110 sch (0 580 453 453) LADA. … (0 580 453 453) LADA. 2110 2110 211 21 | 05:55, 4 |
Location of Kalina fuel filters
To replace filter elements on VAZ 1117-1119 series cars, you need to know where they are installed. The location of the parts is as follows:
- mesh bag - a trap for large particles is attached to the suction pipe of the gasoline pump, immersed in a tank of fuel;
A screen for catching large particles is located in the fuel tank along with the pump.
The fine cleaning element is hidden in a niche to the right of the tank
The location of the filter elements is the same for all modifications of Kalina and does not depend on the body type. That is, on the “station wagon” and “hatchback” you will find parts in the same places as on the “sedan”.
The module has been removed, what next?
Having disengaged the four latches, the module cover is disconnected from the “glass”. Then, the “glass” can be cleaned, the pump screen can be replaced, and so on. Details are illustrated in the photo:
The mesh will be fixed in front of the intake hole
The module is assembled in the reverse order. And when installing it in place, you need to make sure that the plastic protrusion coincides with the slot on the tank:
Here are a couple more tips:
- Do not turn on the pump motor “in the air” (the windings overheat);
- The module is replaced together with the sealing ring, which must be included in the kit.
In a Lada Kalina car, as in any other, you can observe the following effect: symptoms indicate that the fuel pump is not working, but its engine is humming. Then you need to clean or replace the mesh (discussed above).
Be careful when disconnecting or connecting fuel hoses. The fittings on the module cover are very fragile. They are easy to damage.
There are various folk tips for repair and tuning. One sounds like this: the pump is cleaned without dismantling it, but simply by turning on the electric motor in reverse polarity. It is this advice that is not recommended to be followed.
How to change the coarse mesh
The work package for replacing the first stage filter consists of several stages:
- Buying a new part.
- Preparation of tools and repair site.
- Disassembly, removal of the gasoline pump and replacement of the mesh catcher.
To replace the old dirty mesh, you need to remove the fuel pump
How to choose a Kalina mesh filter is described in the previous section. The location for repair work does not matter, since you do not need a car overpass or inspection ditch - disassembly is carried out from the interior.
Preparatory stage
In warm weather, disassemble the car directly on the street, but in windy weather, find a quiet place, otherwise dust will blow into the interior. In winter, it is more convenient to work in an insulated garage or box.
The tools you need to prepare are:
- a Phillips and flathead screwdriver;
- pliers;
- a small chisel or metal point;
- hammer;
- clean rags.
To disassemble and dismantle the fuel pump you will need a modest set of tools
Before starting work, remove unnecessary objects from the rear row of seats, and then remove the seats themselves. They block access to the technological opening with a hatch leading to the fuel tank. The latter is attached to the bottom of the car from the outside.
To reduce the risk of breathing dust during disassembly, it is recommended to vacuum the body covering under the seat.
Removing the fuel pump and replacing the mesh
The first step is to relieve excess pressure in the fuel line, otherwise when the pipes are removed, a stream of fuel will splash around the trim and the pungent smell of gasoline will “linger” in the cabin for a long time. There are 2 ways to relieve pressure:
Important points
The procedure outlined above seems quite simple, but, nevertheless, there are a couple of nuances that should be mentioned.
Firstly, gasoline. When the gas lines are unscrewed, it begins to flow directly onto the cap (this happens especially often if the car owner forgot to relieve the pressure in the gas line using the breather, as mentioned above). Yes, a little gasoline leaks out, but the smell of gasoline in the cabin is not what a car owner needs, right? Therefore, before removing the fuel lines, you should put a cloth on the pump cover and carefully insert it with a screwdriver into all the cracks. The rag will absorb the leaked gasoline, then you can throw it away, which will help get rid of the smell in the cabin.
Secondly, the fuel pump retaining plate. As practice shows, this is a fragile thing, and breaking it by carelessly prying it with a screwdriver is not just easy, but very easy. But it’s difficult to find this part on sale; it is only sold complete with a complete fuel pump, and this is a waste of money. The matter is further complicated by the fact that it is not always possible to move this plate out of place with just a flat screwdriver (especially if the car owner is trying to disassemble the pump for the first time), so sometimes you have to resort to using a hammer and chisel, and this, in turn, increases the risk many times over plate breakage.
As you can see, there are no difficulties with independently replacing the pump grid on the Lada Kalina, and if you strictly follow the above instructions, even those who are doing it for the first time will not have any problems. The main thing is to be patient and follow safety precautions. It is imperative to remove the terminal from the battery! Otherwise, a banal mesh replacement can turn into a fire.
Instructions for replacing the fine filter
To change the second stage filter element, you will need an overpass or inspection hole. It is quite difficult to get to the part by climbing under the car. When entering the overpass, take it as far to the left as possible, this will ensure easy access to the filter (it is located to the right of the tank).
The filter is located to the right of the tank and is held in place by a clamp
From the tool kit you will need a 10 mm wrench and a flat-head screwdriver. The procedure for performing the work is similar to the previous algorithm for replacing the fuel pump grid:
- Relieve pressure in the fuel system in one of two ways (described in the previous section).
- Go under the car and disconnect the gasoline hoses from the filter. The tubes are removed by pressing the levers of the plastic clamps.
The pipe is removed after pressing the lock button
The filter element is removed after loosening the clamp
As a rule, all threaded connections located under the bottom of the machine rust and are difficult to unscrew. Therefore, before dismantling the old part, you should treat the clamp bolt with WD-40 aerosol lubricant.
The new filter is put in place taking into account the direction of fuel movement (indicated by the arrow on the housing) and connected to the system in the reverse order. The replacement technology for a car with a 16-valve engine is generally no different from repairs for an 8V engine. While working, you may encounter minor differences in small details:
- the tube with the gasoline pressure relief valve comes out from the same side, but closer to the cylinder head and slightly at an angle;
- The fine cleaning “barrel” is held in place by a plastic clip rather than a metal clamp.
On the latest Kalina models, the filter element is attached to a plastic clip
If, after dismantling the old part, you find that the fuel pipe clamps are in good condition, you can reuse them.
Video: quick installation of the VAZ 1117 filter element
Features of the electrical circuit
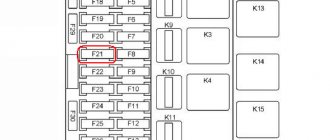
The circuit in which the pump motor is connected contains one fuse (F21) and one relay (K12). Both parts are installed in a single mounting block. We discussed in detail how to access them earlier. In a Lada Kalina car, the fuel pump relay is 4-pin. Two contacts go to the winding, two more are closed when triggered.
Mounting block VAZ-2192/94
The above parts can be dismantled using a special tool, which is secured under the unit cover. If the fuel pump is faulty, the pressure in the fuel rail is equal to atmospheric pressure. The same pressure can be reduced forcibly: by turning off fuse F21, you need to start the engine and wait a few minutes. When the gasoline pressure decreases, the engine will stall.
The fastening of components related to the fuel system should not be loosened without ensuring that the pressure in the rail is reduced to a minimum. The way to achieve this has just been discussed.
How often is replacement done?
There are clear regulations for replacing consumables, which include fuel filters. According to the requirements of the machine's operating instructions, they must be changed every 30 thousand kilometers. But given the different quality of fuel at gas stations and the operating conditions of the car, experienced auto mechanics recommend reducing the maximum interval to the following values:
- for a fine filter - 20 thousand km;
- for coarse mesh - 70 thousand km;
- when operating in northern regions, the service life is reduced by half from the regulations, that is, it is 15 and 35 thousand km, respectively.
Some motorists who carefully care for their Kalina offer their own replacement intervals. The principle is as follows: all consumables are updated simultaneously, along with the addition of fresh oil. With such a scheme, the interval is reduced to 7-15 thousand km, depending on the quality of the engine lubrication.
Compared to its predecessors, the Lada Kalina has a more modern and complex design. But the gasoline filtration scheme, inherited from the “tenth” VAZ family, remained unchanged. Thanks to this, it remains possible to change the cleaning elements yourself and not pay money for car service services.
«>