Stable, reliable, uninterrupted operation of the Lada Kalina engine is ensured by a complex of systems, the most significant of which is the fuel system.
It includes many mechanisms that act harmoniously and complement each other, so when even the smallest part fails, it negatively affects the operation of the entire fuel system.
Today we will talk about how to replace the fuel pump mesh on Kalina, and also reveal the most important issues regarding the fuel pump. So, let's go.
Features of the electrical circuit
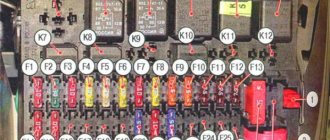
The circuit in which the pump motor is connected contains one fuse (F21) and one relay (K12). Both parts are installed in a single mounting block. We discussed in detail how to access them earlier. In a Lada Kalina car, the fuel pump relay is 4-pin. Two contacts go to the winding, two more are closed when triggered.
Mounting block VAZ-2192/94
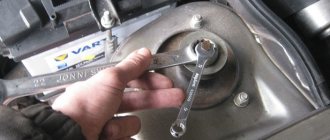
The above parts can be dismantled using a special tool, which is secured under the unit cover. If the fuel pump is faulty, the pressure in the fuel rail is equal to atmospheric pressure. The same pressure can be reduced forcibly: by turning off fuse F21, you need to start the engine and wait a few minutes. When the gasoline pressure decreases, the engine will stall.
The fastening of components related to the fuel system should not be loosened without ensuring that the pressure in the rail is reduced to a minimum. The way to achieve this has just been discussed.
How often is replacement done?
There are clear regulations for replacing consumables, which include fuel filters. According to the requirements of the machine's operating instructions, they must be changed every 30 thousand kilometers. But given the different quality of fuel at gas stations and the operating conditions of the car, experienced auto mechanics recommend reducing the maximum interval to the following values:
- for a fine filter - 20 thousand km;
- for coarse mesh - 70 thousand km;
- when operating in northern regions, the service life is reduced by half from the regulations, that is, it is 15 and 35 thousand km, respectively.
Some motorists who carefully care for their Kalina offer their own replacement intervals. The principle is as follows: all consumables are updated simultaneously, along with the addition of fresh oil. With such a scheme, the interval is reduced to 7-15 thousand km, depending on the quality of the engine lubrication.
Compared to its predecessors, the Lada Kalina has a more modern and complex design. But the gasoline filtration scheme, inherited from the “tenth” VAZ family, remained unchanged. Thanks to this, it remains possible to change the cleaning elements yourself and not pay money for car service services.
Source of the article: https://vazweb.ru/desyatka/pitanie/toplivnyiy-filtr-kalina.html
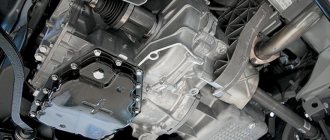
How to dismantle the fuel pump
There is a gas tank under the rear seat of Kalina-2. Fold the seat cushion up and then remove the split sections of the carpet located above the hatch. To make the issue easier to understand, here is a drawing:
The part marked “3” is a hatch that protects the pump. First, the hatch needs to be dismantled, for which four screws “1” are unscrewed. The unit itself, referred to as the “fuel pump module,” is attached to the tank with a clamping ring “5”:
Parts catalog VAZ-2192/94, fuel tank
The steps to dismantle module “6” are illustrated in the photo:
Any of the considered actions does not require special qualifications:
- The four self-tapping screws are unscrewed with a Phillips screwdriver;
- The wired connector is disconnected by squeezing the plastic latch;
- By squeezing the lock buttons, remove the fuel hose from each fitting;
- By prying the protrusions on the ring with a flat screwdriver, they try to unscrew it.
When pulling the fuel pump module upward, it is easy to damage the level indicator sensor. To prevent this in practice, the module is tilted away from the cross.
Remove the plastic module from the tank
We hope no questions arise here.
Changing the filter on carburetor engines
If the engine has a carburetor injection system, the fuel filter is located in the engine compartment. It looks like a plastic or metal part with two tubes going towards the tank and to the engine or fuel pump. There is no point in cleaning the fuel filter at all. On your own, you will not be able to properly clean the smallest honeycombs that are contaminated by debris that has fallen into them.
To change the filter, first loosen the clamps on both sides, and then remove the tubes to release the filter. Instead of the old device, a new one is installed, adhering to the direction of fuel flow there (focus on the arrow). Then you should install the tubes and install the clamps back, checking that they are well seated. At the end, we turn on the ignition and start the engine to check the tightness of the connections we have installed.
Hello, dear friends! How nice it is to see you here and understand that we are not working in vain, you like our articles. It’s especially nice to read the comments and answer your questions.
Today I propose to continue the topic of consumables and talk about the fuel filter. Many people underestimate the importance of this device, but in vain. The performance, serviceability and technical characteristics of the car largely depend on it.
The device can be located on the fuel line between the tank and the pump, or it can be of a submersible type - this is a fuel tank filter. In general, you should understand that gasoline is not the cleanest substance. An ordinary mesh through which the fuel is poured cannot collect all the debris, but is intended only for large particles.
To prevent debris and moisture from reaching the fuel pump and engine, so that water does not accumulate in the fuel system and the car runs like a clock, you need to regularly monitor the condition of the fuel filter. Fuel purification ensures optimal quality of the air-fuel mixture, and therefore the engine operates in ideal conditions.
The module has been removed, what next?
Having disengaged the four latches, the module cover is disconnected from the “glass”. Then, the “glass” can be cleaned, the pump screen can be replaced, and so on. Details are illustrated in the photo:
The mesh will be fixed in front of the intake hole
The module is assembled in the reverse order. And when installing it in place, you need to make sure that the plastic protrusion coincides with the slot on the tank:
Here are a couple more tips:
- Do not turn on the pump motor “in the air” (the windings overheat);
- The module is replaced together with the sealing ring, which must be included in the kit.
In a Lada Kalina car, as in any other, you can observe the following effect: symptoms indicate that the fuel pump is not working, but its engine is humming. Then you need to clean or replace the mesh (discussed above).
Be careful when disconnecting or connecting fuel hoses. The fittings on the module cover are very fragile. They are easy to damage.
There are various folk tips for repair and tuning. One sounds like this: the pump is cleaned without dismantling it, but simply by turning on the electric motor in reverse polarity. It is this advice that is not recommended to be followed.
Also check out
- The photo shows that the coarse filter (mesh) is also very dirty.
- Use a screwdriver to remove the mesh.
The photo shows the mesh after 50 thousand kilometers.
- Assemble the pump and install it in place.
Video with instructions for replacing the fuel pump
The question of how to remove the fuel pump on Lada Kalina cars can often be found on the World Wide Web. But the thing is that the quality of our gasoline and the ability for stable operation of this part cannot “get along” in a peaceful environment. Therefore, the need for a complete replacement or repair of this device for owners of Lada Kalina occurs with enviable frequency.
In the video, replacing the fuel pump on a Lada Kalina:
Location of Lada Kalina fuel filters
This element of the Lada Kalina is “hidden” under the bottom of the car next to the gas tank. To get to it, you will need to lift the car or drive into a viewing hole. The filter is clearly visible from below. Its location is to the right (in the direction of travel) of the gas tank.
This is interesting: Truck racing
The Lada Kalina fuel filter is “hidden”, under the bottom of the car next to the gas tank
The fuel pump strainer is installed inside the tank. To get to the neck, you will need to lift or remove the rear seat, unscrew the floor trim flap and unscrew the hatch cover.
The fuel pump strainer is installed inside the tank.
Replacing the fuel pump
To access the Lada Kalina fuel pump, you need to fold back the rear seat, remove the insulation (if any), and then begin dismantling the device.
Tool for the job
- Screwdriver with flat and Phillips blade.
- Hammer.
- Pliers.
Step-by-step work order
- Disconnect the negative terminal from the battery.
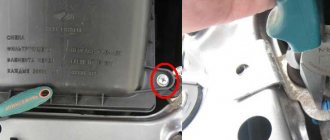
- We open access to the protective cover.
To avoid losing, we put the bolts in one place.
Under the decorative cover you can see the fuel pump and DUST!
The block is marked with a red arrow, and the fittings with a green arrow.
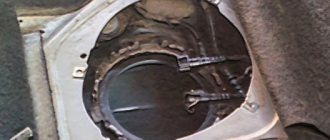
Strikes should only be made on the ring.
Successfully dismantled fuel pump.
Replacing the fuel pump mesh
Fuel pump mesh close up
When the fuel pump is removed, you can inspect the filter mesh. This is the so-called coarse filter. To do this, you need to disassemble the fuel pump and replace the filter element.
On the left is the new one, on the right is the old fuel pump mesh.
Selecting new filter elements
To purchase fuel purification system parts for VAZ 1117-19 models, you need to know what they look like:
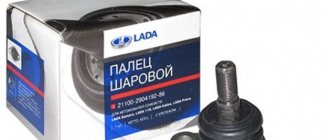
- The coarse filter is a flat mesh bag made of chemically resistant plastic that captures large particles of 80-100 microns. In the center of the element there is a plastic fitting that fits onto the counterpart of the gasoline pump.
The mesh element is equipped with a pipe that fits onto the fuel pump fitting
The element is equipped with clamps for fastening fuel line connections
All modifications of the Lada Kalina, including the second generation, are equipped with absolutely identical filter elements - a “barrel” and a mesh catcher. The dimensions of the spare parts are also identical.
There are no tricks in choosing a coarse mesh - the parts are made according to a single sample and cost from 30 to 45 rubles. The only caution: in order not to purchase a low-quality product or a fake, contact well-established stores. Although the fuel pump mesh costs a penny, it plays an important role in the fuel system: it catches large debris that can quickly clog the filter paper of the next cleaning element.
In operation, the plastic case is not inferior to the metal one in terms of reliability.
The material from which secondary filters are made does not play a big role. What is important is the contents of the “barrel”, which cannot be seen or touched. Therefore, there are only 3 selection criteria:
- correspondence between the body dimensions and the diameter of the fittings;
- the presence of plastic clamps;
- brand (manufacturer).
The mounting clamp on the Kalina is designed for a case diameter of 56 mm
In order for the spare part to fit the mounting clamp, the case diameter must be 56 mm. The internal size of the gasoline pipes put on the fittings is 8 mm.
There are many different fuel filters sold in stores, and not all of them are equipped with clamps (in other cars, the hoses can be secured with clamps). The part for “Kalina” must have latches, otherwise the tubes cannot be secured.
A plastic latch secures the hose to the filter fitting
In the countries of the former USSR, the following manufacturers of gasoline filters have proven themselves best:
At the moment, second-generation Kalina machines are equipped with fine filters made of polyamide. But users are not very complimentary about the factory spare parts: after disassembly, it was discovered that the paper “accordion” was poorly glued to the body. As a result, half of the fuel passed through the gas pipeline without filtering. At the same time, based on the practice of isolated cases, it cannot be unequivocally stated that metal filters are better than plastic ones.
conclusions
All of the instructions described above are designed so that even the most unprepared car enthusiast can independently remove the fuel pump on his Lada Kalina; the most important thing is not to rush, do everything consistently and carefully!
To access the Lada Kalina fuel pump, you need to fold back the rear seat, remove the insulation (if any), and then begin dismantling the device.
Tool for the job
- Screwdriver with flat and Phillips blade.
- Hammer.
- Pliers.
Step-by-step work order
- Disconnect the negative terminal from the battery.
- We open access to the protective cover.
Raise the rear airbag up
Then unscrew the four bolts from the black metal cover located under the rear seat.
To avoid losing, we put the bolts in one place.
When the bolts are unscrewed, remove the cover to the side.
Under the decorative cover you can see the fuel pump and DUST!
- When the cover is removed, you will see a picture where the upper part of the fuel pump is visible, as well as the fittings that are connected to it.
- Now you can begin the dismantling itself, and first of all, disconnect the power wires. To do this, remove the plastic clamp on the block and pull it to the side.
- The next step is to disconnect the fittings; in order to remove them, you need to press on the metal clamp with one hand, and use the other hand to pull the fittings to the side using pliers.
- When dismantling the second tip, note that its retainer is made of green plastic, and in order for the fitting to leave the place of fixation, you need to press on it, and then pull the tip itself to the side with your other hand.
- Before you begin removing the fuel pump, you should thoroughly clean everything of dust and dirt to prevent any debris from getting into the fuel.
- When everything is clean, you can begin to dismantle the retaining ring that secures the fuel pump to the housing. To perform these manipulations, you can use a special puller, or using a flat screwdriver and a hammer, knock it counterclockwise from the mounting points.
- Use a hammer and screwdriver carefully so as not to damage the ring or fuel pump housing.
The block is marked with a red arrow, and the fittings with a green arrow.
Changing the fine filter
The process of replacing this component in the Lada Kalina is a very simple action and is also included in the maintenance regulations. The most significant condition is to provide access under the bottom of the car, to where the filter itself is located, which may require a lift, overpass or pit.
How to remove the old filter? As a tool, you can arm yourself with a regular screwdriver. This operation will take a maximum of about forty minutes.
1. At the very beginning of our “operation” we relieve the pressure present in the fuel circuit. For this purpose, we open the pump power circuit. This action can be accomplished in two ways:
- we take out the fuse with the number “F21”, located under the tunnel cover near the gearshift lever (to remove the cover you will need a screwdriver with a flat blade);
- disconnect the connector of the fuel pump itself, which is located under the rear seat cushion; here you will need to unscrew the 4 screws of the cover and after removing it, access to the connector will be provided.
After turning off the pump, we start the Lada Kalina engine and wait for the fuel to be exhausted from the line, after which we observe a natural stop of the engine.
2. The filter itself is located under the tank and in most versions is secured with a plastic clip.
3. Before dismantling the filter, you will need to disconnect the fuel pipes, also secured with clamps. They should be disconnected, after which the filter can be freely removed.
4. Installation of the new element (its catalog code is “2190-1117010”) on the LADA Kalina car is carried out between the provided stops and following the reverse dismantling algorithm.
5. We put the previously removed fuel pipes onto the corresponding fittings until the characteristic click of the clamps is felt.
6. Make sure that the specified fasteners are securely fixed and return the fuse marked “F21” to its original place (or connect the cable harness to the pump block and install the cover).
7. Start the engine. Here you will need several correct actions:
- turn the ignition on and off immediately several times in a row;
- wait a pause to allow the pump to pump fuel into the line;
- finally start the engine.
Now you know how to change the fuel filter in a car.
When the unit does not fully start on the first try, we repeat this procedure again. This is necessary for the pressure in the fuel supply system to reach its operating value.
REASONS FOR REPLACEMENT
Characteristic signs of a fuel pump malfunction:
Before you begin replacing the fuel pump, it is important to make sure that engine interruptions are related to the fuel supply and not to the ignition system, ECU, or power supply to the pump motor. It is necessary to measure the pressure in the fuel rail. If the value obtained at the time of interruptions in engine operation differs from the standard values, you can begin diagnosing the power system.
The symptoms described above can be caused not only by a faulty fuel pump, but also by a clogged mesh or fine fuel filter. Also, do not forget that the cause of interruptions in the fuel supply may be poor contact in the motor power supply circuit (torn wires, oxidation, etc.). For personal diagnostics, it is important to know the structure and operating principle of the fuel pump.
WHERE IS TN?
On the vast majority of passenger cars, the fuel pump is located inside the tank. A fuel pump with a coarse mesh, a fuel pressure regulator, a fuel level sensor and a critical fuel level sensor, and in some cars also a fine filter, are held inside the tank by the fuel section.
DESIGN FEATURES OF SOME VEHICLES
After reading the guide on how to replace the fuel pump yourself using the example of a specific car, you can easily replace it on any other car. But do not forget that in some cases the power system design will make adjustments to the replacement method.
For example, on the Ford Focus I and Chevrolet Cruze, there is no technological hole under the rear seat cushion for access to the fuel section cover, so to replace the mesh and the fuel pump itself, the tank will have to be removed. For ease of further maintenance, owners often cut holes above the fuel module themselves.
Finally, about precautions when replacing
Compliance with the rules to ensure safety in this procedure is exceptional. Even following the utmost care during work, the release of flammable compounds and fuel spillage cannot be completely excluded. Otherwise, replacing the fuel filter on a LADA Kalina car is not a complicated procedure.
To prevent the risk of ignition of fuel vapors, you must:
- carry out the entire list of manipulations in a well-ventilated room or in an open area;
- Immediately clean up spilled fuel using a rag or filling it with sand;
- follow the rules for using portable lighting devices;
- stock up on a fire extinguisher;
- do not smoke during this repair process;
Remember to use gloves and goggles to avoid the risk of getting fuel on your hands or eyes.
REPLACEMENT GUIDE
Let's look at how to change the fuel pump yourself using the Hyundai Solaris as an example.
- Unscrew the mounting bolts and remove the rear seat cushion.
- Cut off the sealant with a utility knife.
- Remove the power plug.
- Using pliers, loosen the self-tightening clamp and remove the gasoline vapor removal hose to the adsorber.
- Remove the fuel supply hose.
- Release the ventilation hose going to the gasoline vapor adsorber from the bracket.
- Unscrew the fastening screws and remove the pressure plate.
- Pull out the fuel module.
- Remove the rubber seal.
- Disconnect the power plugs.
- We recommend removing the FLS to avoid damaging it during module disassembly.
- Remove the fuel pipe tip stopper.
- Remove the tube and O-ring.
- Press the latches of the metal guides, and then separate the parts of the housing.
Changing the fine filter
How to change the fuel pump on a Kalina
The process of replacing this component in a Lada Kalina is a very simple action and is also included in the maintenance regulations. The most significant condition is to provide access under the bottom of the car, to where the filter itself is located, which may require a lift, overpass or pit.
How to remove the old filter? As a tool, you can arm yourself with a regular screwdriver. This operation will take a maximum of about forty minutes.
1. At the very beginning of our “operation” we relieve the pressure present in the fuel circuit. For this purpose, we open the pump power circuit. This action can be accomplished in two ways:
- we take out the fuse with the number “F21”, located under the tunnel cover near the gearshift lever (to remove the cover you will need a screwdriver with a flat blade);
- disconnect the connector of the fuel pump itself, which is located under the rear seat cushion; here you will need to unscrew the 4 screws of the cover and after removing it, access to the connector will be provided.
After turning off the pump, we start the Lada Kalina engine and wait for the fuel to be exhausted from the line, after which we observe a natural stop of the engine.
2. The filter itself is located under the tank and in most versions is secured with a plastic clip.
3. Before dismantling the filter, you will need to disconnect the fuel pipes, also secured with clamps. They should be disconnected, after which the filter can be freely removed.
4. Installation of the new element (its catalog code is “2190-1117010”) on the LADA Kalina car is carried out between the provided stops and following the reverse dismantling algorithm.
5. We put the previously removed fuel pipes onto the corresponding fittings until the characteristic click of the clamps is felt.
6. Make sure that the specified fasteners are securely fixed and return the fuse marked “F21” to its original place (or connect the cable harness to the pump block and install the cover).
7. Start the engine. Here you will need several correct actions:
- turn the ignition on and off immediately several times in a row;
- wait a pause to allow the pump to pump fuel into the line;
- finally start the engine.
Now you know how to change the fuel filter in a car.
When the unit does not fully start on the first try, we repeat this procedure again. This is necessary for the pressure in the fuel supply system to reach its operating value.
Changing the mesh with your own hands
So, the mesh located in the fuel pump is forced to constantly come into contact with dust and dirt, because the pump itself is located between the seats, and dust constantly settles on its body.
That is why experienced motorists are not lazy to wipe the pump body with a damp cloth from time to time to avoid untimely clogging of the system.
To replace the mesh you need to go through several steps:
- The very first thing we do is buy a new filter.
- Raise the rear seats to provide access to the pump.
- We unscrew the four fasteners on the hatch cover to the pump and put it aside.
- Carefully remove the hoses. They are dismantled in the following way: press on the latch (you can use a screwdriver) and pry up the hose itself (with another screwdriver) in the direction of the arrow. We judiciously balance our strength so as not to break fragile parts and remove the hose. Unfasten the connector.
- We thoroughly wipe the pump from dust and continue to disassemble the structure. Remove the retaining ring. Let us warn you right away that the ring is difficult to remove, you will have to work hard here or even use a hammer, but again, do not overdo it.
- We remove the pump (in order not to flood the interior with gasoline, lay some unnecessary cloth).
The first part of the work is completed. Let's proceed to the most important part, disassembling the pump:
- There is a sensor and wires attached to the pump; you need to disconnect them.
- Next, we remove the intake tube and bend the clamps (there are 4 of them) in order to be able to remove the glass.
- We check the glass for dirt, if there is any, clean it.
- And now we’re doing what we did such a large-scale job for – we’re removing the mesh. She usually looks creepy. But don’t be scared, just replace it with a new one and assemble the system in reverse order.
Why is it needed?
There is a coarse filter that comes first from the gas tank. After all, first the lid where the fuel tank is located is opened, a gun is inserted there, the magic button is pressed and the fuel flows. Yes, it takes a lot of your money along the way, but what can you do? The location of the tank can be on the left or right, but this does not play a special role. Coarse cleaning, which is a mesh that traps large particles of debris.
This is followed by a fine filter. This is exactly what we will talk about. This element is called a fuel filter. With its help, small particles are retained. But even they can penetrate your diesel engine or gasoline injector.
Dust, dirt, debris, rust elements. All this can penetrate the system, causing a clogged pipe, tube, valve, fuel hose, or fuel pump components. Nothing good will come of this if timely replacement is not made.
To understand how to replace the filter, which element to choose and how to choose an analogue for the device you are going to change, you need to have at least a basic understanding of such an important component of the car.
I suggest starting with varieties.
Modern fuel filters installed on Ford Focus, Nissan Almera, Hyundai Solaris, Nexia, Mazda, Opel, BMW e60, Renault Logan and Megane, Kia Rio and many others have at least two degrees of purification.
- First degree. This is a rough cleansing that allows you to get rid of large contaminants. Not to be confused with a regular mesh in the tank, which is not available everywhere.
- Second degree. Fine cleaning. This is the main task that falls on the shoulders of the filter.
And here you probably have the main question - where is the filter device located? I don't know. No, I can answer, but if you tell me specifically what make of your car or what year of manufacture. After all, on the same Chevrolet Niva, different Opel, Toyota, Mazda models, on the Volkswagen Passat B3, as well as on the domestic VAZ 2114, 2112 and 2110, the location may differ.
However, they are always located somewhere between the engine and the gas tank, since the filter's job is to prevent contaminants from entering the engine while the fuel moves from the tank to the engine. What's in the gas tank itself? That's right, a coarse cleaning device. This is an additional filter element so that any unscrupulous gas stations do not spoil your car.
Now let’s talk about the types of filters themselves. What element will be on the car? It depends on the type of engine. There are three of them, as you know. Except for electric motors. Well, there is no need for a fuel filter, as you understand.
Therefore, there are three types of filters:
Location
So you bought yourself a brand new sedan and you think it’s time to change the filter for this engine. Want to choose the best? Well then, take a closer look at Cummins devices. Mann, Hertz. They have proven themselves well, and they cost quite a bit.
You probably know whether your engine is diesel, injection or carburetor
This is important to understand the location of the fine filter, that is, our today's hero
- Carburetor. In these engines, the TF (fuel filter) is placed in front of the carburetor itself, and is often in a transparent housing to control contamination. These are the most basic devices, because the carburetor is the least demanding on the quality of fuel.
- Injector. It uses nozzles and therefore requires high-quality filtration. And the fuel is supplied under high pressure. Therefore, the filters are enclosed in durable metal housings. The TF has to be regularly maintained, cleaned and monitored for its condition. They are placed mainly under the bottom of the car to make it easier to dismantle and replace.
- Diesel. A diesel engine also needs high-quality purified fuel, since the system is quite sensitive. Diesel fuel has a higher moisture content than gasoline. The TF is designed to filter debris and remove accumulated moisture. A separator is provided for this purpose. The location is quite simple - between the engine and the pump that pumps fuel.
Any fuel system must include a TF. They are replaced assembled, that is, there is no point in removing the filter elements themselves (usually special paper), leaving plastic or metal. Be sure to look at the number and article number of the filter that is installed on your machine, and check the operating manual from the factory. This is the only source of truthful information regarding the maintenance of your particular vehicle in this configuration and with this type of engine.
Air filters
These filters are used in Kalina to clean the air entering the cabin and engine. Both filters are made of paper and do not last very long; their service life depends on where the car is used. If the car is used on gravel or country roads, the service life of these filters is sharply reduced.
Engine air filter
This filter is installed in the engine compartment in a special box and serves to clean the air necessary for the operation of the internal combustion engine, which is subsequently mixed with fuel to form a fuel mixture.
The filter must be replaced every 30,000 km, but if the car is used on dirt roads, it is best to replace this part with a new one a little earlier at 20,000 km.
Symptoms of a clogged engine air filter
When the air filter in a car becomes clogged, the following symptoms appear:
- Engine power is lost;
- Engine starting deteriorates;
- The car engine stalls spontaneously;
- No idle;
If such symptoms appear on your car, you need to check the air filter for frequency; if it is very clogged, and you don’t have a new filter at hand, you can pop it and put it in place. This will be enough to complete the train and buy a new filter.
Replacing the Kalina air filter
- Unscrew the 4 bolts securing the air filter box cover and remove it;
- Install a new filter and close the lid;
Cabin filter
It is installed in front of the stove fan and serves to protect it from debris, as well as to clean the air from harmful gases and various odors. The cabin filter also helps protect air ducts from contamination.
Symptoms of a clogged cabin filter:
- The flow from the air ducts becomes noticeably weaker;
- The stove or air conditioner loses its effectiveness;
- An unpleasant odor appears from the air ducts;
If such malfunctions are detected in your car, you need to clean or replace the cabin filter.
Replacing the Kalina cabin filter
How to replace the fuel pump mesh on a VAZ 1117-VAZ 1119?
Removal: 1) Before removing it and replacing it with a new one, the fuel pump will need to be pulled out, this is done very quickly and there should be no problems, just be sure to read our instructions for removing it so that no problems really arise, more details about that how to remove the fuel pump from a car, read the article: “Replacing the fuel pump on cars.”
2) Now that the fuel pump has been removed, proceed to disassemble it, first disconnect the wire block from the intermediate connector (see large photo), and then in a circle press the four latches that secure the module housing to the fuel pump housing and then remove the fuel pump housing from the car, lifting it up, but you won’t be able to completely remove it, because the tubes will get in the way (You don’t need to disconnect them, it will be enough for you that the fuel pump body comes out a little from the body of the fuel pump module and you will replace the mesh with a new one).
Note! When you remove the housing, carefully disconnect the drain tube from the module housing with a screwdriver (see small photo), but when the fuel pump housing is already pulled out, rinse thoroughly (it is best with carburetor cleaning fluid, it is sold in a can) the inside of the module housing, in gasoline is stored in it, and each gasoline contains particles of dirt and this dirt accumulates in the module housing and so that it does not clog the new mesh immediately after installation, it is recommended to wash the housing with anything to remove all dirt!
Installation: The new mesh is installed by snapping it into place, but the old one can be removed very easily by hand or you can use a screwdriver to pry the mesh and remove it from the fuel pump.
Additional video clip: You can see the instructions for replacing the fuel pump mesh in more detail in the video clip that is posted on our website, but just a little lower:
Home » Repair » Lada Kalina » Stable, reliable, uninterrupted operation of the Lada Kalina engine is ensured by a complex of systems, the most significant of which is the fuel system.
It includes many mechanisms that act harmoniously and complement each other, so when even the smallest part fails, it negatively affects the operation of the entire fuel system.
Today we will talk about how to replace the fuel pump mesh on Kalina, and also reveal the most important issues regarding the fuel pump. So, let's go.
Preparing the car for changing consumables
Any manipulations with the elements of the fuel line are carried out after comparing the pressure in the line with atmospheric pressure. After stopping the engine, the fuel in the line is still under pressure. It can be bled only after de-energizing the power supply circuit of the fuel pump module. This procedure is carried out as follows:
- turn off the ignition;
- remove the cover of the central tunnel lining using a flat screwdriver (forms the bottom of a niche for small items near the cigarette lighter);
- remove the 15 A fuse responsible for power supply to the fuel pump (second from right to left) from the fuse box located under the removed cover of the power supply and engine control system;
- turn on the ignition (there will be no usual buzzing from under the rear seat) and start the engine;
- After the engine stops spontaneously, crank the starter for 5 seconds.
You can prepare the Kalina fuel system for filter replacement in an alternative way:
- remove (on a sedan) or fold down (hatchback and station wagon) the rear seat;
- remove the fuel pump hatch, which is attached to the bottom with two self-tapping screws;
- disconnect the wiring block from the fuel pump module with the ignition off;
- start the engine;
- After running out of fuel, crank the starter for 5 seconds.