The windshield on a Lada Vesta car has an unlimited service life and needs to be replaced extremely rarely. This becomes necessary in the event of mechanical damage, cracks, impact, or a frontal collision with oncoming traffic.
The process of replacing the windshield of a Lada Vesta is simple, but requires attention on the part of the repairman.
Step by step guide:
- Placing the vehicle within the perimeter of the repair area.
- Preliminary cleaning of the working surface, drains from dirt, drying.
- Dismantling frills and windshield wipers.
- Removing the rubber seal.
- Puncture of the adhesive seam.
- Lower the saw and cut the seam.
- Remove the windshield from its seat.
- Reassemble in reverse order, laying the seal between the windshield and the instrument panel.
Lada Vesta windshield dimensions. Manufacturer prices
| Name of original product | Size in millimeters | Price in rubles |
| Head-on | 1076 * 468 | From 4000 |
| Heated rear | 1074*438 | From 4000 |
| Front side (2 pieces) | 975*560 | From 8000 |
| Rear side (2 pieces) | 727*430 | From 4000 |
| *prices are as of 04/06/2019. | ||
While everyone is arguing about the BRIDE, we have Fiesta!
Ford decided not to stay away from the advertising war and invited everyone to a fiesta with Ford Fiesta!
Smile! Auto joke!
At the traffic police checkpoint they stop the car and inspect the trunk. There are 10 huge knives in the trunk. Traffic cop: Why do you need so many bladed weapons? Driver: - I'm a juggler, I work in a circus, I juggle with knives. Traffic cop: - I don’t believe it, so show me. The driver stands on the side of the road and juggles knives. In a passing car, the driver says to his wife: “Thank God, I quit drinking.” Look what tests they came up with!
Reviews
| № | Positive |
| 1. | Valery , 43 years old (www.otzovik.com): the car is in its fourth year, the windshield is intact, the seal is sealed. |
| 2. | Kirill , 39 years old (www.zr.ru): survived two winters, the interior and seals are in good condition. |
| 3. | Vitaly , 23 years old (www.autobann.su): comrades advised replacing the seal with a new one after four years, since cracks and contour deformation often form. |
| 4. | Georgy , 33 years old (www.lada-vesta.net): I won’t complain about the quality of the Lada Vesta, the car is good, there were no critical breakdowns. He eliminated minor defects on his own. |
| 5. | Vladlen , 41 years old (www.otzovik.com): the car overwintered for two seasons in an open parking lot, there is no garage. There are no comments on the interior or seals. |
| 6. | Dmitry , 43 years old (www.zr.ru): mileage 80,000 km, no capital investments. I systematically carry out technical inspections and buy original consumables. |
| 7. | Vitalievich , 25 years old (www.autobann.su): I recommend the car for purchase, good quality, affordable price, wide range of spare parts. |
| 8. | Zheka , 33 years old (www.lada-vesta.net): over four years of use, the rubber has cracked in places, but this is not so critical for me. |
| 9. | Konstantin Vladislavovich , 49 years old (www.otzovik.com): the car is like a car, I won’t praise it, there are defects. For daily trips to work - from work will do. |
| 10. | Leonidovich , 33 years old (www.zr.ru): in comparison with Granta, Priora, Lada Vesta - this is something perfect. I am satisfied with the quality, no comments. |
| 11. | Vasily , 36 years old (www.autobann.su): I have had a car for two years, no special comments, no complaints. |
| Negative | |
| 12. | Ivan , 42 years old (www.zr.ru): a year and a half after buying the car, the seals in the interior dried out. I will have it replaced by an authorized dealer under warranty. |
| 13. | Vitaly , 38 years old (www.otzovik.com): constantly taps the glass when driving, especially on rough roads. |
| 14. | Ivan Vasilyevich , 47 years old (www.autobann.su): the quality of the fit of the windshield and the sealing is poor. It is necessary to modify it yourself, which entails additional expenses. |
Related link:
Lada Vesta: error P0523 and engine oil pressure
Replacing the windshield of a Lada car
_x000D_
The windshield of a car is replaced if it becomes scratched, scuffed or cracked. The process is not complicated, but requires knowledge of certain skills. Replacement of fixed body glazing for all Lada cars (Granta, Priora, Largus, Kalina, Niva 4x4, Vesta or XRAY) and foreign cars is similar, the only difference is in the requirements for glue.
_x000D_
After installation
_x000D_
Do not move the car or close the doors abruptly for 7-8 hours after installing the windshield. The side windows should be kept open so that when the doors are closed there is no air pressure on the windshield. Work involving the application of force to the glass can begin 14 hours after gluing. Optimal strength of the adhesive joint is achieved, depending on weather conditions, after 4-6 days. Reassemble.
_x000D_
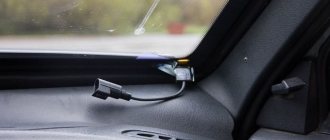
If you have rain, light or heated windshield sensors, do not forget about disconnecting/connecting the connectors with wires.
Categories of products that may be of interest to you based on the article “Replacing the windshield of a Lada car”:
What size wheels and tires
The wheel size of the Lada Vesta is also an important parameter that should be taken into account when choosing a car. This is one of the most important factors affecting the handling and maneuverability of a car, its behavior on the road - for different driving styles and different road surfaces.
Every driver knows that this indicator is changeable. That is, if you wish, you can put wheels of a different size on your car, affecting its dynamic characteristics. The vehicle manufacturer indicates in the manual the recommended parameters, compliance with which will not bring any trouble. Lada Vesta tire size installed and recommended by the manufacturer:
- sedan and station wagon – 185/65 R15, 195/55 R16;
- cross – 205/50 R17,
- sport - 205/50 R17.
The dimensions of the Lada Vesta disks in this case will be as follows:
- DIA – 60.1 mm;
- PSD – 100 mm;
- mounting holes - 4 or 5;
- rim width – 6J or 6½J (in inches);
- rim offset – 43 or 50 mm.
As for the sizes of Lada Vesta SV wheels, they are characterized by the following parameters:
- rim offset – 43 mm;
- rim width – 5½J, 6J, 6½J inches;
- bolt pattern – 4×100;
- DIA – 60.1 mm;
- tire size – 205/50 R17 or 205/50 R17.
The Lada Vesta tire size may differ from these parameters. Often the driver hopes in this way to increase the vehicle’s cross-country ability and improve its performance. However, when installing wheels at your own discretion, you should take into account that the car was tested and certified on those specified by the manufacturer. How other options will behave is unknown. It is likely that the modified car will become less stable and difficult to control. In addition, unauthorized installation of cross rims on the Lada Vesta, the size of which is not regulated, can lead to problems with the traffic police and technical inspection, and repair of the chassis under warranty will not be possible.
Lada Vesta body parts
Products from the Dustershop77 range on the topic of the article:
| Name | Manufacturer | Price | Availability | Add to cart |
| V114-1420501 / LVE112802 | Radiator grill LADA Vesta (Luxe, Exclusive) | Pt GROUP | 9900 / 8600 rub. Discount: 5100 rub. | 1 |
| DC1266-8200257684 | Duster 10 - wing turn signal (L=R) original 8200257684 | Original | 800 / 600 rub. Discount: 500 rub. | 4 |
| V115-1430501-LVE112801 | Radiator grille LADA Vesta (Classic, Comfort) | Pt GROUP | 12000 / 10300 rub. Discount: 6600 rub. | 1 |
| V116-1500505 | Radiator grille LADA Xray | Pt GROUP | 7500 / 7000 rub. Discount: 4900 rub. | 1 |
| DC177-8200733848-BLACK | Internal handle left original 8200733848 black | Original | 1200 / 800 rub. Discount: 700 rub. | 2 |
| DC1715-489702120R | Steering column adjustment knob Renault Duster, Logan, Sandero, Lada Vesta, X-Ray original 489702120R | Original | 1500 / 1300 rub. Discount: 1000 rub. | 1 |
| DC2165-8200194580 | Duster 2011 - wing turn signal (L=R) original 8200194580 | Original | 550 / 400 rub. Discount: 300 rub. | 1 |
| DC1926-8450039478 | Plug for rear left outer door handle Vesta 8450039478 original | Original | 100 / 70 rub. Discount: 50 rub. | 2 |
Removing the windshield
_x000D_
You will need : a piece of string.
_x000D_
Procedure:
_x000D_
- _x000D_
- We place the string behind the edge of the glass and cut off part of the sealant, moving from side to side (with an assistant).
- We pull one end of the string inside the cabin and continue to cut off the sealant around the perimeter of the windshield.
- We remove the glass from the car.
_x000D_
_x000D_
_x000D_
_x000D_
Place the string behind the edge of the glass and cut off part of the sealant
Pull one end of the string inside the cabin
Removing the windshield from a Lada car
_x000D_
What do the inscriptions on the glass mean - decoding
Special markings on the windows for Vesta will help you determine whether you have received the correct copy. This marking is divided into several types. The first one shows the name of the manufacturer, then comes the one that indicates which body type the part is suitable for:
- SD – sedan;
- UN – universal;
- HB – five-door hatchback;
- KP – coupe;
- GR - truck;
- VN – SUV;
- KB – convertible;
- PIC – pickup truck.
*D is the designation of the number of doors. For example, 4D is a sedan, 5D is a five-door hatchback.
This is followed by the series designation – SER.
The next step is the type of steering wheel.
- LVRUL - left-hand drive car;
- PRUL - right-hand drive car.
Next comes the color (shade) of the glass and sun protection coating:
- ZL – green (ZLZL – additionally with a green stripe; ZLGL – additionally with a blue stripe);
- SR - gray;
- PR – transparent (PRGL – additionally with a blue stripe; PRZL – additionally with a green stripe);
- BR – bronze;
- GL – blue;
- PR – dark.
- DD – rain sensor;
- TRIPL – triplex (three layers);
- OTKR – opening;
- DV – double;
- ST PAK – double-glazed window;
- EO – electric heating (heating);
- B/EO – without heating;
- STOP – installation of a brake light on the rear transparent shield;
- DZ – fog sensor.
The following designations may appear:
- Tinted – green athermal glass, additionally – heat-absorbing property;
- Lamisafe – multi-layer.
The manufacturer does not always indicate all the details in the labeling, but he must indicate the type of glass, additional functions and equipment.
Rear window blade Lada Vesta SW
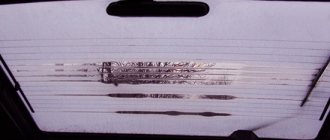
The standard size of the rear brush is 280 mm. You can increase the cleaning area by installing a larger brush. For example, a 330 mm brush (Bosch 3 397 011 306). It is 2.5 cm longer and has a slightly different shape for a stick-hook (the original one is more square, while the Ford one is rounded), but it fits perfectly.
Comparison of brushes on video:
What size wipers do you use on Vesta? Is the standard cleaning area sufficient for safe and comfortable vehicle operation? Take part in the survey, leave your feedback and recommendations. Let us remind you that other improvements to the sedan can be found in this category or by content.
Lada Vesta 2016
- Not long ago I was driving along the highway, and bam, there was a click of a stone on the windshield from an oncoming car. As I walked, I inspected the glass, it seemed to have no cracks or marks. Upon arrival at the place, I examined it more carefully, but also saw nothing. I exhaled and forgot. But a few days later, a small crack appeared in the area where the interior rearview mirror was attached. After another couple of days, its length increased significantly. The crack was located well, it practically did not interfere with the view, and if you lower the sun visor, it is not visible at all.
I admit, my first desire was to stop by for glass repair, but then I thought differently. There is a comprehensive insurance policy, Vesta's glass is not durable, some are even scratched by windshield wipers. This gave me the idea to find out what kind of windshield the windshield is being replaced with under Casco from my insurer.
Basic faults
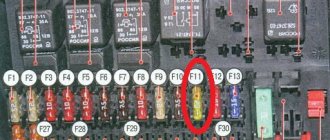
The first important malfunction is the incompatibility of the windshield with the windshield wipers. The standard wipers managed to cause a lot of trouble for the owners of the first Vestas.
- Firstly, they are quite short for a large transparent shield and do not cover its entire area, but only part of it.
- Secondly, the rubber on the wipers quickly hardens in sub-zero temperatures, which is why the area of contact with the windshield is sharply reduced to a minimum - the effectiveness of such work is extremely low.
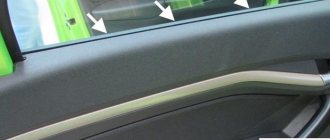
The second problem is scratches on the side windows. The seals on the doors are very tight against the windows. When grains of sand, ordinary dust and dirt appear between them, vertical scratches appear on the sides. Replacing and slightly modifying the rubber seals on the doors can save you from this.
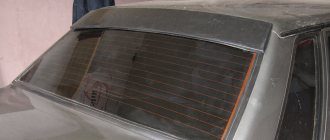
The problem with the windshield is not only due to chipping. If you hear a squeaking sound from the front, the culprit may be the upper rubber seal. If the interior seal is broken, the windshield will have to be replaced.
Windshield Installation
_x000D_
You will need : a sharp knife, a repair kit for gluing the windshield (read the instructions), a glue gun, a heated room (recommended air temperature 23°C, humidity 50%).
_x000D_
Procedure:
_x000D_
- _x000D_
- We remove the remaining sealant; the permissible residual thickness at the seam is no more than 2 mm.
- We degrease the painted edges of the windshield with an activator.
- Degrease the edges of the body opening.
_x000D_
_x000D_
_x000D_
_x000D_
Removing remaining sealant from the body
Degrease the painted edges of the windshield with an activator
Degrease the edges of the body opening
_x000D_
- _x000D_
- Apply glue around the perimeter of the glass, retreating 8-10 mm from the edge. The height of the layer should be 10-12 mm and the width no more than 8 mm.
- We place the glass in the body opening using suction cups. There should be even gaps between the side edges of the glass.
- Install the wedges from below so that the upper edge is pressed against the front side of the body roof. We press the glass to the body.
_x000D_
_x000D_
_x000D_
_x000D_
Apply glue around the perimeter of the windshield
Place the windshield in the body opening
install wedges at the bottom of the glass
_x000D_
To prevent the glass from “sliding down”, secure it with three pieces of adhesive tape to the body 250 - 300 mm long.
_x000D_
_x000D_
The entire process (removing and installing the windshield) is also shown in the video:
_x000D_
_x000D_