Damage to the rear window heating relay and its replacement
If the relay is broken, then you need to perform the following steps. First, disconnect the battery from ground. Then remove the switch from the panel and disconnect the connector. Next, check the circuit between pins 1 and 3 of the connectors on the relay side. Check heater timer.
The switch test lamp should light up and go out after 12 minutes. If the switch does not work, then it needs to be replaced. Next, check the circuit from the switch connector side.
The ignition key will be in the "closed" position, so there will be no voltage. Connect terminals 4 and 6. Check the operation of the heater. If something doesn't work, you'll have to replace the switch. The relay should be located in the passenger compartment fuse box.
The relay turns on when the key is turned and operates when the engine is running. The power button turns on the heating, and after about twenty minutes of operation it automatically turns off.
The heating function is very convenient and necessary. You can install the rear window heating relay yourself.
Most common reasons
It is worth noting that the heated rear window most often does not work in a VAZ-2115 car for the following reasons:
- fuse is blown;
- there is no contact at its terminal;
- The toggle switch that turns on the heating is broken;
- the relay has become unusable;
- contacts on the terminals of the heater circuit have oxidized;
- The threads have broken.
Fuses blow out quite often. This usually happens unnoticed by the car owner.
As a result, one or another device stops working. For this reason, you should pay attention to them first of all if you do not want to join:
- cigarette lighter;
- stove;
- burnout installed on the rear window, etc.
Replacing them with serviceable ones will solve the problem completely. In other cases, it will also be necessary to clean the terminals from dirt, and at least visually make sure that the power wires have not come off the buttons. If the relay is faulty, then it will need to be replaced - it is not very expensive and is quite easy to install.
Heating system design
Almost all cars have heating systems that are similar. The entire design of domestic and foreign passenger vehicles comes down to several positions: wiring, relays, threads and fuses. If you know the operating principle and installation diagram of each unit, then if problems arise, you can restore functionality without difficulty.
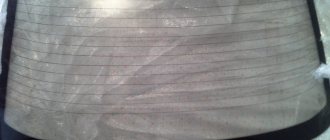
The inside surface of the rear window has thin metal strips that can conduct electricity. Due to this, the glass is heated, and the ice crust and snow melt from its outside. The inner surface dries out, so the glass does not fog up. The entire system is represented by the following components:
- Heating threads – depending on the device model, their number may vary.
- Electrical wires - they supply current to the heating elements.
- Safety relay.
- Power button – it has a signal LED.
- Fuse.
Most vehicles are equipped with a heated windshield system, which allows you to remove ice during the winter seasons. This feature creates a safe driving environment.
Initially, it is necessary to discover the cause, develop an optimal repair algorithm, and restore the equipment to operability. This process can be carried out independently, without involving car service specialists.
A look back: looking for and eliminating a broken glass heating filament
The heated rear window has one good feature: its minor malfunctions can be fixed with your own hands very quickly and cheaply. And if you try, it will also be of high quality. Shall we try?
How does it work and why doesn't it work?
Heating the rear window is a very simple thing. And its operating principle is elementary: current passes through the heating filaments, the filaments heat up and warm the glass itself. A few numbers especially for physics lovers: the resistance of each thread is about 10 Ohms, the current consumption strongly depends on the car and ranges from 10 to 25 A (the larger the rear window heating area, the greater the current). The threads are usually heated to a temperature of no more than 70 degrees, which is quite enough to remove not only fog, but also winter icing.
The design of the heater is simple: several threads are laid on the glass between two tires (their number again depends on the size of the glass, usually about ten). It turns out that they are connected in parallel and this is correct: if one thread fails, the rest continue to work. With a serial connection, any break would lead to the disconnection of all threads.
What could go wrong? The most common problem is a thread break. We will try to deal with it ourselves. But besides this, there are other faults, some of which can be repaired even without the help of fixers. For example, replace a blown fuse.
It’s more difficult if the button burns out. It can also be replaced, but this is rare.
It is also rare for a relay to burn out. Repairing it is usually pointless, and it is much easier to install a known good one.
But breaks in the circuit are more common. Especially on hatchbacks or station wagons, where the heating wiring runs in a corrugation through the rear door. Over time, the wiring wears out and the heating stops working. At the same time, the rear lights or turn signals may stop working if they are also installed on the door. Well, depending on your luck, anything can fall off in the corrugation. The easiest way to detect such a malfunction is with a voltmeter by checking the voltage on the buses. If the fuse, button and relay are working properly, and the heating does not work over the entire surface, you need to check the power supply to it. Sometimes the wiring does not fray, but simply oxidizes at the heating connections. Of course, this happens not only on hatchbacks and station wagons, but also on sedans.
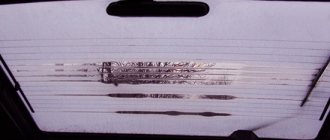
Still, the most common malfunction is the breakage of one or more threads. This is the picture you see most often: some threads stop working, leaving unthawed areas on the glass. This is what we are going to fight with now.
How to remove and replace the block
Such an operation may be necessary if it is necessary to repair the power supply or replace it with a new unit. Even a novice driver can do this. You will need a 10mm wrench (it is best to use a socket or socket). Before removing the power supply, open the hood of the car's engine compartment.
Procedure for removing the power supply:
- Disconnect the terminals from the battery. This is necessary to prevent the possibility of a short circuit in electrical equipment.
- For ease of operation, remove the protective plastic top cover of the power supply unit.
- The block is secured to the body with two screws (they are removed with a wrench).
- Disconnect the connectors with wires. One of them is located in the engine compartment on the wide side of the block closer to the windshield. First, remove the rubber protective cover, and then, rocking it from side to side, disconnect the connector.
- The remaining connectors are located at the bottom of the power supply. To get to them, remove the two outer relays, painted black. After this, the power supply housing is lifted up and the remaining connectors are disconnected.
The unit is removed from the engine compartment for repair or replacement. Reinstalling it in place is carried out in the reverse order.
In this case, pay attention to the rubber gasket between the power supply and the car body. It must be intact, without cracks or tears, otherwise it must be replaced with a new one.
The gasket is needed to protect the power supply from moisture, which can cause a short circuit in the car's electrical circuit.
Watch the video of the AvtoMalina channel about removing the VAZ 2109 fuse box
The basic procedures for removing the mounting block of any model are the same. To remove the mounting block, do the following:
- Remove the negative battery terminal.
- Unscrew the two nuts on the sides of the block (it is located on the driver's side of the engine compartment above the vacuum brake booster).
- Lift the unit as far as possible and pull out all the connectors from the bottom.
- Install in reverse order. First insert all the connectors, then tighten the nuts.
How to disassemble and reassemble
Before disassembling the mounting block, print out a photo or diagram of the fuses and relays, and mark or write down where each relay is installed, because the parts description on the inside of the cover is not always helpful.
- Remove the cover. To do this, on the old model of the block, unfasten one latch from each side; on the new model, unfasten two latch from each block.
- Remove all relays and fuses. The new model has special tweezers that help pull out fuses; it is located next to the turn signal relay.
- After this, unscrew the screws that connect both halves of the body.
On most older model blocks, the screws are installed on top. Most new ones have bottom. But it also happens the other way around, because blocks are produced not only by AVTOVAZ. Use a thin flathead screwdriver to separate both halves of the housing. If you cannot disconnect, make sure that you have unscrewed all the screws and try inserting the screwdriver in a different place. Opening the case, remove the printed circuit board with the connectors installed on it. Reassemble in reverse order. First, install the circuit board onto the mountings of one half of the case, then slide the other half on and gently press them together until they are connected. If you cannot connect the case halves, disassemble them and make sure that the printed circuit board is in place, then reassemble. Then secure the body halves with self-tapping screws.
How to repair
Carefully inspect the traces of the printed circuit board. If you find dirt somewhere between the tracks, moisten it with nail polish remover and a brush. Make sure that the varnish does not dissolve the brush. After all dirt has been removed, thoroughly wipe the tracks with alcohol and dry with compressed air. Perform this operation on both sides of the PCB. Inspect all connectors.
If dirt or oxidation is found, replace them. If you do not have the necessary knowledge, tools or parts to do this, contact an auto electrician. Do not treat connectors with contact cleaning sprays; there is a high probability that some contacts will not be cleaned the first time. In addition, the spray will not help restore contact if the pressure plates (petals) are worn out or weakened. If the circuit board cannot be repaired and a new unit is expensive, buy and install a new circuit board. Before doing this, make sure that it is suitable for your unit by comparing the catalog number of your unit and the one for which the board is intended.
Where is the fuse for the VAZ 2115 stove?
Where is the VAZ-2115 heater fuse located?
It is difficult not to notice when the heater in a VAZ-2115 does not work, especially if the heater breaks down in the winter. What malfunctions can be imagined if a cool air flow leaks into the car interior or there is no heated air flow at all?
There are several circumstances that can stop the operation of the VAZ-2115 stove, including a malfunction of the fan fuse. To repair a fuse, you need to know exactly where it is located. This will be discussed below.
Causes of malfunction of the VAZ-2115 stove fan
The VAZ-2115 stove is a complex mechanism, where a malfunction of at least one part can lead to a complete lack of heating of the car’s interior. To find the correct operation of the fan, start the VAZ-2115 and switch the speed position to format from 1 to 3 inclusive.
Pay attention to the occurrence of noise. When the fan is functioning adequately, the noise should be
But if the fan is not operational at speeds 1, 2, but turns on at speed 3, then the problem is in the resistor or switch responsible for controlling and setting the heating intensity mode of the stove.
The condition of the VAZ-2115 stove fan leaves much to be desired for the following reasons:
- There is a bad contact in the mounting block. Such a contact must be painstakingly cleaned of traces of oxidation or completely replaced with new wiring. To identify this cause of heater failure, you just need to move the block of flagella that fit the mounting block with your own hands.
- The ignition relay may be acting up.
- The heater operates exclusively in switch mode 3. At first glance it may seem that the switch is to blame for the malfunction, but in fact the additional resistor is not working well. To repair the VAZ-2115 heater fuse, you need to know where it is located. To do this, look under the windshield wipers on the left and you will see a dark box. The lid opens by removing 2 latches. Remove the cover and the fuses will be freely accessible.
- The fuse has blown. When starting to replace a fuse, do not forget that you still have to find out why the part burned out. To do this, in order to find the source of the short circuit, VAZ-2115 drivers go through the entire circuit.
REPAIR KIT FOR WINDSHIELD Heater does not work
, washer and heated rear window.
VAZ 2114 BURNS OUT FUSE F-7 30 AMP FOR OVEN FAN
The fuse for the heater blows
f-7.
The stove is adjacent to fuse F7, the current of which is 30A.
This fuse also regulates the operation of the cigarette lighter, the electronic motor responsible for washing the headlights, the glove compartment illumination, and the heated rear window of the VAZ-2115. This is why it is impossible to confuse a blown heater fuse with other fan defects.
- The heater position switch may also break down. The switch is located directly under the center console of the instrument panel.
- The car's heater fan motor has failed. If there is voltage, but the fan remains in the same stationary position, it means it’s time to change it or the motor brushes are stuck.
New model power supply
Here the mounting block diagram is arranged a little differently, but it is more relevant for owners of the VAZ 2109, since most of the nines that have survived to this day are modernized versions.
The scheme is relevant for both carburetor and injection types of engines.
Fuse number
Rated current
The electrical circuit for which it is responsible
Radiator fan relay winding, electrical circuit of switch and heater motor
Hazard warning switch in turn signal mode, turn signal switch, turn signal switch, turn signal warning light, turn signal warning light, reverse optics switch, reverse lights, tachometer, voltmeter, gasoline level indicator, gasoline level sensor, gasoline level warning light, pointer coolant temperature, temperature sensor, warning lamp and emergency oil pressure sensor, brake emergency lamp, brake system hydraulic switch, hand brake switch
Brake light switch and bulbs, interior lighting
Method number 2
This method involves the use of non-ferrous metal shavings as a conductive element. Also, to repair the thread, we will need a transparent varnish (it is advisable to use a thick one, like for nails).
Mix the shavings with a brush and apply to a strip previously sealed with tape, as in the previous case. After an hour, the varnish will completely dry. The method is quite old. It is not always possible to connect damaged contacts as needed. Therefore, if it is possible to buy conductive glue, it is better to use the first method. It will be much faster, easier and more reliable. The cost of a 10-gram tube with this composition is 78 rubles. This volume is more than enough to repair several damaged heating threads.
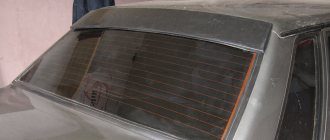
Heated rear window of VAZ 2109 does not work
Heated rear window is a very necessary thing - it protects the rear window from fogging and icing. However, very often it either does not work at all, or only part of the tracks works. I think that many VAZ 2109 owners look at the road through the rear window when reversing. At least that’s how I do it – it’s very convenient. If this glass is foggy or covered in snow, then nothing will be visible. And driving by mirrors, especially when you are used to driving while looking out the rear window, is very inconvenient and scary. And safety when driving a car is important. It’s not very pleasant to drive in reverse, looking at the mirrors and wondering whether you’ll hit someone or not.
Heated rear window of VAZ 2109 does not work
The operating principle of heating the rear window of a VAZ 2109 car is as follows: a conductive mesh is applied to the rear window from inside the passenger compartment. An electric current flowing through this mesh causes it to heat up, and as a result, the rear window of the car also heats up. The heating is turned on by pressing a button on the instrument panel of the VAZ 2109. If the heating of the VAZ 2109 does not work at all, then it is necessary to look for the reason why voltage is not supplied to the rear window mesh. Checking the presence of voltage for heating the rear window of a VAZ 2109 is simple: unplug the two wires connected for heating and measure the voltage between them using a multimeter.
We measure the voltage of the heated rear window of a VAZ 2109
We measure the voltage of the heated rear window of a VAZ 2109
Naturally, before doing this, do not forget to press the heating button on the instrument panel.
Turning on the heated rear window of the VAZ 2109
Turning on the heated rear window of the VAZ 2109
If there is no voltage, then you need to check the heating switch relay in the mounting block, the heating switch button, the condition of the tracks in the mounting block, the integrity of the fuse, and the integrity of the wires to the rear window. If the heating voltage comes on, but the glass still freezes, it means that only part of the tracks are working, or maybe none of them are working at all. To find out which tracks work and which don't, you need to turn on the heating when the rear window fogs up a little. Around tracks that are running, evaporation will disappear. We remember these tracks, or mark them somewhere so as not to forget. The remaining tracks around which the vapors did not dry out are faulty. There is only one problem with more expensive heated rear windows - they are torn. The track can tear spontaneously over time, and the track can also be scratched if something sharp or hard is rubbed on the rear window from the passenger compartment. A broken track can be detected by carefully inspecting each rear window heating track individually.
Broken heating threads VAZ 2109
Heating repair will consist of restoring damaged areas of the paths. That is, it is necessary to eliminate the electrical circuit break and ensure the flow of electric current along all paths on the rear window.
A special conductive adhesive is sold that is perfect for such purposes. It is used as follows: glue adhesive tape on both sides of the break in the track so that the gap between them is no thinner than the track.
Broken thread. Inside view of the VAZ 2109
Then apply a thin layer of conductive glue at the break point, connecting the track, without waiting for the glue to dry, remove the adhesive tape from the rear window. Remember, if after applying the conductive adhesive the track still doesn't work, there is another break somewhere in that track.
In this simple and clear way you can restore the heated rear glass. Now, even in snow and rain, the rear window will be clean and transparent, providing the driver with excellent visibility.
Rear window heating of VAZ 2109 restored
If you live somewhere in the middle of nowhere and no one in your area has heard of conductive glue, then there are quite a few options for restoring rear window heating: starting from homemade adhesives with copper filings and graphite, and ending with fans for blowing the rear window. You can search the Internet and find what suits you.
https://www.youtube.com/watch?v=https://www.youtube.com/watch?v=wdpTUvxVWFU
Stories from our readers
“Fucking basin. "
Hi all! My name is Mikhail, now I’ll tell you a story about how I managed to exchange my two-wheeler for a 2010 Camry. It all started with the fact that I began to be wildly irritated by the breakdowns of the two-wheeler, it seemed like nothing serious was broken, but damn it, there were so many little things that really started to irritate me. This is where the idea arose that it was time to change the car to a foreign car. The choice fell on the melting Camry of the tenth years.
Yes, I had matured morally, but financially I just couldn’t handle it. I’ll say right away that I am against loans and taking a car, especially not a new one, on credit is unreasonable. My salary is 24k a month, so collecting 600-700 thousand is almost impossible for me. I started looking for different ways to make money on the Internet. You can’t imagine how many scams there are, what I haven’t tried: sports betting, network marketing, and even the volcano casino, where I successfully lost about 10 thousand ((The only direction in which it seemed to me that I could make money was currency trading on the stock exchange, they call it Forex. But when I started delving into it, I realized that it was very difficult for me. I continued to dig further and came across binary options. The essence is the same as in Forex, but it’s much easier to understand. I started reading forums, studying trading strategies. I tried it on a demo account, then opened a real account. To be honest, I didn’t manage to start earning money right away, until I understood all the mechanics of options, I lost about 3,000 rubles, but as it turned out, it was a precious experience. Now I earn 5-7 thousand rubles a day. I managed to get the car buy after half a year, but in my opinion this is a good result, and it’s not about the car, my life has changed, I naturally quit my job, I have more free time for myself and my family. You’ll laugh, but I work directly on the phone)) If If you want to change your life like me, then here’s what I advise you to do right now: 1. Register on the site 2. Practice on a Demo account (it’s free). 3. As soon as you get something on the Demo account, top up your REAL ACCOUNT and go to REAL MONEY! I also advise you to download the application to your phone, it’s much more convenient to work from your phone. Download here.
I was faced with the heated rear window of my car not working, the problem was...
Eliminating the break
Patching a cliff in general is not a difficult task, and there are several ways to solve it. The most commonly used is electrically conductive paste. Before repairing, it will be necessary to secure the broken area with adhesive tape (two pieces - one for each fragment of the track). The ends of the thread are cleaned and washed with alcohol. The paste is then applied to them and left to dry for at least 24 hours. You can also restore the functionality of the rear window heating element using:
- glue (type BF);
- metal filings;
- magnet
Sawdust is quite easy to make using a file yourself. In turn, any magnet will do. It should be placed on the outside of the window, and metal dust should be placed on the inside, where the heating element is located. Then the joint remains to be treated with glue and varnish. Any oil paint can also be used.
Heating can be repaired quite effectively with a soldering iron. Here you will need solder containing a small amount of tin (for example, POS-18); in this case, instead of flux, use zinc chloride. But this method is suitable only if the cliff is small. You will have to fill a large area with either copper or silver wire.
In addition, it should be noted that now in stores there are also special adhesive compositions for repairing heating filaments. But for some reason they are currently not in demand.
The video below will help you understand in more detail how to repair a damaged rear window heater:
Restoring work
Today, car stores offer many repair kits for restoring the conductive threads of the rear window heating system. Using them in practice is quite simple.
You just need to follow the following algorithm:
- First you need to clean and degrease the damaged area;
- stick masking tape on the sides of the glass;
- apply repair paste or varnish to the break area;
- Allow the composition to dry overnight.
After this, you just need to remove the protective tape and check the functionality of the heating system.
Conductive varnish, paste, paint
Special pastes, varnishes, and paints are characterized by excellent adhesion to glass. In addition, the composition includes crushed palladium, gold and silver, due to which the conductive properties are increased. Restoration of heating filaments using such means occurs quickly and efficiently. As a result of the repair, a long-term effect is achieved.
This repair composition is a two-component product, so before use, its two parts should be thoroughly mixed in a separate container. You need to use the varnish according to the standard scheme, applying it with a cotton swab or brush. In this case, the layer thickness should not exceed 2 mm. The product hardens in about 30 minutes, and after a day you need to carefully remove the remaining substance.
How to find a breakdown
To find out exactly what the reasons for the failure are, you only need a standard voltmeter, which every self-respecting car enthusiast should have. By simple manipulations with this measuring device, the problem will be identified very quickly.
You should start checking the heating element filaments with the following steps:
- the metal tips of the probes are wrapped in tin foil (this will avoid damage to the tracks);
- turn on the ignition;
- check whether the heating button is pressed;
- one probe is applied to the plus of the heating element mounted on the rear window;
- the second is installed approximately in the center of the thread.
If the device shows 6 volts, this means that there is no damage in this area. If the tester produces 12 volts, the gap is located somewhere in the segment between the probes.
If there are 10 volts, we can confidently say that the gap is located between the minus and the center of the track. In this situation, connecting one probe to the negative output will allow you to more accurately determine where the damage is located. At the same time, the second one must be carefully guided along the thread from the plus to the opposite end. Finding the exact location of the break is indicated by an increase in voltage from zero to 5 volts.
If you don’t have a voltmeter at hand, then the break will also be easy to find visually. To do this, you will need to wait until the windows in the car fog up, and only then turn on the heating. Where the track remains operational, the moisture will begin to evaporate noticeably. Condensation will remain in de-energized areas. It is these sections of the heating element that will need to be examined in detail. To do this you will need a magnifying glass.
If the heating is completely out of order, it can be replaced with a removable model, which is attached to the glass using special suction cups. It is connected to the car's electrical network, like many other devices, through the cigarette lighter.
There are also modifications on sale in which an additional fan is installed. But this option is not very practical because it requires too much electricity.
Possible malfunctions and their symptoms
If the heated rear window does not work, then car enthusiasts usually find out about it when it starts to sweat or a coating forms on it. When you turn on the heater function, you can wait for a very long time, in the end there will be no results or the glass will be partially heated. You don’t need to be a great specialist here to understand that the device requires repair.
Depending on the connection diagram, the car's windshield or rear window defroster may turn on either with or without the ignition on, but usually still works when it is on. Depending on the vehicle, the windshield or threads installed on the adhesive on the rear window may only operate after the engine is started. This allows you to prevent accelerated battery discharge (the author of the video is BortJournal Renault Megan).
It should also be noted that the device can operate at a current of 10 to 25 amperes, it all depends on the specific car.
So, if the rear window heating does not work, then there may be several types of faults:
- The system does not turn on. If the lamp located on the button does not light up when the system is turned on, most likely the problem lies either in the button or in the fuse. If the lamp is on, but the threads attached to the glue do not heat up, you need to check the relay. In some cases, the problem lies in the connectors connecting the device to the vehicle's electrical circuit, so you need to check these elements as well. Diagnostics are carried out in accordance with the service documentation for the car.
- If the rear or windshield fogs up slowly, especially during the winter cold, then the essence of the problem may lie in poor contact of one of the connectors; this needs to be checked. As a result, the resistance of the contacts will increase, and the voltage will be less powerful, accordingly, the threads attached to the glue , will take longer to warm up. In order to check this, you need to use a multimeter and measure the voltage at the terminals of the device. If there are differences in the readings obtained, they should be no more than one volt. Otherwise, the heated rear window of the car will need to be restored.
- Horizontal traces of fogging remain on the car glass - another type of malfunction. One of the most common problems in this case is the breakage of filaments in certain places. Usually, such a breakdown can be checked and identified without special instruments, just by eye, since at the point of the break the auto glass will not be thawed or fogged up. It should be noted that even with a slight mechanical impact, the tracks are destroyed, so when cleaning auto glass you must carefully use a scraper. If you carry large cargo, make sure that it does not rest against the rear window.
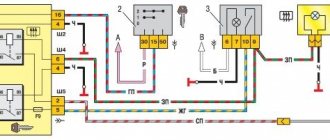
Heated rear window
1 – block headlight; 2 – gear motor for headlight cleaner*; 3 – engine compartment lamp switch; 4 – sound signal; 5 – electric motor of the engine cooling system fan; 6 – fan motor activation sensor; 7 – generator; 8 – solenoid valve for turning on the headlight washers*; 9 – solenoid valve for turning on the rear window washer* (not installed on the VAZ-21099); 10 – solenoid valve for turning on the windshield washer; 11 – electric motor for glass washer; 12 – oil pressure warning lamp sensor; 13 – carburetor solenoid valve; 14 – carburetor limit switch; 15 – spark plugs; 16 – plug socket for a portable lamp; 17 – engine compartment lamp; 18 – ignition distributor sensor; 19 – carburetor solenoid valve control unit; 20 – windshield wiper gearmotor; 21 – switch; 22 – ignition coil; 23 – starter; 24 – top dead center sensor of the 1st cylinder**; 25 – diagnostic block**; 26 – starter activation relay; 27 – coolant temperature indicator sensor; 28 – reverse light switch; 29 – battery; 30 – brake fluid level sensor; 31 – mounting block; 32 – parking brake warning lamp switch; 33 – brake light switch; 34 – glove box lighting lamp; 35 – heater fan electric motor; 36 – additional resistor of the heater electric motor; 37 – heater fan switch; 38 – backlight lamp for heater levers; 39 – cigarette lighter; 40 – rear window heating switch; 41 – rear fog light switch; 42 – fog light circuit fuse; 43 – alarm switch; 44 – external lighting switch; 45 – ignition relay; 46 – ignition switch; 47 – steering column switch; 48 – instrument lighting switch; 49 – side direction indicator; 50 – lamp switch on the front door pillar; 51 – lamp switch on the rear door pillar (not installed on VAZ-2108 and VAZ-21083); 52 – lampshade; 53 – sockets for connecting individual interior lighting to the lampshade; 54 – switch for the carburetor air damper warning lamp; 55 – turn signal indicator lamp; 56 – indicator lamp for external lighting; 57 – rear fog light indicator lamp; 58 – backup warning lamp; 59 – control lamp for high beam headlights; 60 – indicator lamp for heated rear window; 61 – speedometer; 62 – instrument cluster; 63 – instrument cluster lighting lamps; 64 – coolant temperature indicator; 65 – voltmeter; 66 – fuel level indicator with reserve indicator lamp; 67 – econometrician; 68 – “STOP” indicator lamp; 69 – battery charge indicator lamp; 70 – control lamp for the carburetor air damper; 71 – hazard warning lamp; 72 – brake fluid level warning lamp; 73 – parking brake warning lamp; 74 – oil pressure warning lamp; 75 – rear light; 76 – sensor for level indicator and fuel reserve; 77 – pads for connecting to the rear window heating element; 78 – license plate lights; 79 – rear window wiper gear motor* (not installed on VAZ-21099)
The order of conditional numbering of plugs in blocks:
a – mounting block, instrument cluster, ignition switch and windshield wiper (for blocks with a different number of plugs, the numbering order is similar); b – ignition distributor sensor; c – switch and carburetor solenoid valve control unit; d – headlight units, headlight and rear window cleaners; g – interior lighting lamp; e – fuel level sensor; d – rear lights (pin numbering in order from top to bottom)
* Installed on parts of manufactured cars. ** Not installed since 1995.
Old style power supply
Let's first consider the old-style power supply units, which are still quite often found on VAZ 2109 cars. Moreover, as we have already said, with both injection and carburetor engines.
Fuse number
Current strength
The chain he protects
Turn signal indicators, hazard signal breaker (in hazard mode), hazard warning light
Rear brake lights, interior lighting
Rear window heating element, rear window heating switch contacts, carrying socket, cigarette lighter
Horn (horn), horn switch
Heater fan electric motor, windshield washer electric motor, electric radiator fan relay, rear window heating relay, rear window heating indicator light, glove box light
Left side light
Right side lamp
Right low beam headlight
Left low beam headlight
Left high beam headlight, high beam indicator lamp
Right high beam headlight
Turn signal indicators and emergency flasher relay-breaker (in the turn signal indication mode), turn signal indicator indicator lamp, rear reverse lights, gear motor and windshield wiper activation relay, oil pressure indicator lamp, hand brake indicator lamp, coolant temperature indicator, fuel level indicator, fuel reserve warning lamp, voltmeter
BP 17.3722
In addition to the fuse designations, it will be useful for you to know which relay number in the mounting block is responsible for which functions.
Relay number
Functions
Performance of the front optics cleaning elements
Rear window washer motor performance
Protection against breakage of turn signal and light signaling lamps
Protection against failure of the windshield wiper motor
Allows you to determine the performance of the lamp
Rear window defogger overvoltage protection
High beam lamps
Low beam lamps
Responsible for the operation of the engine cooling fan. If this relay fails, the risk of engine overheating increases.
Old PSU
How to check heating?
To do this, you need to wrap the voltmeter probe in aluminum foil and press the foil with your finger and move it along the conductive threads. This way you can detect where the threads are broken.
Initially the voltmeter will show a voltage of 6V. If it displays 12 V, then in this place there is a break in the thread on the side between the connection point of the voltmeter and the heater side. If the voltage is below 0 V, then the conductive strip has a break on the side between the connection point of the volt meter and the heater side.
It is recommended to use an ohmmeter to measure the resistance of the conductive strip between the side terminal of the heater and the center of the strip. The section of the strip with the gap will have twice the resistance of the remaining strips.
You can repair a conductive strip using a conductive mass: glue mixed with metal shavings, a special material. You will also need electrical tape, solvent, and a brush. Use a solvent to clean the area of the glass where the conductive strip of the heater breaks. Electrical tape will be needed as a stencil. Apply conductive compound and remove adhesive tape. After a day, you can remove the excess.
Most electrical circuits are protected by fuses. Electric motors of gear motors (windshield wipers, rear window wipers (VAZ-2108, -2109), headlights - if installed) are protected by automatic reusable bimetallic fuses. The power supply circuit of the injection system (engine 2111) is protected by a fuse-link made of wire with a conductor of reduced cross-section (1 mm2). The battery charging, ignition (carburetor engines), engine starting, and the “generator - ignition switch - mounting block” circuits are not protected. Powerful consumers (starter, headlights, cooling system fan motor, electric fuel pump, etc.) are connected via a relay.
Where is the VAZ 2108-09-099 fuse box (carburetor, injector) located? The relay and fuse box is located under the hood, in the compartment in front of the windshield on the left side.
Fuse mounting block 2114-3722010-18
K1-relay for turning on headlight cleaners; K2-relay-breaker for direction indicators and hazard warning lights; K3 - windshield wiper relay; K4-relay for monitoring the health of lamps; K5-power window relay; K6 - relay for turning on sound signals; K7-relay for turning on the electric heating of the rear window; K8-relay for high beam headlights; K9-relay for low beam headlights; F1-F16 - fuses
Fuse mounting block 2114-3722010-60
K1 - Headlight wiper relay, K2 - Turn signal and hazard warning relay, K3 - Windshield wiper relay, K4 - Brake light and parking light relay, K5 - Power window relay, K6 - Horn relay , K7 - Heated rear window relay, K8 - High beam relay, K9 - Low beam relay, F1 - F16 - Fuses, F1 - F20 - Spare fuses
Fuse mounting block 17.3722
1 — relay for turning on headlight cleaners (K6); 2 — rear window washer time relay (K1); 3 — relay-interrupter for direction indicators and hazard warning lights (K2); 4 — windshield wiper relay (KZ); 5 — contact jumpers in place of the relay for monitoring the health of the lamps; 6 — relay for turning on the heated rear window (K10); 7 - spare fuse; 8 — headlight high beam relay (K5); 9 — relay for low beam headlights (K11); 10 - fuse; 11 — relay for switching on the electric motor of the engine cooling system fan (K9); 12 - horn relay (K8)
Decoding the fuses of the mounting block for VAZ 2109, 2108, 21099
F1-F16 - mounting block 2114-3722010-60, 2114-3722010-18.
Numbers from 1 to 16 - old-style mounting block 17.3722
Fuse blocks installed on old and updated versions of VAZ 2109 cars serve to combine all electrical wiring.
The main task of the power supply is to prevent breakdowns of electrical equipment installed in the car.
Scheme
The entire line of VAZ 2109 cars can be divided into two branches - those produced before 1998 and those produced after 1998.
Older cars are equipped with fuse blocks whose marking is 17.3722. This power supply consists of a housing and an engineering board. Wire contacts, fuses and relays are soldered to the board.
Newer versions of nines, the production of which began in 1998, here the power supply is marked 2114-3722010-60. Here we are already seeing fuses.
The required mounting block is also located the same everywhere - in the engine compartment opposite the driver's seat, almost under the windshield.
Location
Differences
Are there any differences between the old and new versions of the power supply? Of course. They are as follows:
- The parts of the mounting block are marked differently;
- The fuse ratings are different;
- The new power supply does not have a relay for the cooling system fan motor and a time relay for the rear window washer device.
How the system works
The operating principle of heating is very simple; it is used today in almost all cars, including foreign cars. Something simpler and better has not yet been invented. A conductive thread is applied to the rear window on the interior side, which heats up; accordingly, the glass is heated, which eliminates fogging from the inside, as well as snow and ice located on the outside.
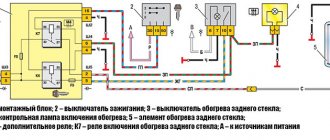
Rear window heating operation diagram
This system is made up on a VAZ 2110:
- the thread itself, which provides heating;
- wiring going to it;
- heating relay;
- switch with signal light inside;
- fuse.
That is, nothing complicated for a craftsman. Considering that the size of the rear window of the VAZ 2110 is 121.3x67.6 cm, the heating size is usually only a couple of centimeters smaller, and essentially covers the entire surface, providing complete heating and good visibility of what is happening behind. There is no point in installing a much smaller heating system, because the driver should see the entire road behind, and not part of it.
Heater device
First of all, let's carefully study the structure of the object in question. On the rear window of a car there are conductive threads that heat up due to the fact that current passes through them. They create heating. Its voltage is maintained by elements such as relays, wiring and fuse. This elementary circuit ends, of course, with a power button.
The diagram below describes in detail the structure of the heater of the VAZ 2107 car:
- mounting block or so-called “block”;
- on/off relay;
- egnition lock;
- on/off button;
- warning light on the dashboard;
- heating filaments on the rear window.
Heated rear window of VAZ 2105 does not work
Question: They fitted me a rear window from a VAZ 2105 with heating. Will it fit on a VAZ 2106?
Answer: I will reveal a military secret. Catalog number of the rear window on the five 2106-5207010-10
Question: On the VAZ 2105 the Heated Glass Heater and Reverse Lights do not work
Question: The heated stove for the rear window of VAZ 2105 has stopped working
Answer: the wiring is faulty. or fuses
Question: The rear window heating does not work on the VAZ 2105, what could be the reason?
Answer: in anything, you need to check the wiring, check the heating element, button, fuse.
Question: The rear window heating of VAZ 2105 does not work
Answer: first check whether the plus goes backwards or not, then the mass. check if the heating tape itself is working. and look at the relay
Question: Tell me, How can I make a heated rear window on a VAZ 2101 myself?
Answer: buy heated glass from 2105-2106-2107, it’s the most reliable. pasted
Question: On a VAZ 2105 the heater and the heated rear window stopped working at the same time. I checked the fuses and everything is fine.
Question: How many volts is supplied to the heated rear window? (VAZ 2105) Is it possible to repair glass with heating?
Answer: 12 volts are supplied. Repairing broken threads on glass is possible using a special conductive paste. It's on sale.
Question: On a VAZ 2105 the heater and the heated rear window stopped working at the same time. I checked the fuses and everything is fine there.
Answer: Look at the first fuse - it powers both the heating and the glass heating. The diagram is here: https://automn.ru/vaz-2105/vaz-33226-10.m_id-4180.m_id2-.html If there is voltage at both the input and output fuse, remove the block.
Question: Question to Nivavodam About the Stove
Answer: Close it at the bottom, everything goes to the feet, and look at the control levers.
Methods for connecting windshield wipers.
The connection diagram for windshield wipers can be divided into two types, depending on the method of connecting the operating mode switch.
In the first connection method, a constant plus is supplied to the wiper drive electric motor, and the mode switch connects the motor elements to the minus. This method is widely used in foreign and domestic cars.
The second method is completely opposite to the first, that is, power is supplied to the electric motor through the mode switch, and the minus in this case is taken from the drive housing.
I propose to consider the principle of operation of a car windshield wiper circuit using an example, where plus is supplied to the electric motor through a mode switch, since this is the more common connection method.
The diagram shows the connection of a windshield wiper drive with an electric motor powered by permanent magnets and having two operating speeds. The difference in speed in this circuit is ensured by the displacement of one of the positive brushes relative to the physical center of the electric motor armature.
General concepts
In order for the glass to heat evenly and to a strictly defined temperature (sufficient to evaporate moisture, but not exceeding safe limits), a special electrically conductive thread (thin flat wire) is used, which has a certain strictly standardized resistance.
When current flows through it, it heats up - just as the coils in electric stoves and kettles heat up, only at a much lower temperature. Thanks to this heating, and also because it occurs evenly over the entire plane of the glass (since the thread is applied to it at equal distances), the latter quickly dries and is cleared of moisture.
READ How to Disassemble a Rear View Mirror on a Grant