Malfunctions in the heated rear view mirror affect vehicle safety. If a breakdown occurs, you can periodically clean the mirror surface yourself. But this is not always convenient and effective, especially in rain and snow.
Heating helps combat bad weather conditions while maintaining excellent visibility for the driver. And if a breakdown occurs and the heated rear view mirror does not work, you can independently determine the malfunction, its causes, and carry out simple repairs.
How to turn on the heated mirrors on a Priora
Heated mirrors of the Priora
provide heating of the rear view mirror of the Lada Priora car.
LADA Priora, Lada Priora is a family of Russian passenger cars produced by AvtoVAZ OJSC and classified according to the European classification.
You can order heated mirrors for a Priora car through the representative office in St. Petersburg, tel. 8(812)4524540 by submitting an application by email.
To obtain the mirror heating circuit for the Priora GEN-147 on a scale of 1:1, print the file GEN-147;
. Attach it to your rearview mirror and determine how suitable this heater is for you.
Representative office phone numbers or. You can also buy these heaters in stores in St. Petersburg. Find out the addresses of stores and the cost of the mirror heater in advance from the official dealer by phone.
The parcel is sent by Russian airmail on the next (working) day after payment for the order. Delivery time is from 5 to 7 days to any point, depending on the location of the post office of the customer for heated mirrors.
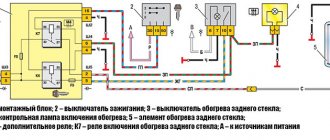
Additional mounting block Priora
- F1 (15 A) – main relay and starter interlock circuit fuse;
- F2 (7.5 A) – fuse for the power supply circuit of the ECU (controller);
- F3 (15 A) – Priora fuel pump fuse;
- K1 – main relay;
- K2 is the place where the Priora fuel pump relay is located.
Attention!
The relay and fuse diagram may differ depending on the configuration and production date of the vehicle. Current diagrams of the mounting block are presented in the operating manual for the date of manufacture of the vehicle (download from the official website).
Let us remind you that on our website you can find detailed instructions for repairing the Lada Priora with your own hands.
Many car owners, if the heated mirrors do not work, ignore the problem and do not take any steps to repair it. It is believed that this option can be avoided by following the rearview mirror or wiping the surface manually. But this approach is a mistake, because the presence of heating helps in the following cases:
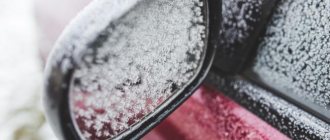
- Formation of a crust of ice on the surface (at sub-zero temperatures).
- In rainy weather, when the mirror fogs up or becomes covered with a layer of small drops.
The reason for inaction is inability and ignorance of the causes of the malfunction, as well as the principles of repairing heated mirrors. What to do if the device does not work? What tool might be needed? Below watch the video “Repairing a heated rear view mirror”
The first stage of repair work is preparing the necessary tools. Here you will need a multimeter or a 12-volt car light bulb to check the voltage. You will also need a screwdriver, a soldering iron, replacement fuses and electrical tape.
How to check the fuse?
If the heated mirrors do not work, start by checking the power supply circuit. Often, the cause of the malfunction is trivial - burnout of the fuse insert. This is where you need to start. The fuse through which the heated rear window and mirrors are powered is usually located in a special block (under the dashboard on the right side). To find out the exact location of the device, read the car manual.
If you still can't find the right fuse, check everything. The serviceability of the fuse insert is checked using a tester. To do this, touch the input and output of the fuse with the probes of the multimeter. First switch the switch to resistance measurement mode. If during testing the device shows about “zero” Ohm, then the product is working properly. Otherwise, we can talk about a blown fuse.
If you don't have a multimeter, use an alternative method. If the housing is transparent, check the integrity of the filament with light (its damage is easy to see). For fuses with an opaque casing, this option will not work.
How to check the button and wiring
If the above check did not help identify the defect, inspect the power button. It happens that it fails and causes a breakdown. If the mirror heating does not work, pay attention to the LED built into the button. Its glow usually indicates that the button is working.
The next step is to check the integrity of the wiring, for which you will have to remove the desired side mirror. After dismantling, a group of contacts connected to the heating is revealed. Proceed like this:
- Discard the contacts (as a rule, they are easy to remove - just pull them slightly).
- Turn on the heating button and check that its LED lights up.
- Measure the voltage (normal level is 12-14 V).
Heated rear view mirror does not work
Malfunctions in the heated rear view mirror affect vehicle safety. If a breakdown occurs, you can periodically clean the mirror surface yourself. But this is not always convenient and effective, especially in rain and snow.
Heating helps combat bad weather conditions while maintaining excellent visibility for the driver. And if a breakdown occurs and the heated rear view mirror does not work, you can independently determine the malfunction, its causes, and carry out simple repairs.
The heated mirror of the Priora does not work
Content
The problem is this: the standard mirrors of the Priora, when the heating is turned on, only the right mirror warms up, the left one doesn’t matter. Where to dig?
Comments 13
Be careful with the heating, I saw in the DPS prior that the mirror was peeling off, they say they used it often, now I don’t turn it on for the wrong time
It would be normal if the heated mirrors and glass were switched on separately. Otherwise, driving with a foggy rear window is not possible
I don’t know how they did it separately, I bought this one
oh, well then cool
I have the same thing, but nothing goes from the key to the wires and I can’t find it at all
I have the opposite problem - the heating works, but the electric control doesn’t! Dig a little to the left and forward?))
I was already digging there! Of course, maybe a little deeper, and then on yourself... but there’s something hard there...
it warms up, only later, on many priors there is such crap, in the rain it’s hard to see, but when it’s raining it’s clearly visible that the right one thaws noticeably faster than the left
The electric heating of the right mirror has stopped working, where should I look, are there any fuses?
Comments 10
It's the same garbage, but the left one doesn't work!
Check the power at the mirror connector; if there is, it is probably the heating element itself.
I had this, the element itself needed to be replaced.
I did exactly the same thing a couple of days ago. The right mirror heating did not work. I took the mirror apart, don’t go straight to the fortune teller near the terminal, everything burned out. I don't know why.
People, we need help. The heated mirrors and rear window do not work. There is power on the wires, the mirrors are new, there is power on the button, the fuse is working, the relay is working. What could it be? Where to dig?
Fuses and relays in Lada Priora, electrical diagrams
Lada Priora is another car in the line of new VAZ cars, which is gaining popularity among segments of the population. External similarities with the 10th model attract the attention of young people; the relatively low price is also a reason for purchase for most car enthusiasts. Along with the growth in popularity, the owners of this model are gaining experience in repair and maintenance, which is becoming more and more every year.
If your Priora has electrical problems, do not rush to get upset; first, check the fuses and relays in your Lada Priora. These are the ones that will be discussed in this article.
Causes of heating malfunction, first stages of diagnosis
To understand the causes and troubleshoot the heated rear mirror system, you need to prepare a tool. To work, you may need a multimeter, a car light bulb, a soldering iron, a screwdriver, a fuse, electrical tape - it all depends on the type of problem.
It is easier to identify a defect by studying the main components of the heating circuit:
Connecting rear view mirrors Priora (SE)
Black-red (right mirror)
- red connects to red-blue.
- blue with blue-black.
- green with green-black.
Block No. 2: heated mirrors:
- Instead of gray there is brown, we combine it with blue-red (black-red).
- black with black (used for heating and for turn signals).
Block No. 3: direction indicators:
- White-red.
The main thing is not to confuse the red-blue and blue-red wires. They are almost the same, so before connecting it is better to check them with a tester (multimeter or + 12V light bulb), connecting the minus of the tester to the body, and the (+) to the wire. If the lamp lights up after turning on the heated mirrors, then this is the correct wire that needs to be connected to the brown mirror wire.
Installation
Remove the door trims and dismantle the old exterior mirrors (by removing the mounting screws). Mirrors of the new SE model are installed in place of the old ones without modifications.
To install the joystick, make a hole in the door trim using a file or a utility knife. Sample:
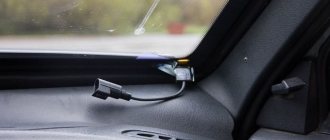
To stretch the wires from the interior to the doors (see connection below), you will need to drill a hole in the door rosette with a drill (or find a suitable female-male connector).
Installation of mirrors
Installation of the side elements depends on the chosen model and will not take much time. First, remove the product being replaced, which is secured with three bolts. If the model is chosen correctly, in most cases no drilling will be required. The mounting area is checked for chips and rust and cleaned if necessary. The new element is installed in the grooves and the fastening bolts are tightened.
To install some Polytech models, you will have to drill a hole in the door. It is better to avoid placing it on standard handle holes. Otherwise, the adjustment knob will not fit well and will fall out. You don’t have to drill a separate hole, but instead pass the cables through the standard ones, pulling them out of the fasteners.
The interior mirror is mounted on a bracket or glued to the windshield. In this case, it is better to use special glue for rear-view mirrors, which is sold at any car store. Before gluing, the windshield area and fastening are degreased. To do this, wipe the surfaces with a cloth moistened with alcohol. Then mark the place where the glue is applied on the glass with a marker, outlining the fastener.
Crush the ampoule with liquid and moisten the mount with it. After 1-2 minutes, a drop of glue from the tube is applied to the glass surface in the center of the marked area. Then press the fastener and hold it for 1-2 minutes until the glue sets. Excess glue and traces of marker are removed with a napkin.
If you do not remove excess glue, the mirror will not fit into the mounting grooves.
After about half an hour, put a mirror on the mount and tighten the bolt.
Installation of electric drive and heating
The mirror is mounted in the same way as a regular one, but additional holes may be needed for the wires. They are drilled out according to a stencil, which is usually included with the kit. Then the electrical elements of the product are connected. The circuit is closed and the wires are brought out into the cabin. The connection is described in detail in the installation instructions.
Where are the fuses on the Priora?
- The main mounting block of the Priora is closed with a lid and located at the driver’s left foot. To open it, you need to turn three latches 90° and unclip the lid.
- The fuse box is under the hood, which is located near the expansion tank.
- Another mounting block, which is located near the left foot of the front passenger. To gain access to the fuses and relays, unscrew several screws with a Phillips screwdriver.
Below is a description of each fuse and relay block in order.
Causes of rear window heating failure
There can be many reasons, but, as a rule, they are all of the same type and almost always the same ones occur.
The most common causes of failure:
- Fuse blown;
- Relay burnout;
- Broken filament;
- Button failure;
- Loss of mass or plus;
All these 5 reasons are the main culprits for problems with the heated rear window of the Priora.
Let's look at each of the reasons in more detail.
Heating fuse
A special fuse is used to protect the heating power supply circuit from short circuit or overload. It is he who breaks the circuit during a short circuit, thereby protecting the car from fire. Quite often, with any overload or with prolonged use of heating, the fuse can fail, thereby de-energizing the filament.
The fuse is located in the Priora mounting block under number F2 with a rated current of 25A. The fuse must be replaced strictly with the same rating as specified by the manufacturer, that is, also 25 Amperes.
Heating relay
A relay is necessary to unload the button contacts, since heating consumes a large amount of energy and, therefore, current, the load on the contacts increases and heating occurs. If there were no relay, then the button, as the weakest part of the circuit, would melt from heating the contacts, thereby failing.
The relay is located on the mounting block under number K2.
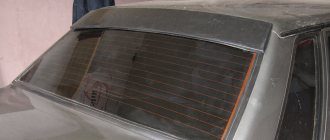
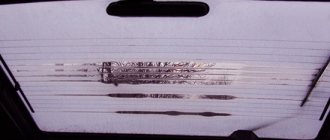
Broken filament
This problem is most common in Priora hatchback and station wagon bodies, since plastic trunk cards can fray the filament, which will make it impossible to supply current to all filaments. This problem is quite difficult to solve and in some cases glass replacement is required.
Some stores have a special conductive varnish that can be used to connect broken filaments and avoid replacing the rear window.
Button failure
The heating switch on the Priora is quite unreliable and has a weak design that often fails and fails. The contacts on the button can oxidize or have carbon deposits, which negatively affects the contact patch, making it impossible to turn on the glass heating.
Loss of mass or plus
The power circuit is connected to the glass via a male-female connector. It happens that after any work carried out in the luggage compartment or after applying a tint sticker, the glass heating stops working, this is possible due to a fallen out power connector or the mass of the glass heating. To solve the problem, all you need to do is insert the connector into its rightful place.
Block in the engine compartment
The power fuse box is located in the engine compartment under the hood, near the left strut support. To get to it, you need to open the lid by prying the latch.
1 (30 A) - engine control system circuit . If there are problems with the electronic control unit, short circuits or other malfunctions, this fuse may blow out.
2 (30 A) - vehicle on-board circuit . 3 (40 A) - vehicle on-board circuit .
4 (60 A) - generator circuit.
5 (50 A) - electric power steering circuit.
6 (60 A) - generator circuit.
In case of any problems, it is important not to panic, to think soberly and logically. The most important thing is to diagnose and establish the cause of the breakdown. If you don’t have enough experience or nerves, it’s easier to sign up at the nearest car service center if it has a competent electrician.
I hope this article will help you deal with electrical problems and quickly fix any Priora malfunctions. If you have any experience or information, please leave a comment below, useful information will be added to the article.
Theme Options
Search by topic
How to understand why the heated mirrors are not working and fix it yourself?
The option of heated mirrors is very helpful for drivers in winter. Without it, the surface of the mirror becomes covered with an ice crust, which significantly impairs visibility. But, like any other heating device, the heated mirrors sooner or later break down, which forces motorists to replace the mirrors with new ones. At the same time, they are quite expensive, and spending that kind of money is completely inappropriate, because you can restore them to working capacity on your own.
Necessary tool
The set of necessary tools is quite modest, and every motorist will probably have one. The first step is to get a multimeter to check the electrical circuit. We may also need a soldering iron, screwdrivers, electrical tape, and a spare fuse.
Let's start troubleshooting
The first step is to check the condition of the fuse responsible for heating the mirrors. To determine which fuse is responsible for the mirrors, you need to look at the repair instructions for your car on the Internet. If the fuse turns out to be blown, then simply replace it with a new one. You can determine that it has burned out not only visually, by looking at the broken wire inside, but also using a multimeter. To do this, you need to switch it to the resistance measurement mode and touch the fuse contacts with the probes; if the device does not show anything, then the fuse has burned out.
Checking the button
If the fuse turns out to be working, then you should next check the heating button. Sometimes it happens that the contacts on it burn out and it stops working. Checking its functionality is quite simple, but getting to the wires we need can be difficult. To gain access to the reins that fit the button, you need to remove the panel on which it is located. Next, we again take the tester with the resistance testing mode turned on and press the probes to the button contacts. When you press the button, a short circuit should occur, that is, some numbers will appear on the device. If nothing happens, then the problem is in the button, and it needs to be replaced with a new one.
Looking further
The next stage of the search is disassembling the mirror. It must be removed from the car, and the wires that go to it must be checked for voltage. To do this, switch the tester to voltmeter mode, press the heating button and, applying one probe to a metal part on the body, and the second to a wire contact, measure the voltage. It should be 12-14 V. If there is current, then everything is in order with the wiring, and we only have one suspect left - the heating element.
Calling the mirror
It is necessary to determine whether there is a break in the filament that is glued to the mirror. We take the tester, turn on the resistance test mode and touch the mirror contacts with the probes. The resistance of a working mirror should be in the region of 10 to 30 ohms. If the device shows 100 ohms or more or even a break, then the fault has finally been found. Some heating elements cannot be repaired and must be replaced. But there are mirror designs from which you can peel off the old heating element and install a new one in its place.
You can buy a new heating plate at automotive stores. Some of them are sold without terminals for the wires, and this is where we need a prepared soldering iron. You will need to unsolder the male terminals from the old mirror and solder them into the new heater. Next, we glue the new plate onto the mirror and, after checking its functionality, put everything back together.
Photos from Internet resources
Return Guarantee
We guarantee a refund of money paid for the entire order or individual goods if we cannot fulfill the order in full.
We also guarantee the buyer’s right to return goods of good quality that are not suitable for the buyer for any reason. You can always return such a product by paying for the shipping of the product at your own expense, and get the cost of the product back.
If upon receipt of the goods you see that you have received the wrong product or the wrong color that you ordered, be sure to contact us and send us photos of the received product. If we made a mistake during assembly, we will definitely return your money or send you the product you ordered for free. But still, we ask you to carefully inspect and completely unpack the parcel, removing all packaging materials; often small parts are wrapped in film to large ones to avoid loss or damage.
What is the cause of the problem
Sometimes there is no malfunction as such. For example, window regulators may fail in severe frost, but other electrics also suffer from similar problems. Therefore, experts advise not to save on buying/renting and heating a garage. But mechanical failures are much more common.
If you suspect a breakdown, you first need to check the TsBKE - this is AvtoVAZ’s personal innovation, which operates the electrical package. First you need to make sure the fuse is working. If everything is fine, we disassemble the doors, arm ourselves with a multimeter and measure the voltage at the terminals of the window lift motor. If there is no voltage, then:
- There may be a malfunction of the power window control unit (the button for opening and closing the window located on the door).
- The problem lies in the connection of the wire connectors.
- CBKE refused.
If there is voltage in the network, which is clearly shown by a multimeter or a 12V light bulb, then the problems described above automatically disappear. This means you need to look for the problem elsewhere. Most likely, it lies in the following system nodes:
- The window lift motor is stuck or stuck.
- The window lift cable has already outlived its usefulness and needs to be replaced.
- Distortion of the glass itself, while the rest of the system is in full working order.
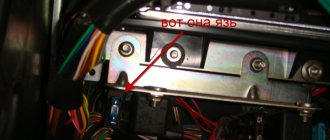
The heated mirrors stopped working (you need to find the location of the fuse) *
The heating of the mirrors has stopped working (you need to find the location of the fuse) I found one (it’s intact), but I can’t find the second one shown in the diagram with a red arrow. When you press the button in the panel, the switch clicks, but none of the mirrors heat up. Can you please tell me I am attaching the diagram?
There are only two options. One under the hood fuse and relay box. The second one is under the dashboard. Everything is signed on the covers of these blocks.
TLC Prado 150 TX-L
It’s stupid to look for a black cat in a dark room, especially if it’s not there. But it’s even stupider to look for a black snake in a dark room. Especially if she is there.
in these places I found only the fuse that is “gauge” in the diagram on the right
You also have fuses on the passenger side, remove the mess, there are still fuses there and this is indicated on the diagram.
Malfunction of button and wiring
After checking and confirming the serviceability of the fuses, you need to move on to the button. This element may also fail. The manifestation of a defect is accompanied by the absence of light from the LED. That is, the light bulb will not turn on and needs to be replaced. In this situation, the voltage at the output contacts of the button is checked.
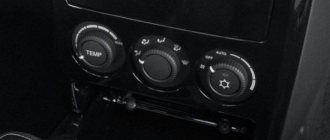
Sometimes the question arises where the mirror heating button is located. The required element can be located on the microclimate control unit. Often the button for turning on the heated mirrors is combined with the heated rear window, then when turned on, two systems will work simultaneously. Situations of separation of devices are not excluded, when the required button is located on the driver's door.
If the problem is not in the button, you should start wiring. Further testing will require dismantling.
How to remove a mirror:
- The adjustment needs to be lowered down, which is accompanied by the appearance of a small gap, which allows you to pry up the structure and easily remove it.
- Next, disconnect the connector of the contacts connected to the heating. Just pull them, no special effort is required.
Examination:
- Using a multimeter, determine the voltage. When the button is turned on, the indicator should be 12–14V.
- Testing with a light bulb also involves connecting wires to the terminal. If you turn on the button, the light will light up.
If the wiring is faulty, the tester will not show results and the light will not light up. It is recommended to check the wires for damage, insulation problems, and short circuits. Another weak point is the contacts, which sometimes break off and come off. To eliminate the defect, they are soldered.
Heating system problems, troubleshooting
If all possible malfunctions have been ruled out, you need to pay attention to the heating circuit itself - the filaments, because they are sometimes damaged. Here it is easy to determine when and why the heated mirrors do not work.
Examination:
- When connecting the tester, the resistance value is determined. Optimal parameters range from 10–30 ohms. The presence of a defect is indicated by missing or inflated indicators.
- Checking with a light bulb involves disconnecting the circuit and connecting the wires in series. The complete absence of glow may indicate a malfunction - the heating system has burned out.
Another typical failure involves breaking off contacts and connections on copper pads that should secure the power wires. In this case, the filaments themselves must be in good condition.
When thinking about how to check the heating of mirrors, determine the resistance of the filaments, the tester should give a result of 100 Ohms.
Then, to eliminate the defect, it will be enough to solder the contact fastenings. If the problem is a broken thread, no values will be displayed as the track progresses. This means you need to find a break and solder it.
Heating element replacement process
Sometimes a complete malfunction of the heating element is detected and restoration is impossible. It is necessary to replace the unit and a new device made in the form of an adhesive tape on which tracks are applied - filaments.
If the left mirror stops working, you can use a universal heating element. When the heating of the right mirror does not work, two elements change. Since they are universal, adjustments and cutting to the desired size are possible.
How to install a new heater:
- work begins with removing the plastic protection, for which you need to heat the surface using a hairdryer or hot water;
- as the plastic frame gradually separates, the soft coating holding the filaments becomes noticeable;
- under the influence of high temperatures the coating is also removed;
- Taking a new heating element on the side mirror, cut it to the required size and glue it onto the mirror surface, removing air bubbles;
- for new contacts you need to make additional holes;
- then the protection is removed and a plastic frame with suitable holes is glued on.
Having completed the manipulations, you can begin to reassemble the mirror heating system and safely operate the car.
What you need
To make a heater you only need:
- Nichrome wire;
- Double-sided and regular tape;
- Wires;
- Sealant;
- Soldering iron;
- Multimeter;
A wire with a cross section of 0.4-05 mm and a length of 1-1.3 m is suitable for the heater. For normal functioning of the heating system, the resistance of the piece of wire must be 12 Ohms. This is exactly what a multimeter is for. That is, we took a section of 1.5 meters and measured the resistance. If it exceeds the specified value, cut off 10 cm and measure again. Thus, we select the desired segment.
Priora mirror heating button
Here's the process. Here, on the right side of the connector, you can see the necessary gray wire, which is connected in a terminal to a thick blue wire (this must be cut off and connected to a new button): 1. We look at the diagram of the instrument panel harness and see that there is “4” on the block. on contact No. 2, 2 wires are connected (gray and blue) ... 2. +12 V is supplied to them through the relay. The relay is turned on by a button on the instrument panel. 3. When we get to contact “2” on block “4” of the instrument panel harness, removing the cover of the mounting block and looking just above the mounting block and to the right, we see:
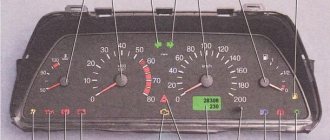
Priora fuse box diagram
| Fuse no. | Current strength, A | "Standard" and "Norm" | “Norma” with air conditioning and “luxury” |
| F1 | 25 | Engine cooling radiator fan | Reserve |
| F2 | 25 | Heated rear window | Mounting block, rear window heating relay (contacts). Electrical package controller, contact “10” of XP2 block. Rear window heating element. |
| F3 | 10 | Right headlight, high beam | Right headlight, high beam lamp. Instrument cluster, headlight high beam indicator. |
| F4 | 10 | Left headlight, high beam | |
| F5 | 10 | Sound signal | Mounting block, horn relay. Sound signal. |
| F6 | 7.5 | Left headlight, low beam | |
| F7 | 7.5 | Right headlight, low beam | |
| F8 | 10 | Alarm signal | Mounting block, alarm relay. Alarm sound. |
| F9 | 25 | Priora heater fuse | Reserve |
| F10 | 7.5/10* | Interior lighting, instrument panels, brake light | Instrument cluster, pin “20”. Brake light switch. Brake light bulbs. Interior lighting unit. Interior lighting. The door sill light on the right front door. Additional brake signal. |
| F11 | 10/20* | Wiper | Mounting block, high speed windshield wiper relay. Switch for cleaners and washers, contact “53a”. Wiper and washer switch, contact “53ah”. Heated rear window switch. Mounting block, rear window heating relay (winding). Windshield wiper motor. Rear window wiper motor (2171,2172). Windshield washer motor. Rear window washer motor (2171,2172). Airbag control unit, pin “25”. |
| F12 | 20/10* | Terminal 15 devices | Instrument cluster, pin “21”. Electrical package controller, contact “9” of block X2. Electromechanical power steering control unit, contact “1” of block X2. Reversing light switch. Reversing lamps. Parking system control unit, contacts “11” and “14”. |
| F13 | 15 | Cigarette lighter fuse Priora | |
| F14 | 5 | Left headlight, parking light, license plate light, trunk light | Side light lamps (left side) Instrument cluster, main light indicator License plate lights Trunk light Electrical package controller, pin “12” of block X2 |
| F15 | 5 | Right headlight, parking light | Side light lamps (right side) Glove compartment lamp |
| F16 | 10 | Terminal 15 ABS | Hydraulic unit, contact "18" |
| F17 | 10 | Left fog lamp | |
| F18 | 10 | Right fog lamp | |
| F19 | 15 | Seat heating | Seat heating switch, contact "1" Front seat heaters |
| F20 | 5/10* | Immobilizer control unit | Recirculation switch (switch on) Mounting block, relay for low beam headlights and parking lights (automatic lighting control system) Heater electric fan relay Automatic lighting control switch Windshield wiper and external lighting control unit, contacts “3”, “11” Automatic climate control system controller installation, pin “1” Automatic window cleaning system sensor (rain sensor), pin “1” |
| F21 | 7.5/5* | Rear fog lights | Light switch, contact "30" Diagnostic block, contact "16" Clock Automatic climate control system controller, contact "14" |
| F22 | -/20* | Reserve | Windshield wiper motor (automatic) Mounting block, windshield wiper relay and windshield wiper high speed relay, (contacts) |
| F23 | -/7.5* | Reserve | Windshield wipers and external lighting control unit, pin “20” |
| F24-F30 | Reserve | ||
| F31 | 30 | Electrical package control unit | Electrical package controller, terminal “2” of block X1 Electrical package controller, terminal “3” of block X1 Driver’s door module, pin “6” Threshold light of the left front door |
| F32 | Reserve | ||
* – for the “Norma” configuration with air conditioning and “luxury”
| Relay | "Norm" | "Norma" with air conditioning | "Lux" |
| K1 | relay for turning on the electric radiator fan of the engine cooling system | Reserve | Relay for turning on the low beam and side lights of the headlights (automatic lighting control system) |
| K2 | rear window heating relay | ||
| K3 | starter activation relay Priora | ||
| K4 | additional relay (ignition relay) | ||
| K5 | space for backup relay | ||
| K6 | windshield washer and wiper relay | ||
| K7 | headlight high beam relay | ||
| K8 | horn relay | ||
| K9 | alarm relay | ||
| K10 | Reserve | Fog light relay | |
| K11 | Reserve | Front seat heating relay | |
| K12 | Reserve | ||
Product delivery options
Note! Below are the shipping methods available specifically for this product. Payment options may vary depending on the shipping method. Detailed information can be found on the “Delivery and Payment” page.
Parcel by Russian Post
Available payment methods:
- Cash on delivery (payment upon receipt)
- Using cards Sberbank, VTB, Post Bank, Tinkoff
- Yandex money
- QIWI
- ROBOKASSA
Shipping throughout Russia. Delivery time is from 5 to 12 days.
Parcel by Russian Post 1st class
Available payment methods:
- Cash on delivery (payment upon receipt)
- Using cards Sberbank, VTB, Post Bank, Tinkoff
- Yandex money
- QIWI
- ROBOKASSA
Shipping throughout Russia. Delivery time – from 2 to 5 days. More expensive than regular delivery by Russian Post, approximately 50%. Parcel weight up to 2.5 kg
Express Parcel EMS
Available payment methods:
- Cash on delivery (payment upon receipt)
- Using cards Sberbank, VTB, Post Bank, Tinkoff
- Yandex money
- QIWI
- ROBOKASSA
Shipping throughout Russia. Delivery time – from 3 to 7 days. More expensive than regular delivery by Russian Post, approximately 100%.
Transport companies
Available payment methods:
- Using cards Sberbank, VTB, Post Bank, Tinkoff
- Yandex money
- QIWI
- ROBOKASSA
Delivery is possible to any locality where there is a representative office of the transport company. Delivery time – from 2 to 10 days. Sending large parcels is approximately 50% more profitable than by Russian Post.
Courier delivery in Togliatti
Available payment methods:
- Cash upon receipt
- Using cards Sberbank, VTB, Post Bank, Tinkoff
- Yandex money
- QIWI
- ROBOKASSA
Delivery time from 1 to 12 hours.
Pickup from our warehouse
Available payment methods:
- Cash upon receipt
- Credit, installments
- Using cards Sberbank, VTB, Post Bank, Tinkoff
- Yandex money
- QIWI
- ROBOKASSA
Pickup times must coincide with store opening hours.
Connection
Connecting the central lock
. We use a circuit of two relays so as not to go under the panel to the central locking unit:
Connecting heated mirrors
(to the wiring harness under the driver's threshold)
Connecting mirror turn signals
- Option 1: Pull the wire from the direction indicator on the fender.
- Option 2: To the wiring harness under the driver's threshold (blue - left turn signal; blue-white - right).
We transfer the wires from the power windows from the standard buttons to a new block with a joystick.
For Lada Kalina and Granta with heated and electric side mirrors (without direction indicators):
- The new mirror has a chip with six wires, but the old one has only five. We pull the sixth contact, which is used to operate the turn signals.
The process of installing exterior mirrors from a liftback on a Lada Granta sedan is also shown in the video:
Are you considering replacing old mirrors with new ones with turn signals?
Do-it-yourself mirror adjustment repair for Lada Kalina. Removing the mirror element
Rādīt atskaņotāja vadīklas
- If your mirror adjustment does not work, then you have come to the right place; in this video I will tell you how to disassemble and repair a side mirror with mechanical adjustment for the Lada Kalina. The result is instructions for repairing a side mirror. Background: – In the cold weather, the driver’s side mirror froze and could not be adjusted, I decided to adjust the mirror element manually, as a result, a slight crunch was heard and the mirror adjustment broke. In this video you will learn how to independently remove the mirror element of the rear view mirror on a Kalina, how to install the cables correctly, and also how to change the mirror on a Kalina if it breaks and you buy a new one. This instruction is also suitable for self-repair of side mirrors on Lada Granta and Lada Priora cars. Have questions? Write them in the comments.
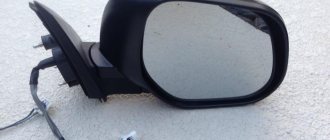
Standard side mirrors - article number and price
For the Lada Priora car, standard parts with electric drive have catalog number 2170-8201017. Price – about 3,100 rubles per set.
Compared to the SE version, they have one design disadvantage. The surface area does not completely cover the mirror, which can also be “usefully” occupied. This shortcoming was corrected with the SE, where the mirror elements were actually made larger.
Heated mirrors on the Priora received a larger mirror element. Thanks to this, the driver does not have to lower them when reversing – even this difficult-to-reach area is visible. For the SE version, repeaters were added to the mirrors. Priora with electric drive, repeater and heating (catalog number 2170-8201021, price - about 3,800 rubles per set) was much more expensive than conventional versions.
Please note that kits are often sold unpainted or painted to match the body color. If necessary, paint the body of the mirror device before installation. Painting it yourself will turn out much better. Some stores offer painting only the upper parts of the body, but you can choose any painting method yourself. Speaking about the rear-view mirror of a Priora car, you can notice that it is ordinary, as simple as two rubles, attached to a holder that is secured under the trim.
How to turn on heated mirrors on a Priora
There can be many reasons, but, as a rule, they are all of the same type and almost always the same ones occur.
The most common causes of failure:
- Fuse blown;
- Relay burnout;
- Broken filament;
- Button failure;
- Loss of mass or plus;
All these 5 reasons are the main culprits for problems with the heated rear window of the Priora.
Let's look at each of the reasons in more detail.
Heating fuse
A special fuse is used to protect the heating power supply circuit from short circuit or overload. It is he who breaks the circuit during a short circuit, thereby protecting the car from fire. Quite often, with any overload or with prolonged use of heating, the fuse can fail, thereby de-energizing the filament.
The fuse is located in the Priora mounting block under number F2 with a rated current of 25A. The fuse must be replaced strictly with the same rating as specified by the manufacturer, that is, also 25 Amperes.
Heating relay
A relay is necessary to unload the button contacts, since heating consumes a large amount of energy and, therefore, current, the load on the contacts increases and heating occurs. If there were no relay, then the button, as the weakest part of the circuit, would melt from heating the contacts, thereby failing.
The relay is located on the mounting block under number K2.
Broken filament
This problem is most common in Priora hatchback and station wagon bodies, since plastic trunk cards can fray the filament, which will make it impossible to supply current to all filaments. This problem is quite difficult to solve and in some cases glass replacement is required.
Some stores have a special conductive varnish that can be used to connect broken filaments and avoid replacing the rear window.
Button failure
The heating switch on the Priora is quite unreliable and has a weak design that often fails and fails. The contacts on the button can oxidize or have carbon deposits, which negatively affects the contact patch, making it impossible to turn on the glass heating.
Loss of mass or plus
The power circuit is connected to the glass via a male-female connector. It happens that after any work carried out in the luggage compartment or after applying a tint sticker, the glass heating stops working, this is possible due to a fallen out power connector or the mass of the glass heating. To solve the problem, all you need to do is insert the connector into its rightful place.
Through any other bank according to the issued invoice (non-cash payment)
ONLY for legal entities
Payment is made by transferring funds to a current account.
Payment on an invoice for LLCs and individual entrepreneurs (RF)
Note ! we work “without VAT”
Buy Mirrors Lada Kalina, Granta in a new model case from Lada Priora (“ANS”, electric drive, heating, repeater)
The final cost of some products may differ; it will be announced by the manager when confirming the order. We apologize for any inconvenience caused.