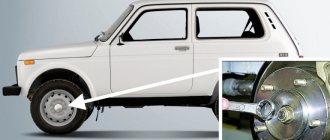
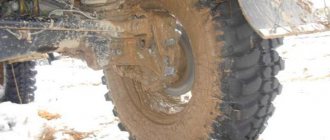
Destruction of the Niva Chevrolet front wheel bearing is considered a chronic disease. This is especially pronounced in Niva models due to operation in difficult conditions. It is quite possible for car owners to change the front wheel bearing on a Niva themselves. And this must be done immediately, otherwise the trip is fraught with an accident with a rollover.
Why is replacement necessary?
There are some signs indicating that the front wheel bearing on the Niva needs to be replaced. The very first sign is a strange sound, different from normal when moving on the road.
If it appears, you should pay attention to the following points:
- Wheel overheating.
- The front wheels send vibrations through the steering wheel and body.
- When driving at high speed, the car pulls to the sides.
- It is difficult for the driver to control the steering wheel when driving off-road.
- When you turn the steering wheel, you can hear the crunching of the wheels (even with the engine off).
Even the presence of one sign may indicate that the front hub of the Niva 2121 requires replacement. A damaged bearing will cause the suspension ball joint to fail and the axle shaft to break. This can cause the car to roll over when driving fast.
Most Niva 2121 bearings fail at 100,000 km. mileage, even with declared wear resistance. This is due to the poor condition of the roads and the constant use of the vehicle in difficult conditions. In addition to natural causes of failure, improper installation of the bearing, insufficient lubrication and excessive tension can affect it.
Symptoms of a problem
Bearing wear manifests itself as the following symptoms:
- Vibration of the front wheels, which can be reflected in the steering wheel or felt in the cabin.
- Knocking or crackling sounds in the front of the car when driving;
- Heating of the front wheels in the axle area.
If such manifestations occur, you need to check the condition of the wheel bearings. To do this, jack up the car and rock the wheel in different directions. Play and knocking in the bearing area indicates the need for replacement and adjustment. The malfunction may also manifest itself in the form of noise when the wheel rotates.
Separately, it is worth mentioning two problems that arise during the operation of the Chevrolet Niva:
1. The hubs get hot
It is important to understand that when braking, the kinetic energy of the car is converted into thermal energy. As a result, the brake discs and the hubs on which they are attached become very hot.
Heating of the part during movement, and not during braking, indicates wear of the bearing or its incorrect adjustment.
The second option is typical for adjustable hubs. The adjusting nut must be tightened with a force of 2 kgf*m. If you tighten it further, the tapered bearings will be too tight.
Their rotation will be difficult. Prolonged operation of the machine in this condition leads to bearing failure and wheel jamming.
2. The adjusting nut is unscrewed while moving. Sometimes this happens literally after 20-50 kilometers. The phenomenon is observed in three cases: the master forgot to tighten the nut, there was a misalignment between the bearing races, or play appeared in the coupling of the CV joint with the hub.
Checking the wheel bearing
As mentioned earlier, the first thing that appears is an unusual sound when driving on the road. You can accurately determine the breakdown by turning the steering wheel. When moving to the left, the car skids to the right. The same thing happens when turning right.
Check bearing wear when driving at low speeds of 15 km/h. If, when turning the steering wheel to the left, the characteristic sound disappears, a part on the corresponding wheel has broken. Does the sound disappear when moving in the other direction? This means the problem is in the right bearing.
A more accurate diagnosis can be made by lifting the car with a jack:
- Turn the engine into 4th gear, accelerating the VAZ to 70 km/h. A broken wheel can be identified by ear - it will crack.
- Turn off the engine and wait until the wheels stop completely.
- The wheel, previously identified as broken, is rocked in different directions. If there is even slight play, the bearing must be replaced.
Play may be caused by wear on the suspension or control system. You need to ask an assistant to hold down the brake pedal and rock the wheel again. If the play remains when pressed, the problem is in the suspension. Otherwise, the issue is bearing wear.
Steps for replacing a wheel bearing yourself
To replace the wheel bearing of a VAZ 2121, it is necessary to position the front part of the vehicle above an empty space, which will provide unobstructed access to the necessary parts. You can place the machine on a lift or above an inspection hole.
The process of replacing a part takes place in the following sequence:
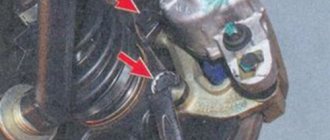
- First of all, remove the wheel, then remove the caliper from the pad guide. The bottom of the car must be fixed so as not to damage the brake.
- Remove the boot, wheel bearing nut and tapered bushing.
- Using a chisel, bend the stopper of the nut that secures the front knuckle lever. In the same way - the rear.
- Using a spanner wrench 19, remove both nuts and the stopper plate.
- The lever is moved away from the fist and the brake hoses are disconnected.
- Remove all the fasteners and the fist itself, and then disconnect the hub base from it.
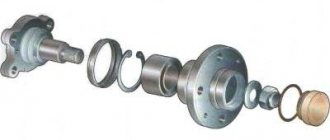
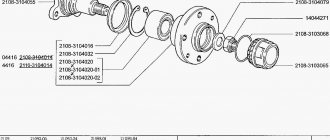
After completing all the processes, it is necessary to disconnect the bearing from the base:
- Remove the steering knuckle, ball joints, hub assembly and brake disc.
- Disconnect the steering knuckle from the hub with the brake disc, and then remove the mounting bolts.
- Separate the hub from the brake disc by screwing the nut onto the stud and remove it. Also separate all the studs from the parts.
- Separate the hub from the brake disc and use a chisel to knock out the mud ring.
- Using wrench 10, unscrew the bolt of the protective casing and remove it.
- Remove the seal and inner ring of the bearing. Do the same with the other part.
The hub base must be completely cleaned of used lubricant, after which a fresh compound is applied to the inner surface and a new bearing. All elements are installed step by step in reverse order. When filling the hub base, all parts must be thoroughly compressed using a pipe of suitable diameter.
Adjusting the wheel bearing on a VAZ 2121
After replacing the front wheel bearing of Niva 2121, it is necessary to adjust it. Before this, an hour indicator is attached to the steering knuckle. Its leg rests against the wheel hub near the adjusting nut. Place spanners on the studs using the rings and secure them with wheel nuts. Use the keys to turn the hub in the direction of the axis and check the amount of displacement using the previously installed indicator.
If it is more than 0.15mm, you need to remove the nut and readjust the bearing:
- Use your beard to straighten the jammed nut belt.
- Use a spanner wrench 27 to remove it and install a new one.
- Tighten the nut to a torque of 2.0 kgf.m, while simultaneously turning the hub in different directions. Then loosen and tighten again to a torque of 0.7 kgf.m.
- Loosen the adjusting nut 20-25˚ and check the bearing clearance. It should not exceed 0.08mm.
Upon completion of work, the nut must be locked.
Repairing the Niva-21213 hub
My old Niva has a disease. The wheel bearings on the right don't last long. Once every year or two I change them, and together with the hub, because, according to the instructions, with a slight movement of the hand towards you, the hub does not come out of the steering knuckle and you have to knock it out along with the bearings, and then, having examined and noticed the “grooves” on the seat of the internal bearing and the collar, sadly I’m going to buy a new one... Moreover, on the left I only changed the hub once or didn’t change it at all - I don’t remember now. I try not to take it apart unnecessarily.
Today I started assembling hubs after repairing the front suspension and noticed differences in two new hubs purchased at different times and in different places, as well as differences in their operation. The difference is strange and I cannot explain it. It consists in the presence or absence of a ring at the point of contact of the hub with the end of the steering knuckle bushing. Previously, I neglected this difference, because... I disassembled the hubs at different times and it was not possible to compare defects on different designs.
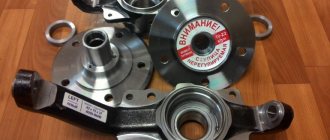
Hub type 1.
Manufacturer: VAZ JSC. Price 707 rubles in a store selling factory (?) spare parts. Rosstandart stamp. Pay attention to how the place that comes into contact with the steering knuckle is designed. Here we see grooves of varying depths
Hub type 2.
Bought at the car market for 550 rubles. Manufacturer unknown. I purchased a hub of a similar design in Pskov several more times, since the loss of the original one. The difference is a slightly rougher surface treatment and the presence of an unfortunate yellowish ring at the point of contact with the end of the steering knuckle, where the factory hub has just a groove. Photographed after assembly with the brake disc.
Look - a hollow (U-shaped in cross-section) ring in the place where there should be a notch. When I first bought such a hub, I asked what the hell it was. I was told that this was a “better” hub, so I continued to use this type of hub until today without paying attention to the ring and without being puzzled by its absence or presence. So today, after turning two different types of new hubs in my hands, I decided to see what the old ones looked like. They looked different. On the left is the left one, factory type 1, without ring. On the right is the right one with a ring - type 2. Hub Type 1. Without a ring, factory (?) Used for at least 4 years. The inner bearing has been removed. The outer one came out of place tightly, but its inner ring moves freely along the seat of the inner bearing and even spins merrily on it. The knurled collar prevents it from being completely removed. The oxidation layer (?) at the site of the outer bearing is preserved, but absent at the site of the internal one. Hub Type 2. Used for a little over a year. The ring is heavily dented during use and shows signs of rotation and friction. The oil seal has not been removed, there are nicks on the seat from the chisel used to knock down the bearing. The seat for the inner bearing is worn, but less than that of the left hub, there is a fillet along the edge. It is because of this that the inner ring of the outer bearing cannot be removed, and in general the hub cannot be removed from the steering knuckle as required by the instructions. Let's take a look at the steering knuckles. The left steering knuckle that worked with the factory hub. The condition of the contacting surfaces is almost perfect. The o-ring (?) is in place and in good condition. The right steering knuckle that worked with the hub with the ring. The condition is not very good. The sealing ring is crushed “to a cone” and has traces of friction during rotation precisely against the ring on the hub. The oil seal is not pressed in completely, I realized this later, it is still recessed by 3 millimeters.
Now the actual questions. 1. How to achieve correct mating of the steering knuckle with the hub and ring (Type 2). Remove the ring from the hub or the knuckle? If both rings remain intact, they rub against each other and become deformed. Moreover, as I understand it, the correct (completely) seating of the bearings is not ensured. 2. How far should the oil seal be driven in in the photo above. Enough or all the way? 3. Why do hubs fail so quickly and, first of all, the seats for internal bearings wear out with the formation of a shoulder. The bearings, apparently, would still be working if it had not been necessary to disassemble the hub with a sledgehammer. 4. How necessary is it to install spacer rings between the bearing and the oil seal? I only have one left, but I can’t buy it. And how is it installed correctly? Cone to the bearing or oil seal. I had a cone facing the oil seal, but I’m not sure which is correct. 5. Is it necessary to stuff lithol into the seals? Indications vary.
Well, as an epilogue, the machine is in progress. New steering rods made by Trek were installed, a front beam with a new pressed-in bushing, which turned out to be 1.8 mm shorter than the original one and also with chamfers removed from the inside, as a result of which the area of the pressing surface to the washers decreased by about 1.5 times . There is a risk that the washers will, if not rotate, then be pressed inward.
And now for those who read to the end the answers to some questions. The hub with the ring is the hub for the Niva-2121 - it has a slightly different design of the hub assembly. It turns into a Niva-21213 hub by picking out a copper alloy ring. On the Niva 2121, mud rings were not put on the steering knuckle (I incorrectly put this ring as an “o-ring”). On Niva-21213 they are provided by the design of the steering knuckle. It is absolutely not correct to put two rings on the Niva 21213 hub. It is necessary to install (requiredly) only a dirt deflector that fits on the steering knuckle. I used to do everything correctly, but then I lost this secret knowledge and when I wrote the post I decided that I had always installed it with a copper ring, especially since due to some misunderstanding the last time I had an old hub with a hub ring assembled at a service center without dismantling it. What this led to can be seen in the photo. By the way, I never changed the left hub, but the right one still works after this repair.
What else can you do?
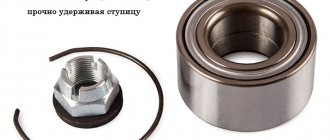
The Niva 4x4 wheel bearing is not very durable. It often breaks down and requires repair. In order not to think about constantly replacing the front wheel bearing of the VAZ 2121, you can use alternative bearings, for example, double-row ones.
They have advantages over the standard ones in the VAZ 2121:
- They do not require adjustment or lubrication of the unit. All necessary work is carried out at the factory.
- They have high wear resistance.
- Do not allow arbitrary rotation of the wheels when driving.
- They have a long service life.
Of course, before installing a double-row bearing, you need to bore the hub to the desired size. And the parts are quite expensive. But this is compensated by a long service life, eliminating the need for constant repairs.
Replacing a Niva 2121 wheel bearing is quite simple. It only requires having the necessary tools and strictly following the instructions. Replacement must be carried out immediately if at least one sign of wear is detected. Otherwise, the car may roll over while driving.
Unregulated
As a rule, the Niva has a standard adjustable hub, which requires periodic adjustment. But in order to get rid of this inconvenience, non-adjustable hubs for the Chevrolet Niva were developed, which have such positive qualities as:
- No maintenance required. They don't need to be adjusted
- The bearing in the device does not rotate
- It is filled with special lubricant from the factory, so there is no need to lubricate it.
- Due to the fact that the work occurs thanks to the ball bearing in the unit, friction is reduced
- There is no wear on the seat in the rotary cam
- Not adjustable as it is tightened from the factory
- No need to change the bearing
- Long service life which is equal to 100-120 thousand kilometers
Therefore, thanks to all the positive characteristics listed above, many car owners change the standard part to a non-adjustable one.
It is also worth noting that the non-adjustable part can be produced as a reinforced Niva Chevrolet hub, which solves the problem of wear of the oil seals on the steering knuckle. It is best to choose companies such as VolgaAvtoprom, IVECO, OmegaInterAuto.
The main disadvantage of this unit is its high price, but by installing this part you can forget about the problems that appear in the standard element. By installing a reinforced version of your SUV, the cross-country ability will increase and reliability will increase, and having a standard set of tools, you can make an independent replacement without any problems.