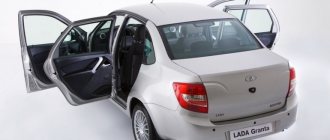
Serial production of LADA Granta started in 2011. The model replaced the classic configuration of the Lada Samara and Lada Kalina for the sedan body. In 2013, the line was supplemented with a liftback body option. This trim level shares the same wheelbase with the sedan and is equipped with similar engines.
Despite the good assembly and good driving characteristics, the owners are faced with the same defect - the rear doors of the Lada Granta do not open well, we will tell you what to do in this case below.
Adjusting the rear doors of Lada Granta
Many owners of the Lada Granta car pay attention to the fact that the rear doors of the car are more difficult to open than the front ones. This “disease” concerns new cars that rolled off the assembly line in 2019.
Cases are described when owners who contacted car service specialists received the answer: there was a factory defect and it was impossible to make a full repair. The only option is to disassemble the car and reconsider the geometry of the body.
In terms of price, such work costs 90% of the cost of a new vehicle, if you contact a workshop.
Review of Manufacturer Prices
| Name/article | Price, rub.) |
| External handle 11180-6205151-00 | From 425 |
| RENAULT/LADA 11180-6205151-00 | From 385 |
| 11180-6205150-00 | From 420 |
| Internal handle 21900-6205181-00 | From 135 |
| 21900-6205180-00 | —/— |
| Bolt M5x10 00001-0038331-21 | From 10 |
| Nut M5 00001-0038318-01 | From 10 |
| Screw M6x10 00001-0032759-01 | —/— |
| Lock washer 00001-0026053-71 | —/— |
*prices are current as of November 28, 2018.
Recommendations for selection
Without a doubt, when choosing, give preference to parts with factory catalog numbers. Purchase consumables exclusively from official representative offices, service stations, and auto stores.
Before purchasing, check the catalog numbers of parts with the actual data specified in the operating instructions. If such a book is not available, seek advice from service center specialists, download recommendations from the Internet.
Possible problems, solutions
One of the main problems why the back door on a Grant may not open well remains the design feature of the lock. The locking mechanism and heavy pull require that the doors fit into the doorway with millimeter precision. It is important to strictly maintain the gaps between the canvas and the car body. Failure to comply with this condition leads to misalignment, friction of the part against the body in certain places, and deformation of the already crooked geometry. The main problems that will need to be addressed:
- door position correction;
- repair, lock adjustment;
- changing the position of door hinges.
In 70% of cases, after self-repair, the doors on Grant begin to open without much effort.
Reviews
| № | Positive |
| 1. | Vasily: after two years of active use of the car, there are no complaints about the body or its elements. The doors close easily and the locks are also in good working order. I try to treat equipment with care and carry out diagnostics in a timely manner. |
| 2. | Kirill: at 65,000 km I adjusted the hinge once on the right side. Obviously there was a bad fixation from the factory. There are no more complaints, I am satisfied with the build quality of the domestic car. |
| 3. | Ivan: for the first time, a Russian car turned out great. Of course, there are complaints about the technology, but they are insignificant. Those who are familiar with a screwdriver can easily eliminate defects on their own. |
| 4. | Gennady: I haven’t noticed anything like this in a year and a half of driving. All mechanisms are operating normally, lubricated and secured. |
| 5. | Dmitry: after buying the car, I immediately re-tightened all the moving elements myself, lubricated them additionally, and adjusted the gaps. I haven't had any worries for more than a year. |
| 6. | Alexander: I bought the car two years ago from a dealership, drove more than 80,000 km, no comments. There were minor breakdowns, but I fixed them myself. There were no major breakdowns. |
| 7. | Ignat: in a year and a half of active operation of the machine, I adjusted the hinges twice and lubricated them additionally. In general, there were no serious breakdowns. |
| Negative | |
| 1. | Kirill: I’ve only driven 75,000 km, but I’ve already adjusted the hinges, changed the seals, and ordered soundproofing for the interior. |
| 2. | Gennady: the dashboard is systematically fastened on the paving stones, I can’t do anything. I contacted specialists and repaired it myself, but it didn’t help. |
| 3. | Vladlen: there are more shortcomings in Grant than advantages; the manufacturer is in no hurry to eliminate defects. |
Conclusion The door lock is replaced only if it is damaged, deformed, or defective. The design of the mechanism is not complicated, and the operating principle is intuitive.
Bottom adjustment
To adjust the gaps in the lower part, it is necessary, as in the previous case, to apply force.
- Lower the window completely until it stops.
- Close the door by lightly hitting the bottom of the door with your palm.
- Repeat the procedure until the gap reaches the recommended value.
It is very important not to overdo it when performing these steps so as not to bend the part.
This method of adjusting Grant doors is used during the final stage of car assembly. Any violation of the geometry results in the doors becoming difficult to close.
Advice from car enthusiasts and recommendations from experts
I have already removed the card several times myself, laid out the wiring, no complaints. The fit is tight, the first time I broke one pin, I installed a new one. No complaints.
Michael
https://remont-avtovaz.ru/snyat-obshivku-s-dverej-na-lade-grante-liftbek/
The car is not even six months old, but I have already removed the cards twice and sealed the joints. You can hear knocking and vibrations on the paving stones. Additionally, I pasted over the noise reduction. I can't recommend the quality.
Ivan
https://remont-avtovaz.ru/snyat-obshivku-s-dverej-na-lade-grante-liftbek/
Now the clips on the doors are different. cone with latch. When removed, all the clips came off without breaking (I removed the trim on all 4 doors). And these black brushes keep the cover in the trunk, after removing them I had to throw them away (they didn’t fit back tightly and the petals were partially covered) and buy them from foreign cars.
Alex
https://club-lada.rf/granta-remont/181-snyatie-obivok-dverey-granta.html
On my new Grant, the handle mount was not like on the nines and classics; you need to bend the ring from the round washer and pull the locking ring in the direction opposite to the direction of the handle.
Alexander
https://ladakalinablog.ru/snyatie-obshivki-zadnej-dveri/
I haven’t yet met people who have had difficulty removing door trim from Granta’s doors.
Zhenya
https://1ladagranta.ru/remont/snyat-obshivku-dveri.html
The process of removing the trim from the front and rear doors of the Lada Granta is simple, so even an inexperienced motorist can cope with it. In order to deal with one door, it is enough to spend 10–20 minutes, it all depends on your qualifications.
Refinement of the castle
The method is used by experienced drivers who prefer to repair any fault themselves. This is a makeshift option, but it helps to adjust the smooth running for a year and a half and get a tight fit.
- At the end, insert a limiter into the lock; you can use a thick plastic tube. This is done so that the element does not snap into place and the tab that needs to be modified does not “disappear.”
- Use a file to sharpen the lock tongue, which engages when closing with the striker.
If you grind off a large sheet of metal, then the door may not close.
Craftsmen recommend systematically checking the seals and the external position of the hinges; in this case, door adjustment on Grant will be required less than once a year.
general information
The functioning of the car alarm, the light in the cabin and the operation of the door opening lamp on the instrument panel are closely related to the operation of the limit switches. The cost of the described devices is approximately 160-175 rubles. (for example, this is the cost of devices with a cap with article number 1118-3710199 and end switches with article number 104035756).
Let us also note a number of differences that exist in various Grant configurations:
- In the “Standard” configuration car, the buttons on the seats are replaced with plastic plugs. There is no wiring in machines of this configuration;
- On the Norma Grant, limit switches are installed not only on the driver’s door, but also on all other doors, however, all other seats (except the driver’s) are equipped with plugs. In vehicles of the specified configuration, wiring is installed;
- Luxury vehicles also have a full set of door opening sensors installed on each of the car doors. In some early modifications, the sensor on the driver's door was responsible for turning on the lighting lamp and the door closed indicator on the instrument panel. The rest participated only when the lights were turned on. Modern modifications have more complete functionality, that is, all sensors send a signal to turn on the lights and to the dashboard.
General questions about the parking brake on Grant
Let's look at a few basic questions about VAZ 2190 brakes.
Operating principle of the Granta handbrake
When raising the handbrake lever in the passenger compartment:
- the drive brake cable is tensioned;
- through the equalizer he pulls the cables going to the rear brake pads;
- The pads are pressed against the brake drums through expansion bars, stopping the wheel from moving;
- When the tension is loosened (removed from the handbrake), the tension of the cables also weakens, and the wheels move freely.
Lever 1 pulls cables 3 through cable 2. Those, through levers 4 and strips 5, push the brake pads apart.
Why is it necessary to tighten the parking brake?
When the cable tension is loosened, there is a danger of the vehicle rolling away .
This means that as the rear pads wear out, the original parking brake setting will lose effectiveness.
Handbrake adjustment video 2190
If the hood comes back
In the case when the hood opens backwards, the situation becomes quite complicated. The most obvious and easiest way to open such a hood is to get to the lock mechanism through the air intake openings. Naturally, they must first be protected from scratches and chips with electrical tape, or the working tool must be wrapped with it. If the air intake grilles are removable, the best solution is to remove them (if possible). This way you can have excellent access to the lock and open it quickly.
Way out
What to do if the car door does not open from the inside or outside? In fact, there are not so many solutions.
- Call a qualified service technician to open the door or lock. Considering current prices, just one call will cost the owner half the average salary. So it's not fun for everyone. This service can only be used in extreme situations;
- Remove the door hinges and unscrew the lock fastening: this option is more suitable when the front doors are jammed. The bottom line is this: if the door cannot be opened either from the outside or from the inside, then you need to use a Phillips screwdriver to unscrew the two hinges of the rear door that follows the “problem” door. In this way we will provide access to the rear wall of the lock mount. Here it’s a matter of chance, you can unscrew two bolts the first time, or spend 10-15 minutes doing this. After unscrewing the bolts, disconnect the rear wall of the door lock from the body. All that remains is to make an effort to pull back the door, and everything is ready;
- Next, it is necessary to remove the mechanism itself and do diagnostics, look for the cause, but this is “a completely different story”;
Repair methods
Straightening dents is carried out not only from the inside, although this seems the most logical, but also from the outside. The technology of work largely depends on the area of damage and its location.
Firecrackers
This is what tinsmiths call dents that are large (up to several square decimeters) in area, but small (no more than a centimeter) in depth, with very gentle slopes. The metal in them has hardly changed in thickness. They got their name because straightening is accompanied by a clap.
The larger the area of the cracker, the easier it is to straighten. Although this can be explained simply: the lever arm of the force - the distance from the center of the dent to the edge - is large. Sometimes it is enough to press it from the inside with your palm. Often it is a combined damage - at the point of application of force there remains a hole, which will have to be straightened separately.
Fixing from the inside is the main way to repair such dents. To do this, you will have to remove the ceiling or door trim - the usual place for firecrackers to appear. If it does not lend itself to hand force, then, for example, a volleyball chamber can be placed in the technological cavity. A pressure of a couple of atmospheres will be quite enough. Small - you can still touch the metal with your hand - heating the edges will help speed up the process.
Medium dents
It is often not possible to straighten such a problem from the inside. For example, on a wing, the cavity of which is blocked by spars. If it is flat, without a break, then heating and hammering it through a trowel will help fix it.
- Heat the edges of the dent so that your hand feels noticeably hot when touched.
- Apply the trowel, making sure that it lies flat and does not touch any part of the body's relief with its edge. Tap the dent in a circle with light blows.
- Constantly control the heating (cooling is no better than overheating), don’t rush anywhere and persistently hammer the dent in a tapering spiral.
The construction trowel successfully replaces the professional tool “trowel”. Its handle is raised up, does not move around the body and does not interfere with the work of the hammer. It should be made of stainless steel, and the lower, working surface should be polished so as not to scratch the paint. During work, you must constantly wipe it with a cloth so that not the slightest speck remains on it, and degrease it.
There is a very exotic straightening method based on the use of temperature contrast. For it you need to prepare a can of carbon dioxide. These are used, for example, to charge airsoft weapons.
- Heat the dent in a spiral from the edges to the center.
- You spray carbon dioxide using the same principle.
- As the frost disappears, the metal straightens, subject to deformation forces arising from temperature changes.
Leveling in this manner may damage the paintwork. And the older the car, the higher the likelihood of such an outcome.
Small dents
Damage with a diameter of up to 1.5 centimeters can only be pulled out, since they are smaller than the hammer head and aiming along the edge is very problematic. Pulling is carried out with a bolt or screw with a head of suitable diameter and shape. It needs to be sanded to the desired configuration and polished.
The work area is degreased (as is the bolt head), after which the glue gun is used. After gluing the bolt, add glue on top, for reliability. The thread will help secure something like a handle or eyelet. The bolt is pulled behind them with whatever is available. But this must be done carefully, in several stages, constantly monitoring the process. The bolt may come off. Remove the adhesive with a solvent and repeat the process until the dent is straightened.
For such work, there is a professional tool - a set of polymer fungi of different sizes and shapes, as well as strikers. The firing pin consists of two parts - something like a bolt, the lower part of which hooks onto the figured protrusion of the fungus, and a massive bushing that slides along the stem. At the end of the striker there is a wide protrusion against which the bushing strikes.
Straightening a car body is an art. The master must feel the material and be able to predict its behavior. The skill is formed by long hours of training. Don't be afraid to put your hands in, though. The value of having such a skill will pay for all the costs. We advise you to initially practice on some car frame.
During the operation of the car, scratches, chips and dents appear on the body. The reason for their appearance can be both negative environmental factors and careless driving. Chips and scratches are painted over. Repairing and pulling out dents on a car is carried out using various methods and devices that allow you to eliminate metal jams.
Tips and tricks
To achieve optimal results, you need to follow these tips:
- If even the smallest fragment with rust and other defects is detected, it is better to remove the door completely to eliminate the defects. The same is true with internal elements, which must be located in strictly designated areas;
- colored electrical tape will help to temporarily fix small parts while working on doors that have not been removed from their hinges;
- After such work, you will need to adjust the fit of the door, especially after installing additional devices and trim inside. If there is more weight, the door will go down, making it difficult to open/close the lock. Thanks to the intervention of the master after working with the cladding, the presence of such problems is eliminated.
It is worth remembering that hermetically sealing the door trim not only allows you to insulate/isolate from unnecessary noise and vibration, but also improves the sound quality of speaker systems. Dense low frequencies directly depend on the presence of material inside, and the presence of extra gaps will add unpleasant ringing and resonance when the speakers are operating.
It is best to test the reliability of the work performed by opening and closing the doors several times and testing the installed elements while driving. If possible, you can take a passenger with you who would monitor how the sound comes in and whether there is a draft through the casing and cracks.
Crib
Instead of a conclusion, let's summarize :
- Carry out work on a lift, pit or overpass;
- Tools: open-end wrench 13, ratchet with heads 10 and 13 (preferably long);
- It is not necessary to remove the heat shield - just move it forward as the vehicle moves;
- The ideal stroke is 3-4 clicks of the handle until the rear wheels come to a complete stop.
If you've already started adjusting the brakes, maybe change the rear pads too? Detailed instructions with description and photos are here.
Have something to add to the article, share your opinion or recommend? Write in the comments!
The main points about door locks are discussed in this video
As a result of performing such work, the doors should have the same gaps, not be exposed outside the body and not fall into it; if you have problems with the front doors, we adjust them in the same way.
Please note that when making adjustments yourself, the most important thing is not to overdo it and not to dent the doors or damage the paintwork. If you have any doubts about doing the work yourself, it is best to contact a dealer or a specialized auto repair shop.
Let's proceed to the second stage: dismantling the side view mirror
- Using a screwdriver, unscrew the three screws that secure the mirror frame to the body.
- Using pliers, remove the locking bracket.
We remove the mirror and remove the hinges through the diagnostic hole.
- Using an “8” socket, unscrew the bolt that secures the outer handle to the end of the door.
- In the inner tunnel, unscrew the second bolt holding the handle.
- Using a screwdriver, carefully pry up and remove the rods from the lock.
- We remove the handle from its seat, turning it slightly from side to side.
