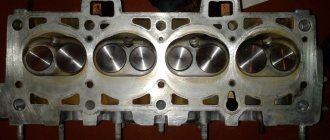
During the operation of the car, for one reason or another, sometimes a VAZ 2114 must be removed: 8 valves or 16. Most often, the head is removed for modification, repair or tuning of the system, or to replace the gasket.
Currently, many VAZ 2114 drivers, in order to get the most out of their car’s power unit, perform various operations with valves and cylinders. In a word, they are refining it. There is a reason for this, but since it costs a lot, after reading the article and watching the video, you can try to do the repair yourself. And one of the main stages in this work is the dismantling and installation of the VAZ 2114 cylinder head.
When is it time to change the block head?
The cylinder head is a fairly strong unit and its replacement and repair is infrequent. On domestically produced cars, as a rule, it has to be removed due to cylinder leakage or gasket wear.
Also removed for revision. Removing and replacing, on a car with any number of valves, the process itself is not difficult, but some skills and some experience are required. Therefore, if you are removing the cylinder head for the first time, it would be better to invite a more experienced car enthusiast as an assistant. One who has already dealt with this work, or better yet, if he has already completed modifications or repairs to this unit.
Causes of defects
The purpose of the head is to form a combustible mixture of air and fuel, which is created in the combustion chambers. It is used to ignite and propel the vehicle. The cylinder head, like any other machine component, is not immune to defects. Malfunctions can occur spontaneously or as a result of a traffic accident or wear and tear of the unit.
All failures are associated with:
- defects in the production of the cylinder head;
- high load on the node;
- incorrect or insufficient maintenance;
- poor quality lubrication of the internal components of the device;
- lack of protection against freezing or corrosion in the refrigerant circuit.
Stages of work
Replacement and repair may require some tools that are not often found in a car enthusiast's glove compartment. There is no point in buying them, but it is better to borrow them from friends for a while.
Tools
Process
- The first step is to disconnect the negative batteries.
- Next, you need to set the piston of the 1st cylinder to the top dead center position.
- Then you need to drain the antifreeze.
- Reduce fuel pressure.
- The exhaust pipe must also be disconnected from the manifold.
- Remove the cylinder head cover.
- We remove all pipes, hoses and electrical wires, remembering or outlining what is connected where so that there is no confusion during assembly.
- We unscrew the three bolts securing the camshaft belt cover.
- Remove the cover.
- Remove the timing belt.
- It is imperative that the shafts be secured against rotation.
- We unscrew the bolts that secure the pulley to the camshaft.
- Remove the pulley from the camshaft.
- Next, you need to unscrew the nut securing the rear camshaft cover.
- Unscrew the remaining bolts and remove it.
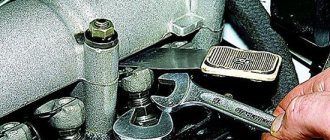
- Slightly loosen the 10 bolts that secure the head. This is done in a strictly defined order.
- Then completely unscrew the bolts and remove them with washers.
- Remove the head completely.
- If the head is stuck to the gasket, you need to insert a screwdriver or other tool under the manifold and, using it as a lever, lift it.
- We completely remove the cylinder head.
- Slowly, so as not to scratch the surface, remove the remnants of the old gasket. It is best to use liquids available specifically for this purpose.
- After cleaning the surfaces, repairing or modifying, you can begin installing a new cylinder head.
- First of all, install a new gasket.
- We make sure that the shafts are in the top dead center position and the valves of the first cylinder are closed.
- Insert the bolts.
- We begin tightening them using a torque wrench.
- Tightening occurs in four circles: 1st – 20 kgf/m; 2nd – 7.1–8.7 kgf/m; 3rd – tighten the bolts 90 degrees; 4th – once again you need to tighten it 90 degrees.
- Next, we install the removed equipment. To make this easier, many people film the dismantling work on video or take photos.
- After completing all the work, you need to adjust the gaps in the valve drive of the VAZ 2114, and also correctly tension the camshaft drive belt. If you learn how to do these jobs yourself, then calculate how much money you can save.
Video “Replacing the Gasket”
This video shows the process. To repair the valve system and modify the head, the head is removed in the same way.
Each VAZ engine model is equipped with a cylinder head gasket. Its main task is to seal the combustion chambers and channels between the cylinder block and the cylinder head (cylinder head), through which coolant flows.
It is made of thin sheet metal or reinforced paronite with metal edging for the holes for the combustion chambers. The holes in the gasket have fairly thin walls, so the slightest mistake during installation or replacement will lead to their rapid burnout. If the cylinder head gasket malfunctions, various problems appear in the engine.
Signs and causes of cylinder head gasket failure on a VAZ 2114
- A foam-like emulsion
is visible on the oil level dipstick . This indicates a failure of the cylinder head gasket or a crack in the block itself. Liquid from the cooling system enters the oil channels and, during engine operation, is whipped into an emulsion, which is observed on the dipstick. - Drives antifreeze
into the expansion tank. The cause most often may be a burnt-out cylinder head gasket. A similar problem may arise due to an air lock in the cooling system; therefore, the heater in the cabin may also not work or the thermostat may not work correctly, provided that the fluid level is normal. - emits
a lot of . This indicates that, most likely, the cylinder head gasket has ruptured; through the resulting gap, coolant enters the cylinder head. - Oil stains and stains
on the surface of the coolant in the expansion tank. This was probably due to a cylinder block gasket rupture and oil leaking into the cooling system channel. - Increased
engine temperature. This occurs due to a breakdown of the combustion chamber edging. Burning gases enter the cooling system and quickly heat up the antifreeze.
It is necessary to change the cylinder head gasket of the VAZ 2114 every time the cylinder head is dismantled, regardless of the reasons that caused it. The gasket is disposable and cannot be reused as this may cause engine damage.
To replace the cylinder head gasket we will need:
- torque wrench;
- keys “13”, “17”, “19”;
- socket heads “10”, “13”, “17”, “Torx”;
- screwdriver;
- head for unscrewing spark plugs;
- new cylinder head gasket VAZ or its equivalent ELRING.
The price of a cylinder head gasket for a VAZ 2114 is about 200 rubles. Relevant for the spring of 2017 for Moscow and the region.
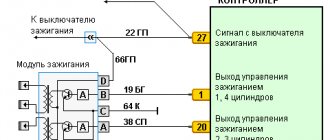
How to choose high-voltage wires?
It is important not only to correctly connect high-voltage wires to the VAZ 2114, but also to select the part. When purchasing, you should focus on two main factors - resistance and breakdown voltage. The weaker the resistance level, the faster the impulse will be transmitted. And the magnitude of the breakdown voltage shows how stable and durable the GDPs will be. Having access to the characteristics of wires from different brands, you can compare them and choose the best option for yourself and your car. Below is a comparative table of wire harnesses of various brands for the VAZ 2114.
PS: Did you manage to replace the spark plug wires? Maybe you still have any difficulties or questions? Then be sure to write about it in the comments, and we will try to help you!
Source
The procedure for tightening bolts and assembling the VAZ 2114 engine
- We install a new head gasket on the block, along the installation sleeves so that the hole with a copper edging for the passage of oil in the gasket is located between the third and fourth cylinders, the gasket should be dry and clean.
- Then we install the head on the block, having first made sure that the crankshaft and camshaft are in the TDC position, and both valves of the 1st cylinder must be closed.
- We proceed to tighten the head bolts in the specified sequence, see photo 18 in four stages. Tighten the bolts from the center, gradually moving equidistant to the edges of the cylinder block, as shown in the diagram.
The cylinder head bolts become stretched with repeated use. Replace with new bolts longer than 135.5 mm. Before installing the cylinder head, lubricate the bolts with a thin layer of engine oil.We do the first tightening cycle with a torque of 20 N m (2 kgf m), the second with a torque of 69.4–85.7 N m (7.1–8.7 kgf m), the second and third we finally bring the bolts to 90°.
- We install the parts on the cylinder head, and connect the hoses and wires to it in the reverse order of removal.
- We install the camshaft pulley with the protruding part of the hub facing the engine.
- If necessary, to drive valves.
- We adjust the tension of the timing belt.
Please note that there are O-rings installed on the fuel pipes. After disconnecting each hose, remove the O-ring from the tube. Replace heavily compressed or torn rings.
The cylinder block of a car engine, including the VAZ 2114 engine, consists of two parts. One contains the piston mechanism, and the other, called the head, contains the gas distribution system. These two parts are separated by a special gasket made of two sheets of metal connected with rivets. Sometimes asbestos is added to the material of the part.
conclusions
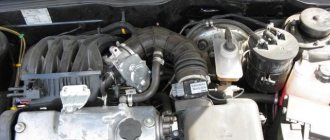
The design of the 8-valve injection engine VAZ-2114 is quite similar to the first generations of this engine - “Samara”. Of course, the designers made many changes to the features of the power unit, but in many ways they remained similar. Repair and maintenance of this engine must be carried out regularly, which will not only extend its life, but also reduce wear on the parts located inside.
The car is equipped with a gasoline, four-stroke, four-cylinder, in-line, eight-valve, overhead camshaft, liquid-cooled engine, model 2111 or 11183.
Cross section of engine 11183 (1.6i):
1 – oil pan drain plug; 2 – engine sump; 3 – crankshaft; 4 – oil filter; 5 – coolant pump; 6 – exhaust manifold; 7 – piston; 8 – rod for fastening the intake pipeline; 9 – laying of the intake pipeline and exhaust manifold; 10 – inlet pipeline; 11 – nozzle; 12 – fuel rail; 13 – receiver; 14 – bracket; 15 – cylinder head cover; 16 – camshaft bearing housing; 17 – camshaft; 18 – crankcase ventilation system hose; 19 – valve pusher; 20 – cylinder head; 21 – bolt securing the head to the cylinder block; 22 – valve; 23 – spark plug; 24 – cylinder head gasket; 25 – upper compression ring; 26 – lower compression ring; 27 – oil scraper ring; 28 – piston pin; 29 – fitting for installing the oil dipstick; 30 – connecting rod; 31 – flywheel; 32 – cylinder block; 33 – oil pan gasket; 34 – oil dipstick; 35 – oil intake
The cylinder block is cast iron, with cylinders machined into it. The internal cavities of the block for coolant are formed during casting, and the oil supply channels are made by drilling. At the bottom of the block, five supports for the crankshaft main bearings are machined. The main bearing caps are machined together with their bearings and are therefore not interchangeable. In order not to confuse the covers during installation, they are marked with the serial number of the bearing, starting from the crankshaft pulley. The cover of the second main bearing has two threaded holes for the oil intake bolts. Steel-aluminum liners are installed in the supports and main bearing caps. On both sides of the third main bearing support there are sockets for installing thrust half-rings that prevent axial movement of the crankshaft. The front half-ring is steel-aluminum (yellow on one side, steel-colored on the other), the rear half-ring is metal-ceramic (yellow on both sides).
Functions of the cylinder head gasket
The VAZ-2114 cylinder head gasket is needed to maintain the tightness of three automotive systems: gas distribution, cooling and lubrication. In essence, this is a simple seal between the block head and its main part. If it breaks down, the above components and assemblies of the machine may fail. The part itself is a metal plate with wide round cutouts for the pistons. It is located directly under the “head” of the cylinder block.
This is how new and unusable gaskets differ.
This is what a burnt gasket looks like
And this is a new cylinder head gasket
What is this?
What exactly is this gasket ?
This is a rubber element that has a certain elasticity. With use and wear, elasticity is lost. This reduces the quality and efficiency of performing the main task of the element - sealing the connection between the cylinder head and the cylinder block.
In order for the engine to work properly and without problems, the gasket must be installed efficiently and reliably. Ignoring its wear will lead to a serious reduction in engine life.
Features of bolt tension
We should also talk about tightening the bolts when replacing the cylinder head gasket. Here you should adhere to a certain tension torque so as not to damage the new gasket or make the connection insufficiently strong.
The torque should be between 69.4 and 85.7 Nm
The bolt is finally tightened 90 degrees.
READ What battery for Mazda CX 5
After this, the reassembly procedure is performed.
Do not under any circumstances rotate the camshaft or crankshaft until you have replaced the timing belt.
The camshaft pulley is mounted in such a way that the protruding element of the hub is turned towards the engine.
Don’t forget to check the quality of the work done, the gaps, and adjust the belt tension level.
Yes, replacing a gasket has its own characteristics and difficulties. The greatest number of problems are caused by disassembling the engine compartment elements in order to get to the required gasket. Otherwise, even less experienced car owners can do the job.
Signs and symptoms of wear or burnout
Wear of the cylinder head gasket is determined by the presence of a so-called burnout or breakdown on the surface of the part
. But, unfortunately, it is established not only by external signs. We said above that the gasket is responsible for the tightness of the cylinder block. So, the fact that it could burn out greatly affects the operation of the vehicle systems and causes the following problems:
- The liquid in the expansion tank or radiator begins to bubble, even when the engine is not warmed up. This means that exhaust gases enter the engine cooling jacket due to wear of the gasket.
- Thick white smoke comes out of the exhaust pipe. The situation is the opposite of the previous one: antifreeze got into the cylinders. This smoke is much thicker than the usual steam that can be observed from the rear of a car in winter.
- An incomprehensible yellow or white emulsion is detected on the oil dipstick. Another symptom of a gasket failure is that it may be punctured.