Choosing a car radio for VAZ
With today's variety of head units and multimedia systems, the choice depends primarily on the owner's wallet. According to many experts, the most successful VAZ model is the VAZ 2114 Samara -2. As you can see in these photos and videos, the radios installed in the seat of the pants fit very well into the interior of the car.
Nowadays, the most popular radios are those with a 2-din size; if your choice falls on such a car radio, then you will need to cut out a place for it in the dashboard. If the device you have chosen has a size of 1 din, then you will not have to cut anything, since the standard connector for the radio on the VAZ 2114 is exactly 1 din.
Lambda probe Shnivy: device and principle of operation
The essence of the device’s operation lies in changing the resistance of sensors mounted before and after the catalyst. The operating principle of the device is as follows.
- The on-board computer sends a constant electrical pulse at a level of 450 mV to the element.
- If oxygen is present in the escaping gases, a potential difference occurs.
- Depending on the level of gas concentration in the system, the device readings vary from 50 to 900 mV.
- The on-board computer reads the data difference and adjusts the fuel mixture.
Typically, only 1 element is installed on Euro 4 level cars. For EURO 5, the manufacturer already installs two sensors.
Nuances of self-diagnosis of the VAZ 2114
When carrying out diagnostics at specialized service stations or independently, various results and error codes can be obtained. Not all drivers know that faults can be identified without an on-board computer. An odometer is used for this. A significant drawback of such diagnostics is the addition of error numbers into a single sum. For example, if an error of 8 and 1 occurs, the odometer will display the number 9. The device's memory is not automatically cleared, so error codes will be displayed until manually reset by disconnecting the battery terminals for a few seconds.
Resetting the "checkengine" error
As you can see from the video, the error can be reset by following these steps:
- Turn off the engine, but leave the car's ignition on.
- Disconnect the car battery terminal and wait a few seconds.
- Reinstall the terminal and start the engine.
The error will be reset after these steps, but if it is caused by serious malfunctions in the engine, it will occur again. In this case, the best option would be to contact a service station.
NIVA CLUB
International Niva Club
- List of forumsAuto - EquipmentTechnical section Lada 4x4 NivaInjection engine
- Search
- Links
- Unanswered topics
- Search
- Online store "NIVA SHOP"
Active topics
ECU errors. Check-Engine - the light came on!
- Go to page:
Check-Engine - the light came on!
Post by ILIA » 13 Dec 2010, 16:14
Re: Injector light came on!
Post by Anton » 13 Dec 2010, 16:16
Re: Injector light came on!
Post by Captain » Dec 13, 2010, 6:30 pm
Re: Injector light came on!
Post by ILIA » 13 Dec 2010, 18:40
Re: Injector light came on!
Post by Magellan » Dec 13, 2010, 07:54 pm
Re: Injector light came on!
Post by ILIA » 14 Dec 2010, 13:12
Re: Injector light came on!
Post by ALK » Dec 14, 2010, 01:27 pm
Who knows what's going on behind the fence of the zoo? ©
Re: Check-Engine - the light came on!
Post by Portada » Dec 14, 2010 6:35 pm
ECU errors. Check-Engine - the light came on!
Post by Axen » Mar 19, 2011, 03:24 pm
All ECU errors and symptoms are malfunctions. It is known that it is difficult to identify some faults even when identifying an error. The error must match the classifier. (for all types of ECU.
specify) First position: B — is for body codes P — is for powertrain codes C — is for chassis codes
Second position: 0—code common to OBD-II 1—manufacturer code
Third position - type of malfunction: 1 - fuel system or air supply 2 - fuel system or air supply 3 - ignition system 4 - auxiliary control 5 - idle speed 6 - ECU (ECU) or its circuits 7 - transmission 8 - transmission
The fourth and fifth positions are the serial number of the error.
Here are several types of ECUs installed on AvtoVAZ: https://www.chipautovaz.ru/Article06.aspx PS: Before asking questions, visiting the link is required! In the question, indicate the model and modification of the ECU. etc.
Re: ECU errors
Post by Axen » Mar 19, 2011, 4:30 pm
Re: ECU errors
Post by dimanoff2007 » Mar 19, 2011, 4:54 pm
Replacing the coolant temperature sensor
The VAZ-2114 antifreeze temperature sensor itself is a thermistor (resistor) with variable resistance.
Its indicators change depending on the temperature:
- 0 degrees – 9420 Ohm;
- 20 – 2868;
- 25 – 2796;
- 30 – 1350-1880;
- 50 – 585-820;
- 70 – 280-390;
- 90 – 155-196;
- 100 – 177;
- 110 – 87-109.
It may fail for one of the following reasons:
- failure of electrical contact inside the controller;
- broken wires near the sensor;
- insulation violation.
- Cool the engine after driving and store the car in the garage. Prepare a set of tools and containers for the coolant; you will have to replace it. Ask a friend to help you to make your work more convenient and faster - you will need to drain the antifreeze from two units.
- Remove the engine protection and remove the radiator mounts.
- Turn the heater to maximum, open the expansion tank cap and the heater tap.
- Place a container under the radiator and slowly begin to unscrew the plug to drain the antifreeze. If you move too quickly, excessive pressure will build up, which will force coolant out of the expansion tank.
- It will take you about 10 minutes to remove all the liquid. While this process is taking place, place the container under the engine and find the plug on the cylinder block, it is located next to the ignition module. Also wait 10 minutes.
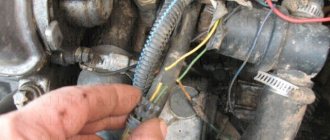
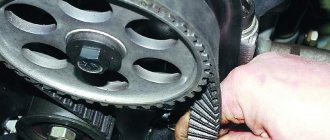
- Find the sensor between the cylinder head and the thermostat; it looks like a hexagon. Remember its position or mark it so that you can install the new one as well. Unscrew the sensor with a 21 key.
Before installing a new sensor, apply a small amount of heat sealant to the threads.
Install the new controller in place of the old one so that it stands on the same marks, pay attention to the position of the marking of this element. After this, you need to tighten the plugs and pour new coolant into the cylinder block and expansion tank
What is error 14h?
The cash register transmits fiscal documents to the OFD in real time. According to the current legislation of our country, there are 30 days during which the cash register may not send FD, for example, when there is no Internet connection, or other difficulties arise that are beyond the control of the user.
During this time, documents that need to be transferred to the operator are recorded and stored in the memory of the fiscal drive. 30 days are given to fix the problem. During this time, you need to resume the data transfer process and send all documents stored in memory.
If the deadlines established by law are violated, the fiscal accumulator stops creating fiscal indicators. In other words, it is blocked. If the seller tries to carry out any cash transaction, but error 14h appears on the cash register screen. The error can occur in cash registers and under a different designation (235 on a receipt or the inscription 3979 on the screen). If you do not get the equipment working within 30 days, you may face administrative liability under one of the following articles:
How to fix the problem?
To fix error P1602, you need to determine the cause of its occurrence. Even during normal operation of the car, simply deleting it from the memory of the electronic control unit, as many VAZ owners do, is wrong. The problem may be more serious than it seems. The only exception is that the code appears after removing the terminal from the battery or in frosty weather.
The first step when an error is detected is to check the battery charge, the condition of its terminals and wires. It is also necessary to test with a multimeter and visually inspect the contacts on the ECU, generator and sensors, ring and evaluate the condition of the wiring by eye. It is often very easy to find the location of broken or oxidized terminals. You can fix these problems yourself.
If the generator or battery is not working properly, it is often possible to restore its functionality. The battery often just needs to be charged with a charger and the terminals cleaned. But many owners also repair the generator themselves. Sometimes it is better to replace these devices.
Problems associated with low-quality fuel are easily solved. To do this, just change the gas station. If there was a switch to another fuel or the unit was flashed, it is advisable to contact an auto electrician. He will do the correct firmware for the equipment.
Nature of the failure
If the error text contains the phrase “failed CRC check,” then the probable cause of the problem is related to damage to the archive file. To get out of this situation, you will have to find another source or check how correctly the download of the files used was completed.
If the notification contains the phrase “decompression failed,” we can safely say that the cause of the failure lies in the system itself - there are no problems with the archive, and there is no need to download it again.
What to do if code 2 appears instead of error 10
After checking the power system, repeat the diagnostic procedure using the on-board computer. In most cases, when the voltage is restored, the error disappears by itself, but it may happen that code 2 appears on the VAZ-2114 display.
In this case, you need to check and replace the fuel level sensor. Follow the instructions provided:
- Remove the cushion from the rear seats and fold back the luggage compartment upholstery. You need to gain access to the fuel pump. Self-tapping screws hold the upholstery on the sides, and they also hold the fuel tank cap. Slide this part forward to remove.
- Disconnect the wires from the pump, and then use a 17-mm open-end wrench to unscrew the nut of the fuel supply hose. To do this, make one revolution first to bleed off the gases, and then slowly unscrew the fastener completely.
- Unscrew the 8 screws around the perimeter of the cover; they hold the pump in place. To avoid damaging the meter float, pull the pump up, turn it clockwise and tilt it slightly.
- Using a flathead screwdriver, remove the retaining ring on the pump. Remove the cover from it.
- Bend the clips away from the cover and disconnect the wiring. Release the sensor and slide it along the grooves in the housing.
After this, you can check the sensor or immediately replace it with a new one. To check, you will need a tester set to resistance measurement mode. Change the position of the float and lever to create the illusion of different filling of the fuel tank and measure the resistance by connecting the probes to the sensor terminals:
- in the lowest position (tank empty) - the resistance should be from 285 to 385 Ohms;
- on average (50% full) – 100-135 Ohms;
- at the highest level (full tank) – 7-25 Ohms.
If the instrument readings differ from those indicated, it is necessary to replace the sensor, after which the fuel assembly should be reassembled.
Troubleshooting unarc error. dll
First of all, the user needs to download and install a universal archiver on his computer - 7-ZIP. This can be done on the official website of the program https://www.7-zip. org/download. html. Here you will need to select your operating system and its architecture. It works with almost all types of archives.
When installing a problematic game or application, you must carefully select the installation path. It should not contain Cyrillic, that is, Russian letters. The entire path must consist only of Latin characters or numbers. For example, when installing DotA2 into the Games folder, an error will occur. Try canceling the installation, renaming the folder to "Game" or something similar in English and running the installation again.
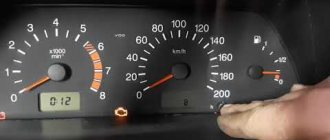
How to view the error code using the odometer
In the interior of the VAZ 2114 dashboard, the speedometer scale is combined with the odometer scale in one instrument. The error code will appear on the display if you perform the following actions:
- At the bottom of the speedometer there is an odometer button, which should be pressed and not released, and simultaneously turn the ignition key to the first position.
- Return the button to its initial state, then briefly press it again, the firmware version will appear in the window.
- If there is a malfunction, the error code numbers will be displayed on the display after pressing the device button for a short moment.
The error codes that the odometer shows differ from those displayed by the on-board computer; they have numbers ranging from 1 to 9, as well as two-digit numbers. The numbers do not say anything; to identify the problem, you need to look at the printout of the digital values in the verbal description.
Failures identified using the odometer
| Error code | Decoding code numbers |
| 1 | The malfunction is related to the microprocessor, a failure or a serious malfunction that requires flashing |
| 2 | The float sensor that determines the fuel level inside the gas tank has stopped transmitting readings |
| 4 | The voltage in the electrical network is higher than normal, there is a possibility of a short circuit |
| 8 | The voltage in the power supply has dropped to a minimum value, one of the reasons is the battery, it needs to be recharged |
| 12 | The indicator lamp on the instrument panel does not work correctly, the wiring is faulty |
| 13 | There is no connection with the oxygen sensor, possibly a wire break or short circuit |
| 14 | Engine overheating, high signal level of the coolant temperature sensor |
| 15 | Antifreeze temperature controller is faulty, wiring problem |
| 16 | There is increased voltage in the car electrical network |
| 17 | Low voltage, battery may be low |
| 19 | Malfunction in the crankshaft position sensor circuit |
| 21-22 | There is a malfunction in the throttle position sensor circuit, the cause may be a break or short circuit in the wiring |
| 23/25 | High or low signal level of the temperature sensor of the air entering from outside, possibly a short circuit of the TPS |
| 24 | The speed sensor circuit is faulty, there is no speedometer reading |
| 27-28 | Exhaust gas sensor signal is incorrect |
| 33-34 | The air flow meter does not work, there is a fault in the circuit |
| 35 | The idle air control has a deviation |
| 41 | The signal from the phase control sensor does not work correctly |
| 42 | Malfunction in the electrical circuit of the ignition unit |
| 43 | The signal from the mixture knock sensor is questionable |
| 44-45 | Fuel mixture is too lean or rich |
| 51 | Malfunction of the starter-charger |
| 52 | Malfunction of the memory module of the electronic control unit - RAM |
| 53 | CO potentiometer failure |
| 54 | Indicates that there is no signal from the octane corrector regulator |
| 55 | Lean air-fuel mixture (sudden throttle opening) at low load |
| 61 | Malfunction in the electrical circuit of the oxygen sensor (lambda probe) |
Determining the fault yourself
Of course, we, like real drivers, always strive to solve any problem with our own hands. Well, you don’t like it when someone else’s guy treats your “swallow” and I understand you perfectly. However, if we consider the issue of the on-board computer, then everything is somewhat different, but in certain cases you can handle it yourself. I warn you right away: do not listen to pessimists who will foam at the lips to prove that you cannot defeat computer errors. But remember once and for all, the error codes will differ from the service station options, since by and large we will be testing the dashboard without resorting to the help of that same “on-board driver”. Instead of a number with a four-digit value, we will be presented with a two-digit one.
Before I tell you about the different combinations, follow a few simple steps. They will help not only determine the firmware version, but also find out about existing faults. Self-diagnosis begins with these actions!
If the Check Engine light is on, this means a failure in the electronics system, then you cannot do without specialists. In other cases, after carrying out these actions using the following information, it will be possible to read errors. Combinations that may appear on the instrument panel:
Even after eliminating the malfunction, the corresponding codes will still appear on the error panel. “How to remove these readings?” you ask. Yes, very simple! Turn on the ignition and disconnect the positive terminal from the battery for a few seconds.
After which, we check the result, there is almost a 100% guarantee that if the error is corrected, the problems will disappear. Another nuance that can mislead you is the addition of errors. That is, if there are several of them, for example: 24 and 41, then you will see the number 65.
What does error 10 mean?
The driver of the VAZ 2114 sees error codes on the dashboard under the speedometer.
In the list of error codes 10 on the VAZ 2114, injector 8 valves do not exist. However, its appearance on the display is not uncommon. It means adding two known codes. To make sure that code 10 is not a glitch that arose as a result of errors stored in the computer’s memory, they can be reset by disconnecting the car’s power supply terminal from the battery. A de-energized control unit will clear the information stored in it. And if, while the car is moving, error 10 in the VAZ 2114 appears again, then you will have to understand its cause.
Replacing the unarc. dll
If an error occurs during unpacking the unarc archive. dll returned error code -11 (1, 7, 12, 6, 14, 8)" you must try to replace the dynamic library file and register it in the system registry. To do this, you need to download another unarc file. dll via the link https://www. dll. ru/files/search/unarc. dll.
Try running the application with which you were experiencing the error again.
Reasons for error 8
For the latter, this most often indicates the need to replace the brushes, since the old ones are already worn out. In addition, the code may occur in such cases as:
- Poor contact at the battery terminals or generator contacts;
- Damage to battery or generator wires.
Sometimes an error indicates other problems. But this happens very rarely.
You can determine the exact reason for this behavior of the car on your own. First, you should visually inspect the battery and generator and their contacts. You may notice oxides and other defects on the terminals and connectors. There is often visible damage to the wiring. The battery terminals may not be properly tightened. In rare cases, you may notice that the battery is swollen.
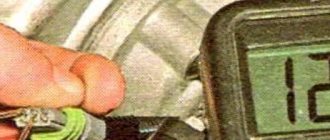
It’s a good idea to check what the voltage is in the on-board network on the dashboard
You need to pay attention at what point it decreases or constantly remains low. You should also diagnose the battery and generator with a multimeter in voltmeter mode
Battery diagnostics is performed as follows:
- Set the measuring device to voltmeter mode. Select a voltage of about 20 Volts;
- Connect the black probe to the negative terminal of the battery, and the red one to the positive terminal.
- Evaluate the device readings. If the battery is charged, the display should show at least 12 volts.
If the value is lower, then the battery needs to be charged. If after this, it does not charge completely or discharges quickly, it should be tested with a load fork. This can be done independently or at a car service center.
You should also check the operation of the generator. To do this you need:
- Take a multimeter and set it to voltmeter mode, set the voltage to approximately 20 Volts;
- Connect the black probe to the negative of the battery, and the red one to the positive;
- Start the power unit and wait until the speed stabilizes;
- Evaluate the value on the device display. During normal operation of the generator, it should be at least 13.5 Volts. If the multimeter shows a figure less than the specified one, the generator is not charging the battery well or is not charging at all.
Diagnostics using special equipment
The diagnostic process using special equipment consists of checking the car using a laptop. To connect to the diagnostic connector you will need a cable with an adapter. Using this cable, we connect the computer to the connector via USB output. For testing you will also need software; the power of the computer used is not important. There are many versions of different testing programs on the Internet.
Diagnostics is performed as follows:
- It is recommended to inspect the vehicle before starting the inspection. Check the volume of consumables - engine oil, brake fluid, coolant.
- Find the diagnostic connector and connect your laptop to it. If you have a special scanner, then that's even better. But since finding a scanner is not so easy, and buying one is not cheap, you can use a laptop. Before testing can begin, the ignition must be activated. There is no need to start the power unit.
- After connection, the testing utility starts. The software interface may vary. When you launch the software, graphs or a list of parameters with numbers may appear. This information will allow you to draw conclusions about the operation of the power unit.
- The scan starts. Fault codes will appear on the laptop screen. To decrypt, use the information provided in this article. We could not describe all the codes, but we deciphered those that occur most often. Usually, when downloading a program to a computer, users are provided with a separate file describing the faults.
- After decryption, the problem is repaired.
Do-it-yourself modification of vases and frets
If you are tempted by the multimedia characteristics of 2DIN devices, then in order for your radio on the VAZ 2114 to become “like native” you will have to worry about modifications.
To do this, you need to acquire the following consumables:
- panel for 2114 (do not spoil the standard one, it may be useful when reselling the car);
- polyurethane foam;
- automotive putties, starting (fiberglass) and finishing;
- epoxy glue (resin);
- primer and paint (the material you will use to cover the panel afterwards);
- sandpaper.
Tools that will be useful:
- jigsaw;
- mounting knife;
- screwdriver;
- automotive spatula;
- brush.
The installation algorithm is as follows:
- We choose a place on the panel for the future radio (remember, the air vents can be moved, and most of the buttons move perfectly within 10 cm).
- We put the slide under the radio and outline the place.
- We cut it out with a jigsaw.
- Now from the scraps we assemble a full-fledged rectangle for fastening the sled. We cut them with a mounting knife and “plant” them with epoxy glue.
- We insert the slides and fix them with screws on four sides (there is a little secret - secure the future radio with a vertical angle offset, then the sun will not blind the screen).
- We select a place for the air ducts and lengthen them, if necessary, using corrugations.
- When the slides are mounted, we blow everything with foam.
- We cut off the foam and cover it with epoxy resin.
- We putty the start, then the finish.
- We prime.
- We paint or cover with self-adhesive.
- We connect the radio in the same way as described above.
Lambda decoy
The sensor itself often fails and is quite expensive. For this reason, some motorists install the so-called DK blende into the system.
There are two ways to eliminate the problem of a constantly “jamming” lambda - mechanical and electronic. Both methods are good in certain conditions.
Mechanical "trick"
A metal tube is welded onto the sensitive area of the sensor, reducing airflow to the sensor. Consequently, the device thinks that less oxygen is coming in and the system is stabilizing.
The downside of the modification is its low efficiency. The device works stably only on old-style machines where the sensitivity of the electronics is not high.
Electric "trick"
To complete such a system, experts suggest increasing the resistance of the device by soldering an additional part into the sensor circuit. The photo shows a drawing of how this is done.
Checking the oxygen sensor
If there is an error, you need to check the sensor and power circuit. To do this, the machine is installed on an overpass. First, an external inspection of the wiring is carried out for breaks or oxidation. You need to check the wiring. You need to use a diagnostic fault scanner and record the available error information.
Checking the lambda probe begins with inspection:
- When feeding a thick mixture, a layer of soot will be visible on the sensor. A clogged element can cause its failure.
- The mixture supplied contains lead. During operation, it is deposited on the oxygen sensor, clogging it.
- If low-quality additives are used in the fuel, this can be visually detected by the presence of white spots.
If the causes of the error were not visually detected, diagnostics are carried out using a voltmeter as follows.
- The engine starts and warms up to operating temperature.
- The multimeter is turned on in voltmeter mode.
- One probe is connected to the signal wire, the other to ground.
- Engine speed should be between 2500 and 3000 rpm. A multimeter for a working unit should show a value in the range of 0.2-0.9 volts.
If the signal falls outside the specified limits, this indicates a sensor malfunction. Sometimes the problems are related to the slow operation of the device. It is believed that the signal value should change every second.
Video “Replacing fuses on Niva 4x4”
Author Alexander Belousov is looking for the reason for the constant failure of fan fuses on his VAZ 21214.
Niva SUV is known as the VAZ-2121
(VAZ 21213, VAZ 21214) and since 2006 as Lada 4×4
.
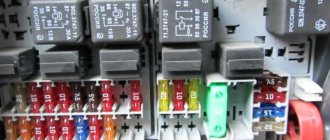
Produced from 1977 to the present with various body modifications, mainly 3- and 5-door station wagons with gasoline engines ( carburetor, injection ). In our publication you will find a description of the fuse and relay blocks of the Niva 2121 with their locations, photo examples of execution and block diagrams. Note the fuse responsible for the cigarette lighter. In conclusion, we will offer a Niva electrical diagram for downloading.
Due to the long production period and the huge variety of designs, there is no one general description of the fuse and relay block for Niva 2121. In your car, the purpose of the fuses may differ from those presented.
All main fuse and relay boxes are located in the passenger compartment, under the instrument panel on the driver's side.
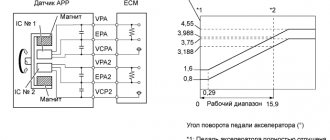
Causes of error P0327
To eliminate the errors themselves that appear on the display screen, it is important to eliminate the causes that generate error P0327 and possible other problems associated with the operation of this sensor:
- The device is installed and connected incorrectly;
- Has factory defects or defects acquired during operation that prevent the correct transfer of data to the ECU. Such defects include oxidation of contacts, their poor fastening, short circuit in the wiring harness;
- Broken wires in the circuit also prevent the transfer of information to the on-board computer;
- Short circuit in the DDD power circuit.
- Failures in the on-board computer.
Ways to solve the problem
We offer several methods for correcting the error - we recommend using them one by one.
Checking file integrity
As already noted, if the phrase “failed CRC check” is present, you need to immediately proceed to downloading the archive again, since the reason lies precisely in the violation of the integrity of the installation files. When using torrent trackers, some files may be missed - you need to verify the integrity of the archive through the tracker itself.
Disabling antivirus
Files of games and programs downloaded from unofficial resources and repackaged in RePack are often recognized by antivirus software as malicious. In such situations, the antivirus is quite capable of automatically deleting part of the data from the archive, which will ultimately lead to the occurrence of the failure we are considering. In this regard, it is recommended to disable the antivirus while downloading and installing games from third-party sites - this will eliminate the possibility of deleting some of the data.
Downloading the archiver
When repacking licensed games into RePack, unofficial developers often use less common archivers that allow them to achieve the highest degree of data compression. In this regard, problems may arise when unpacking the archive on a regular user’s computer. The solution is to install several free archivers at once.
Common options include WinRAR, 7-Z and WinZip - however, there are a number of other freely distributed solutions.
How to fix the problem
After diagnosis, the problem should be repaired. When reading a signal, it is necessary to check the circuit and devices following it. The most accurate method is to replace the damaged part with a known good one (new). This will eliminate the possibility of incorrect repairs. If the device is in working condition, the lines are checked; usually a primitive test is sufficient. However, if the control unit or relay fails, you will need a special tester and the ability to use it.
You can prevent this from happening in the following way.
- Check the condition of the connectors once every 5000 km. The pads should sit in place tightly, without play. If necessary, elements must be replaced with new ones.
- Check plug connectors two to three times a year for oxidation. Oxides reduce the flow of electricity through on-board wiring, which leads to incorrect display of information.
- Experts recommend purchasing and using oil for electrical terminals. The liquid is similar in composition to transformer lubricants. The formula prevents water and oxygen from reaching metals, which prevents them from rusting.
Important! You can diagnose VAZ 2114 error codes on the instrument panel and ECU yourself, only if you understand the essence of the process. If you don’t have confidence in your own abilities, it is recommended to contact a qualified specialist.
What and how can you check the lambda?
Catalytic converter overheating. If the lambda is faulty, an incorrect signal is sent to the ECU. This may cause the catalyst to malfunction. It overheats until it turns red and fails.
Indirect signs of sensor malfunctions are unstable operation at low speeds, increased fuel consumption and low dynamics. It must be remembered that these external signs accompany malfunctions of the injection system and malfunctions of the ignition system.
As a result of a failed sensor, the quality of the fuel mixture entering the combustion chamber deteriorates, which disrupts the smooth operation of the engine.
If you find it difficult to determine the malfunction of the exhaust system of your car, then the best way to solve the problem is to contact a car service center in Nagorny to identify the malfunction and repair the exhaust system of your car.
How to fix error p0300?
We talked about replacing spark plugs above, now we’ll look at how to fix other problems that generate error code P0300 for the VAZ 2114 8 valves.
Wires and ignition coil
The ringing of the wires will indicate the location of the break. Broken wires can be connected by twisting or soldering. Wires that are too old are best replaced. Before changing the ignition module, you need to ring it; we talked about how to do this in the article - No spark on the VAZ 2114. Malfunction of the wires from the computer to the ignition coil and from the coil to the spark plugs is checked with a multimeter. If everything is in order here, then the module itself must be replaced.
Oxygen sensor or lambda probe.
The durability of this device depends on the quality of gasoline. Its resource is 80-165 thousand km. In the first photo: this is what the oxygen sensor looks like. On the second, the oxygen sensor is screwed into the catalytic converter. The lambda probe affects fuel consumption. If carbon deposits form on the sensor due to partial combustion of fuel, it can be cleaned. But it is better to check the performance of the device at a car service center, where there are the necessary testers for this.
Fuel injectors.
Checking the resistance of fuel injectors is done with an ohmmeter. The resistance in the injectors should be 11-15 Ohms. The flow capacity of the injectors is checked by removing the fuel rail. Then the block with wires to the harness is connected to the ramp. It is necessary to connect the fuel pipes and place cups under the injectors. Then use the starter to turn the engine one or two times and make sure that fuel comes out evenly and equally from all injectors. If there is less fuel in one of the cups, that injector will need to be cleaned or replaced.
Catalyst.
A clogged catalyst can be removed and thrown into a corner of the garage, since without it the engine can breathe easier. But this operation may result in a conflict with environmental services and fines from the traffic police, since the catalyst is necessary to purify gasoline vapors from harmful impurities. Therefore, it is better to remove it and wash it. This simple procedure will extend the life of the device. Washing will give the proper result if the honeycombs are not damaged or melted due to the use of leaded gasoline, but are simply clogged with soot. If the cells are damaged, the neutralizer will have to be replaced.
TPDZ.
If the throttle position sensor is faulty, the engine will idle at high speed. This is the very first sign of a TPS malfunction. At the same time, the engine power decreases and its throttle response deteriorates. The sensor is subject to corrosion, cracks often appear on it, and the damper does not close completely. To extend the life of the sensor when corrosion occurs, it can be washed and cleaned. It is better to replace a sensor with a crack.
Engine control module. (ECU)
The ECU is called the brain of the engine, since this device coordinates all processes in the operation of the internal combustion engine, starting from the launch of gasoline into the ramp. The module is connected to most sensors, receiving information from them. And if the engine control module fails, the engine will not operate correctly. This unit in the car should only be checked by a specialist using special diagnostic equipment. You can only install a known-good unit on your own and see how the engine behaves after that.
Catalog numbers
You must always monitor the catalog numbers of the Toyota ignition module and make changes in a timely manner, since outdated models are no longer produced, but new ones appear.
These important components of the Toyota ignition system (like all others) have a ten-digit catalog number.
The first five are the same for all coils - 90919, the next five (usually written with a dash) are different, for example, 02117, 02163, 02234, 02259, 02265, etc.
Considering the important role that this module plays, it would be correct not to experiment with installing suitable coils on the machine, but to install only the one recommended by the manufacturer.
How to decipher the codes of VAZ-2114 on-board computers
What codes can you look for when diagnosing the Lada 2114 in relation to on-board computers? These devices are exactly the same electronics as those on foreign cars, but the problem is that VAZ-2114 they are capable of malfunctioning, but this does not mean at all that you should avoid diagnosing the car yourself using this product.
So that you do not have to study the full list of errors and their explanations, experts have selected only the most common ones:
- 0102, 0103 – the indicator responsible for regulating the mass flow of air flow gives an insufficient level signal;
- 0112, 0113 – the signal from the sensor recording the temperature regime of the incoming air is faulty;
- 0115-0118 – the condition of the VAZ-2114 coolant temperature meter leaves much to be desired; to eliminate the breakdown, a complete replacement of the indicator is necessary;
- 0122, 0123 – interference or an incorrect signal is coming from the indicator that controls the throttle position; the component requires immediate replacement;
- 0130, 0131 – the device indicating the oxygen level is faulty;
- 0135-0138 – the equipment heating the oxygen meter does not work, so it is worth replacing the element;
- 0030 – there are malfunctions in the functioning or a break in the entire chain of control and regulation of the oxygen meter heater up to the neutralizing mechanism;
- 0201-0204 – a break in the injector control chain has been detected;
- 0300 – there are misfires in the on-board computer, this is obvious – the VAZ-2114 is difficult to start right away;
- 0301-0304 – misfires were detected in engine devices;
- 0325 – the on-board computer detected an open circuit in the detonation mechanism chain;
- 0327, 0328 – malfunction of the detonating sensor; the situation can only be saved by replacing the equipment;
- 03335, 0336 – malfunction of the crankshaft position sensor;
- 0342, 0343 – the on-board computer indicates a breakdown of the phase sensor;
- 0422 – the neutralizer refuses to work adequately;
- 0443-0445 – the valve that bleeds the adsorber does not work;
- 0480 – the fan cooling the VAZ-2114 is faulty;
- 0500, 0501, 0503, 0504 – the vehicle speed sensor requires repair;
- 0505–0507 – the idle speed controller, which is responsible for the speed, is faulty;
- 0560, 0562, 0563 – the voltage is poorly supplied, which requires more thorough checking and testing; this is the only way to identify areas of the chain that need to be replaced;
- 0607 – detonation channel does not work;
- 1115 – the heating circuit of the oxygen level meter is not functioning properly;
- 1135 – a break in the heating circuit of the oxygen sensor has been detected, there is a high probability that a short circuit has occurred;
- 1171, 1172 – the level of the gas component of the potentiometer leaves much to be desired;
- 1500 – the control circuit of the fuel pump device is broken;
- 1509 – an overload of the idle speed component has occurred;
- 1513, 1514 – the computer has detected an open circuit in the idle mechanism chain;
- 1541 – the regulation and control circuit of the relay suitable for the fuel pump is broken;
- 1570 – the integrity of the traction control system is broken;
- 1600 – there is no connection with the system responsible for the car’s traction control;
- 1602 - occurs very often during diagnostics, means insufficient voltage on the on-board network or its complete absence on the electronic control unit;
- 1606, 01616, 1617 – the mechanism for fixing uneven road surfaces is broken;
- 1612 – faulty reset of the electronic part of the control;
- 1620 – it’s time to change the memory part;
- 1621 – the state of the random access memory sensor is affected;
- 0337, 0338 – the component that controls the position of the crankshaft is not working correctly, a circuit break is possible;
- 0481 – cooling fan does not work;
- 0615, 0617 – the relay circuit is not working adequately, there are breaks and short circuits;
- 1141 – the heating mechanism of the first oxygen sensor, next after the neutralizer of the oxygen level meter, is not functioning correctly;
- 230 – it’s time to change the fuel pump relay;
- 263, 266, 269, 272 – the driver of injectors No. 1-4 does not work, you cannot do without replacing the components;
- 640 – the Check Engine lamp circuit is broken.
Errors that the injector may produce
The lifespan of the lambda probe for the “fourteenth”, declared by the manufacturer, is 80 thousand kilometers. But this does not mean at all that it cannot fail much earlier or last twice as long.
The cause of a malfunction of the VAZ-2114 lambda probe may be:
- overheating of the working element;
- violation of the tightness of the connection between the sensor and the exhaust manifold body;
- clogging of the device contacts due to the use of low-quality fuel, or oil (coolant) getting into gasoline.
Errors in the fuel injection unit and combinations associated with engine problems should be included in a separate group. During self-diagnosis, they may appear with the following signals:
- 35 – malfunction of the idle speed sensor, it will need to be replaced;
- 43 – incorrect signal from the detonation regulator, often appears when there is a break in the electrical circuit;
- 44 and 45 – problems with the injection system, fuel is excessively rich or, conversely, lean;
- 54 – the octane corrector controller does not respond;
- 55 – at high speeds the fuel mixture is lean.
It is worth considering combinations 44, 45 and 55 in more detail. If the malfunction is not hidden in the sensors themselves, then you can notice signs of it on the engine side:
- he will triple;
- Jerking may be felt when changing gears;
- in rare cases, the VAZ-2115 simply stalls for no reason.
If you notice one of these combinations on the display, then it is worth conducting a more thorough diagnosis of your car. In some cases, major repairs may be required. Those who are faced with the problems described should contact a service station, because often it will not be possible to repair the car on your own.
OBDI protocol
In the VAZ-2114 and 2115 models, the diagnostic connector is located under the cigarette lighter and is covered with a special panel. To remove it, just lift the decorative cover. A VAZ car can be equipped with an old-style connector with 12 contacts of the OBDI type, which has a rectangular shape. All injection models with 8 valves are equipped with this, except those produced after 2002 with an OBDII connector.
If an error occurs that causes deterioration in the quality of exhaust gases, the standard failure code, operating parameters and external conditions will be stored in the device that records the malfunction. If a malfunction is detected that affects the exhaust gases, a failure is detected during self-testing of the device, the indicator will light continuously.
The code indicates the part that causes suspicion and the type of breakdown; the information is displayed on the screen of the device used for diagnostics. The text of the error code may vary depending on the manufacturer
Saving data is important to assist in troubleshooting
Car self-diagnosis
Before we begin to decipher the error codes of the on-board computer on the VAZ 2114 and 2115, we will talk about self-diagnosis. It must be taken into account that checking the vehicle independently and using special equipment at a service station can give different results. The equipment available to professionals will allow you to more accurately detect problems than diagnosing problems using a dashboard. Combinations of breakdowns will also be different. Nevertheless, self-diagnosis of malfunctions of the eight-valve “four” is useful.
How to view and find out about breakdowns that the control unit has recorded independently:
- First you need to sit in the driver's seat and hold down the odometer button on the speedometer.
- Then insert the key into the ignition and set it to the first position.
- After turning the key, you must release the pressed button. This will cause the needles on the speedometer, tachometer and other gauges to move quickly.
- Then you need to press the odometer key again and release it. An inscription with the firmware version will appear on the device.
- After the third press of the odometer button, the VAZ 2114 error codes will start to light up on the display.
How to reset errors yourself
After self-diagnosis of errors and elimination of their causes on a carburetor or injection engine, a malfunction message may remain on the standard panel. If the problem has been deleted, this means that the code combination remains in memory. We'll look at the description of the faults below, and now we'll tell you how to remove the code from memory. To remove it after testing the device, when VAZ 2114 errors appear, the codes themselves must be written down. After this, the daily mileage reset button is pressed again, this will clear the fault from the control unit’s memory.
Resetting the "Check Engine" error
It often happens that the instrument panel 2114 8 or 16 valves displays a check error - engine malfunction, the orange icon is on. Self-diagnosis does not always allow you to accurately check and determine how to fix such a problem. To fix the problem and find a solution, you should perform more detailed diagnostics of the car using a computer and additional equipment. Perhaps, during diagnostics, an unknown error indicates a malfunction in the microprocessor, on-board network or sensors. After the problem is fixed, the receipt may remain.
The "Check Engine" indicator indicates a problem with the engine.
How to reset the fault code:
- First, turn on the ignition; you do not need to start the car engine.
- Then open the hood. Use a wrench to loosen the bolt on the negative terminal of the battery.
- Wait about one minute, after which the battery terminal must be replaced.
- Close the hood and turn off the ignition.
- After that, turn it on again and start the car engine. If the check remains, it should go out on its own after some time. If the instructions given did not work and the solution did not help, then you need to look for the cause of the problem and fix it.
Determining and decoding errors on the VAZ 2114
Self-diagnosis of a car allows you to identify faults, but some of them are rarely identified. An odometer is used for diagnostics.
Self-diagnosis of VAZ 2114
The sequence of actions is as follows:
- Press and hold the odometer button and turn the ignition key to the first position.
- Release the odometer button and press briefly again. As a result, the firmware version will be displayed.
- Now, to see the error codes, you need to press and release the odometer button again.
Error codes are in the form of numbers from 1 to 9 and two-digit numbers, unlike those displayed by the on-board computer. Thus, you can use the odometer to identify some car faults. The most common errors are shown in the table below.
Diagnosis of faults using special equipment
To identify faults, service stations usually use the car’s on-board computer and a laptop with specialized applications. In this case, it is possible to obtain error codes that correspond to various problems. The most common of them are shown in the table.
If errors occur with other codes, you should read the information about them in the file that comes with the car diagnostic application, or search on the Internet.
The controller clears the memory after turning off the engine with the ignition and disconnecting power from the battery for 10-15 seconds. In this way, you can determine after repair whether the malfunction has been eliminated.
Errors in the VAZ 2114 occur quite often, so the ability to recognize them will not be superfluous to carry out proper car repairs. For correct diagnosis, you will need a computer with a special program and an understanding of the on-board computer readings.
Diagnostics of Niva Chevrolet
The Chevrolet Niva diagnostic connector helps you obtain information about how most units work, into which special equipment is connected via Bluetooth or a cable. Therefore, if you want to conduct independent diagnostics, it is important to know where it is.
The connector in the Niva is located under the steering wheel on the right side, and the pinout itself is under the dashboard on the driver’s side. To check the on-board computer, you need to use special equipment that transmits all the necessary information to the laptop. Data transfer is carried out using a COM port into which a K-LINE type connector is installed.
When connecting, errors may appear on the laptop screen. At this moment, there is no need to worry, since the appearance of such messages may be due to a lack of communication with the device itself. You should also check whether the standard anti-theft system is installed; if so, check the adapter itself. If there is a standard location, then it is connected to the diagnostic line between the ECU and the immobilizer. And if it is missing, a plug is installed in its place. To restore communication between the contacts, a jumper is installed, as shown in the picture below:
Replacing the lambda probe Shnivy
To change the first and second oxygen sensors, follow a simple sequence of steps.
- Drive the car onto an overpass or inspection hole.
- Remove the terminals from the battery.
- Get under the car and prepare key No. 22. In some cases, fasteners stick to the metal. Therefore, a loosening compound will also come in handy.
- Unscrew the sensors with a wrench. If the housings do not lend themselves and the device is guaranteed to be replaced, you can cut the wires and use a spanner or socket of the appropriate size.
- After disconnecting the device, you should wipe the sensor seats to remove all dirt and dust.
- Installation of the new part is carried out in the reverse order.
You can see how such repairs are performed in the video.
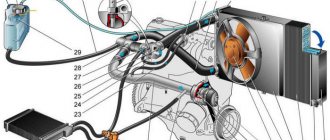
General arrangement of blocks
Scheme
Description
p, blockquote 7,0,1,0,0 —>
- Engine control system fuse box
- Windshield wiper relay
- Main fuse box
- Engine Control Relay Box
- Additional relay block (above the gas pedal, and not shown in the diagram)