DIY air intake mesh
Hello everyone
! So I was not spared this modification of our favorite cars. I decided to make an air intake mesh, and then install it. I used these safety posters as materials.
I found the mesh sizes on the Internet.
I made the frame width 15mm. Next, I marked and cut out with a serrated knife (a knife with serrations).
Next, I cut out the mosquito net to shape and glued it with waterproof glue.
This is what happened in the end.
The frame thickness was 4mm.
The most difficult operation was to remove the wiper arms. They didn’t want to remove themselves with their hands. Even rocking and light blows with a hammer did not help. In the end, I decided to use a puller, but only a three-legged one was available.
Naturally, not three, not even two such thick paws could not fit. Because I’m an experienced pelvic specialist, and there was no such thing that I couldn’t do anything with the means at hand. I decided to try to use it as a one-legged one)))).
We do not completely unscrew the nut, place one paw under the leash and begin to tighten the rod, while holding the puller tightly and applying tension. Then, with light movements, we swing the leash and it is removed. The frill can be removed quickly and without any difficulties.
At the same time I decided to enlarge the holes in the drainage rubber bands, because... I read while driving that over time, these rubber bands become clogged with dirt, leaves, and because of this, water begins to enter the cabin through the air intake.
Then everything is assembled in reverse order. Good luck and health to everyone, and if you are sick, be sure to get well!
I installed a mesh on the interior air intake. I had to remove the plastic under the wipers, 6 screws + the wipers themselves (take them off) I ordered the mesh from Ali. arrived in 6 days 546.71 rubles. | Frill mesh filter for Lada Vesta 2015 2016 2022 2018 2022 plastic ABS protection function car tuning accessories https://s.click.aliexpress.com/e/YsL03hC
But to clean the mesh, it’s the same torment?
I installed it last year in the summer. The Internet is full of manuals on how to do it. The only problem was removing the wiper arms, the rest is simple) I bought the mesh at Westashhop)
what to put. what to remove. everything is one.
Lada Vesta SW Cross 1.8 5MT Luxe Multimedia Mars 2022. was.
then you need another mesh to protect the mesh from debris))
What does this net save her from? I’ve been driving without nets for exactly a year, well, I changed the cabin filter, I won’t say that there was something terrible there..
So nothing reaches the filter - it gets stuck on the fan.
Last edited by mc1aren; 05/03/2019 at 15:32 .
Lada Vesta SW Cross 1.8 5MT Luxe Multimedia Mars 2022. was.
# Literacy is encouraged, but in this case the misspelled word was used to add emotional overtones. The entire offtopic has been deleted, please stay on topic!
Last edited by admin; 05/03/2019 at 18:52. Reason: offtopic
12-640×426.pnghttps://lada.online/do-my-self/tunin. ada-vesta.html tvy61
,After all, the filter is installed behind the fan, which means that all the debris first fell on the fan blades, and only after that settled on the cabin filter. Most likely, this was done so that Vesta’s cabin filter acts as additional sound insulation. Solution to the problem It consists of installing an additional filter, but a much smaller one. Previously, sedan owners had to do everything themselves. However, now the problem has become much less acute, because mass production of filters has been established. The air duct mesh itself for Vesta is a black outline surrounding a fine mesh mesh. Fastening is carried out using magnets. This is a very convenient and logical solution, since fixing the air duct mesh with screws or bolts would be extremely inconvenient due to the lack of standard holes and space to drill new ones
Yes, I don’t mind, the question was about the difficulty of cleaning this mesh..
How does the air intake work on a Lada Vesta car?
The principle of operation is to take dirty air from the engine compartment with a fan and redirect it through a filter into the heating or recirculation system pipes. As a result, purified air enters the cabin through the openings:
- in the door;
- to the right of the driver's working leg;
- under the glove compartment above the front seat passenger's feet;
- in the middle, on the sides of the control panel.
The operation of the Lada Vesta air intake is regulated by pressing a button that turns the electric fan on or off. The speed of its rotation is regulated by a special resistor. The structure itself is located to the right of the driver, in the glove compartment area.
Air intake components
The air intake system of the Lada SV Cross includes the following components:
- cabin lower filter;
- electric fan;
- pipe system;
- lattice with large mesh;
- control resistor;
- beverage cooling chamber.
Photo source: https://www.drive2.com/l/525869199726216248/
All parts of the system ensure the supply of clean warm or cool air to the vehicle interior.
Advantages of the Vesta Sport air intake
On previous Lada models, the design looked different, which led to inconvenience. And the air intake of the new Lada Vesta model is located closer to the cabin. Because of this, he gained the following advantages:
- repairs of the entire structure are carried out from inside the car;
- To remove and replace the air filter, it is enough to dismantle the glove compartment;
- a more advanced air supply system for heating or ventilation;
- new space under the control panel on the right side for cooling drinks.
Despite so many improvements, there are still unresolved problems with this system.
DIY Vesta air intake mesh
- 340 rub.
- Description
- Reviews (8)
- Question answer
Interior air intake mesh with magnets for Lada Vesta car.
The mesh covers the inlet to the car's air intake, creating an obstacle for various small debris; the dust itself is already filtered by your cabin filter.
The mesh is installed in a regular place without drilling the body, fixed with neodymium magnets (supplied with the mesh)
1. Remove the windshield wiper arms 2. Remove the plastic frill (6 torx t20 screws) 3. Install the mesh 4. Fix it in the hole with magnets 5. Reassemble in reverse order
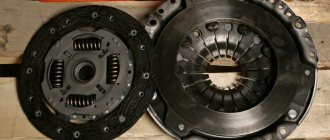
Hood gas struts
Without the following accessory, it would be wrong to talk about any modifications to the Lada Vesta. And you probably guessed what it is. These are those wonderful gas hood struts. They allow you to open the hood easily and simply, with one hand.
The thing is really useful, when they are not there, you think: “A standard poker is enough.” But when you install them, you realize that using them is much easier and more convenient. The hood stops are installed easily and without problems. One bracket is placed on the front panel, the other on the hood. The entire installation process takes no more than 20 minutes.
Problem
However, this solution had almost no effect, as a result of which the company received complaints and requests for additional improvements to the design. After all, the filter is installed behind the fan, which means that all the debris first fell on the fan blades, and only after that settled on the cabin filter. Most likely, this was done so that Vesta’s cabin filter acts as additional sound insulation.
And AvtoVAZ gave an answer according to which, from January 2022, the frill was corrected in accordance with the wishes. However, as the actual operation of Vesta showed, although the likelihood of filter clogging was reduced, it was not possible to completely eliminate this design flaw.
Naturally, all this forced the owners of Lada Vesta and X-Ray to resolve the issue on their own.
Review of Manufacturer Prices
Dimensions: 184x133.5x26 mm.
| vendor code | |
| Serial number/item | Price in rubles |
| LUZAR 271153553R (original) | From 5000 |
| STELLOX 10-35126-SX | From 4500 – 4700 |
| FENOX RO0004C3 | From 4500 – 4700 |
| RO0003O7 | From 4500 – 4700 |
| AVA QUALITY COOLING RTA6398 | From 4500 – 4700 |
| VALEO 812374 | From 4500 – 4700 |
| NISSENS 76512 | From 4500 – 4700 |
| MAGNETI MARELLI 350218221003 | From 4500 – 4700 |
| *prices are as of May 2022 | |
Cold intake from Vesta Sport
Lada Vesta SW Cross 1.8 5MT Luxe Multimedia Mars
Lada Vesta SW Cross 1.8 5MT Luxe Multimedia Mars
I feel like the jerking has disappeared in 1.2 gear. The car became more responsive when you press the gas pedal. There is always enough air now. In terms of the temperature of the incoming air, there is no change on the highway; in the city it may be a little hotter, but the difference is not so obvious. Because The entire intake system also got hot before. After 3t. rpm there was a roar like a sports car.
Work: I only pulled out the original box with the filter, unscrewed the adapter from it (with 2 bolts), which is then inserted into the rubber corrugation. This adapter was screwed directly to the Ford filter (all seats fit perfectly) and back into the corrugation to the throttle. Place the corner in the standard filter mounting location.
Tank neck protection
To protect the paintwork in the fuel filler area, I installed a rubber ring.
But here I would like to talk about another important improvement. Many Vesta owners have encountered the following situation. You press the gas pedal, but the car does not accelerate and moves jerkily. The “check” on the instrument cluster does not light up. That is, there seems to be no pronounced problem.
The reason for this is a clogged fuel pump grid. The point here is not even the use of low-quality gasoline. In my opinion, dirt gets into the tank in another way. This path is a hole for a check valve, which serves to connect the tank with the atmosphere.
Dirt from under the wing gets into this cavity. To remedy the situation, I installed an additional hose in the hole.
This is a hose from the pneumatic system of the intake module 129 of the engine. It fits the hole perfectly. After this modification, neither I nor any of my friends ever encountered a clogged fuel pump strainer. I recommend doing this before you encounter this.
I installed cool speakers with good sound in the Lada Vesta. I show in detail all the installation work
Checking heating efficiency
The heater should be checked before the start of the winter season, and also several times in winter. Then troubles will not take you by surprise. To do this, you need to check the operation in all modes and evaluate:
- Does the air heat up and how quickly?
- Does the flow of air masses change with a change in command;
- Are there any extraneous noises?
- In general, are you satisfied with the operation of the heater?
Particular attention should be paid to the same temperature of the pipes. If the difference in the heating of rubber pipelines is significant, this means a serious problem. It's worth finding. In the worst case, this means replacing the Vesta radiator; in the best case, airing or a low level of antifreeze.
Door stops
My car is a 2022 model, and the doors swing from side to side like a gate. All this is due to the fact that old-style limiters are installed here.
They perform their functions poorly. New types of limiters have been on sale for a long time. The price for one is about 1,450 rubles. Today we will install them to replace the old ones.
To do this you will need to remove the door trim. Having safely removed the upholstery, we move on to replacing the limiters themselves.
The restrictions have been removed. You see old and new.
The old one is mounted on studs, and to attach the new one you will need additional bolts. Installed new door stops. Now there are 3 clearly fixed positions.
The door is clearly fixed, does not slip, does not dangle like a gate. The thing is really useful. If you have old-style limiters, I strongly recommend that you replace them with new ones.
see also
Comments 26
The cabin filter is probably clogged. I changed it and it helped. We have minus 40 in winter. The bottom left button is on.
Found a video as a solution to the problem
As an option. Haven't you tried it? Because this feature infuriates me. All the way to the feet and the fan in the middle. It blows like a scribe.
Found a video as a solution to the problem
And there really is a bad wind in my legs. It became noticeable especially with the cold weather.
I'll tell you my observations. The coolant temperature is maintained at 82 degrees. When moving, it can drop to 75. I installed YarPlast winter protection on the lower part. The temperature became higher than 82 - 95 degrees. It has become much warmer in the car, but it works up to - 8 -10 It should be noted that turning on the first fan speed is 100 and turning it off is 96. This suggests the thought that the engine is operating in incomplete warm-up mode...
I'm also not happy with the heating. precisely the fact that when translated “blowing at the feet” it also blows on the glass. This Feature of AvtoVAZ is annoying... If you turn it on your feet and yourself. and closing the deflectors is fine. Are there any ways to overcome this feature?
And I have a luxury. It blows wherever I want.
It's not true. Most likely you didn't check. I checked this with my manager on 3 machines with different configurations. There's a little bit of an uplift on everyone! turn on the airflow only for the legs, and the fan to medium, and then to maximum. You will be convinced!
That's not what I was talking about. In the suite you can turn on all the buttons at the same time.
In short, the answer was here. Only at AvtoVAZ this is a feature. I checked and compared the algorithm of work on the Test Drive West with full stuffing and on the empty one. It's the same everywhere. The manager's answer sounded like this: Either you get used to the car and drive, or you get rid of it. On AvtoVAZ this feature is specifically designed to prevent the windows from fogging up. He also confirmed that this does not happen on other cars. For me, such an algorithm is bullshit. Since there is a separate button for turning on the windshield and foot airflow.
Departing from the topic, I’ll say one more piece of news: the driver’s lower air duct has now been changed (for better airflow of the driver’s right foot).
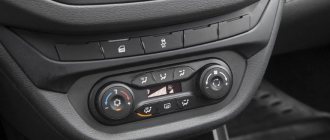
Heater and air conditioner control
“Classic” block without air conditioning
Left regulator (No. 9) – supply air temperature control; Right (No. 17) – air flow regulation; Buttons (No. 11-16) – setting the direction of air flow.
Comfort unit with air conditioning
The left regulator additionally has the function of turning on the air conditioner (No. 18), and the right one has the function of turning on air recirculation (No. 19). Otherwise, the control of supply air temperature, fan speed and air flow distribution of the Comfort version of the system is similar to the Classic version.
Luxe unit with climate control
Two buttons are replaced on the control unit:
- “Defrost MAX” mode (No. 24) – the air conditioning is forcibly turned on (if conditions permit), electric heating of the windshield and rear windows and side rear-view mirrors. The entire air flow is directed to the blower nozzles of the windshield and front side windows, and the maximum speed and air temperature are set.
- “AUTO” mode – in this mode, the air flow intensity (fan speed) and one or another air flow distribution mode are automatically set depending on the outside air temperature, the cabin air temperature and the coolant temperature of the engine cooling system.
The information display (No. 10) has also undergone changes; the air temperature scale has been replaced with numbers.
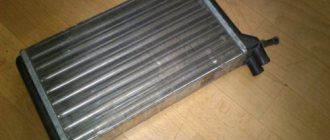
Instructions for replacing the VAZ 2107 heater radiator
2.Using an open-end wrench set to “7”, unscrew the two radiator mounting screws, and then remove the seal.
3.Next we go to the salon. This will require partial disassembly of the panel, or rather dismantling of the radio shelf (“beard”). It is dismantled by unscrewing two screws.
4. Under the “beard” we find the heater valve, and using the key “7” we unscrew the fastening of the cable drive. Move the free end of the cable to the side.
5. There are four steel brackets on the heater casing, with which the two halves of its body are fastened
Unclip the staples and remove the bottom half.
6.Only after this, carefully remove the old heat exchanger along with the heater tap, trying not to spill the remaining coolant.
- 7.Using a “10” wrench, unscrew the two bolts securing the valve to the radiator. We inspect the rubber gasket that is located between them. If it becomes unusable, we throw it away.
- 8. Just in case, use the same key to unscrew the two bolts securing the inlet pipe to the stove tap. Checking the gasket.
9.Check the faucet for functionality. If there are problems with it, it is better to replace it too.
10. Screw the inlet pipe to the tap, not forgetting to install a new gasket between them and lubricate it with sealant. Next, we screw the tap to the new radiator, also installing a gasket lubricated with sealant between them.
- 11.Install the new radiator in place.
- 12. Without closing the heater housing, screw the radiator to the partition between the passenger compartment and the engine compartment, installing the seal.
- 13.Connect the rubber hoses to the radiator pipes and crimp them with clamps. If the hoses have cracks or other signs of wear, they need to be replaced. This also applies to clamps.
- 14. After making sure that the drain plug is tightened, pour coolant into the system. In this case, the stove tap must be completely open so that the liquid gets into the stove radiator.
- We tighten the caps of the expansion tank and the cooling radiator.
- 15.Start the engine and warm it up to operating temperature.
- 16.Without turning off the engine, we check from the interior side to see if the new radiator is leaking, and if there is a leak from the place where it connects to the tap. Check the coolant level. If necessary, add it until the required level is reached.
- 17.If everything is in order, connect the crane drive cable and secure it with a bolt.
- 18.Attach the bottom cover of the heater housing and secure it with metal brackets. We put the radio shelf in place and screw it to the panel with self-tapping screws.
How to understand that there is a malfunction in the system
Frequent addition of antifreeze indicates that the connecting hose system is not tight. And this contributes to the penetration of liquid beyond the CO. You should carefully inspect the connecting hoses and their integrity. Be sure to inspect the pump and drain holes. If there are traces of leaks, you need to solve the problem yourself or contact a service station.
To identify problems with the cooling system, you need to warm up the car to a maximum of 85-92 degrees. Then you need to check the lower pipe, when it is cool, this means that only a small circulation circle is working - the thermostat does not open. In this case, the machine cannot be used. To verify that the part is faulty, you need to open the expander cover. Make observations when antifreeze does not flow, you need to clean the pump or replace the thermostat.
Installing the rear window frill on the Lada Vesta
Anti-corrosion treatment of the machine The quality of the paint and varnish coating is also at the highest level. Amateurs and automobile experts checked whether the Lada Vesta's paintwork was reliable. No imperfections, scuffs or various coating defects, which often happened on previous models, were noticed.
Although the small thickness of the Lada Vesta LPC may raise doubts. But this trend is characteristic of many modern cars - environmental standards impose restrictions on the depth of the paint and varnish layer. High-quality soil protects the iron well, and corrosion is unlikely to spread due to ordinary chips.
The bottom, sills and arches have been additionally treated with a layer of anti-gravel. In total, the thickness of the body metal is about 0.7 mm.
Is additional anti-corrosion treatment required for the Lada Vesta body?
Body of the Lada Vesta AvtoVAZ really kept its promise and improved the quality of the body, and even gives a six-year warranty on it instead of the originally promised five-year. This is still not much when compared with market leaders, but still better than nothing.
Galvanized or not? Yes, galvanization is present. True, the cold method is not the most reliable - the body is processed only from the outside, with the exception of the floor screen, which is protected on both sides. The peculiarity is that not liquid, but powdered zinc is used - this way all the cracks and bends will be filled more efficiently.
The thickness of the zinc layer does not exceed 8 microns - this became the determining factor in calculating the warranty period.
In terms of corrosion protection, the main focus is on cataphoretic priming, one of the tasks of which is to protect the zinc layer. The process involves immersing the body in a cataphoresis bath. The anode is connected to the body, and the cathode is connected to the bath. Thus, positively charged soil will settle on the negatively charged metal, and the body will be completely covered with a film that has sufficient rigidity for full protection.
But it is worth remembering that the service life of the body depends not only on the quality of galvanization and paintwork, but also on the owner’s attitude towards his car. If you neglect regular washing and do not get rid of paintwork damage in a timely manner, the car may soon rust and in this case additional anti-corrosion treatment is necessary.
Expectations from Lada Vesta
Domestic cars had an eternal problem in the form of weak paintwork and the rapid formation of corrosion. Remember the same Priora, which within a year could acquire rusty areas, which is simply unacceptable for a modern car.
With the first announcements, it became clear that the Lada Vesta will be a car of a new level. Car owners shared their assumptions about what kind of body the Lada Vesta has and that it will finally have normal corrosion protection. Representatives of the plant assured the public that in this regard their new product would not disappoint anyone and even promised to provide a guarantee on the body.
Separate accessory
For the most part, the product is a reincarnation of the original side rubber bands that AvtoVAZ installed for some time, and then abandoned them and removed these seals from sale. This option is made of plastic.
Price about 650 rubles
Buy: at Vesta Shop.
Attention! Check out the photographs with captions to determine which frill you need (Short or Standard). Includes 2 side frills
- Side frills Standard come on all new Vestas with the hood seal wrapped in a ring (except when short hood stops are installed);
- The shortened version is suitable for older cars that have a plastic straight corner sticking out (see photo), and also if you installed short, rather than long, stops that are attached to the area in front of this square.
- Unscrew the 3 Torx screws.
- Unscrew 1 large wing screw with washer.
- Wind up the frill and secure it.
- If desired, glue it with tape (the tape is applied in reserve, the frill will stick like that, but we do not recommend removing it so that the plastic does not rub the paint).
- Screw the screws back.
Problem
The main problem associated with this body layout surfaces in the fall, when leaves begin to crowd into the wide opening. It is quite difficult to clean them out, and few people would want to constantly fish out fallen leaves from the opening.
But in winter the situation gets worse, as snow gets into the opening, which prevents the trunk lid from opening normally. But that's not all. Over time, if there is a thaw, it snows and rains, or the car occasionally drives into a heated parking lot, the snow in the opening melts and turns into ice. And this is a direct threat to Vesta’s paintwork. When opening the trunk, the ice simply peels off the paint from the edge of the trunk lid - in this case, all that remains is to repaint the part.
Without a frill, snow quickly accumulates in the opening.
Solution
As it turns out, it's quite simple. Manufacturers of accessories for the Russian sedan began producing rear window frills for the Lada Vesta. The frill is a plastic trim of a special configuration, which is inserted with one edge into the opening of the trunk lid (near the seal), while the other is placed on the glass.
As a result, the opening closes, and Vesta owners can safely drive without fear for the safety and appearance of their car. In addition, cleaning your car with a brush becomes noticeably easier, more convenient and faster.
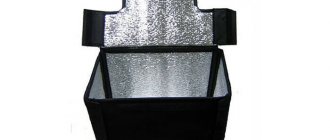
This pad is made of durable ABS plastic, which is resistant to external influences. The color of the product is black, and light shagreen is visible on the surface.
Video review of frill for Vesta
Why is galvanization needed and what is it?
Paintwork is not enough to protect the body. The slightest damage and moisture does its job, causing oxidation of the steel. The corrosion center, unnoticeable at first, grows, and the car has to be repaired.
One of the most effective ways to prevent rust formation is galvanizing the body. Auto industry leaders have been practicing this procedure for many years. Thanks to this, they can provide a warranty on the body for up to 20 years.
The body can be galvanized in the following ways:
- heat treatment;
- galvanic treatment;
- cold processing.
With the cold method, the body is simply treated with a zinc-containing primer. In this case, manufacturers do not provide a long-term guarantee, because the protective layer may be damaged along with the paint.