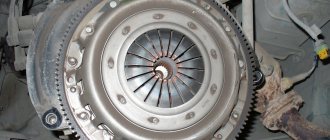
The pressure mechanism is controlled by the leftmost pedal. A well-designed lever ensures easy movement of the release disc petals. In this model of machine, commands to move the fork are supplied by a cable. He “walks around” in a matching shirt. It is worth noting that an automatic cable length adjustment system is implemented here.
Symptoms of a problem
On a new car, the important pedal assembly moves easily. Violation of the factory condition requires stopping operation and identifying the reasons. Usually, along with tight movement, related symptoms occur that indicate a malfunction of the assembly module:
- Extraneous squeaks during pedal movement.
- Jerky movement of the pedal.
- The need for frequent adjustment of the idle speed of the lever.
- The machine jerks when connecting the box to the motor.
Features of clutch on Grant
Unlike older models, the VAZ-2190 is equipped with an automatic clutch adjustment system. This unit is monitored by a special sensor, so car enthusiasts have much less hassle. If you hear all kinds of clicks from the machine, then the system is working. However, the system is not always effective. In particular, it will not help you in the following cases:
- If the pedal fails.
- If the clutch is not fully depressed.
In this case, there is a possibility of the cable breaking. It will definitely have to be replaced. If a replacement has been made, the clutch must be adjusted.
Next, we’ll talk about how this procedure is performed on a Grant liftback, sedan or hatchback.
List of online stores selling parts (Moscow, St. Petersburg, Kyiv regions)
| № | Name | Address |
| 1. | "Autoall" | www.avtoall.ru |
| 2. | "Original part" | lada-original.ru/ |
| 3. | "Navigator" | www.navigator-63.ru/ |
| 4. | "TOTAX" | totax.com.ua |
| 5. | "Zakupka" | kiev.zakupka.com |
| 6. | "How much" | www.avtostore.spb.ru |
Operations for adjusting the clutch cable Lada Granta
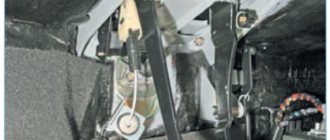
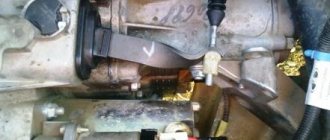
1. Set the clutch cable to its original position; to do this, overcoming the force of the spring of the mechanism, move the lower tip of the cable all the way forward, that is, in the direction of movement of the car. Hold the tip in an extended position, measure the size (see photo for size L) between the fork and the leader, it should be 27 mm. If the size does not correspond to the required value, then adjust it by rotating the leash in the desired direction. (see picture below, the mechanisms are located in the engine compartment)
Review of Manufacturer Prices
| Manufacturer | Price, rub.) | Resource (Thousand km) |
| LADA 21901-1602210 original | From 634 | 100 |
| ASPCC260210 | From 465 | 75 – 80 |
| BRAND 219011602210 | From 300 | 75 — 80 |
| Plastic cable lead 21901-1602266-00 | From 150 | 40 |
| 21901-1602210-00 clutch cable assembly | From 550 – 600 | 75 |
| 21901-1602210-00 clutch cable assembly | —/— | 75 |
| JSC "ProSport" 26594516 | From 500 | 80 – 85 |
| JSC Vortex 5465465 | From 550 | 80 — 85 |
Related link:
How to remove moisture from Lada Granta headlights yourself
*prices are current as of October 29, 2018.
Recommendations for the selection of parts and components
The vast majority of spare parts for the Lada Granta are domestically produced. Foreign analogues are not in demand due to their high cost. Compared to “our” products, imports are 10–15% more expensive. The workmanship is at the same level.
When purchasing spare parts and components, always give preference to high-quality, original parts. Check the correspondence of catalog items with the actual data specified in the operating instructions for the technical device.
If you have no experience in car maintenance, seek qualified assistance from service station specialists.
What tools will you need?
If the Grant clutch pedal is too tight or, conversely, has completely failed, and the Grant clutch does not work properly, you will need to change the cable. By the way, a breakdown of the clutch fork will lead to exactly the same symptoms.
To replace the clutch cable you will need:
- open-end wrench at “8”, as well as at “10”;
- a knob (for the end cap) and a knob attachment “10”;
- a pair of Phillips screwdrivers (wide and medium), a flat screwdriver;
- ruler and caliper or ruler
Reviews
| № | Positive |
| 1. | Gennady: This is my second year driving Grant, there are no special problems. I follow maintenance deadlines, fill with high-quality oils, and have a moderate driving style. I believe that these are the main factors that ensure the “longevity” of a car. |
| 2. | Vasily: after 35,000 km the cable creaked, I thought about replacing it with a new one, but the guys advised me to lubricate it with oil. Thanks for the recommendation, I’m driving, I don’t know any problems. |
| 3. | Vitaly: I heard from motorists about the problem of cable squeaking on Grant. I can’t confirm, since I drove 75,000, the unit is working properly. |
| 4. | Ivan: the total mileage of the car is over 110,000 km. I replaced the clutch cable at 80,000 km; this is a very good resource for the Lada Granta. Of course, the car is not perfect, but with timely maintenance, everything works properly. |
| 5. | Kirill: on a run of 90,000 km the cable flew, I didn’t think that Grant would last that long. The store recommended a number of manufacturers, and made a choice in favor of domestic ones. My recommendations to motorists. |
| 6. | Vladislav: the first creak of the tensioner appeared at 65,000 km, did not lubricate it, replaced it with a new one. I think that this is quite normal for Russian quality. |
| 7. | Igor: the clutch works properly, does not knock, does not stick, mileage is 95,000 km. Taking good care of the machine and quality parts are the main factors contributing to long service life. |
| Negative | |
| 1. | Victor: the first tensioner flew at around 30,000 km. The interval is too short. Manufacturer's warranty is 95-100 thousand km. In the store I chose a foreign-made tensioner. I've been using the machine for two months now and I'm happy with the quality. |
| 2. | Vasily: at the second technical inspection, the master recommended replacing the tensioner, since the pedal travel exceeded 146 mm at maximum tension. I think the resource is too small. |
| 3. | Gennady: the release bearing flew at 60,000 km, which was unexpected, because the replacement interval had not yet arrived. |
Drive system design and symptoms of malfunction
The pressure mechanism is controlled by the leftmost pedal. A well-designed lever ensures easy movement of the release disc petals. In this model of machine, commands to move the fork are supplied by a cable. He “walks around” in a matching shirt. It is worth noting that an automatic cable length adjustment system is implemented here.
Symptoms of a problem
On a new car, the important pedal assembly moves easily. Violation of the factory condition requires stopping operation and identifying the reasons. Usually, along with tight movement, related symptoms occur that indicate a malfunction of the assembly module:
- Extraneous squeaks during pedal movement.
- Jerky movement of the pedal.
- The need for frequent adjustment of the idle speed of the lever.
- The machine jerks when connecting the box to the motor.
Why the ECM detects error “P0830”, video explanation
Praise to the author! I am also a terrible car enthusiast, albeit with little experience... I also had right-hand drive ones, but unfortunately, they are not convenient with our traffic. I now have probably the most boring Toyota model. For almost 2 years of owning this car, I had no problems at all, it burned out once a light bulb in the foot, and I changed the brakes and oil according to plan, despite the fact that the car is 8 years old, the mileage is about 150 thousand. It accelerates quickly, drives smoothly, and is maneuverable. spacious trunk and for its size a very comfortable and spacious interior, dad feels completely comfortable in the back seat, and he is a large man. After a night in a windswept parking lot at minus 35, it started up and didn’t even sneeze once. The stove heats perfectly, the air conditioner cools quickly, the consumption is 6-7 liters of 92 in the city. engine 1.5. 106 horses, + with its size it will fit into any hole in the parking lot. In short, the car is just great. )))
I've been meaning to adjust the clutch on my Grant for a long time. I made a printout of your article. Tomorrow I’ll arm myself with the necessary tools and go to the garage to do everything with my own hands step by step, as described in the article.
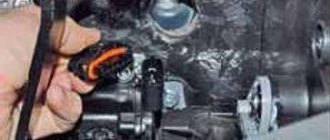
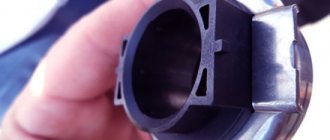
Open the hood, under the air filter there is a clutch foot. It is equipped with a cable with a plastic screw. Lightly pressing the foot, remove the cable to the side. We adjust the cable screw and put it back on the foot.
When accelerating, the engine roars slightly when the leveler revs up
Clutch needs replacement! It's slipping!
When starting off there is jerking, what could be the problem?
Replacement clutch disc
I sharpened the flywheel! and he was crooked. so you can’t get away with just one disk
The clutch cable broke. I went and bought a new one. Changed it. While I was driving, the clutch was soft; accidentally, in 4th gear at 90 km/h, I jumped into 3rd gear instead of 5th. But nothing. An hour later, I noticed that when changing gears, my car seemed to be giving up gas (by the sound), but in fact I don’t know what it is. The clutch pedal has free play, i.e. hanging out. And the pedal is too soft. Can there be different clutch cables on the grant?
Source
DIY adjustment procedure
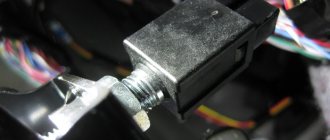
The first necessary step is to adjust the wires. To be more precise, a special bolt. It is located under the hood, at the end of the cable. The bolt is secured with locknuts, so finding it will not be difficult.
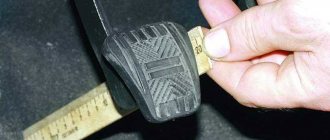
The pedal travel is simply fine-tuned as adjustments are made. The standard and normal value for the stroke itself is 120-130 millimeters. The nut is screwed onto the tip when enlargement is required. When the parameter is reduced, the part is unscrewed.
The pedal is pressed three times when the debugging process is completed.
First you need to prepare the tools, which most often include brake fluid and a free container along with a hose of a suitable diameter.
Only after preparation can you begin the procedure itself. It doesn’t matter whether you mean a large clutch pedal travel or a small one. Photo: pbs.twimg.com
- The first step is to add brake fluid to the expansion tank. This is done even before pumping. The liquid is added until 15-20 millimeters remain to the edge. The main thing is to keep it clean. And make sure that the system is free of debris and dust.
- You cannot do without an assistant, who must be inside the car. First, he presses the pedal three times. It should go all the way down. And the movement itself should be as sharp as possible. After pressing hard, the pedal is released. And they wait until the structure returns to its original position. The main thing is not to exceed the time interval between expectations. Usually it is two seconds.
- After the third press, the pedal is not released, but is fixed in a specific position. After which the second person secures the hose to the fitting. The next step is to release the valve, which is designed to get rid of excess air. To do this, use a simple spanner or a special wrench. It is immersed in a container prepared in advance. The end of the hose is taken out of this container.
- Next they move on to turning off the fitting, no less than halfway. The maximum permissible movement is at 34. Liquid will begin to leave the structure when the movement ends. There is nothing strange in the fact that air bubbles can be noticed. The pedal begins to release as everything unnecessary comes out of the system. The person inside the car needs to wait until the pedal reaches the stop. Without removing his feet, the assistant informs the car owner about this. Then the valve is screwed back on.
You will also find options for self-leveling in the video:
What else to pay attention to
During the bleeding procedure, you must constantly monitor the level of the brake fluid. We are talking about the liquid located in the expansion tank. Its quantity decreases as it is pumped.
Adding liquid is allowed after the procedure is repeated 2-3 times. The main thing is that its volume does not decrease by more than 35 millimeters to the edge of the expansion tank. If necessary, simply add more material.
But sometimes it happens that air bubbles appear even after 3-4 repetitions of the procedure. Then perhaps the reason lies in other components.
They move on to the last stages when all the air has been eliminated. Then the valve is clamped and the hose is removed. A special cap is placed on the valve for additional protection. The pumped out liquid is poured into a container that can easily be closed if necessary. Such waste materials can be reused if this does not reduce overall safety.
At the end of the procedure, you need to check the operation of each part. Why do you first depress the pedal completely? And then they study the power reserve of the pusher in the piston. The standard value is 27-28 millimeters. If the indicator differs from the norm, the adjustment is repeated.
Conclusion: about other subtleties
Bleeding is a mandatory procedure after any car repair work or other actions that affect components in the hydraulic line. Photo: ad-cd.net
Technical glasses and gloves, a mask - devices that should not be abandoned by those who pump themselves. The main thing is to be extremely careful when performing work. After all, the fluid from the hydraulic line is poisonous and hazardous to health. After completing the procedure, wash your hands thoroughly with soap. It is recommended to repeat this action several times.
It is important to take measurements in advance for the indicators of the parts. Then you can immediately understand whether adjustment is needed or not. As you can see, no particularly complex tools are required to solve this issue. Regular wrenches and screwdrivers, which you can probably find in any garage, will suffice. All that remains is to call an assistant, this is one of the mandatory requirements.
Sometimes it happens that the problem is solved, but only for a while. Then the reason is that the housing does not remain sealed. Defective hoses can allow air to leak inside.
Oil seals and rubber cuffs also cause serious defects if they are already worn out or destroyed for one reason or another. These parts are used to complete the cylinders that participate in the operation of the entire system. It is these parts that are subject to wear and tear more than others. And they are the first to fail during active use.
How to replace the cable yourself
In this case, serious manipulations on the part of the car owner will not be required. The first thing you need to do is get into the car and unscrew the nut under the pedal. He is responsible for connecting the cable itself to the main node. After this you will need:
- Remove the outer housing cover from the pin.
- Armed with pliers, remove the holding bracket itself.
- Pull out the lever rod.
- Remove the pedal bracket spring.
- Pull out the bit retainer with pliers.
- Release the pedal.
- Remove the cable sheath gaskets.
The next step is to pull the end of the cable towards you and carefully pull it out of the groove. Subsequently, the tip harness and guide bushing are disassembled. At the final stage, the cable is easily removed by passing through a hole located between the car interior and the engine compartment.
Before installing a new element, it is recommended to lubricate it with machine oil. The cable installation is carried out in the reverse order.
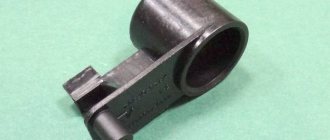
Fork
If this element needs to be lubricated, the pedal may also feel harsh. A common sign of a faulty fork is that you constantly hear an unpleasant squeaking sound during operation.
To fix this, you must first remove the entire air filter along with the housing. The plastic sleeve is then carefully pushed away and silicone lubricant is sprayed underneath it. Alternatively, you can use the popular WD40 tool.
Let's sum it up
The technology we examined in detail for replacing the elements of the clutch assembly is a rather labor-intensive procedure, the implementation of which may not be feasible for every owner. Adjusting the clutch drive is much easier, which even an inexperienced owner of a VAZ model, in particular a Lada Granta, can handle. If you doubt your own abilities and believe that replacing the clutch is beyond your capabilities, it is better to contact a service center.
Are problems with gearbox operation always associated with an unadjusted clutch?
Mechanical transmission problems do not always indicate a clutch that needs to be adjusted. If the clutch seems to be at fault, check the list above. We will also look at other problems with the manual transmission. Frequent malfunctions are:
- Gearbox noise. In neutral, this happens when the oil in the box is reduced or contaminated or the bearings wear out. In transmission, the problem may be in the synchronizer, licked teeth and dead bearings. When changing gears, the problem may be an unadjusted clutch, bearings, synchronizer, misalignment of the clutch housing and crankshaft, as well as deformed clutch forks and gearbox.
- Vibrations. Typical for internal combustion engines with disrupted operation in neutral or when fastenings are destroyed (including self-unscrewing of bolts).
- Leaking oil. The reason is most often in oil seals, gaskets, excess oil level or deformation of the transmission itself.
- The gear shifts with difficulty or does not shift at all. The problem here can also be in the clutch, as well as in other factors - contamination, lack of oil, wear of couplings, springs, gears.
- The transmission turns off by itself. There are many reasons - synchronizers, grooves, springs, spontaneous loosening of bolts and others.
Cable transmission
If you suspect the clutch, take a closer look at the problem. It is far from certain that it is exactly to blame.
How long a gearbox will last depends directly on how you use the car. And the comfort, safety and controllability of your car depend on the service life of the gearbox.
If you do not want to repair the Lada Granta gearbox, follow a number of simple recommendations:
- With a manual transmission, one of the main operating factors is shifting gears with the clutch pedal fully depressed. You cannot change gears when it is not completely turned off. This leads to accelerated licking of the gear teeth. You need to choose a gear that matches your speed. It is best to move in fourth gear - it is direct and uses a minimum of gears. Accordingly, their wear is reduced. Speed range – 70-100 km/h.
- In winter, you should not leave the car in gear for a long time. This is unsafe and damages the transmission. After you start the engine, even if the car is in neutral, it may jerk.
- Lubrication of all components also has an effect. Periodically check the gearbox housing for oil leaks. They usually appear near the oil filler neck. Change your oil on time. The approximate replacement period is 50-70 thousand kilometers. Do not mix oils of different brands, as this may cause increased wear of all rubbing parts.
The recommendations are quite simple to follow. Repairing a cable transmission on a Lada Granta is neither easy nor cheap, so stick to them.