Vanooo44 Was 1 day ago
Ivan Blokhin I drive a Lada Granta Portveshok (previously Lada 2109) Kostroma, Russia
Message
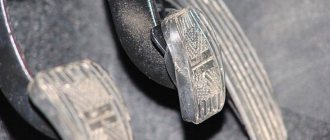
While replacing the clutch cable, I accidentally broke off the edge of the pressure sleeve. Because of this, when pressing the clutch pedal, the ECU did not reset the engine speed. I tried to make this edge from what was at hand. An electrode came to hand. Unfortunately, this was not successful. I looked for this bushing for a long time and found it. The price is not very clear for a flimsy piece of plastic - 200 rubles
Replacement is simple - remove the pedal axle, pull the pedal out of the mount, replace the bushing (the main thing is to remember how it was positioned) and put everything back together in reverse order.
Previously The twitches ended Next The clutch said hello
Removing the clutch pedal position sensor
Remove the clutch pedal position sensor to replace it. The sensor is located in a hard-to-reach place under the instrument panel, so most of the operations for dismantling the sensor are shown on the removed pedal assembly for clarity.
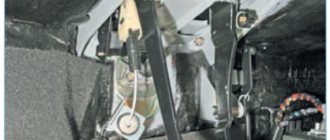
Location of the clutch pedal position sensor. Before disconnecting the sensor wiring connector from the instrument panel wiring harness...
...remove holder 1 of the sensor wire block from hole 2 in the pedal assembly bracket. By pressing the clamp of the instrument panel wiring harness...
...disconnect the wiring harness block from the sensor wiring block.
Using a screwdriver, remove the hook of the pressure lever spring from the hole in the sensor holder.
Using a Phillips screwdriver, unscrew the two self-tapping screws securing the sensor holder to the pedal assembly bracket.
...and remove the holder with the sensor assembly.
Remove the sensor from the two holder rods.
Clutch pedal position sensor Install the clutch pedal position sensor in the reverse order.
Tool:
- Open-end wrench 8 mm
- Pliers
- Medium flat screwdriver
Parts and consumables:
- Clutch pedal bushings
1. In the cabin, under the instrument panel, using an 8 mm wrench, unscrew the nut securing the cable sheath bracket to the pedal assembly bracket.
2. Remove the clutch cable sheath stop from the stud.
3. Use a screwdriver or pliers to pry the spring clip and remove it from the groove of the clutch pedal pin.
4. Remove the axle and clutch pedal.
5. Remove the right and left pedal axle bushings and the clutch cable end bushing from the clutch pedal.
7. Install new bushings into the clutch pedal and the clutch pedal into the bracket in the reverse order of removal.
8. Install all parts on the Lada Granta VAZ 2190 in the reverse order of removal.
The article is missing:
- Photo of the instrument
- Photos of parts and consumables
- High-quality photos of repairs
To remove the clutch pedal on a Lada Granta car, you must perform the following steps:
- Secure the car on a level surface, squeeze the parking brake lever, and install wheel chocks on the rear row of wheels.
- Using a “14” key, unscrew the three bolts and disconnect the steering shaft (interior of the car, at the base).
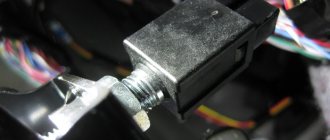
- Unscrew the plastic clamp from the clutch cable lead.
Plastic retainer
- Remove the protective bracket and remove the brake pedal vacuum booster pin.
Safety bracket
- We disconnect the block with wires from the dashboard with the sensors on the bracket.
- Using a key set to “13”, unscrew the four nuts and remove the vacuum brake booster.
- Using a “13” wrench, unscrew the five nuts and remove the clutch pedal bracket and brake assembly.
After troubleshooting, we replace the worn elements with new ones and assemble the structure in the reverse order.
This is interesting: Replacing light bulbs in interior lamps with LED panels Lada Largus
Flight magazine VAZ Granta 1.6 (2014)
Do it yourself: Repairing the clutch pedal bracket 130,000 km
While repairing the chassis at a service center, the serviceman, while driving the car, noticed a tight clutch pedal. How do you drive like that, on the lawn it’s even easier to press, don’t you feel it, they say?
I didn’t even pay attention, I was already used to it. There were only a few things that bothered me about the clutch’s operation, namely, a creaking sound, a crunching sound in the pedal that appeared intermittently and disappeared on its own, and also a feeling that when the pedal was fully pressed, the clutch was not fully disengaged. Let's say you can drive up to a red traffic light. Turn on neutral. A couple of seconds before the green signal, you start to engage first gear, but it doesn’t engage. To engage it, you either depress the clutch a second time, or you begin to press the pedal to the floor harder, straight with great effort, the pedal goes a little more to the floor, just a centimeter somewhere, no more, and the gear is engaged, also with reverse gear, it was engaged only with a crunch , if you do not press the pedal with great force to the floor.
I explained all this to the master, and he went with a flashlight to see what was happening there when pressed. It turned out that the clutch pedal bracket, on which the brake pedal also hangs, had burst. That is, to change this bracket, you need to disassemble the steering column, remove the pedals, spend 3 hours disassembling it, then another 1.5 hours to put everything back together. The master estimated the work at 4,000 rubles. I went online to see how much the bracket costs. I found it only assembled with pedals, 2,500 rubles. On disassembly you can find it for 700 rubles.
I started looking at the drive, it turned out that there was a very frequent breakdown on grants. Those who change it, someone wrote that they weld carefully, without removing the bracket, placing wet towels and disconnecting the battery.
I had the idea to straighten the construction corner and screw in three self-tapping screws. The problem is that it’s very difficult to get there, everything gets in the way, you need a bat with a long tip and preferably roofing screws so that the bit doesn’t constantly fly off.
In the end, I think it turned out well, now the pedal is pressed without crunching, all the way and easier. The gears are switched on easily.
I show photos as it was, as well as after repairs with a corner.
The main thing is that you didn’t have to disassemble anything and don’t waste money on expensive, unnecessary repairs.
Clutch (release bearing) VAZ – Granta assembled
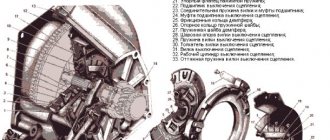
Lada Granta/Kalina cars have a dry-type single-plate clutch with a central pressure spring. The clutch release drive is a cable, backlash-free, with a mechanism for automatically adjusting the length of the cable.
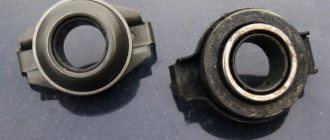
The release bearing is one of the main elements in the design of the clutch basket, designed to squeeze out the clutch basket spring and briefly interrupt the transmission of torque from the engine crankshaft flywheel to the gearbox input shaft. Protecting transmission elements from overloads and damping vibrations.
A release bearing (clutch release clutch) is a bearing, one side of which is made in the form of a round pressure pad commensurate with the diameter of the release springs located in it.
The release bearing is located on the input shaft protruding from the gearbox. The bearing is mounted not on the shaft itself, but on the shaft protective casing. The bearing is driven by a “rocker arm” or drive fork, which presses on a bearing mandrel that has special projections.
1 — release bearing guide sleeve; 2 — gearbox input shaft; 3 — cable lead; 4 — clutch release fork; 5 — fork axle bushing; 6 — pressure disk assembly (basket); 7 — driven disk; 8 - flywheel; 9 pedal; 10 mechanism for automatic adjustment of cable length; 13 — clutch (release bearing); 15 — bracket installed on the gearbox housing; 14 — lower tip of the cable sheath; A - distance of the pointing displacement, checked when installing the cable (27 mm)
The clutch consists of a basket (pressure plate assembly) and a driven disc. The basket is a steel casing in which a pressure spring and a pressure disk are installed.
The pressure disk is fixed in the casing on three pairs of elastic plates. From the casing side, the disk is pressed by a diaphragm-type pressure spring.
The clutch basket of Lada Kalina, Granta VAZ-2190 is attached with six bolts to the flywheel and covered with an aluminum crankcase. A driven disk is installed between the pressure plate and the flywheel.
Friction linings are riveted to both sides of the driven disk. To dampen torsional vibrations when the clutch is engaged, a damper with six coil springs is built into the driven disk. The driven disk hub is splined into gear with the input shaft of the gearbox.
The clutch pedal is suspended on an axle and attached to the body through a bracket. The upper part of the pedal is designed as a double-arm lever. At the end of the lever there is a pin to which the clutch release cable is attached.
The connection is made through a special ratchet mechanism that regulates the length of the cable. Therefore, during the operation of the car, there is no need to regularly check and adjust the pedal stroke. This mechanism also ensures that there is no play in the clutch release drive.
Clutch elements are manufactured from high quality materials using modern technologies and in accordance with quality standards.
Other article numbers of the product and its analogues in catalogues: 21810160118001.
VAZ 2190, Kalina 2, Datsun.
Any breakdown is not the end of the world, but a completely solvable problem!
How to replace the clutch release bearing on a Lada Granta car yourself.
AvtoAzbuka online store, repair costs will be minimal.
Just COMPARE and BE SURE!!!
How to remove the pedal assembly of a Lada Granta
The vehicle uses an electronic throttle valve
There are two gas pedal position sensors installed in the gas pedal housing
Gas pedal sensors are potentiometers with a sliding contact mounted on a common shaft.
When the position of the pedal changes, the resistance of the sensors changes and, accordingly, the voltage that is transmitted to the controller.
From the controller, the corresponding signals are sent to the throttle assembly, which changes the position of the damper.
If one of the sensors (or its circuit) fails, the engine control system fault warning lamp will light up.
If the signal from the sensor is not restored within the control time, the ECU will switch the system to backup mode.
In this mode, when you sharply press the gas pedal all the way, the speed will increase slowly.
The car will be able to continue driving to the repair site under its own power.
There may be a slight increase in fuel consumption and changes in some other technical parameters of the engine.
In the event that both sensors fail, the ECU will switch the engine management system to emergency operation mode, the engine will only operate at speeds slightly above idle (1500 min -1 ).
At the same time, the car retains the ability to move independently, albeit at a slow speed.
This will allow you, if necessary, to leave the intersection, pull over to the side of the road, or move the car to a safe place a short distance.
As a result of wear of the moving contacts or conductive paths, the sensors may fail or the signals coming from them will not be correct.
If the signals are violated, the engine will operate unstably, and “failures” are possible in transient conditions.
When idling, the engine speed may change spontaneously.
To remove the accelerator pedal module:
Press the latch of the wire block and disconnect the block from the pedal connector
Using a 10mm socket, unscrew the three nuts securing the gas pedal module to the front panel bracket
Remove the module from the bracket studs
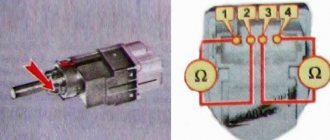
Using a tester in ohmmeter mode, you can check the condition of the moving contacts and current-carrying paths of the gas pedal position sensors. For this:
— connect one probe of the tester to pin 4, and the other probe to pin 2. By slowly moving the gas pedal, we control the electrical resistance across the device, which should decrease.
— repeat the test by connecting the tester to pins 4 and 3;
— we also check the track of another sensor, connecting the tester in series to pins 1 – 6 and 6 – 5.
If, when checking the tracks, the resistance changes abruptly, the sensor should be replaced.
Install the electronic gas pedal in the reverse order.
To avoid accidentally bending the leads in the gas pedal sensor connector, connect the wire block before installation.
Then we put the gas pedal bracket on the studs. Tighten the pedal mounting nuts to 6 - 8 Nm.
Types of faults
All types of clutch malfunctions installed on Grants are divided into the following groups:
- The clutch cannot be completely disengaged. The reasons for this type of breakdown lie in incomplete pedal travel, vibrations and possible jamming in the driven disk hub, warpage and distortion in the pressure disk, loose rivets and faulty friction linings. In addition, such a problem is often caused by a malfunction of the drive cable, a breakdown of the compensation mechanism, or disturbances in the mechanism that compensates for the wear of the driven disk linings.
- The clutch cannot be fully engaged. This breakdown can occur due to wear of the friction linings or due to their oiling. Other reasons for this malfunction include an oily surface of the flywheel and clutch basket and jamming (or damage) on the clutch drive.
- The clutch works with jerks. This violation is caused by oily friction linings, as well as an oily flywheel and clutch basket, a stuck drive and a damaged pressure plate surface.
- An increase in noise level when the clutch is engaged is caused by a malfunction of the damper springs.
- An increase in noise level during clutch disengagement is caused by a leak from the release bearing, as well as its damage or wear.
As a rule, if the clutch pedal fails and clicking and creaking sounds are detected during its operation, most often you just need to replace the clutch cable. Exactly how this procedure is performed will be discussed below.
Why is the Check Engine Light on?
Details
Created: January 19, 2016
Why is the Check Engine Light on? Malfunctions and solutions.
VAZs, like the vast majority of modern cars, have a lot of different sensors that monitor engine performance. Like other engines, the power unit of the latest VAZ models has an ECU (electronic control unit), which, if faults or irregularities in the operation of the internal combustion engine are detected, can issue an inscription that many motorists are very afraid of. As you understand, we are talking about Check Engine, this is an error that means “check the engine,” literally.
Symptoms of malfunction, diagnostics, solutions
| Sign | Cause and remedy |
| Short pedal stroke | Adjust the length of the cable. Check the integrity of metal fibers. Most likely delamination or bending. |
| The clutch drags at speed, it is difficult to shift into higher gears. | The flywheel is bent or damaged. The gripper teeth are worn. Replacing the flywheel and related consumables. |
| Slipping when activating first gear and increasing speed with the accelerator pedal. | Replace friction linings, disk, clean the drive from old grease |
| Sharp jerks when turning on / changing gears. | The pressure plate is damaged, replace the basket. |
| Whistle when activating first and subsequent speeds | Install a new release bearing |
| Crackling, knocking, crunching noise when shifting into up/down gears | Wear out the damper spring, replace it with a new one, lubricate the entire drive mechanism. |
| The lever falls, falls, rattles | Excessive stretch of tensioner. Replace with a new one, install bushings. |
This is interesting: Replacing spark plugs for a 1.6 (8V) Lada Largus engine
Preparation for repair
To remove and subsequently replace the clutch, prepare a set of tools consisting of:
- center punch;
- extension cord;
- funnels;
- heads (8, 10, 15, 17, 19 and 30 mm);
- high head (13 mm);
- heads Torx E12 and Torx E14;
- Phillips and flat screwdrivers;
- pliers;
- curved spanners (8 and 13 mm);
- straight spanners (17 and 19 mm);
- two adjustable stops;
- metal brush;
- ratchet wrench;
- caliper;
- stands;
- hammer;
- jack;
- balloon wrench;
- torque wrench;
- centering mandrel.
In addition, you will need to apply certain parts and consumables. So, you will need CV joint-4 lubricant, a guide pin M12×1.25 mm, transmission oil, wood blocks, a technical container, a hose, rags and the clutch itself.
Replacing the release bearing Kalina 2, 1118, Cross, Sport
To make a replacement you will need to put your car on a pit or a lift. Repairs are also possible if you have reliable supports and a jack. It is worth noting that without a pit or lift, the replacement method without removing the box, which is described at the end of the article, is suitable.
How to remove the gearbox and release bearing on Kalina 2 (1.4-1.6 8kl) with your own hands
Replacing the release bearing on a Lada Kalina begins with dismantling the gearbox; this process is described in detail in step-by-step instructions with photos/videos. Perform the operations in order.
- Open the hood of the car and immediately remove the battery.
- Next, remove the air filter by unscrewing the clamp and disconnecting the fastenings to the body.
- The clutch cable is located behind the battery; you need to unscrew the nut and disconnect the cable from the fastener.
- Now disconnect the plug of the speed sensor wire, it is located behind the “engine”, in the area of the pipes.
- Next, find the upper bolts securing the gearbox to the engine and unscrew them.
- The last operations on top of the gearbox are unscrewing the starter and its terminals, as well as disconnecting the clutch cable and electrical wiring.
- Remove the front wheels and tighten the hub nuts. We disconnect the protection (mud flaps) under the wing.
- Immediately disconnect the terminal of the reversing lights wire.
- Nearby there is a suspension beam, first twist the rear nut with a 24mm wrench.
- Now we move on to the ball joints, loosen the nuts and remove them on both sides.
- On the same side of the manual transmission we find the oil drain plug, unscrew it and drain it into any container.
- Between the manual transmission and the engine there is a clutch protective cover. To remove it, unscrew the nuts around the perimeter.
- Let's move on to dismantling the gearshift mechanism. First, unscrew the two bolts and remove the cover.
- Then unscrew the screw that secures the linkage connection.
- The next step is to remove the wheel drive shafts from the gearbox on both sides.
- Let's return to the suspension. On the manual transmission side, it is necessary to unscrew the bolt securing the lever, and also disconnect the extension.
- Next, to remove the gearbox and replace the release bearing of the VAZ Kalina, unscrew the lower bolts securing the gearbox to the engine, as well as the front cushion. Before doing this, be sure to install a support under the engine.
- As a result, the housing of the high-speed unit (MKPP-2181) will be completely disconnected from the mating units, and it can be dismantled. First, use a sharp, wide screwdriver to separate the assembly from the engine.
- Then we manually dismantle the assembly. It is advisable to use a special telescopic stand or ask a partner for help, since the gearbox is not light. After removal, we proceed to replacing the release bearing on the Lada Kalina with our own hands.
How to change the release bearing on Kalina - step-by-step technology
The clutch release bearing for Kalina 2, 1118, Cross, Sport (including 8 valves) is located in the crankcase (see photo at the beginning of the article), to remove the old “releaser” follow the instructions.
- First, use a screwdriver to remove the coupling spring, after which the VP will be removed from the shaft without difficulty.
- Next, inspect the fork, check for smoothness, absence of radial and axial play, as well as runout. If the fork is in working condition, then check the input shaft on which the VP is located: splines, seating surface. No nicks, cracks, or corrosion are allowed.
- After checking the unit, if the condition is normal, the coupling should be replaced. In reverse order, put the coupling on the shaft (the ear should mate with the fork without distortion). Secure the spring and check the smooth operation of the mechanism.
- When the new clutch release bearing is installed on Kalina, you can begin installing the box. The operations are performed in reverse order. To lift the gearbox to the power unit, it is recommended to use third-party assistance or a telescopic transmission stand.
general information
The drive shaft is equipped with an overrunning clutch with a drive gear moving along the splines of the shaft. It is the clutch that ensures the transmission of torque from the starter to the motor, separating these elements after the engine starts. This condition ensures proper protection of the starter from possible damage that it may receive due to its high rotation speed.
The relay is designed to engage the drive gear with the teeth of the crankshaft flywheel mechanism, as well as to activate the starter power supply. Thus, by turning the key in the lock, the driver begins the process of supplying electric current to the starter from the battery. The starter is set in motion and turns the crankshaft, starting the engine and igniting the combustible mixture.
After starting the engine, the crankshaft speed begins to increase, however, the clutch protects the starter from damage. After the driver returns the key in the lock to the “ignition” position, the relay winding will de-energize and its armature will return to its original position, while the relay contacts will open and the drive gear will disengage from the flywheel teeth. At the same time, the power contacts supplying electric current to the starter motor windings will open.
In addition, the starter is one of the most powerful energy consumers on a car; when starting the engine, the electric current it consumes reaches 400 A or more. For this reason, all electrical connections between the starter and the battery must have reliable contact.
The elements that Grants are equipped with are similar to the starters used by VAZ on its other cars of previous generations. When the engine is in normal condition, two or three turns will be enough to start. Deviations from the norm will be indicated by any of the existing signs of unstable functioning. Possible malfunctions of the drive and starter relay will be revealed by inspection carried out after disassembling the part.
Clutch and brake pedals with brackets and clutch cable assembly - removal and installation
Removal
1. Place the vehicle in the work station, apply the parking brake and turn off the ignition.
2. Remove the steering shaft.
3. Unscrew the clutch drive cable lead 2 from the cable tip and remove the cable 3 from the clutch drive fork 1 and the cable mounting bracket 4.
Clutch drive elements:
- clutch release fork;
- leash;
- clutch cable;
- cable fastening bracket.
4. Remove the locking bracket and remove the pin securing the vacuum booster pusher to the brake pedal (flat-head screwdriver, pliers).
5. Disconnect the instrument panel wiring harness connectors from switch 3, Figure 3-2, brake signal and switch 6 of the clutch pedal position signal.
Removing the clutch and brake pedal bracket:
- bracket mounting bolts;
- bracket for clutch and brake pedals;
- brake light switch;
- vacuum booster mounting nuts;
- bracket fastening nuts;
- clutch pedal position switch
6. Unscrew the two nuts 4 securing the vacuum booster to the clutch and brake pedal bracket (replaceable head 13, extension, ratchet wrench).
7. Unscrew the three bolts 1 securing the clutch and brake pedal bracket to the cross member of the instrument panel (replaceable head 13, extension, ratchet wrench).
8. Unscrew two nuts 5 securing the clutch and brake pedal bracket and remove bracket 2 assembled with pedals and clutch cable (replaceable head 13, extension, ratchet wrench).
Installation
1. Install the clutch and brake pedal bracket with the cable assembly in place and tighten, without tightening, the two nuts securing the pedal bracket to the front panel (replaceable head 13, extension, ratchet wrench).
2. Tighten, without tightening, three bolts 1 securing the pedal bracket to the cross member of the instrument panel (replacement head 13, extension, ratchet wrench).
Attention
: Before installing the vacuum booster, apply liquid gasket PS 1 to the mating surfaces of the vacuum booster and the body in accordance with the current “Codifier of main and auxiliary materials used in the maintenance and repair of LADA vehicles” K 3100.25100.00018.
3. Secure the vacuum booster to the pedal bracket with two nuts. The tightening torque of the nuts is 20...24 N m (2.0...2.4 kgf m) (replaceable head 13, extension, ratchet wrench, torque wrench).
4. Tighten the pedal bracket mounting bolts and nuts. The tightening torque of bolts and nuts is 20…24 N·m (2.0…2.4 kgf·m) (replaceable head 13, extension, torque wrench).
5. Connect the brake booster pushrod and the brake pedal with a finger and secure the finger with a locking clip (pliers).
6. Install and adjust the clutch cable.
7. Connect the instrument panel wiring harness connectors to the brake light switch and the clutch pedal position signal switch.
8. Install the steering shaft.
9. Check the effectiveness of the service brake.
To do this, you need to find the book you are interested in and click on the “Buy” button. The price of the book is indicated on the button.
For residents of Ukraine in hryvnias, and for all other countries - dollars.
After clicking on the “BUY” button, a payment window will open where you can select a payment system with which you can pay for the selected book using any bank card (Visa, MasterCard, MIR, etc.)
When you click on the “Pay by bank card” button, the Portmone payment system will open, which is the easiest way to make a payment.
- Yandex (payment from any bank cards, Yandex Money account, QIWI Wallet, terminals, etc.);
- Portmone (payment from any bank cards, Portmone account);
- PayPal (payment from any bank cards, PayPal account);
- WebMoney (payment from any bank cards, payment from WebMoney wallets).
Auto chemical goods
On elements from VALEO, the nut located on the terminal is coated with zinc, and the contact screw is also galvanized. Therefore, they can only be treated with WD-40 or one of its substitutes. But this processing option is not suitable for copper. All car owners using WD liquid on copper are strongly advised not to repeat their mistake - using WD-40 will lead to destruction of the outer layer.
That is why the threads on KZATE starters made of copper must be cleaned using special means. To do this, you can use: Molykote S-1002 solvent, WL remover, Kontakt 60 or 100 acid and CRAMOLIN ContaClean. When reusing an element after exposure to acid, it must be cleaned with a remover.
Installing a towbar on a Lada Granta What tire size is suitable for a Lada Granta? Lada Granta colors Hydraulic compensators on Lada Lada Granta AMT cars How to disassemble the instrument panel of Lada Granta and Kalina-2
Payment via Yandex Cashier
After selecting payment via Yandex, the Yandex Cashier payment system will launch, where you need to select a convenient payment method (bank card, QIWI, Yandex Money account, etc.)
After specifying payment details and confirming payment, payment for the goods will occur.
If you have a bank card in a currency other than the ruble, then the money will be debited from the card at the rate of the Central Bank of Russia at the time of the purchase.
This payment method is optimal for residents of Russia, Kazakhstan and Belarus.
What are standard parameters
Each engine has its own standard parameters. These are technical characteristics that determine the normal operation of the motor. These parameters are compared with the values obtained during diagnostics. All measurements are carried out with the engine running at idle speed.
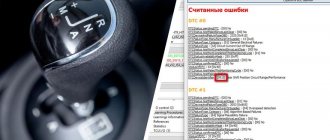
The presence of errors that are stored in the car's memory is the so-called DTC parameter. What these errors are can be determined by deciphering their codes, which can be easily found on any resource on the Internet. There are entire tables with interpretations of error codes.
But the engine may have malfunctions and malfunctions and not generate errors. For example, if the idle speed is too high, the control unit believes that the driver pressed the gas pedal, does not perceive the situation as an error and, naturally, does not display it during diagnostics.
Read more: Willson guard liquid glass reviews
If, during engine diagnostics, all measured parameters differ from typical values by no more than 20%, then the engine is operating normally. Components and parts whose performance exceeds the specified value can be considered faulty.
Signs of clutch wear
| Sign | Cause and remedy |
| Incomplete engagement of the clutch (slips) | Replacing discs, cleaning clutches |
| Incomplete shutdown (leading) | Prevention of the clutch mechanism |
| Periodic jerks | Clutch cable wear, clutch replacement |
| Vibration, beating when shifting to higher gears | The flywheel is bent, the gripper teeth are worn out. Replacing the flywheel and related consumables |
| Noise, creaking, grinding noise when activated | Damper spring wear, replacement with a new one, drive lubrication |
| Pedal free play is increased, exceeding 2 -3 mm | Tensioning the cable, replacing with a new one |
| You can hear the smell of burnt friction linings | Dismantling the clutch block, replacing worn elements |
| Increased fuel consumption | Flywheel worn, teeth damaged |
| Reduced acceleration dynamics | Replacing clutches |
Why the ECM detects error “P0830”, video explanation
Praise to the author! I am also a terrible car enthusiast, albeit with little experience... I also had right-hand drive ones, but unfortunately, they are not convenient with our traffic. I now have probably the most boring Toyota model. For almost 2 years of owning this car, I had no problems at all, it burned out once a light bulb in the foot, and I changed the brakes and oil according to plan, despite the fact that the car is 8 years old, the mileage is about 150 thousand. It accelerates quickly, drives smoothly, and is maneuverable. spacious trunk and for its size a very comfortable and spacious interior, dad feels completely comfortable in the back seat, and he is a large man. After a night in a windswept parking lot at minus 35, it started up and didn’t even sneeze once. The stove heats perfectly, the air conditioner cools quickly, the consumption is 6-7 liters of 92 in the city. engine 1.5. 106 horses, + with its size it will fit into any hole in the parking lot. In short, the car is just great. )))
I've been meaning to adjust the clutch on my Grant for a long time. I made a printout of your article. Tomorrow I’ll arm myself with the necessary tools and go to the garage to do everything with my own hands step by step, as described in the article.
Open the hood, under the air filter there is a clutch foot. It is equipped with a cable with a plastic screw. Lightly pressing the foot, remove the cable to the side. We adjust the cable screw and put it back on the foot.
When accelerating, the engine roars slightly when the leveler revs up
Clutch needs replacement! It's slipping!
When starting off there is jerking, what could be the problem?
Replacement clutch disc
I sharpened the flywheel! and he was crooked. so you can’t get away with just one disk
The clutch cable broke. I went and bought a new one. Changed it. While I was driving, the clutch was soft; accidentally, in 4th gear at 90 km/h, I jumped into 3rd gear instead of 5th. But nothing. An hour later, I noticed that when changing gears, my car seemed to be giving up gas (by the sound), but in fact I don’t know what it is. The clutch pedal has free play, i.e. hanging out. And the pedal is too soft. Can there be different clutch cables on the grant?
How to replace the cable in the clutch mechanism?
How to properly replace a clutch cable? Below are detailed aspects of the instructions to successfully replace the cable.
- First, we begin to unscrew the cable nut from the bracket, which is located under the dashboard. We perform this action using the key set to “8”, after which access to dismantling the bracket stop appears.
- We disconnect the locking bracket, which is located on the “finger”.
- Next, remove the body of the compensation device (use a screwdriver).
- We remove the fluoroplastic bushing from the pedal pin.
- We visually monitor the assembly element for wear. If such “artifacts” are present on the surface of the bushing, then we definitely replace it by pre-treating it with grease.
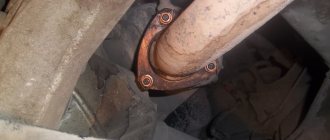
- We dismantle the cable seal, which is mounted in the technological hole of the frontal shield of the body (in the photo it can be seen from the engine compartment).
- Pull the cable end as you move until it is removed from the fork groove.
- Using the key “17” we “defeat” the nut by means of which the cable tip is held on the corresponding bracket of the transmission unit. To prevent the tip from turning, we use an additional key.
- Now we proceed to dismantling the cable end, after which we remove this element from the hole. The cable itself can also be removed.
- Having completed the indicated manipulations, we begin the installation of a new unit.
- First, we pass the cable into the previously designated hole in the front shield.
- We treat the bushing with a special compound and fix the wear compensation element on the corresponding pin.
- Now we attach the cable directly to the pedal and return the previously removed seal to its place.
- We move on to installing the tip on the LADA Granta transmission bracket. Screw the retaining nut with the required torque (do not overdo it).
- We remember the need to tighten the leash.
- We continue the installation procedure by moving the lower tip in the forward direction until a feeling of stop occurs.
- We hold the tip in the designated position and at the same time measure the distance that was illuminated by us earlier (more specifically: in the “leash-fork” section). If the parameter is incorrect, rotate the leash until the optimal value appears.
- We remember the need to lubricate the body of the leash before installing it in the knot. The surface in contact with the fork must be lubricated.
- The final action is to press the pedal to its full value multiple times. Then we again make a control measurement in the “fork – leash” sector and, if it deviates from the regulations (27 mm), we make a re-regulation. This completes the clutch cable replacement.
All steps from start to finish
Open the hood and find the gearbox. The starter will be located nearby. All nodes are covered with a filter that needs to be removed:
- Disconnect the negative terminal of the battery (key “10”);
- We disconnect in turn: the mass air flow sensor connector (oval), the adsorber valve (we press the tongue from below). We also loosen and remove the fastening tie for the “thick wire”;
Getting rid of unnecessary details
A “fork” will be attached to the top of the crankcase - a bent plate with a slot. This is the clutch fork (see photo).
Found the most important detail
Using pliers wrapped in electrical tape, try to pull the tip forward.
Clutch adjustment on Lada Granta (first method)
Here we will look at how to adjust the clutch on a Lada Grant:
- Grasping the end of the cable, pull it forward as far as it will go.
- Using a caliper, measure the distance from the fork to the plastic leash. The distance should be exactly 27 mm.
If everything is set up and checked, measure the clutch pedal travel.
We measure the free movement distance
The distance from the “top point” to the “bottom” should not exceed 146 mm.
If at the last stage it turns out to be more than 146, then the cable needs to be replaced.
Alternative clutch adjustment method (second method)
No calipers are needed here:
- Carry out step 1 as indicated above - pull the tip forward.
- Let go of the tip and look: if the leash does not fit tightly to the fork, screw it onto the rod.
- Press and release the pedal (3 times), repeat steps 1 and 2.
Achieve the following: when the pedal is not pressed, the leash should be pressed tightly against the metal, at the same time, the displacement of the fork should not be noticeable. Let the displacement be equal to 1-2 mm.
Clutch adjustment on the Lada Grant is carried out using any of two methods. And according to reviews, the need arises every 15,000-20,000 km.
List of online stores selling parts (Moscow, St. Petersburg, Kyiv regions)
| № | Name | Address |
| 1. | "Autoall" | www.avtoall.ru |
| 2. | "Original part" | lada-original.ru/ |
| 3. | "Navigator" | www.navigator-63.ru/ |
| 4. | "TOTAX" | totax.com.ua |
| 5. | "Zakupka" | kiev.zakupka.com |
| 6. | "How much" | www.avtostore.spb.ru |
Payment via Portmone
After selecting payment through Portmone, the payment system will launch, where you need to select the payment method: bank card or Portmone account.
The price in the Portmone payment system is converted into dollars at the exchange rate of the Central Bank of the country where you are located.
If you have a bank card in a currency other than the dollar, then the money will be debited from the card at the rate of the Central Bank of your country at the time of the purchase.
After specifying payment details and confirming payment, payment for the goods will occur.
What are standard parameters
Each engine has its own standard parameters. These are technical characteristics that determine the normal operation of the motor. These parameters are compared with the values obtained during diagnostics. All measurements are carried out with the engine running at idle speed.
The presence of errors that are stored in the car's memory is the so-called DTC parameter. What these errors are can be determined by deciphering their codes, which can be easily found on any resource on the Internet. There are entire tables with interpretations of error codes.
But the engine may have malfunctions and malfunctions and not generate errors. For example, if the idle speed is too high, the control unit believes that the driver pressed the gas pedal, does not perceive the situation as an error and, naturally, does not display it during diagnostics.
Read more: Willson guard liquid glass reviews
If, during engine diagnostics, all measured parameters differ from typical values by no more than 20%, then the engine is operating normally. Components and parts whose performance exceeds the specified value can be considered faulty.
Review of Manufacturer Prices
| Manufacturer article number | Price, rub.) | Resource (Thousand km) |
| Set of wheels LADA 2190-316010001 | From 3100 | 85 — 105 |
| —/— 2190-31601000 | —/— | —/— |
| —/— 302050901 | —/— | —/— |
| —/— 302052223 | —/— | —/— |
| —/— 302052307 | —/— | —/— |
| LADA 21810160118001 clutch | From 650 | 80 |
| LADA 21090160119000 input shaft guide | From 750 | 75 — 80 |
| LADA 21010160121500 fork support | From 150 | 75 – 95 |
| LADA 21810160120001 plug | From 800 | 85 – 95 |
| Connecting spring fork and clutch 21010160118800 | From 350 | 85 — 95 |
*prices are current as of October 30, 2018.
Recommendations for the selection of parts and components
The vast majority of spare parts are provided by domestic manufacturers. Foreign analogues are 10-17% more expensive. The manufacturing quality of the parts is approximately at the same level.
In order to prevent the purchase of counterfeits, use the services of official representative offices, dealer centers, and authorized service stations.
Lately, ordering parts with their subsequent installation directly in workshops has become popular. The advantages of this choice are professional installation, prompt delivery, and a guarantee.
Lada Granta clutch diagram
List of online stores selling parts (Moscow, St. Petersburg, Kyiv regions)
| № | Name | Address |
| 1. | "VIN code" | VIN-code.rf/ |
| 2. | "Avtopiter" | https://www.autopiter.ru/ |
| 3. | "DvizhCom" | https://dvizhcom.ru/ |
| 4. | "BaltKam" | https://www.baltkam.ru/ |
| 5. | "Elite" | https://eshop.elit.ua/ |
| 6. | "Clan" | https://klan.com.ua/ |
Reviews
| № | Positive |
| 1. | Gennady: This is my second year driving Grant, there are no special problems. I follow maintenance deadlines, fill with high-quality oils, and have a moderate driving style. I believe that these are the main factors that ensure the “longevity” of a car. |
| 2. | Vasily: after 35,000 km the cable creaked, I thought about replacing it with a new one, but the guys advised me to lubricate it with oil. Thanks for the recommendation, I’m driving, I don’t know any problems. |
| 3. | Vitaly: I heard from motorists about the problem of cable squeaking on Grant. I can’t confirm, since I drove 75,000, the unit is working properly. |
| 4. | Ivan: the total mileage of the car is over 110,000 km. I replaced the clutch cable at 80,000 km; this is a very good resource for the Lada Granta. Of course, the car is not perfect, but with timely maintenance, everything works properly. |
| 5. | Kirill: on a run of 90,000 km the cable flew, I didn’t think that Grant would last that long. The store recommended a number of manufacturers, and made a choice in favor of domestic ones. My recommendations to motorists. |
| 6. | Vladislav: the first creak of the tensioner appeared at 65,000 km, did not lubricate it, replaced it with a new one. I think that this is quite normal for Russian quality. |
| 7. | Igor: the clutch works properly, does not knock, does not stick, mileage is 95,000 km. Taking good care of the machine and quality parts are the main factors contributing to long service life. |
| Negative | |
| 1. | Victor: the first tensioner flew at around 30,000 km. The interval is too short. Manufacturer's warranty is 95-100 thousand km. In the store I chose a foreign-made tensioner. I've been using the machine for two months now and I'm happy with the quality. |
| 2. | Vasily: at the second technical inspection, the master recommended replacing the tensioner, since the pedal travel exceeded 146 mm at maximum tension. I think the resource is too small. |
| 3. | Gennady: the release bearing flew at 60,000 km, which was unexpected, because the replacement interval had not yet arrived. |
Payment via PayPal
After selecting payment via PayPal, the PayPal payment system will launch, where you need to select the payment method: bank card or PayPal account.
If you already have a PayPal account, then you need to log into it and make a payment.
If you do not have a PayPal account and you want to pay using a bank card via PayPal, you need to click on the “Create an Account” button - shown with an arrow in the picture.
PayPal will then prompt you to select your country and provide your credit card information.
After specifying the information required to make the payment, you must click on the “Pay Now” button.
TsBKE pinout
The location of the TsBKE contact connectors is shown in the figure:
- Enter exit. CAN bus (L – line)
- Enter exit. CAN bus (H – line)
- Enter exit. Rear window heating control
- Exit. Heated windshield relay
- Entrance. Hazard switch
- Entrance. Trunk lock actuator switch
- Entrance. Windshield Wiper Switch (Intermittent Position)
- Entrance. Windshield Wiper Switch (Low Speed Position)
- Entrance. Windshield Wiper Switch (High Speed Position)
- Entrance. Windshield washer
- Exit. Seat heating relay
- Exit. Heated windshield switch
- Enter exit. Lighting control module (Automatic lighting mode) – for 21900-3840080-20 Not activated – for 21900-3840080-10
- Terminal 15
- Entrance. Engine compartment lamp switch
- Entrance. Light switch (Left side direction indicators)
- Entrance. Light switch (Starboard direction indicators)
- Enter exit. Headlight high beam relay control
- Exit. Low beam relay
- Entrance. Lighting control module (Low beam mode)
- Exit. Alarm sound
- Exit. Windshield Wiper Motor (Low Speed Mode)
- Terminal 30 (Turn signals, daytime running lights, low current signals)
- Exit. Turn indicators "Left side"
- Exit. Direction indicators "Right side"
- Exit. Daytime Running Lights
- Enter exit. Park position windshield wiper
- Exit. Windshield Wiper Motor (High Speed Mode)
- Terminal 30 (Windshield wiper motor, interior lighting)
- Terminal 30 (Power windows, door and trunk locks)
- Exit. Trunk lighting – for 21900-3840080-20 Not activated – for 21900-3840080-10
- Exit. Power window switch power supply
- Entrance. Rear left door power window switch – for 21900-3840080-20 Not engaged – for 21900-3840080-10
- Entrance. Rear right door power window switch – for 21900-3840080-20 Not engaged – for 21900-3840080-10
- Entrance. Front right door power window switch
- Exit. Electrically controlled mirror right (Mode “Up / Down”) – for 21900-3840080-20 Not activated – for 21900-3840080-10
- Exit. Electrically controlled mirror right (Mode “Right / Left”) – for 21900-3840080-20 Not activated – for 21900-3840080-10
- Enter exit. LIN bus
- Housing (Low Current Loads)
- Exit. Trunk lock drive
- Exit. Interior lighting unit
- Entrance. Airbag activation signal
- Entrance. Rain sensor sensitivity regulator - for 21900-3840080-20 Not activated - for 21900-3840080-10
- Entrance. Trunk light switch
- Enter exit. CAN bus (L – line)
- Enter exit. CAN bus (H – line)
- Entrance. Front right door switch
- Entrance. Rear passenger door switch
- Autostart (for Lada Connect system)
- Entrance. Front left door switch
- Exit. Car interior lighting (Energy saving mode)
- Exit. Driver's door lock motor
- Exit. Front left door power window
- Exit. Front right door power window
- Exit. Rear left door power window – for 21900-3840080-20 Not activated – for 21900-3840080-10
- Exit. Rear right door power window – for 21900-3840080-20 Not activated – for 21900-3840080-10
- Housing (High Current Loads)
- Exit. Passenger door lock motors
- Exit. General "starboard"
- Exit. General "left side"
Payment via WebMoney
After selecting payment via WebMoney, the payment system will launch, where you need to select the payment method: bank card or WebMoney wallet.
If you already have a WebMoney wallet, then you need to log into it and make a payment.
If you do not have a WebMoney wallet and you want to pay in another way, you need to select any of the methods that WebMoney offers and make the payment
After specifying payment details and confirming payment, payment for the goods will occur.
Engine control unit Lada Kalina
The capabilities of autodiagnostics depend on the type and brand of the ECU (electronic control unit, ECU). The type of ECU depends on the year of manufacture of the car and the engine (environmental friendliness and engine number).
On Kalina 1, 2 cars the following are most often installed:
- Engine 21116 - ECU M74
- Engine 21126 - ECU Bosch Me17.9.7 or M75 (with or without CAN bus).
- Engine 21127 - ECU M74 - 638 (analogue of M74 with a modified board).
- January and Itelma ECUs were installed on cars until 2008.
The ECU of the Lada Kalina is located under the central panel, and in order to view the number and type of the ECU, the ECU should be removed (lift the panel).
Engine control units, in turn, have a certain firmware, but for diagnostics via the OBD2 connector, only the presence of a CAN bus is affected. If you have CAN, you must select an appropriate diagnostic adapter that supports this protocol.
IMPORTANT: If ECUs without CAN bus support are installed, you must use the KKL VAG adapter
It is recommended to carry out ECU diagnostics once every 10,000 km, or every maintenance. The example shows a Bosch unit with firmware b173CR03 (serial firmware) without CAN.
Briefly about ECU firmware:
Flashing (reflashing) the Bosch Me17.9.7 control unit on VAZ cars is only possible using a K-Line adapter, which supports data transfer via the corresponding bus.
Source
Downloading a book
After successfully completing the payment (by any method) and returning to the KrutilVertel store from the payment system website, you will be taken to the successful payment page:
On this page you need to indicate your e-mail, where access to download the book will be sent.
If you are already registered on our website, then simply follow the link to your personal account.
The book you purchased will be in your personal account, from where you can always download it.
Please note that after making the payment, you need to return back from the payment system website to the KrutilVertel website.
If for some reason you did not return back to the site and closed the payment system tab with a message about the successful completion of the payment, please let us know - we will send you a letter indicating access to download the book.