FakeHeader
Comments 23
Pedal adaptation helps me personally!
When I came for diagnostics, about six months after purchasing the car, the diagnostics showed that the gas pedal was not adapted! I performed the above operation on rpm from 1000 to 4000 and it adapted! These failures, if you suddenly give the gas to the floor even for a second, are annoying! After chipping there was not a single failure at all, you press sharply and it immediately slips without delay! For some reason, about a month later, a small failure appeared again! This is not an adaptation! What you described is enabling the misfire diagnostic function.
Throttle valve adaptation is done as follows:
1. Ignition on 2. Wait 30-40 seconds. 3. Start the internal combustion engine. 4. Turn off the ignition 5. Wait for the main relay to turn off. 6. Everything
But only then we go to the track and adapt the passes.
But before this, you need to warm up the internal combustion engine until the fan turns on three times.
initialization, and then the above written by the author! Helps! ) BC State1 for help or diagnostics
The staff transfers to 95th without training, many ride on 92nd
You read more carefully (— adaptation of the throttle position zero. For this, the first turn on of the ignition switch after replacing the controller) after replacing the controller. Removing the terminal from the battery or resetting the settings by the staff does not affect anything. Again, we carefully read (adaptation of the misfire diagnostic function of the controller in order to avoid damage to the catalytic manifold and possible fire of the car) misfires have nothing to do with the pedal in general. In the first case, all this is done at the factory. This is only necessary when the brain changes or the throttle assembly.
or by “resetting” it with initialization using diagnostic equipment, my B.K can do initialization, so for whom how
If the staff resets it, won’t it work?
I think no! The state only resets the values to zero! This is different!
I’ll try this during the day, otherwise I’ve already sinned on the filter, you press the pedal, from 2 to 3 there are dips, that is, no!
try! Let me know if it helped or not!
I need to try it, otherwise there are holes in my guts
everything is clear, I just changed the firmware, I did it! But when I drove around after buying the car for about six months and stopped by for diagnostics! It revealed that for some reason the pedal was not adjusted! And even after the firmware, the car was tearing out from under itself, and about two weeks ago small gaps appeared again! I tried from 1000 to 4000 as it was written to do everything, the pedal became more responsive! But it’s still not the same as right after the firmware!
A two-mode “booster,” so to speak, deceives the ECU: it makes it think that we pressed the pedal harder than it actually happened. It works in a more rigid coupling with the engine
But it is important to understand that this will not result in more “horses” and the nominal acceleration will not change, it’s just that the ecological “cotton wool” disappears from the pedal. In principle, the driver could drive at the same pace before, just press with his right foot more boldly
Next up is a Mini at the go-kart track and a Tiguan in the city. Both cars only confirm the above. However, sitting in a Volkswagen crossover, I very opportunely remember about the sport mode of the DSG transmission and decide to compare it with the operation of a “booster”. The latter predictably pales in comparison to this convenient feature. I think that for cars that have a “sport mode”, the accelerator will most likely be superfluous. The “brain” block of modern two-pedal boxes makes the actuators move faster in “sport”; pushes down a gear quickly and coordinates it with engine speed, achieving the best torque output. This is the real environmental killer. But the “booster” does not have such an arsenal.
Stuttering when accelerating? Dig! — logbook Lada Kalina Sedan 2006 on DRIVE2
As you know, every car requires attention. So mine demanded it. Sluggish acceleration, vibration, consumption, shocks when switching. List of suspects:1. MAF sensor. I recently measured www.drive2.ru/l/477094589040165062/. The multimeter reading is 1.04 V.
According to the diagnostics, it showed 1.016 V. There is a third way - remove the chip from the mass air flow sensor and drive it. I haven't tried it.
2. Candles. I forgot to take a photo. Yesterday I took it off, like new. Candles cost 17 dv. www.drive2.ru/l/473344429755728085/. I'm going to install DENSO.
3. Air filter. Yesterday I took it out dirty. I blew it out from the compressor. I was breathing better. It was easier to go.
photo from the Internet. It looks like it was for me.
4. I have long wanted to try running antifreeze past the throttle valve. The fitting was used from an old radiator.
5. Corrugation. www.drive2.ru/l/478326591819088066/. I've seen some cars come out inside. I thought so too. It turned out not. It just rattled and siphoned. Although sound could also play a role. After replacement the vibration went away.
6. It remains to look at the injectors. There is no smell of gasoline. But the O-rings have already been purchased. I took washing for the injector and valves. I'll do it as soon as I fill the tank full. After this, you will need to replace the spark plugs as recommended.
Expert answer
The following two tabs change content below.
About the expert:
Frets Expert
An expert on Lada cars with many years of experience. I own a Lada Granta car, I collect cramps based on the Priora. Sometimes I stay overnight in the garage. My wife is more jealous of cars than of women.
I can assume that due to power surges, the engine control system “glitched” and went into emergency mode. It’s a pity that we didn’t look at the error code, but most likely the error was: “Low signal level of the gas pedal sensor.”
In this case, you did everything right. We found a box in which it does not rain and removed the battery.
If you have a similar situation when the engine does not respond to the gas pedal and an error appears on the instrument panel screen, then try the following:
- turn on the ignition and sharply press the gas pedal all the way several times.
Press the gas pedal all the way down - Start the car, if it idles steadily, then again sharply press the gas pedal all the way.
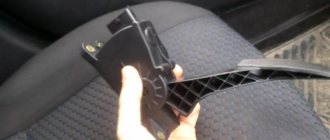
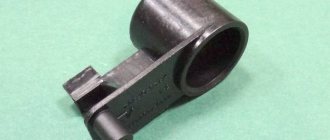
- Next to the pedal there is a so-called “frog” - this is the contact block with the wires. Move it, take it off and put it on again (just before doing this, remove the terminal from the battery).
- The brake pedal frog could also be stuck. This is easy to check; if this happens, the rear brake lights should be on. The brake pedal may also squeak when driving. This is what the brake pedal frog looks like
Detailed video about removing the frog pedal
If all else fails, then you need to contact the dealer or an experienced diagnostician. Most likely, your ECU (electronic control unit of the car) has been flooded with water, or a short hole has appeared in the area from the pedal assembly to the rear dimensions. Or the electronic gas pedal could even break down.
One of the symptoms of a faulty frog (pedal limit switch) is failures during acceleration, but failures can also be caused by a clogged fuel filter.
Description of the problem
In general, there was a terrible downpour, puddles on the roads, and general floods in the yards.
Heavy rain could affect the operation of the car's electronic systems
But we had to go, my wife and daughter were in the shopping center, and the queue for the minibus, according to them, was huge. I am inclined to believe that the minibuses simply stalled (we have old, decrepit Gazelles in our city).
We have one place that is constantly flooded. I look, and there are new Kia Sid floating on the radiator grille in the water, well, I’m taller, I thought that nothing would happen. Here, as luck would have it, the traffic light is still red, and the intersection is straight, only a pedestrian crossing, on which there is no one at all, since it is knee-deep in water. Most people pass it, even on red lights, quietly. And I’ve only been driving for a month, I’m not used to breaking rules yet. Has stopped.
Belt whistled due to water ingress
My Granta is standing there, waiting for the green light, and then the alternator belt started whistling, as if it was slipping. I see the voltage on the on-board computer jumps, from 13 Volts to 11.8, and there is a whistle under the hood. The light turned green and I was off. I started, drove out of the puddle, accelerated a little and the whistle disappeared. The voltage on the on-board computer screen leveled out to 13.6.
Among the current consumers, my headlights were on, the rear window was heated, the tape recorder was working quietly, and the heater was turned on at second speed to blow the windshield.
I got to the shopping center, stopped, and waited for my wife and daughter. The engine begins to vibrate and bleed a little. I went home already on the detour, there are fewer puddles there. I dropped everyone off and decided to go to the garage.
I started the engine, the revolutions jumped to 6000, I was already scared. Then they dropped to 1000, the engine sneezed and died. The check engine light on the dashboard came on. It started again, it idles, but pressing the gas pedal does not respond. I try to start, it idles and doesn’t respond to the pedal at all when driving. So I drove to the garage in second gear, well the 21116 engine is torquey and drives like a tractor.
I repeated the experiment in the garage. I started it up, tried to press the gas pedal, nothing happened, the revs were like a glove, the engine icon was still on.
How I solved the problem of gas pedal failure
- I took a smoke break and decided to remove the terminal from the battery.
- I reset it and waited five minutes. He swore that he forgot the diagnostic adapter at home.
- Reconnected the terminal and started it.
- “Jackie Chan” stopped burning, the engine reacts to the gas pedal with a vigorous increase in speed. The engine really didn’t start at first, it started only the second time.
I left the garage, circled along the pit line, and came back. There were no signs of damage. Now I'm afraid to drive in the rain.
What could it be? Now I’m subconsciously afraid that if I start the engine, my Lada Granta won’t want to go anywhere in rainy weather. How likely is this situation to happen again?
On injection machines
This problem occurs both on domestically produced injection cars (Lada Priora, Granta, Kalina, etc.) and on foreign cars. In most cases, this is explained by a phenomenon known as engine tripping. The situation is typical when only three out of four cylinders work normally. In this case, the engine simply does not have time to quickly react to a sharp press of the accelerator, and power failures occur, which sometimes turn into a series of jerks. This problem can occur both when accelerating and at idle. Here are the reasons why problems occur:
- The oxygen sensor has failed. Solution: check and replace.
- The valve timing in the engine is disrupted. Solution: set the phases as indicated in the operating instructions for the machine.
- The heat rating on the spark plugs does not correspond to that specified in the instructions. Solution: check the heat rating, then purchase and install new spark plugs.
- One or more injectors are clogged. Solution: the injectors are removed, installed on a special stand, where they are washed with a solvent under pressure.
Fines for crossing the stop line and speeding will no longer bother you!
Main reasons with engines of other cars
Next, we will go through other cars, and we will indicate the most frequently occurring problems that lead to a drop in power.
So, on a Mitsubishi Lancer 9, the problem most often arises with the exhaust gas exhaust system. This car uses a double catalyst, which becomes clogged with carbon deposits relatively quickly.
Therefore, many owners of this car, when the power drops, recommend first of all paying attention to this system.
But in the ZMZ-406 and 405 engines, which are equipped with GAZelle and Volga cars, a drop in power often occurs due to:
- Ignition coil malfunctions;
- Losses in high-voltage wires;
- Non-working spark plugs;
- Failure of sensors (primarily DPKV).
But do not forget about the other above-mentioned elements of the power supply, ignition, as well as timing and CPG systems.
In Ford Focus cars, in general, problems with loss of traction arise due to malfunctions of sensors, as well as elements of the power system - especially the fuel module, which includes both a fuel pump and a filter, combined into a single structure.
Much the same applies to a car like the Renault Megane.
In this machine, power loss may occur due to:
- Wear of the distributor cover;
- Faulty spark plugs and high voltage wires;
- Weak exhaust system capacity;
- Worn fuel pump and dirty filter elements;
- Damaged injector sensors.
In general, first of all, you should look for the cause in the power and ignition systems, and only then move on to the timing belt and CPG.
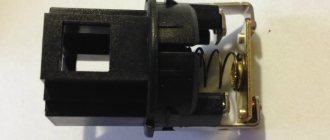
Replacing the gas pedal module of Lada Granta
The car uses an electronic throttle valve.
There are two gas pedal position sensors installed in the gas pedal housing.
Gas pedal sensors are potentiometers with a sliding contact mounted on a common shaft.
When the position of the pedal changes, the resistance of the sensors changes and, accordingly, the voltage that is transmitted to the controller.
From the controller, the corresponding signals are sent to the throttle assembly, which changes the position of the damper.
If one of the sensors (or its circuit) fails, the engine control system fault warning lamp will light up.
If the signal from the sensor is not restored within the control time, the ECU will switch the system to backup mode.
In this mode, when you sharply press the gas pedal all the way, the speed will increase slowly.
The car will be able to continue driving to the repair site under its own power.
There may be a slight increase in fuel consumption and changes in some other technical parameters of the engine.
In the event that both sensors fail, the ECU will switch the engine management system to emergency operation mode, the engine will only operate at speeds slightly above idle (1500 min-1).
At the same time, the car retains the ability to move independently, albeit at a slow speed.
This will allow you, if necessary, to leave the intersection, pull over to the side of the road, or move the car to a safe place a short distance.
As a result of wear of the moving contacts or conductive paths, the sensors may fail or the signals coming from them will not be correct.
If the signals are violated, the engine will operate unstably, and “failures” are possible in transient conditions.
When idling, the engine speed may change spontaneously.
To remove the accelerator pedal module:
Press the latch of the wire block and disconnect the block from the pedal connector
Using a 10mm socket, unscrew the three nuts securing the gas pedal module to the front panel bracket
Remove the module from the bracket studs
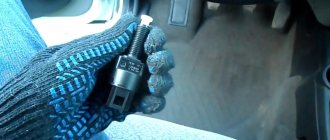
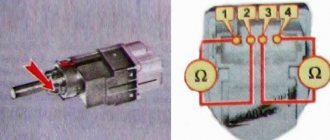
Electronic gas pedal
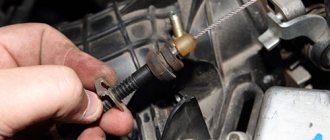
Using a tester in ohmmeter mode, you can check the condition of the moving contacts and current-carrying paths of the gas pedal position sensors. For this:
— connect one probe of the tester to pin 4, and the other probe to pin 2. By slowly moving the gas pedal, we control the electrical resistance across the device, which should decrease.
— repeat the test by connecting the tester to pins 4 and 3;
— we also check the track of another sensor, connecting the tester in series to pins 1 – 6 and 6 – 5.
If, when checking the tracks, the resistance changes abruptly, the sensor should be replaced.
Install the electronic gas pedal in the reverse order.
To avoid accidentally bending the leads in the gas pedal sensor connector, connect the wire block before installation.
Then we put the gas pedal bracket on the studs. Tighten the pedal mounting nuts to 6 - 8 Nm.
No sound from speakers
There is often a situation where only one side plays. A common question among car enthusiasts is what to do in such a case. Most often, the problem is a faulty cable, which just needs to be cleaned accordingly. The following substances can be used for cleaning:
- Ethanol. It can be found in pharmacies, and the cost is relatively low.
- Isopropyl alcohol. This substance is much more expensive, is sold in large bottles, and cannot be used in the future to achieve other purposes.
- Nail polish remover. It is able to dissolve the smallest particles and also remove dust from the surface.
School eraser is used to clean large trains. Cleaning instructions are as follows:
- Use a Phillips screwdriver to remove the right trim in the immediate vicinity of the glove compartment.
- The screws that secure the torpedo trim are unscrewed.
- The front part of the radio is pulled out. It is often held on with clips.
- All connectors located at the rear are disconnected.
- The radio is disassembled, after which the cables are cleaned using a suitable substance.
After completing the above work, you can begin assembly in reverse order.
How to check E-gas
If you have doubts about the performance of the product itself, you should dismantle and check the unit using a multimeter.
Main symptoms of a malfunction:
- “Chek” lighted up on the dashboard (error 0504 during diagnostics);
- when you press the gas pedal, the responsiveness disappeared;
- increased engine speed is diagnosed when changing gearbox speeds.
If we talk about the causes of malfunctions, the most common of them are:
- failure of one or both MPG sensors;
- malfunction of sensors as a result of oxidation of contact tracks, their contamination.
As mentioned earlier, in order to check E-gas grants, you need to use a multimeter. To carry out diagnostic measurements of electrical circuits, the module must be dismantled by first disconnecting it from the contact chip.
After that, you need to switch the operating position of the measuring device to ohmmeter mode. The point of the test is that it is necessary to alternately measure the condition of the contacts and conductive paths of the MPG sensors. For example: connect one probe of the device to contact No. 2, and the other to No. 4. While keeping both probes attached, slowly step on the gas pedal and observe the readings on the meter. A normal reaction is considered to be a smooth decrease in electrical resistance when pressing the accelerator. An abrupt, unstable decrease indicates a possible sensor malfunction. A similar sequence of actions is taken for the remaining contacts.
Dips during acceleration
Once the causes are considered, we can consider how to deal with the problem. So, let’s describe step by step what needs to be done when the gas pedal has dips during acceleration:
- The first step is to check the spark plugs. The appearance of carbon deposits or spark plugs that are too clean indicate that the mixture is not adjusted correctly. It is worth adjusting the correct amount of fuel mixture.
- Ignition wires can also cause the vehicle to malfunction.
- A clogged throttle can lead to failures during acceleration.
- The condition of the air filter affects the formation of the mixture, so it is worth changing it on time.
Air filter clogged - The fuel pump (), as well as the condition of the fuel filter, can affect injection.
Therefore, in case of failures, it is necessary to diagnose them. To diagnose and check its operation, as well as the condition of the mesh filter. Dirty fuel filter - ECU errors can also lead to accelerator failures.
- The last reason is clogged injectors. They need to carry out diagnostics, check functionality, and also clean and replace faulty elements.
Thus, the causes of failures during overclocking have been identified and can be eliminated.
Electronic gas pedal - how does it work?
Modern technologies are aimed at making our lives as easy as possible. On the one hand, this is a huge plus, but on the other hand, they simply deprive us of the opportunity to make any decision, or rather, they correct it, and in such a way that it is not always possible to achieve the desired result. This is clearly visible in the operation of the electronic pedal, which is so popular in the modern automotive industry. Although for those who feel insecure behind the wheel, and especially do not delve into the technical nuances of the car, this innovation is only a plus.
The principle of operation of the electronic gas pedal is as follows: after the driver presses the accelerator, data on pressure angles immediately enters the control unit through special sensors. Next, the ECU comes into play, which calculates the required opening angle of the throttle valve, and the drive, based on the data received, opens it to this angle. Moreover, if it suddenly becomes necessary to change the value of this angle (for a more economical mode or safety), the control unit does it itself, without receiving the corresponding command. It turns out that the driver cannot 100% regulate this process.
If the diesel engine doesn't work
A decrease in traction can also occur in diesel engines. If we look at old cars that have completely mechanical power systems, then the most common cause is depressurization of the system.
As a result, air enters the fuel, which is why the fuel injection pump is unable to provide the required pressure.
Don't forget about:
- clogged filters;
- weakly pumping fuel priming pump;
- damaged plunger pair;
- Coking of injector nozzles.
And if we also add possible problems with the timing belt and CPG, then identifying the cause will not be so easy.
In modern diesel installations, where an additional electronic component is used, the search range will increase.
For example, the Common Rail system uses all the same sensors as the injection engine. And if at least one of them breaks, this will certainly affect the operation of the control part.
Lada Granta electronic gas pedal malfunction
Features of the Lada Granta throttle assembly
The throttle valve is turned by an electric motor through a gearbox. Both are built into the throttle body. When starting and warming up the engine, as well as during idling, the flow of air into the cylinders is regulated by opening the throttle valve. The throttle position is controlled by two sensors built into the throttle body.
The throttle valve opening angle is set by the electronic control unit (ECU) depending on the estimated amount of air that should enter the engine cylinders. This takes into account the operating mode of the engine (starting, warming up, idling, and so on), the temperature of the ambient air and the engine, and the position of the gas pedal.
Control commands are sent to the throttle assembly to the electric motor. At the same time, the ECU monitors the opening angle of the damper and, if necessary, sends appropriate commands to adjust its position. As a result of the fact that the ECU simultaneously regulates the amount of injected fuel and incoming air, the optimal composition of the combustible mixture is maintained in any engine operating mode.
The electric throttle body is sensitive to deposits that may accumulate on its inner surface. The resulting layer of deposits can interfere with the smooth movement of the throttle valve, jamming it (especially at low opening angles). As a result, the engine will operate unstably and even stall at idle, start poorly, and failures may also appear during transient conditions. To avoid this, as a preventive measure, deposits should be removed with special detergent compounds during regular vehicle maintenance. A large layer of deposits can completely block the movement of the damper. If flushing fails to restore the throttle assembly to operability, it must be replaced.
A malfunction or incorrect operation of the throttle assembly may be caused by a broken contact in its electrical circuit (oxidized terminals in the wiring harness connection block). In this case, it will be possible to restore operation by treating the terminals with a special compound for cleaning and protecting electrical contacts. There are other possible causes of the malfunction:
— no supply voltage is supplied to the throttle assembly;
— signals are not received from both throttle position sensors;
— The computer cannot recognize signals from the throttle position sensors.
In these cases, the engine control system goes into emergency mode. At the same time, the car retains the ability to independently move a short distance at a slow speed, which, in extreme cases, will allow it to be moved to a safe place
(move to the side of the road, leave the intersection, etc.).
The fact that the throttle assembly is operating in emergency mode may be indicated by a burning indicator lamp for a malfunction of the engine management system and an increased speed of the crankshaft at idle (about 1500 rpm, despite the fact that the engine is warmed up to operating temperature), the engine at this will not respond to pressing the gas pedal.
Each of the throttle position sensors is a potentiometer. During operation, gradual wear of conductive paths and moving contacts occurs. Over time, wear can reach such an extent that the sensor cannot function correctly. The presence of two sensors increases the reliability of the entire unit.
If only one sensor fails, the warning lamp will light up, but the engine management system will switch to backup mode. In this case, the engine will respond adequately to pressing the gas pedal, but with worse performance parameters
The reserve mode allows you to drive your car to the repair site under your own power.
Electronic gas pedal Lada Granta
On modern cars, instead of the usual cable drive for throttle control, a so-called “electronic gas pedal” is installed. In such cars, the throttle position is controlled electronically. When you press or release the gas pedal, information about this goes to the control unit (ECU) and only after processing and adjustment is a command given to the throttle module. The pros and cons of such a system, as well as signs of malfunctions, will be discussed in this article.
Other engine and system malfunctions
- Compression in the engine cylinders is low.
- The cylinder head gasket is damaged.
- The engine control system is faulty.
- The valves of the gas distribution mechanism are burnt out and leaky.
- The exhaust system is leaking.
- The valve clearances are not adjusted (8-valve engines only).
- The hydraulic pushers are faulty.
- The engine air filter is dirty.
- Vacuum hose connections are leaking.
Keywords: Lada Granta engine | Lada Priora engine | Lada Kalina engine | Lada Kalina 2 engine | Lada Largus engine | Lada Vesta engine | Niva engine | lada xray engine | universal article
Examples of throttle valve adaptation on VAG and Lancer IX vehicles
In this video, they will tell you and show you how to adapt the damper for a VAG car.
Adaptation of remote sensing for Volkswagen Golf 4:
- We warm up the engine to t=80 0 C and turn off the car. Then we connect the USB-KKL cable to the diagnostic connector and, after turning on the ignition, launch the diagnostic program (VAG-COM 3.11).
- We enter section 01-engine.
- We poll the fault memory (02).
- We erase detected faults (05).
- After returning to the previous menu, enter the “adaptation-10” section.
- On channel 00, press the “read” button.
- Save the result and return to factory settings.
- Enter the basic settings (04) and go to the measurement mode.
- If the group value is 001, press “start”.
- We wait 2-3 minutes, then close the program and disconnect the cable. Adaptation is complete.
Adaptation of remote sensing of Nissan cars with an electronic gas pedal:
- Fully release the accelerator pedal.
- Turn on the ignition for at least 2 seconds.
- Turn off the ignition and wait at least 10 seconds.
- Turn on the ignition for at least 2 seconds.
- Turn off the ignition. The accelerator pedal adaptation procedure is completed.
- We are adapting the throttle valve. The accelerator pedal is released.
- Turn on the ignition and turn it off immediately. We wait at least 10 seconds. During this period of time, the damper moves.
- We teach air supply at idle speed (XX).
- Warm up the engine and gearbox to operating temperature.
- We turn off all electrical equipment of the car.
- We start the engine and bring it to operating temperature.
- Turn off the ignition and wait at least 10 seconds.
- Fully release the accelerator pedal.
- Turn on the ignition and wait at least 3 seconds.
- Within 5 seconds, press the accelerator pedal five times, then wait 7 seconds.
- Pressing the accelerator pedal, hold it until the CHECK stops flashing and lights up constantly (about 20 seconds are required).
- After the CHECK light comes on continuously, you must release the pedal within 3 seconds.
- We start the engine to run at XX.
- Press the pedal several times to check the stability of the XX.
Adaptation of remote sensing on VW Passat B5:
We recommend that you watch this video, it will show you how to adapt the damper for a Passat car.
- Warm up the engine to operating temperature and turn off the car.
- We turn on the ignition, but do not start the engine.
- We connect the cable to the diagnostic connector and launch the program.
- We enter section 01-engine.
- We enter the basic settings (04).
- In the damper adaptation we select 060 for cars with electronic damper control, and value 098 for cars with cable-controlled damper.
- Let's start the adaptation.
- We are waiting for the “ADP RUN” entry to appear on the screen and the subsequent “ADP OK” entry.
- We return to the basic settings.
- Turn off the ignition. Adaptation is complete.
Mitsubishi Lancer IX throttle adaptation:
- Warm up the car engine.
- We connect the ScanDoc scanner to the diagnostic connector. IAC values = 0.
- We artificially restore the thermal gap in the damper (for example, we use a mixture of grease and waste oil).
- We start the engine and wait for the steady idling speed to be established.
- In the scanner, we launch the “Sas mode” mode and adjust the position of the IAC during adaptation.
- If the engine stalls when turning on the “Sas mode” mode, then unscrew the IAC screw to increase the engine speed to XX;
- We set the speed within 750-800 rpm.
- During adaptation, the IAC steps are set to 4-7;
- We forcibly complete the adaptation process and turn off the engine.
- We start the engine and check the IAC. If the adaptation was successful, then the IAC steps will be 27-28.
Adaptation of remote sensing on Audi A4:
- We warm up the engine to t=80 0 C and turn off the car. Then we connect the cable to the diagnostic connector and after turning on the ignition, launch the diagnostic program (VAG-COM).
- We enter section 01-engine.
- We enter the “Adaptation-10” section.
- On channel 00, press the “read” button.
- Save the result and return to factory settings.
- Enter the basic settings (04) and go to the measurement mode.
- Enter channel value 098, start adaptation.
- We are waiting for a message about the completion of the adaptation process.
- We return to the original section. Close the program and disconnect the cable.
You can find out how to install car audio with your own hands here. We recommend it to everyone!
From this article, you will find out how much anti-corrosion treatment of the underbody of a car costs.
Power system pressure
The fuel pump is located in the gas tank on the injection engine. On carburetor engines, the pump will be found under the hood, on the engine. For most cars, power loss can be attributed specifically to the fuel pump.
Many modern cars have special connectors on the fuel line for connecting a pressure gauge. This way you can check the pressure. If the connector is missing, you will have to work a little to connect.
Pressure values can be found in the engine instructions. There is a special regulator in the line, with which you can relieve excess pressure directly into the tank. This regulator may be incorrectly configured, or it may leak. To check it you will need an ordinary air pump. Using it, you need to smoothly raise the pressure level to the one indicated in the passport for the motor. If you did not have time to increase the pressure, and the regulator dumped fuel into the tank, then it must be replaced.
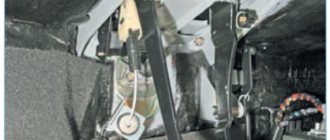
10.14. Throttle cable
Checking full throttle opening
| EXECUTION ORDER |
| 1. Turn off the engine. |
| 2. Turn the throttle lever by hand to check that the throttle valve is fully open with the accelerator pedal fully depressed. |
| 3. If the throttle valve does not open completely, adjust the throttle cable. |
Examination
| EXECUTION ORDER |
| 1. Turn off the engine. |
| 2. Remove the pin securing the cable to the throttle lever. |
| 3. Pull the pin in the direction of cable extension (direction R) with a force less than 1.96 N (0.2 kg) and stop momentarily when you feel tension, then use a marker to make a mark on the cable at the end of the outer cable sheath. |
| Warning What is meant by tension? If you pull on a loose cable, the throttle cam mounted on the valve body on the inside of the automatic transmission begins to move. This movement of the cam will be transmitted to you in the form of tension and at this moment you should stop pulling the cable. |
| 4. Connect the cable pin to the throttle lever. |
| 5. Check whether the mark on the cable matches the end of the outer sheath of the cable. |
| 6. If the mark does not match, then achieve this by adjusting the cable. In this case, do not pay attention to the amount of free play. A=5±1.0 mm |
| 7. Move the throttle lever by hand from fully closed to fully open and check for any obstruction. |
| 8. If there are problems associated with the operation of the automatic transmission, check the line pressure at idle speed (392.4 kPa) and adjust the throttle cable again. |
Installation
| EXECUTION ORDER |
| 1. Remove the throttle cable adjuster (red). |
| 2. Insert the cable pin into the throttle lever assembly hole. |
| 3. Install the cable onto the bracket (C). |
| 4. Make sure the choke lever is in the fully closed position. |
| 5. Place an intermediate ring with a thickness of 5±0.1 mm on section A of the freewheel. |
| 6. Turn the nut (B) by hand towards the bracket (C) until there is no gap at either end of the spacer. |
| 7. Lock the position of the nut (B) and tighten the nut (A) to the required torque. Tightening torque: 11.77–16.68 N•m At the same time, press the outer sheath of the cable in direction D in order to prevent the outer sheath of the cable from moving from bracket C. |
| 8. Move the cable by hand from fully open to fully closed to check if there is any interference with its movement. |
| 9. Check distance A=5±1.0 mm with the throttle valve fully closed. |
| 10. If there is a deviation from the required values, reassemble the throttle cable again. |
| Warning Be careful not to damage the cable and cable sheath (deformation or bending). |
Adjustment
| EXECUTION ORDER |
| 1. Turn the front ears all the way to the left. |
| 2. Turn off the engine. |
| 3. Check whether the throttle valve is fully open when the accelerator pedal is fully depressed. If it is not fully open, adjust the accelerator cable. |
| 4. Install the outer casing of the cable onto bracket C. |
| 5. Check if the throttle lever is completely closed. |
| 6. Remove the gaskets from the front left wheel splash guard. |
| 7. Remove the line pressure plug L shown in the figure and install an oil pressure gauge. |
| 8. Start the engine in position “P” and check the engine idle speed. Engine speed at idle speed: 800 rpm |
| 9. With the throttle lever fully closed, perform the following actions: – holding the cable by the outer sheath with your hand, move it in direction L to obtain a pressure higher than the specified value; – Slowly move the outer sheath of the cable in direction R and stop at the point where the line pressure curve begins to bend, then tighten nut A until it reaches bracket C. |
| 10. Tighten nut B to the required torque with nut A in fixed position and the specified line pressure. Tightening torque: 11.77–16.68 N•m |
| 11. Turn off the engine. |
| 12. Remove the pressure gauge and install a new square head plug (MFU60 |
| 19 423A), tightening it to the required tightening torque. Tightening torque: 4.9–9.8 N•m |
| 13. Install the splash guard. |
| Warning Do not move the cable excessively in the R direction when the specified line pressure is reached. (Do not move it more than 3mm from the bend point). This may cause the inner cable wire to come loose and damage the automatic transmission. |
BB wires
If the engine stalls at idle, the problem may be related to the operation of the ignition system. The culprit is the armored wires, which most often fail. If the wire is damaged, then the spark will break through and, naturally, there will be no spark at the spark plug. The fuel mixture in the cylinder will not ignite. It is best to check the wires with a multimeter.
Among the malfunctions of the wires, one can identify problems with the contacts at the points of connection with the spark plugs or with the coil. Also, the conductor may have various damages. If the insulation is destroyed, this will be accompanied by breakdowns and current leakage. In addition, increased wire resistance is also considered a malfunction. This also negatively affects sparking and the operation of the ignition system.
Adjusting old-style E-gas
Disconnect the negative terminal of the battery.
Use a screwdriver to loosen the screw, remove the clamp and rubber air duct from the throttle body.
Use a 10mm wrench to loosen the cable lock nut on the sector.
From the side of sector 3 of the throttle valve, you need to pull out cable 1 until it stops. The upper lever 5 of the accelerator pedal should rest against the buffer 4 on the bracket. Tighten nut 2 securing the cable to the sector.
Loosen the tightening of nut “A” and move the limiter “B” of the pedal lever until it stops in the pedal bracket. Tighten nut “A”.
If we fully press the gas pedal, the throttle should be fully open, and the lower lever of the pedal should rest against the mat
After adjusting, tighten nuts 2.
Read more: The brake pedal has become hard or soft: the main reasons
If necessary, repeat the adjustment. Once the adjustment is complete, replace the air duct.
- The adjustment is carried out using a clamping bracket, which we previously removed. This bracket is a tensioner for the casing in which the cable moves.
- Remove the bracket and tighten the throttle cable so that it sags about 1-2 mm near the throttle drive.
- Now you need to install the fixing bracket into place in the casing. Make sure that the cable is tensioned optimally and that the gas pedal is not open at zero position. A cable that is too tight will cause constant high voltage. Squeeze the gas pedal several times and check how everything works.
- Start the engine and make sure the throttle cable is adjusted correctly and the idle speed is normal.
The block cover (11183-1108500) is fixed with bolts that are inserted into oval holes. The improvement is this. to loosen the 4 screws and turn the cover in the desired direction:
- Economy mode (counterclockwise). To drive smoothly, to accelerate, you should press the pedal a little more than before. Gasoline consumption is reduced;
- Active mode (clockwise). The car reacts even with slight pressure on the gas pedal. Gasoline consumption increases. The pedal becomes more sensitive and informative.
In other words, we get the same effect as after installing JETTER (Jetter or spur).
If necessary, you can easily return to the original position (mark it in advance).
conclusions
The main cause of failures are spark plugs, but they are not the only ones that influence the appearance of this effect. Some car enthusiasts may not be able to cope with the occurrence of such malfunctions on their own, and it is necessary to go to a car service center, where they will carry out high-quality diagnostics and also fix the problem. But at the same time, it is worth considering that you will have to be generous, since neither the repair nor the repair will cost a penny.
Now a little background:
The car was purchased new in 2005, initially the engine seemed “strangled”. But without paying attention to this, they referred to the reason for its Euro-3 environmental class (it was not possible to compare engine dynamics at that time). We traveled like this for several years. By that time, the engine was becoming less dynamic, and citing its mileage (50-70 t.km.), they decided that the catalyst had definitely melted. Having heard enough stories about how easy it is to get rid of it, we didn’t take one thing into account :) If everything were that simple, it turned out to be metal
, not ceramic))). How we got rid of it is a separate story, but the result was still achieved. We start the engine, move off and... OH GOD! its dynamics have not changed in any way, only it has become louder (((( Around the same time, another malfunction appeared: the engine began to get hot during operation (high-quality antifreeze was used since the car was in operation!!). Now it not only does not pull , and it’s also heating up. The next struggle began with the second malfunction. The temperature sensor was replaced, then the pump, then the thermostat, then the temperature sensor again, and then the radiator itself. All this lasted for a year. Then we decided that the increased the operating temperature of the engine is a side effect of its first malfunction. Are the marks off? No, everything is normal. Again, all efforts were thrown into searching for the first cause. The next step was to change the engine program to the Euro-2 class. We set off - zero result! ... We continue to drive Over time, the dynamics of the car became comparable to a car loaded with 3, 4, 5, 10 bags of potatoes, and then it felt like you were towing a car. The mileage was already 100-130 t.km. It's time to change the fuel pump grid - zero results, then the fuel pump - zero results, cleaning the injectors - the same story. I am already silent about how many diagnostics have been made since operation. The parameters are always normal, and to the question “why doesn’t it work?” There are no exact answers. “Try changing this, doing that, checking the marks.” Like a fool, I’ve been checking my timing marks almost every month for several years now - in case they suddenly go wrong? If only I had known earlier what result this troubleshooting would lead to (What’s most interesting is that all the repairs done were typical for the operation of a LADA car, but only now I understand that most of them were in vain. Perhaps I would have continued to drive like this, so Only last week the car stopped moving at all. It accelerates only at a quarter of the gas and then in a straight line, and when starting from a stop uphill, where you need to give more gas, it completely choke (it hums and goes 1-2 km/h).
Maybe there are GURUs and SENSEIs among you who can tell you what the reason is?
PS I have extensive experience in operating the domestic automobile industry, and I myself am a mechanic by profession, I thought that LADA cars had been studied inside and out. He practically did the repairs himself, and the signs seemed to be characteristic. BUT THIS CASE BROUGHT ME TO my KNEES.
Design and principle of operation
To understand how the electronic gas pedal works, you need to know the general principle of the accelerator. The fact is that their functions are extremely similar, but the simplest mechanism is a mechanical drive.
The accelerator pedal, or as it is commonly called, “gas”, is a means of controlling the position of the throttle valve.
The throttle valve, in turn, is responsible for the amount of air supplied to the engine intake manifold. The more oxygen enters the combustion chamber, the higher the crankshaft speed. The pedal is a lever that acts on the damper drive. The drive can be cable or lever. All this, one way or another, makes it easier to press the gas pedal.
The operating principle of the electronic pedal is a little complicated, but it makes it much easier to control engine speed. This pedal is used only on fuel-injected cars, as it is entirely based on the operation of electronic devices. The accelerator includes: a pedal module, a signal conversion module and a throttle position control unit.
When you press the pedal, the module transmits information about the angle of deflection of the lever to the signal conversion module. The transistor system transmits an amplified signal to the throttle control unit. After matching the received signal with the electronic control unit, the throttle valve module determines its opening angle. This provides an electronic way to open the throttle valve.
Advantages and disadvantages
Not all drivers like the electronic gas pedal. This is not surprising, since this element was introduced mainly to improve the environmental friendliness of the car and simplify its design, and not for convenience.
The fact is that combining all modern electronic driver assistance systems with a manual throttle is quite difficult and expensive. It is much easier to install electronic elements, simultaneously adding smart assistance systems and protecting the car from the driver himself.
Let's look at everything in more detail, because E-gas has several tangible advantages and disadvantages.
Advantages:
- Better environmental friendliness. This is also achieved through electronic control of engine speed;
- Smoothing out sharp gas changes. The ECU simply does not allow the driver to change the speed of the power plant too sharply;
- Reduced fuel consumption. Everything is clear here, if you drive less aggressively, fuel consumption will decrease.
Flaws:
- Non-repairable. In the event of a breakdown, the pedal assembly, ECU or throttle control module are replaced rather than repaired;
- Slight delay in response to the gas pedal. For most drivers, this drawback will not be critical, but some notice that the engine responds to the gas pedal with a slight delay, and the change in speed is smoother than with a cable drive;
- Softer gas pedal. It is easier to press, but this results in loss of information content.
Unstable engine operation
If the engine runs unstably and stalls when idling, then there are reasons for this. It is quite possible that we are talking about insufficient pressure in the ramp. We also talk about the difficulties in the functioning of the electronic gas pedal.
In the first case, it is worth checking the pressure regulator. Just keep in mind that in new Lada Granta models this regulator may be located in conjunction with the fuel pump. As for the second situation, the check should concern the electronic part of the car, including the power unit adjustment system.
Air supply problems
The problem may also be that there is an air leak in the system. It may be located on the crankcase ventilation hose that connects the inlet pipe to the brake booster. You should carry out additional tightening of the fastening clamps. And, if the need arises, the hoses must be replaced with new ones.
If the problem concerns violation of valve clearances, then the solution requires contacting a service station.
Or it could be different. If the air filter is clogged, it will be more difficult for air to get through and an overly rich mixture will flow into the injectors. In this case, diagnostics and replacement of the air filter is necessary.
Spark plug
The problem could be the spark plugs.
And, of course, the reason may relate to a malfunction of the ignition system. We are talking about the source of the problem in the form of spark plugs or individual coils. If you have localized the source of the breakdown, then the faulty part must be replaced. On 16-valve engines, AU17D spark plugs are installed from the factory.
More details in the materials:
An indirect factor that may indicate problems with the spark plugs is increased fuel consumption. However, increased consumption may also appear for a number of other reasons; for more details, see the material: reducing the fuel consumption of a Lada Granta car.
Main reasons
There are many reasons for this phenomenon and in most cases they are associated with a malfunction of the systems and mechanisms of the power plant.
Some of them are trivial and very easy to fix, others require quite serious repairs.
The main problem with the fact that the engine does not pull is not related to eliminating the malfunction, but to finding it.
In some cases, it is very difficult to determine what caused the reduction in traction effort and you have to go through almost the entire engine.
Therefore, we will try to indicate the main reasons why the car accelerates very “sluggishly”.
Since engines on different cars have their own design features, we will consider specific models.
Power drop on a VAZ carburetor engine
To begin with, let's take VAZ cars with a carburetor power system and an 8-valve timing system - VAZ-2109, VAZ-2110, VAZ-2114, VAZ-2115.
The same power plant is installed on these cars, so the reasons are identical.
Let's go through those components, due to malfunction of which a drop in dynamics may occur.
In general, the main reason that the engine does not pull is a change in the processes in the combustion chambers - a mismatch in the proportions of the air-fuel mixture, the combustion process is disrupted, the filling of the cylinders and the removal of exhaust gases does not occur as required.
Supply system
Very often, a drop in traction occurs due to the power system. Structurally, the carburetor fuel system used on cars from VAZ-2109 to VAZ-2115 is very simple and is almost completely mechanical, so identifying the cause is not particularly difficult.
A decrease in power can occur due to:
- Severely clogged fuel filter (its throughput drops and the pump is simply not able to pump the required amount of fuel);
- Contamination of the carburetor channels (the jets and fuel channels in this element have a small cross-section and debris often clogs them);
- There is air leakage in the area from the tank to the pump (because of this, the performance of the fuel pump drops sharply);
- Damage to the fuel pump membrane (a small crack in it leads to the fact that the vacuum required for pumping fuel is not created in the pump chambers);
- The fastening of the carburetor or intake manifold is loose (due to this, air leaks around the carburetor and the proportion of the air-fuel mixture is greatly disturbed);
- The hole in the fuel tank cap is clogged (because of this, a vacuum is created in the tank and it is much more difficult for the gas pump to pump gasoline out of it);
In addition to the elements responsible for supplying fuel, a drop in power also occurs due to severe contamination of the air filter element.
Ignition system
This system also takes part in the combustion of the mixture, which means a failure in its operation can affect power.
In carburetor engines VAZ-2110 and others, a decrease in traction can occur due to:
- Faulty spark plugs or changes in their thermal gap;
- Excessive wear of the contacts and the central electrode of the distributor;
- Voltage losses in high-voltage wires;
- Violations of the ignition timing.
Irregularities in the power supply and ignition systems most often cause a drop in power, so testing to identify the cause should begin with them.
If the operation of these systems does not raise suspicions, other components of the engine should be diagnosed.
Exhaust system, timing belt and crankshaft
Loss of traction can also occur due to the exhaust gas removal system, although problems with it rarely occur on carburetor engines.
The main reason here is the reduction in throughput due to large deposits in the muffler. Because of this, exhaust gases, without having time to escape from the cylinders, “choke” the engine.
The reasons for the drop in thrust are also often the gas distribution mechanism and the cylinder-piston group.
Here the reduction in power occurs due to:
- Violations of the thermal clearance of valves;
- Heavy carbon deposits on the valve plates and seats, or their burning;
- Occurrence of rings;
- Limit wear of the CPG;
- Cylinder head gasket failure.
In general, problems with the timing belt and CPG cause a drop in power in any engine - carburetor, injection, diesel. Therefore, we will not mention these mechanisms further.