Computer diagnostics of a VAZ-2110 car can be performed independently, without contacting a specialized car service center and large financial costs. But for this you will need to have at least minimal knowledge and skills, as well as appropriate equipment. After all, without a simple understanding of where the diagnostic connector of a VAZ-2110 car is located, you will not even be able to connect the adapter to the electronic control unit.
In this article we will talk in detail about how to read and decipher error codes, and also answer the most common questions related to the ODB connector. All you have to do is follow our recommendations.
Location of the diagnostic connector on the VAZ-2110 and features of its use
Computer diagnostics of a VAZ-2110 car can be performed independently, without contacting a specialized car service center and large financial costs. But for this you will need to have at least minimal knowledge and skills, as well as appropriate equipment. After all, without a simple understanding of where the diagnostic connector of a VAZ-2110 car is located, you will not even be able to connect the adapter to the electronic control unit.
In this article we will talk in detail about how to read and decipher error codes, and also answer the most common questions related to the ODB connector. All you have to do is follow our recommendations.
Useful video
You can learn more about how the scanner works in the video below:
In conclusion, it should be noted that using elm327 for the VAZ 2114 you can significantly save on car diagnostics and fix problems immediately after they appear (either on your own or at specialized service stations).
Computer diagnostics is a complex process. Even now, many people prefer to trust it exclusively to specialized service stations with appropriate scanning equipment.
Autonomous scanners allow you to identify all faults in the electronic and mechanical systems of a car quickly and completely.
The problem is the cost of the service. It is high and not accessible to everyone. Not even all auto repair shops provided such a service. Repairs, therefore, were most often carried out the old fashioned way - using the “scientific poke” method.
Finding the diagnostic connector on a VAZ-2110 car
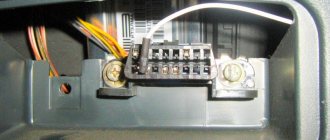
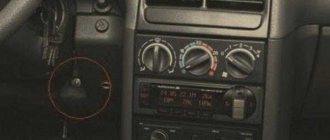
Regardless of the modification of the “ten”, the diagnostic connector will be located on the right side of the driver’s seat at the bottom of the steering column. That is, right under the steering wheel. This location can be called quite convenient, since when using a laptop computer (both a laptop and any modern tablet can be equally successfully used), all necessary operations are performed directly in the driver’s seat, without the need to dismantle any components and mechanisms.
For comparison, in older UAZ cars the connector is located under the hood, which somewhat complicates diagnostic work.
In the new version of the UAZ Patriot, the manufacturer has eliminated this drawback. Now the block is installed under the steering column, as in the VAZ-2110.
Let's sum it up
With the advent of computer diagnostics, car owners and repair specialists immediately appreciated the main advantages in the form of time savings, as well as the absence of the need to dismantle and test important components and parts of the car.
We also recommend reading the article on how to reset an engine error. From this article you will learn about the available methods for resetting errors, how to reset the check engine light, etc. As a summary, we note that an adapter connected to the OBD-2 diagnostic connector of the VAZ 2110 and connected to the computer via a cable or wireless connection makes it possible to comprehensively test the car. If a particular malfunction is detected using the software, you can read the corresponding error codes to accurately decipher them.
Monitoring the condition of the car by ear, smell, touch, and visually allows you to focus the driver’s attention on emerging problems. The VAZ 2110 car is equipped with electronic devices for monitoring the operation of the engine, components, and mechanisms. An external diagnostic device will help you understand the situation.
The article will answer the questions:
- where is the diagnostic connector located?
- what diagnostic connectors are installed on the VAZ 2110,
- which scanner to choose,
- how the adapter is connected,
- which allows you to find out the testing of the vehicle.
Vehicle manufacturers, when releasing new models, strive to adhere to international standards. Making a car is half the battle. Ensuring service operation of the car and unifying maintenance is a more important task. The developers of the VAZ 2110, trying to keep up, equipped the car with nine sensors, eight actuators (the number of sensors and devices depends on the configuration option and version of the car), an electronic speedometer, tachometer, controllers, and an anti-theft system.
Information is collected, processed and stored. External test equipment connected to the diagnostic connector located inside the cabin will help you interrogate the electronic control unit, view error messages, find and eliminate faults. The European standard, launched in 2000, specifies that the test connection be located directly next to the driver's seat at an outstretched distance (up to 1 meter). The exact location is not specified. Access must be free, excluding additional manipulations with wrenches.
The creators of European passenger cars place diagnostic blocks under:
- dashboard,
- handbrake lever,
- steering column,
- ashtray.
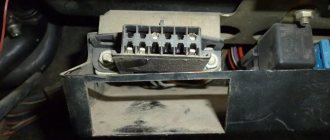
Important. On the VAZ 2110, the diagnostic connector is mounted in a niche under the steering wheel on the driver's side.
The information provided by the car's electronic unit uses a special data exchange algorithm. The OBD2 (On-Board Diagnostics Version 2) protocol, developed by the USA, is recognized as a mandatory standard for checking cars with internal combustion engines. The command system, electrical signals, and exchange order are discussed. The shape of the connector has not been clearly established. Historically, since 2000, a two-row 16-pin trapezoidal connector has been used. At the same time, the VAZ 2110 continues to use the old-style 12-pin GM-12 connector. Manufacturers equip trucks and commercial vehicles with connectors of other types.
- Cabin filter VAZ 2114: principle of operation, operation and care
Demand creates supply. Online stores are full of advertisements for diagnostic devices that check all kinds of car brands of different years of production. Adapters that satisfy a wide range of untrained users are considered. The buyer makes the choice. Some car enthusiasts want to perform periodic monitoring, maintain the operating condition of the vehicle, and use a laptop or tablet. Others like to be an airline pilot, constantly monitoring changes in dozens of parameters on a smartphone by connecting a test device permanently. The diagnostic devices produced will satisfy various wishes.
VAZ car owners should pay attention to devices designed to test VAG Group vehicles (48 automobile manufacturing enterprises producing branded cars in 21 countries around the world). In an effort to enter the world market, VAZ developers focused on electronic units with the logic for constructing tires from the VAG concern. The scanner must support the required protocol. Vehicles manufactured before 2007 are checked using the K-Line bus. New cars operate via a CAN bus; the K-Line bus is not provided on the connector.
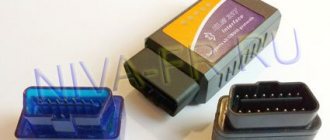
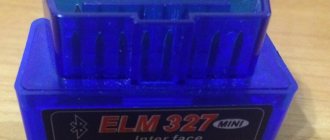
The leader in popularity is the ELM 327 adapter with firmware version 1.5 for wired (USB) and wireless (WiFi, Bluetooth) versions. Wired communication works more stable, a working scanner reads information the first time. It is advisable to choose a device built on an original chip (the main chip is indicated in the description). Supports 5 test protocols for passenger cars equipped with injectors manufactured after 1996.
Brief device features:
- reads, clears errors, turns off the Check Engine light,
- displays parameters of the engine, fuel system, valve position in real time,
- saves data in files of different formats, prints them out,
- Comes with disk media containing free diagnostic programs.
An addition is an adapter that allows you to connect an OBD2 scanner to the GM12 interface. There are several options for resolving this issue.
- The most civilized. Order a universal adapter cable from the online store. Wait a few days (domestic suppliers), 3-4 weeks (Ali Express). Connect, use.
- More troublesome. Stock up on patience, time, spare parts, tools. Replace the on-board GM12 with a female connector (in simple terms, mother) of the OBD2 standard.
- Least reliable. Connect the diagnostic adapter using wires. It has negative aspects: unreliable contacts, the possibility of connection errors during the next testing, difficulty of use while on the move.
Wiring diagram for a 16-pin block instead of a 12-pin one: GM12 OBD2;
A – mass 4; 5H – plus 16; M – K-Line 7 The Internet offers various connection methods that may have been used previously. The provided version of the scheme is guaranteed to work.
Successful connection of the test device allows the test to begin. The adapter user manual is included on electronic media.
- You must first prepare a computer and smartphone.
- Download and install programs.
- Connect the adapter (wired USB option).
- Turn on the power with the ignition key.
- Launch the program, select the type of diagnostics.
- Follow the instructions for the program. Codes of detected errors are deciphered using tables attached to the program and found on the Internet.
Software developed for diagnostic equipment can be paid, shareware (the commercial version contains more functions), or free. The first is supplied to specialized service centers and service stations. Contains the ability to control and change operating modes of the engine, components, and mechanisms. The other two are suitable for ordinary car owners, making it possible to maintain the performance of the vehicle.
ODB connector pinout: convenient pin layout
In order to personally diagnose a VAZ-2110 car through the connector located under the steering column, you need to know where to connect this or that equipment. This task is greatly facilitated by pinout, which is a diagram of the placement of contacts. It identifies the following main outputs:
- A – ground from the car battery is connected to this output;
- B – output is intended for connecting L-Line type equipment. It is not used on all modifications of the VAZ-2110, so be sure to pay attention to this when choosing a computer scanner or adapter;
- M – K-Line type devices are connected to this output. They are rightfully considered the optimal choice for self-diagnosis of the VAZ-2110, as they provide excellent interaction with any computer equipment;
- H – output to which power is supplied during diagnostic operations;
- G is a very important pinout element, since it is it that ensures safety control of all procedures performed and eliminates any short circuits or other emergency situations.
This designation of contacts will allow you to avoid mistakes when connecting diagnostic equipment, as well as perform all the necessary work efficiently. Now that you know the location of the ODB connector, as well as its main components, you can begin to assess the technical condition of the car.
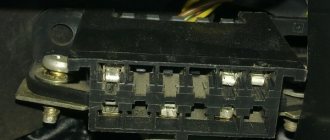
OBD1 pinout - 12 PIN (GM12)
Description:
OBD1 (GM12) connector is rectangular in shape, consists of 12 contacts.
Brands and years:
All injection models, except for some models after 2002, which have an OBD-II connector.
Access and location:
Open access. Located next to the ignition switch, partially covered by the steering column cover.
Pinout:
| M | L | K | J | H | G |
| A | B | C | D | E | F |
| Key * | |||||
* Connector Keying - A design element of a removable connector that ensures the correct orientation of the plug and socket.
Example in the photo:
Conclusions and their purpose:
| Conclusion | Color | Purpose |
| A | Weight | |
| B | L-line diagnostics (not always routed) | |
| D | CO potentiometer (not always diluted) | |
| G | Fuel pump control | |
| H | Power supply +12V (not always wired) | |
| M | K-line diagnostics |
Computer diagnostics of cars: basic steps
To perform diagnostics, first start your tablet or laptop, and then connect the adapter or extended cable connecting the tester to the connector. It is necessary if the operation is carried out using a desktop computer to the appropriate output. After this, you just need to take a few simple steps:
- turn the key in the ignition to turn on the power. This is necessary, since otherwise the software will not be able to receive a signal from the controller and display error codes on the computer display;
- we launch the software on a tablet or laptop. If you made no mistakes when connecting and use only working equipment, a diagram of the entire electronic part of the car will appear on the display;
- We select the type of diagnostics we need from the menu (checking the engine, suspension, electrical equipment, gearbox, etc.) and start the process.
During diagnostics, the software will display only error codes detected by the on-board computer. To identify certain faults, you will need to decipher them. It’s not difficult to do, since you can easily find the meaning of all codes on any specialized website.
How to choose the right type of diagnostic work? We suggest focusing on the symptoms of a car malfunction. For example, if fuel consumption suddenly increases, you should check the engine, and if extraneous noise appears while driving, evaluate the serviceability of the vehicle’s chassis.
Characteristics
Important! Depending on the type of on-board computer, certain characteristics of the device play an important role. For example, screen resolution and diagonal are important for multimedia files, or for viewing maps when planning a route. Well, the presence of a huge number of options for controlling the car’s electronic systems is suitable for narrowly targeted on-board computers.
Diagnostic connector VAZ 2110: modification with your own
Modern VAZ 2110 cars have a fault diagnostic system, which can tell a lot not only to a service station specialist, but also to an ordinary driver, if he knows how to correctly read and decipher error codes.
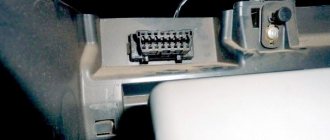
In order to read codes, or in case of replacing diagnostic equipment, you need to know that the diagnostic connector on the VAZ 2110 is located under the dashboard console on the left, and here is the pinout for each cable.
Diagnostic connector VAZ 2110
How can you tell if your car is faulty?
There is a special lamp on the instrument panel with the inscription CHECK ENGINE. When you turn on the ignition, it lights up, and until you start the engine, a special program reads data from all systems and components of the car, thus transmitting data to the on-board computer to identify faults.
After you start the engine, the lamp should go out, but if it stays on for another 10 seconds, it means that some problems have been identified and error codes have been entered into the on-board computer programs.
Communication with the controller is carried out using the diagnostic block.
CHECK ENGINE control signal on the instrument panel of a VAZ 2110
Electrical connections
During the preparation stage, you must perform the following steps:
- Disconnect the negative terminal from the battery.
- The VAZ-2110 on-board computer is connected to the alarm block. Find it and position it as conveniently as possible.
- You will need to first locate the orange wire (at pin seven).
- Connect the red-white wire to it, which is located in the computer connection harness.
- To the red-black wire installed in the tenth pin, connect the red one from the harness coming from the trip computer.
- And connect the red on the block with the red-black coming from the BC harness.
- Find the black wire on the fifth pin. And you connect the same one from BC to it.
- A white wire is installed on the eighth contact, which you connect to a similar one going to the BC.
READ How to Set up Internet on a Computer Via Modem
Calculation of codes
Most often, diagnostic program codes are “deciphered” using a special device. However, on VAZs it is not so difficult to do it yourself.
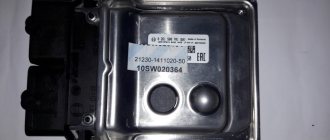
ECU January 4 for VAZ 2110
The diagnosis itself goes like this:
- Connect contact “B”, which has the diagnostic block and “ground”;
- Turn the ignition key to the third position, do not start the car;
- First, the aforementioned “CHECK ENGINE” lamp flashes code 12 three times in a row. It, in fact, does not signal any malfunction, but simply shows that the diagnostic programs are working. On the VAZ 2110 this happens in this order: the lamp blinks briefly once (which should be considered the designation of number 1). After a pause of at least two seconds, it flashes twice in a row (two). So we got the number two. And this is repeated three times so that the driver can understand these signs;
- Now you need to be careful not to miss any faults. After the diagnostic program has declared its serviceability, it will begin to display error codes, if any. In the same way - flashes and pauses.
Installing a new adapter
Modern adapters elm 327 with the OBD-II program (puncture) are suitable for the VAZ 2110 . You can also install them yourself. First you need to purchase an elm 327 and a cable for it. You already know the location of the diagnostic connector. Be sure to study the instructions, which indicate the pinout of the block and the location of each connector.
Connection diagram for ELM327 to 12 PIN diagnostic block
The pad can be removed quite easily. Insert your own cable into each connector of the block, making sure that the pinout of the elm 327 complies with the manufacturer’s instructions. Check that each connector is connected correctly and each cable is in the correct place. After this, the block is installed in its place.
Connecting the diagnostic connector to the block
Fault detection programs for elm 327 can be downloaded on the Internet, many of them in a free version. Now your VAZ is ready to detect errors in various car systems, and you can always download error codes from us.
Connecting the diagnostic connector to the block
Connecting the diagnostic connector to the block
Materials for download:
- Pinout for some cars
- OBD 2 error codes
- VAZ error codes
- Error codes for Mikas 10.3/11 controllers
OBD2 pinout - 16 PIN
Description:
The OBD2 connector is trapezoidal and consists of 16 pins.
Brands and years:
Gasoline passenger cars and light commercial vehicles manufactured or imported into the United States since 1996 (US CARB and EPA legislation) and in Europe (EOBD) since 2000-2001 (European Union Directive 98/69EG) and Asia (mainly since 1998). ).
Access and location:
Pinout:
| 1 | 2 | 3 | 4 | 5 | 6 | 7 | 8 |
| 9 | 10 | 11 | 12 | 13 | 14 | 15 | 16 |
| Smaller side of trapezoid | |||||||
Example in the photo:
Conclusions and their purpose:
| № | Color | Purpose |
| 2 | J1850 Bus + | |
| 4 | Body grounding | |
| 5 | Signal Ground | |
| 6 | Line CAN-High, J-2284 | |
| 7 | K-line diagnostics (ISO 9141-2 and ISO/DIS 14230-4) | |
| 10 | J1850 Bus- | |
| 14 | Line CAN-Low, J-2284 | |
| 15 | L-line diagnostics (ISO 9141-2 and ISO/DIS 14230-4) | |
| 16 | Power supply +12V from battery |
Diagnostic connector pins for used protocols
Pins 4, 5, 7, 15, 16 - ISO 9141-2.
Pins 2, 4, 5, 10, 16 - J1850 PWM.
Pins 2, 4, 5, 16 (without 10) - J1850 VPW.
The ISO 9141-2 protocol is identified by the presence of pin 7 and the absence of pins 2 and/or 10 on the diagnostic connector.
If pin 7 is missing, the system uses the SAE J1850 VPW (Variable Pulse Width Modulation) or SAE J1850 PWM (Pulse Width Modulation) protocol.
All three data exchange protocols operate via a standard OBD-II J1962 connector cable.
The correct connection diagram for a 12 PIN block with a 16 PIN adapter
Self-diagnosis of VAZ 2110: pinout, connector location, features
Inside every modern car there is a lot of electronic stuffing.
This also applies to the new generation of VAZ, which includes the Lada 2110. If there is electronics, then it can be tested. Today, this task is performed by computer diagnostics, which quickly and effectively finds all problems with the car. Testing can be done by yourself, but this requires an adapter. Diagnosis requires experience in working with computers.
Computer diagnostics are divided into 2 types:
- Suspension testing. Performed when knocking or uneven tire wear is detected. Testing is also carried out if drift of the front or rear axle occurs during sharp turns.
- Diagnostics of the power plant. Performed when problems are detected in the engine: increased fuel consumption, the engine is difficult to start, low or high idle speed, the presence of black or white smoke, etc.
There is also a computer check of the automatic transmission, but this does not apply to the VAZ 2110. Now we know why diagnostics are required. It is performed using a special scanner, which is connected to the car via a diagnostic connector.
Nuances of setting up a bookmaker
After connecting the bookmaker, it needs to be configured. To set up a bookmaker, you need to perform the following series of actions:
- Turn on the vehicle ignition and start the engine.
- Activate settings mode.
- Select the type of electronic unit.
- Select fuel consumption mode.
- Select the indicators that will be displayed on the device screen and adjust the backlight brightness.
- The final, important stage of setup will be determining the conditions for turning on the fan to cool the motor. To set the condition for turning on the “cooler”, you need to specify the engine temperature at which the motor requires cooling.
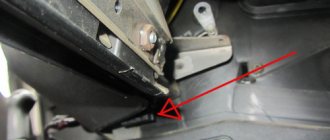
Connector location
So, we plan to check our car and we even have the necessary equipment. Now you need to find the connector - it is located at the bottom of the steering column, to the right of the driver. This connector is also called OBD. Knowing this name, it will be easier to find a suitable adapter.
If you believe the reviews, the most successful adapter for VAZ cars is considered to be a device for connecting K-Line. It has a lot of free space, so you can connect almost any testing equipment to it.
As for the main diagnostic device, it will be a computer. Of course, it is easiest to work with a laptop, since the process can be performed right behind the wheel of a car. But if there is only a stationary option, then you should take care of a long cord connecting the computer to the adapter.
Performing diagnostics yourself
Many motorists believe that having a computer and an adapter is enough to perform a quality check of their VAZ 2110. But the main “component” for a successful and extensive test is the presence of a competent specialist. Of course, you can complete the task yourself, but to do this you need to install special software, which is publicly available on the Internet. A good option is Motor-Scan.
Also, the presence of the Internet is necessary in order to decipher the received error codes and abbreviations. The work is performed in the following sequence:
- The adapter is inserted into the OBD connector (located where the steering block is), and the computer must be turned on.
- When the block has received the adapter, the ignition is turned on, since without power the program will not be able to read anything.
- Now the testing program starts on the laptop.
- If the block and other elements are in working order, then the electronics of the VAZ 2110 will be displayed on the monitor. Now you can start checking.
Possible causes of malfunction of the on-board computer and the main ways to eliminate them
One of the most common reasons is a lack of communication with the controller or line-K. What does the current error indicate and what needs to be done:
- the appearance of this error directly indicates a broken contact, or a poor connection of line-K with the additional block;
- The first thing you need to do is check line K according to the diagram;
- in most cases, the cause of this malfunction is a contact break between line-K and the diagnostic block.
Failure in temperature sensor readings
Occasionally, due to exposure to extremely low temperatures, off-board temperature sensors may fail. Typically, in this case, there are two options:
- breakage of the corresponding contacts;
- failure of the sensor itself or partial loss of functionality.
Note. Sometimes, if there is a practical need, you can install two on-board computers in a car at once, each of which will confidently occupy its own niche.
The instructions for installing the on-board computer with your own hands are quite clear and allow you to easily do everything yourself. However, if the choice is made to do everything yourself, then the use of photo and video materials is a prerequisite. Since a car’s on-board computer costs a very substantial amount of money, the cost of installation at a car service center is quite significant. Therefore, it will be better if you do the replacement yourself, especially since it does not present any practical difficulties.