The very first cars equipped with suspension - springs - behaved quite dangerously under heavy loads. The fact is that forces act on the car in different directions, and a conventional spring at first was highly susceptible to excessive “looseness”.
That is, the car under heavy loads (driving at high speed, on bumpy roads, sharply entering a turn) began to behave unstably - it swayed, began to “spring”, and could even tip over.
Therefore, it was necessary to solve this problem as quickly as possible. The result of this was the development of reaction rods - a special part of the suspension design that helped stabilize the body, and therefore increase driver safety.
Tie rod malfunctions
The jet thrust of the VAZ 2107, like any other car, takes on loads aimed at shifting or rocking the rear axle. If these parts fail, the car’s behavior on the road changes: handling deteriorates, braking distance increases, and even there is a threat of a sudden change in trajectory or the car overturning. What factors cause breakage or wear of steering rods?
- Static loads. It is impossible to avoid this factor, but you can reduce it without overloading the car.
- Torsional loads. They most often occur when hitting an obstacle. You can reduce them by reducing speed in front of an obstacle.
- Chemical effects of water and chemicals sprinkled on roads in winter.
Therefore, it is important to regularly check the condition of the rods and promptly detect deformation, chips and cracks. The appearance of such signs indicates the need to replace the part.
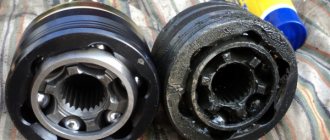
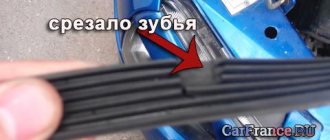
The rear links of the VAZ 2107 have weak points - welding seams that attach the eyes to the link and silent blocks. The latter are made of rubber, which wears out much faster than metal rod parts. Wear of silent blocks contributes to the appearance of backlashes that prevent the rods from performing their stabilizing function. As for the breakdown of a welded joint, it can lead to the most disastrous results, even an accident.
A failure of the torque rods manifests itself in a characteristic knocking sound in the rear suspension while driving. Such a knock indicates the need to immediately check the condition of the rear suspension.
To eliminate defects in steering rods, as well as to diagnose the suspension, you can contact a service station. But you should know that repairing and replacing these parts is a fairly simple operation that you can do yourself, even without much experience in auto repair work.
Purpose
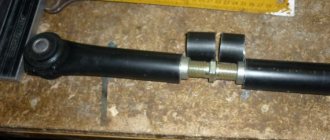
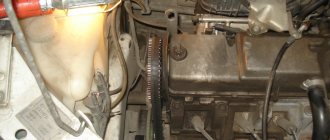
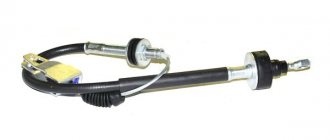
It is worth noting that this traction was used by automakers long before the appearance of the classics. Thus, the element was used on cars with dependent leaf spring suspension. The design of the rod has not changed for years. On the “seven” this element is a long metal pipe installed under the bottom near the rear axle.
The part is attached to the body using rubber-metal bushings. Why is jet thrust needed on a VAZ-2107? This element is designed to prevent lateral rocking of the car. Since the Zhiguli had a dependent suspension at the rear, this car leaned heavily when cornering. To stabilize its body and increase safety, the machine is equipped with jet thrust. The VAZ-2107 is equipped with an element made of elastic steel grades. This material can withstand high loads for a long time and works well in compression and tensile strength.
Removing jet rods
Replacing jet rods on a VAZ 2107 consists of two stages: removing the old ones and installing new ones. The rods are removed as follows:
- Thoroughly clean the threaded connections with a wire brush to remove any rust or dirt, then apply WD-40 and wait a while before continuing.
- Unscrew the nut that holds the rod on the free side. It is quite difficult to unscrew, so you should take a wrench with a long handle and, if necessary, spray the threads again with WD-40.
- Remove the bolt and nut and move to the other side of the rod.
- Unscrew the nut of the lower shock absorber mounting and remove the bolt with the spacer sleeve.
- Move the shock absorber to the side to gain access to the second linkage bolt.
- Use a wire brush to clean the bolt threads and treat them with WD-40.
- Unscrew the nut and remove the bolt.
Note: if the nut cannot be unscrewed, the bolt must be cut off.
- Using a spudger, remove the torque rod.
- If the bolt has been cut, remove the remaining linkage fastenings.
Note: it is unacceptable to try to weld cracks on a cracked rod - the seam will not withstand the load. Therefore, cracked rods must be replaced.
Changing thrusts according to your mind
Before changing the jet rods on a VAZ 2107, find a suitable place. The work must be done in a pit or overpass. As a last resort, find a flat area, lift and secure the desired part of the car.
For work, prepare:
- required set of keys;
- metal brush;
- WD-40.
The algorithm for replacing jet rods is as follows:
1. Clean the joints of the reaction rods using a special brush. After treatment, be sure to spray the bolted joint with WD-40 and allow time to soak.
Note! The process of replacing rods is identical, so there is no point in describing how each rod changes separately.
2. It happens that you won’t be able to unscrew it the first time. Re-treat with Vedashka and wait a little more time.
For greater efficiency, you can take a wrench with a large “shoulder” and unscrew the nut (of course, if you work while lying under the car, then this option is unlikely to work). 3. As soon as the nut is level with the edge of the bolt, apply several blows with a hammer to dislodge the bolt from its “home” place, since it usually sticks strongly in the sleeve.
4. Using a wrench, unscrew the nut completely and remove the bolt; if it does not give in, use a drift.
5. If the rod was torn out alive, then you will have to remove the remains of the fastening. This can be done using a small mounting spatula.
6. Now move on to the second part of the fastening. Here you still have to unscrew the lower part of the shock absorber, pull out the spacer sleeve and move it to the side, this is done in order to gain access to the torque rod bolt
8. The nuts may be too tight—this is normal. This is explained by the fact that a self-locking nut is used for fastening. Its peculiarity is the presence of a nylon “side” along the edge, which makes the connection more dense.
9. Further - more difficult. The design feature is such that the bolt is installed on the gearbox side. As a result, hitting the bolt is not very convenient - to do this you need to unscrew everything unnecessary on the left side (remove the brake disc, remove the axle shaft, and so on).
Of course, doing such work is a serious investment of time and effort, so there is no point in doing such work. Try cleaning the connection with a brush, treating it with WD-40 and then try to unscrew photo 2.
If nothing works out again, then you can’t do without an angle grinder. Cut off the bolt head in the space between the silent block and the bracket. Perform a similar manipulation on the other side.
10. Using a mounting spatula, remove the rod from the bracket.
Please note that if the jet rod is cracked or broken, you should not weld it or try to restore it in any other way - this is dangerous.
It is better to install a new rod and no longer worry about possible failure of the unit.
Repair and installation of jet rods
If the metal part of the rod is in good condition, they can be reused. It is only necessary to replace the rubber silent blocks. To do this, you need to remove the old parts from the eyes and press in new ones. You can make pressing easier by lubricating the surface with dishwashing detergent (it does not corrode the rubber).
Installation of new rods is carried out as follows:
- install the linkage eye in the front bracket;
- lubricate the fastening bolt with nigrol or lithol, insert into the bracket and tighten with a nut;
- install the rear bracket traction eye;
- insert the fastening bolt, lubricated with nigrol or lithol, and tighten the nut.
Due to the displacement of the rear axle, the holes in the bracket and the linkage eye may not align. In this case, it is necessary to correct the position of the rod using a mounting blade.
After installing the links, you need to secure the lower part of the rear shock absorber.
Welcome! Tie rods are an integral part of car suspensions, they only come into operation when hitting a bump or when starting off, there are five rods in total in a classic car, all are located in the rear of the car, two on the sides, two in the center (Closer to the center ) and one long one, but it is not called a jet rod, but a transverse rod, we described in detail how all this changes in this article, the principle of replacing all rods is the same, so you should not have any problems with replacing them.
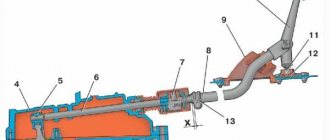
Seven rear suspension design
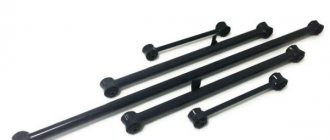
The rear suspension design of the VAZ 2107 is quite simple, which is required by the presence of a rear axle. It is due to the presence of the rear axle that the rear wheels are rigidly connected to each other. The rear axle beam is suspended from the body using reaction rods, of which there are only 5 in the design - four longitudinal rods and one transverse rod.
The main purpose of the longitudinal rods is to prevent and prevent the beam from moving in two directions - forward and backward. Transverse traction is needed in order to prevent the beam from moving when lateral loads occur. You need to know all the suspension parts in order to identify faults and make correct repairs.
This is interesting! To combine the rods with the body part and the beam, special hinges are used, which are made of rubber material and are called silent blocks.
We continue to study the structure of the rear suspension of the seven, and it is worth highlighting another important element - the springs. The lower part of the springs is in contact with the bowl on the bridge beam. To soften contact and prevent squeaks, a thick rubber gasket is placed between the spring and the bowl. The upper part of the springs also rests against the body bowls through an insulating gasket.
How to replace jet rods on a VAZ 2101-VAZ 2107?
Note! If you decide to replace all the rods, then think about replacing the bolts, what this will give you, firstly, it will be more pleasant to work with new bolts, and secondly, the nuts will be screwed much easier on the thread than will happen with old rusty bolts , and thirdly, in the future, if you have to work with the rods again, the new bolts will be much easier to unscrew and knock out (Nothing will rust because in a short time), but we recommend replacing the bolts only if the old bolts have already deteriorated and everything is rusty!
1. Absolutely all the links that are present in the rear suspension of a classic car are removed identically, so we will not show a separate photo about each link and explain how it changes, let’s take the central link as an example (Others are removed in the same way, but there are some nuances, we will we’ll indicate everything), in general, let’s get started, first of all, lubricate the bolts and nuts securing the torque rods with a penetrating lubricant (This can be WD-40), then let the lubricant soak thoroughly (5 minutes is enough) and after waiting for that, you can start working.
2. First of all, take two wrenches (One of which should be a spanner, and the other a knob and head, this is much more convenient) and holding the bolt from turning with one, unscrew the nut with the other, as soon as the operation is completed, knock out the bolt using the handle of a hammer or using something similar (the bolt can be completely knocked out with a drift or another bolt of a suitable size), then lift the rod to the top and clean the entire seat from dirt, if there is any dirt on the metal eyes (This is where the bolt is inserted that secures the rod, there are two eyes in total, on one end the head of the bolt sticks out, and on the other there is a nut) traces of rust are found, then in this case take sandpaper and clean it off, on the other side the central link (Where it is attached to the body) is disconnected in the same way, after disconnecting, remove completely traction from the car.
3. We have sorted out the central links, if you decide to remove the transverse rod, you need to unscrew it in exactly the same way (It is attached to the sides), but there is one problem in the installation, when the rod is removed, the angles of the rear wheels change (They collapse) and therefore when the new link If you bring it up, you will find that the hole for the bolt will not match (see photo below), but you can overcome this by inserting a powerful screwdriver into the hole and forcefully aligning these two holes and pulling it out, on the other hand immediately insert a bolt that will be hammered in later you will have to tighten the nut of this bolt, and the rod will be completely installed.
4. And let’s say a few words about the last links, they are the most difficult to change, because there you will also need to unscrew the lower part of the rear shock absorber (How to unscrew the rear shock absorber from below, read the article entitled: “Replacing rear shock absorbers on a VAZ”, point 2 -5), after that, fold back the lower part of the shock absorber so that it does not interfere and do exactly the same actions as with the other rods, that is, hold the bolt from turning with one key, and with the other, unscrew the nut, knock out the bolt, disconnect the rod from one end, It is disconnected from the body in absolutely identical way.
Installation of traction is done as follows:
- First, the rod is mounted in the front bracket. Before inserting the bolt into the desired hole, it is treated with nigrol;
- The reaction rod is placed in the rear bracket. Don't be surprised if the holes at the mounting location don't line up.
If the jet rod was broken, then the bridge would move all the time under load. This led to the shift.
To adjust the holes, you need to use a mounting spatula, resting it on the bracket, and unscrew the bridge until the fasteners align. When they match, you need to insert the bolt and secure it with a nut.
With the help of such manipulations, you will be able to replace the jet rods with your own hands and save money on visiting a service station.
I am glad to welcome you, friends, to the blog ""
The knocking noise in the rear wheels of the kopeck, deuce and the next row of classic models of the domestic automobile industry appears from wear on the bushings of the reaction rods or, as they are also called, rods. Almost all classic VAZs in their layout contain these elements necessary for the rear axle.
Some car owners change the entire rod, but to eliminate knocking or other malfunctions, it is enough to change only the bushings, which wear out very quickly, unless, of course, the rod itself is bent or deformed. Naturally, changing a complete rod is much easier than knocking out a worn rubber band and then pressing a new one back in, but this process is more economical and not so complicated.
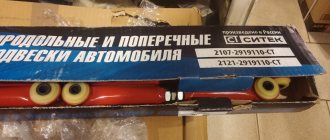
On the market today you can find many different repair kits, both for complete rods and for bushings separately
When purchasing, you should pay attention to the equipment, and more specifically to the number of large and small rubber spare parts. Most provide sets with 4 large and 6 small bushings
It is better to take a repair kit for the VAZ-2121 in which all the elements are of the same large size. Of course, you will have to tinker with them, but the resulting result will meet all expectations. In addition to rubber bushings, you will also need to purchase metal bushings, which in any case will also need to be replaced.
The procedure for replacing rear torque rod bushings must be carried out in the inspection pit. First of all, you need to unscrew the nuts on the bolts that connect the rod to the car body and the bridge. Then remove the bolts and release the rod itself.
When using the machine for a long time, to carry out this operation, you may need special tools, for example, a metal spacer, with which you can knock out a rusted bolt. After removing the jet thrust, you can begin to knock out the worn bushings. To do this, it is better to clamp the eye of the rod in a vice, and use the same spacer and hammer to knock out the rubber. Once the bushing has moved out of its place, it can be easily removed by prying it off with a screwdriver. As a last resort, if it is already stuck to the metal, the bushing can be pulled out with pliers. After freeing the rod ear from the rubber bushing, its inner surface must be cleaned with sandpaper and the surface wiped with a dry cloth.
When installing a new bushing, you need to make sure that the inner surface of the ear is smooth and free of roughness. Next, the rod and the new elastic band are treated with soapy water in order to avoid much friction. The bushing to be replaced is inserted into the eye of the rod and, using a vice, is carefully and slowly pressed into place. After this, the metal part is installed in the same way. The same actions must be performed with the second part of the jet thrust.
In addition to replacing the bushings, you also need to take care of the bolts and nuts. It is advisable to change them too, because jet thrust is a moving element of the car. The seats of the car body and axle are pre-cleaned and lubricated with special oil. After this, the rod with the replaced bushings is screwed to the body. You can also lubricate the bolts themselves, thus protecting them from corrosion.
Knocks and shaking in VAZ cars mainly depend on the rear thrust rods, so attention should be paid to them, especially since solving the problem does not involve large financial investments and does not require more skill and experience. There were even cases when the rear rod simply burst in the area of the eye and the rear axle “drove” along the road, but the domestic car still kept moving
Purpose of thrust rods on the VAZ 2107
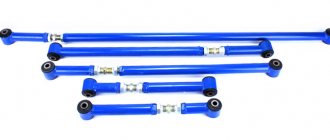
The purpose of the thrust rods on the VAZ 2107 is simple: to prevent the car from “walking” on the road and swaying strongly when entering sharp turns and when hitting various obstacles. This problem has been known since the days of early cars. They didn’t know about any jet thrust at that time, and the cars were equipped with ordinary springs. The result was natural: the car easily overturned, and it was incredibly difficult to drive. Over time, the car suspension was improved: a system of long rods began to be installed in it, which were supposed to take on part of the loads arising from road unevenness or due to an overly aggressive driving style. On the VAZ 2107 and other classic Zhiguli models, there are five jet rods: a pair of long ones, a pair of short ones, plus a large transverse rod, which serves as the basis of the entire traction system. All this is installed near the rear axle of the car.
This system can only be seen from the inspection hole, where all work on replacing broken rods is carried out.
About the choice of jet thrusts
Currently, there are not many large manufacturers left that produce jet thrust for the VAZ 2107 and other classics. Their products differ in both price and reliability. Let's look at the most popular products.
Traction "Track"
The product is very popular among owners of the “Seven”. These rods are distinguished by their high reliability and high price, which starts from 2100 rubles per set.
The main difference between Trek is the heads for the bushings. Firstly, they are large, and secondly, they are attached to the rods by welding. The silent blocks on Tracks are also made of especially dense rubber, which significantly extends their service life.
Rods "Cedar"
The overwhelming majority of “Sevens” that had previously rolled off the assembly line had jet thrusters installed specifically from “Kedr”, since this company has always been and remains the official supplier of AvtoVAZ.
The quality of Kedr is somewhat inferior to Trek. This is especially true for bushings and silent blocks. All this wears out quite quickly, and therefore they will have to be changed more often. But there is also a good side - a reasonable price. A set of “Cedar” rods can be purchased for 1,700 rubles.
Belmag rods
Despite the simplicity and reliability of Belmag rods, they have one significant drawback: they are not so easy to find on sale. Every year they are found less and less often on the shelves of auto parts stores. But if the car owner still manages to find them, then he can be congratulated, since he got a reliable product at a reasonable price. The cost of Belmag rods starts from 1800 rubles per set.
This, in essence, is the entire list of large manufacturers of good rods for the VAZ 2107. Of course, now there are a lot of smaller companies on the market that are quite aggressively promoting their products. But none of these companies gained much popularity among the owners of classics, and therefore it is inappropriate to mention them here.
So what should a driver choose from all of the above?
The answer is simple: the only criterion for choosing jet rods is the thickness of the car owner’s wallet. If a person is not short on funds, the best option would be to purchase Trek rods. Yes, they are expensive, but installing them will allow you to forget about problems with the suspension for a long time. If you don’t have enough money, it makes sense to look for products on the shelves. Well, if this idea is not crowned with success, there remains a third option - “Cedar” rods, which are sold everywhere.
Here we should say a few words about fakes. Knowing that car owners most often choose products from the three above-mentioned companies, unscrupulous manufacturers are now literally flooding the shelves with counterfeits. Moreover, in some cases, the fakes are made so skillfully that only a specialist can identify them. In such a situation, an ordinary driver can only focus on the price and remember: good things are expensive. And if there is a set of Trek rods on the counter for only a thousand rubles, then this is a serious reason to think about it. And don't rush into buying.
Signs
What may indicate the need to replace this element? If you do not take into account external inspection, a traction fault can be determined by the nature of the car’s behavior. Over time, the bushings become loose and the rod no longer performs its function.
The car rolls more when cornering, and dull knocks are also heard in the cabin. This indicates failed silent blocks. Well, if the rod is rusty and broken, part of it will simply drag along the ground. It is hardly possible not to notice such a malfunction. But how can you get home if your traction breaks on the way? You can hang part of it on some element under the bottom (for example, a muffler) using a wire and carefully move to the parking area and repair.
Checking the condition of the jet rods on the VAZ 2107
Before we talk about checking jet thrusts, let’s ask ourselves: why is there a need for such a check at all? The fact is that when driving, jet rods are subjected to both lateral and torsional loads. Torsional loads occur when wheels hit large potholes or run over large rocks and other obstacles. This type of load is especially harmful for rods, or more precisely, for silent blocks in rods. It is the silent blocks that are the weak point of the jet thrust (there is simply nothing to break in the thrust itself: it is a metal rod with two eyes at the ends). In addition, the rubber parts of silent blocks are periodically exposed to reagents that are sprinkled on roads during icy conditions. As a result, cracks appear in the rubber and its service life is rapidly reduced.
If you believe the operating instructions, the new jet thrusts on the VAZ 2107 can travel at least 100 thousand km. But taking into account the conditions listed above, the actual service life of rods rarely exceeds 80 thousand km.
From the same instructions it follows that the state of the jet rods must be checked every 20 thousand km. However, car service technicians strongly recommend checking the rods every 10–15 thousand km in order to avoid extremely unpleasant surprises. To check the condition of the silent blocks in the rods, you will need an inspection hole and a mounting blade.
Test sequence
- The car is placed on an inspection hole (or, alternatively, on an overpass).
- The mounting blade is inserted behind the rod eye.
Video: checking jet rods on a VAZ 2107
Replacing jet rods on a VAZ 2107
Before starting work, we will decide on the necessary consumables and tools. Here's what we need:
- a set of new jet rods for the VAZ 2107;
- rust remover WD-40;
- mounting blades;
- set of open-end wrenches;
- hammer.
Sequence of work
First of all, two important points should be mentioned. Firstly, the rods should only be changed in an inspection pit or on an overpass. Secondly, all five rods from the VAZ 2107 are removed in exactly the same way. That is why the procedure for dismantling only one central rod will be described below. To remove the remaining four rods, you just need to repeat the steps listed below.
- The car is installed above the inspection hole. The silent blocks, lugs and nuts on the central rod are carefully treated with WD40 (as a rule, the lugs rust very badly, so after applying the liquid you will have to wait 15-20 minutes for the composition to properly dissolve the rust).
Video: changing jet engines on a VAZ 2107
Tools
So, to replace it, we need to prepare a standard set of tools (heads, wrenches), a hammer, a mounting blade, as well as universal grease VD-40. In the absence of one, you can use any analogue from, “Mannol” and “Laurel”.
These products cope no worse with soured bolts. We will also need a metal brush. We will use it to clean the head of the bolts from accumulated dirt.
Replacing bushings on VAZ 2107 rods
Bushings for VAZ 2107 torque rods are disposable products that cannot be repaired. It is not possible to restore a worn bushing in a garage. The average car enthusiast has neither the necessary equipment nor the necessary skills to restore the inner surface of the bushing. Thus, the only option for repairing damaged traction bushings is to replace them with new ones. Here's what we need to replace the bushings on the rods:
- a device for pressing bushings (can be purchased at any auto parts store);
- hammer;
- beard with a diameter of 10 mm.
Sequencing
The rods are removed from the car according to the instructions outlined above. The lugs and silent blocks must be treated with WD40 liquid and thoroughly cleaned of dirt and rust using a wire brush.
- Usually, after removing the rod, the bushing is removed from it freely. But this only happens if it is very worn and not very rusty. If the bushing is literally welded to the rod due to rust, you will have to knock it out with a hammer, after inserting a bit into it.
So, to replace jet rods on a VAZ 2107, the car owner does not have to take the car to the nearest service center. All the work can be done with your own hands. Even a novice car enthusiast who has held a hammer and wrench in his hands at least once can handle this. All you need to do is follow the above recommendations exactly.
Let's get started
Having thoroughly cleaned the joints with a brush, treat them generously with universal lubricant. You need to wait until it completely penetrates inside. Next, select the head of the required size (19) and unscrew the nut that holds the rod on the free side. If it is tight, you can re-spray the threaded joint with lubricant. When the end of the bolt is level with the nut, take a hammer in your hands. It is necessary to strike the bolt several times and remove the latter out. After that we move on to the second side. To remove it, you need to unscrew the lower shock absorber mount.
Next, remove the spacer sleeve of the elastic element. This way we will get access to the second bolt of the VAZ-2107 jet thrust. If the nuts are difficult to unscrew, and even lubricant does not help, you can cut off the bolt with a grinder. Please note: do not knock out this element with a hammer, since it is close to the gearbox. At the next stage, you need to get the remains of the rod itself out.