Today, the radio has become an indispensable attribute of a modern car. This also applies to the new product on the domestic market - Lada Vesta. Initially, in most versions, this model is not equipped with speakers. Only the “Comfort” option can provide its owner with standard speakers.
Note that not all Lada Vesta equipment is equipped with a radio, although all cars are equipped with audio preparation. In the least equipped version, the seats for the speakers are covered with soundproof panels. And in this case, installing a radio is mandatory. Many car owners need to know what is included in audio training?
Installation
In many cars where there is no designated space for a tweeter, it is usually installed in the upholstery of the front pillars.
However, this is a very, very labor-intensive process, because you have to cut holes for the speakers, putty, etc. Fortunately, installing tweeters in the Lada Vesta is much simpler - usually the owners put them in the factory corners - in the cabin, opposite the side mirrors. This allows you not to spoil the interior and greatly simplifies the work. The disadvantage of this option is the need to buy tweeters whose diameter will fit the specified angle.
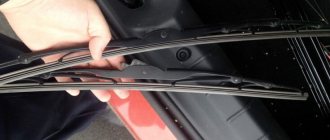
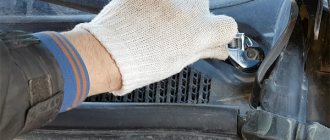
Removing the Vesta front door trim
Initially, you will need to remove the plastic corners, as well as the front door trim. Before starting work, you need to prepare some tools - a Torx 20 socket with a ratchet and a plastic spatula for removing handles and other components. If you don’t have a spatula, you can use a knife or a thin screwdriver, covering the sharp edge with a cloth.
Tools for work
First, the plastic triangle is removed, into which the tweeter will then be placed. It is held on by one clip and a pair of guides. You need to pry the element from above, snap it off and remove it.
There will be a plug under it (the wires go to the mirror) that needs to be disconnected.
When the triangle is dismantled, you need to remove the backlight, which is located at the bottom of the door card. It is hooked from the side, removed, and the wires going to it are disconnected.
Lamp in the door of Lada Vesta
Next, you need to remove the 3 screws from below that secure the casing.
Three bolts on the bottom of the door card
Another screw is unscrewed from the outer end of the door - it is located at the top, not far from the glass. The screw itself is covered with a plastic plug, which must first be removed.
Next comes the turn of the internal handle, interlocked with the keys for the windows, mirrors and central locking. First of all, you need to unscrew the screw that is located inside the handle itself.
Bolt in Vesta handle
Next, the entire element must be pryed from above and removed, then disconnect the plug
According to the owners of the sedan, it is this moment in the process of installing tweeters in the Lada Vesta that is the most difficult, since it is easy to damage the handle through negligence
Removing the entire plastic element
Then the fastening screw is unscrewed.
Lastly, unscrew the mounting bolt.
When all the screws and elements are removed, all that remains is to unclip the latches that hold the door card in place. This is done using a knife or screwdriver wrapped in cloth. It is recommended to start from the bottom, gradually moving up.
The video clearly shows how to remove the front door trim of a Lada Vesta
Tweeter Installation
Everything is ready to install the tweeter you Lada Vesta
Before installing the tweeter in the Lada Vesta, you need to make sure that the speaker is equipped with a capacitor.
Tweeter capacitor
Next, you need to try on the tweeter itself and see if it will stand evenly if it is secured. In this case, it all depends on the parameters and configuration of the tweeter.
First comes the fitting
If it stands crooked, you will have to make a platform for it. As practice shows, it is easiest to make it from hot melt glue.
After the tweeter is installed in the Lada Vesta, all that remains is to connect it directly to the speakers.
Done - tweeters installed
To do this, use either a speaker connector adapter, which can be purchased under article number ZRS-AG-22, or connected through special terminals. The price of the adapter is low and is about 150 rubles.
Where can I buy?
If you live in a large city and are not very well versed in such issues, the easiest way is to go to a large car acoustics store and choose tweeters for Vesta there. It would also be a good idea to consult with the seller, who can recommend the best option.
However, many either do not have the opportunity to go to a large store, or initially know what they need. In this case, the smartest thing to do would be to order the product online. Some people use Aliexpress because they can find acoustics cheaper there, but not everyone is satisfied with long delivery times, and therefore sometimes it is much easier to pay a little more and buy everything in a Russian online store.
Regarding the cost, it depends on many factors, including the prestige of the manufacturer, power, sensitivity, resistance and other characteristics. In general, the cost range is very large - from several hundred to several tens of thousands of rubles.
The table shows some tweeter options for the Lada Vesta, indicating the manufacturer, model and some characteristics:
| Brand | Model | vendor code | Rated power (W) | Maximum power (W) | Price, rub.) |
| ARIA | TL30-66 | 4376 | 20 | 500 | |
| Ural | AS-C0114 | 1886 | 70 | 590 | |
| Airtone Audio | ART-S25T | 6423 | 50 | 990 | |
| KICX | ND-25S | 3399 | 70 | 140 | 1900 |
| Ural | AS-W1625K | 3223 | 90 | 1950 | |
| Dynamic State | NT-7.2 NEO Series | 6553 | 40 | 150 | 2100 |
| Focal | Integration TIS 1.5 Tweeter | 5650 | 15 | 100 | 2990 |
| CDT | DRT-26 | 2776 | 10 | 100 | 11200 |
| CDT | ES-1200iScw | 5769 | 50 | 100 | 22500 |
As for the standard high-frequency speakers of the Lada Vesta, they can be found under article number 281489095r.
As you can see, the range of products is impressive, but the positions presented in the table are only a very small part of the products.
In addition to the tweeter itself, you also need to purchase terminals for plugging into Vesta’s factory wiring or a special adapter.
Recommendations for removing the casing
All about how to install speakers in the rear doors of a Lada Granta.
It is impossible to install a sound system in a Lada Vesta car without removing the door trim. When dismantling the cladding, be extremely careful not to scratch the plastic. Under no circumstances should you use a screwdriver; we only use a plastic card.
To dismantle the plug at the end of the door, pry it off with a card; there are special recesses at the bottom. In the same way, the window lift buttons are dismantled using a card; the fastening antennae are located at the back and on the sides in front of the MUS.
The casing itself is attached, in addition to self-tapping screws, to 4 more “hedgehogs”. They will definitely break if you do not use a special removal tool. The Lada Vesta has hedgehogs from Nissan or Renault, but if you modify the grand ones, which are much stronger and cost several times less, you can save money.
Thus, the trim from the left door is removed. Removing the trim on the right side has its own characteristics. There is no need to remove the power window buttons and look for the secret screw plug. Simply remove the handle cover. To do this, you need to pry the plugs from the bottom; there is a special groove in it, using a plastic card. Then you need to unscrew two 10 mm screws, the next step is to remove the trim, as with the left door.
Comments
TOP materials of the week
TOP products in the store (more)
Are you satisfied with the standard low beam of the Lada Vesta?
Lada.Online
- about the project
- ·
- Rules
- ·
- Confidential Policy
- ·
- Contacts
- ·
- mobile version
- ·
- LADA concepts
- ·
Lada (“Lada”) is a brand of cars produced by JSC AVTOVAZ. Previously, it was used only for export cars, and for the domestic market, cars were produced under the Zhiguli brand. In 2004, the management of AVTOVAZ announced the transition to the Latin alphabet for the official spelling of the names of all cars produced by the plant: Lada - instead of "VAZ" and "Lada".
Lada.Online is the largest Russian-language automotive resource with a daily audience of thousands, which is dedicated primarily to cars of this brand, the domestic automotive industry and the automotive world in general.
This site is not the official LADA website.
© 2022 Lada.Online. Copying of material is permitted only with a link to the source.
Vesta's standard MMS
Installing PTF on Lada Vesta with your own hands
All versions of Vesta, with the exception of the basic one, have MMS installed. The minimum configuration of the car is equipped only with an audio system. The main functions of the MMC are playing audio files from removable media, receiving radio signals, navigation, parking assistance with video playback from the rear view camera. The MMC on the Lada Vesta is located in the central upper part of the console and complements the updated modern design. The system is equipped with a good filling with the following characteristics:
- processor CSR S3681 B036BK K609B CPU SiRFatlas VI 800mhz Cortex A9;
- RAM Micron D9PSK 2X 256MB DDR3-1600 Clock Rate 800 MHz MT41K128M16JT-125 IT:K;
- internal memory 2 GB Micron NQ283 NAND FLASH 2gb MT29F2G08ABAEAH4-IT;
- internal memory 8 GB SDMMC 8GB SAMSUNG KLM8G1WEMB-B031;
- bluetooth CSR 8311 Bluetooth v4.1 BlueCore CSR8311 QFN Automotive;
- WI FI CSR 6030 Wi-Fi IEEE 802.11b/g and n;
- digital video decoder AKM8859 DIGITAL VIDEO DECODER PAL/SECAM/NTNC AK8859VN;
- audio AK7757VQ Audio DSP with 24bit 3ch ADC + 4ch DAC + MIC Amp;
- power controller MPS MP4570 Automotive Power Systems;
- TPS65150 Low Input Voltage, Compact LCD Bias IC With VCOM Buffer;
- TJA1042 high-speed CAN transceiver;
- CAN and K-Line controller Freescale S9S12G96F0CLF;
- controller Fujitsu 32-bit ARMTM CortexTM-M3 based Microcontroller.
The following elements are used to manage and play files:
- seven-inch touch screen;
- “Mode” key – select modes;
- “MUTE” – mutes all sounds;
- Volume control – pressing once turns the device on or off;
- microphone for the ability to talk on the phone without hands - Handsfree;
- “Reset” – button to reboot the device;
- slot for reading a removable SD card;
- connector for reading information from removable USB media and connecting various gadgets;
- AUX connector for connecting headphones or external audio devices.
Additional control
In addition to the buttons near the touch screen, MMS functions on the Lada Vesta are controlled using duplicate buttons located on the steering wheel:
- volume control;
- selection of file and radio playback modes;
- turning off all sounds;
- button for navigating through folders and tracks on removable media; in another mode, the buttons are responsible for accepting/ending an incoming call.
Photo 2 (Additional controls on the steering wheel)
Such equipment first appeared on AvtoVAZ cars. Previously, a standard audio system and MMC without duplication on the steering wheel were offered. Thanks to this, Vesta can compete with budget foreign cars of the same class in approximately the same price segment.
Key Features
The system combines several different devices that should be in every modern car. The main one is the audio system, consisting of a 7-inch touch screen. Its peculiarity is its resistive base and the need to press with a stylus or other similar object. The input method is not the most progressive, but in weather conditions with sudden temperature changes, the resistive screen works without failure. The sound is reproduced through six speakers to create surround sound.
The system recognizes most SD and USB drives, but with a limitation - the media should not contain more than 1024 files and 256 folders. The flash drive must be formatted to FAT 16 or 32 with a maximum number of partitions - 4. Cards supported by MMC Lada Vesta:
- SDHC no more than 32 gigabytes;
- SD no more than 4 gigabytes;
- USB 2.0 and 3.0 no more than 64 GB.
The user is warned by the instructions that the download speed depends on the number of files on the drive. The optimal solution would be a medium that contains only audio and video files.
Files supported by MMC:
- WMA audio codec, bitrate no more than 128 kbps, sampling 44100 Hz;
- video codec WMV3 with a frame rate of 25, bitrate 750 kbps.
Before use, it is recommended to convert all files to the required parameters. For these purposes, the manufacturer recommends the free Freemake Video Converter program. When playing back, keep in mind that the files will be played in the order they were recorded.
Removing the casing and installing the speakers (Acoustic system)
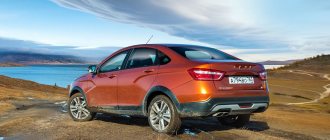
Lada Vesta Cross 2020
First of all, remove the casing. Here you need to act extremely carefully; use a plastic card, not a screwdriver, to pry off the plugs and buttons. In addition to self-tapping screws, the casing is held on by clips, which constantly break when removed; it makes sense to purchase spare ones in advance. Having removed the trim, when replacing the standard audio system, we see that AvtoVAZ attaches the speakers using blind rivets. If there is a piece of the pull rod left inside the rivet, knock it out inside and carefully drill out the caps. After removing the speaker, we remove the remaining rivets, making sure that nothing remains inside the door. To do this, place a suitable piece of paper in a semicircle in the door in advance.
The speakers are installed using spacers that dampen resonance. If you are cutting a spacer from plywood 10-15 mm thick, it makes sense to cut a thin rubber spacer for it.
We cut out the plywood along the recesses in the door; for this it is advisable to make an initial paper template, tightly attaching the paper to the metal of the door. We draw a small pencil on the outside for the recess, on the inside for the holes, cut it out with scissors, and try it on. We apply it to the plywood, draw, saw. Ready. We drill holes for the screws, make a recess for the “sunk hole” so that the head does not stick out, and screw it onto the door.
To connect the speakers you will need an adapter; the factory wiring has an original Renault-Nissan plug. It is not recommended to cut it off; there is a risk of losing the repair warranty. An adapter ST 55-17 or ZRS-AG-22 is suitable. We fasten the speaker with screws or self-tapping screws. Installation of speakers in the doors is complete.
Tips when installing an audio system
As we can see, the installation of acoustic components in the LADA Vesta interior is not capable of generating difficulties and dead ends. The main thing for the owner is to adhere to simple but useful rules, namely:
- We carry out the entire list of manipulations extremely carefully, without breaking the fasteners or scratching the panels.
- Since audio preparation is initially present, we just need to connect the speakers and head unit.
- We do not cut off the standard connectors, but stock up on the previously specified adapters.
- Before directly installing the dynamic heads, we soundproof the door panels.
- Installation of the speakers is carried out on previously prepared gaskets.
Recommendations for removing the casing
The speakers can only be installed by removing the trim from the car doors.
This process must be done with care to avoid scratching the plastic. The casing is attached with self-tapping screws and 4 “hedgehogs”
They often break when dismantling the casing, so it is better to get spare ones.
It is impossible to install a sound system in a Lada Vesta car without removing the door trim. When dismantling the cladding, be extremely careful not to scratch the plastic. Under no circumstances should you use a screwdriver; we only use a plastic card.
To dismantle the plug at the end of the door, pry it off with a card; there are special recesses at the bottom. In the same way, the window lift buttons are dismantled using a card; the fastening antennae are located at the back and on the sides in front of the MUS.
Removing the trim
Removing the trim
Removing the trim
Removing the trim
The casing itself is attached, in addition to self-tapping screws, to 4 more “hedgehogs”. They will definitely break if you do not use a special removal tool. The Lada Vesta has hedgehogs from Nissan or Renault, but if you modify the grand ones, which are much stronger and cost several times less, you can save money.
Thus, the trim from the left door is removed. Removing the trim on the right side has its own characteristics. There is no need to remove the power window buttons and look for the secret screw plug. Simply remove the handle cover. To do this, you need to pry the plugs from the bottom; there is a special groove in it, using a plastic card. Then you need to unscrew two 10 mm screws, the next step is to remove the trim, as with the left door.
Basic car equipment and tips for choosing car speakers
Everything that is included in the Lada Vesta audio preparation is presented below:
- For the basic version there is a plug instead of a radio. The Classic does not have front or rear speakers, but does have wires in the doors to connect the speakers.
- “Comfort” has optimal standard acoustics with a display 4.3/USB/AUX/FM/AM, etc. The standard speakers on special spacers are also located here.
- The top version of Lada Vesta is fully equipped. The designers placed here a multimedia system with a color display, six speakers and standard audio speakers, as well as tweeters in mirrored triangles.
Speakers for Lada Vesta The choice of speakers for the Lada Vesta car has a colossal assortment.
On the shelves of specialized stores you can find a system for every taste. In addition, the kit includes everything you need for independent installation of media devices. Acoustics vary in structure, dimensions and installation method
When purchasing, you must pay attention to the compliance of the technical characteristics of the product. If you purchase complex and expensive equipment for a simple radio, the sound quality will not improve in any way.
- When choosing the diameter of the speakers, you should know the dimensions of the audio preparation of the Lada Vesta.
- The louder the acoustics, the better, since when driving on uneven roads, all elements of the media system can reduce their performance over time. It is preferable to choose a radio that is suitable for adverse conditions.
- You should choose amplifiers, subwoofers and acoustic systems from the same manufacturer in order to avoid inconsistencies.
- The smaller the radius of the speaker cone, the more clearly the high frequencies are reproduced. The size of the speakers in the doors is 16 centimeters.
- The electrical power of the devices must prevail over the voltage of the radio. Otherwise, you will experience a decrease in sound quality
- All car stereo components must be purchased only from authorized suppliers. To maintain the validity of the warranty card, it is better to install the elements in special workshops. If you install the audio system yourself, the right to compensation disappears.
All frequencies of coaxial speakers are collected in one place, and their sound is rich in good quality. Component acoustics are distinguished by a separate arrangement of elements that produce frequency vibrations. It separates the melodies of instruments from each other, but is much more expensive than the first. Lada Vesta comes with factory speakers of the first type.
Tweeters
This is the name for high-frequency speakers, which are necessary for playing high frequencies. Tweeters in Lada Vesta not only have a positive effect on sound quality, but also make the sound picture more saturated.
Tweeters are installed from the factory in the Lada Vesta, but only in the top-end configurations Comfort Multimedia and Luxe Multimedia, which, however, is not surprising, since these acoustics are usually available in expensive versions, where the closest attention is paid to sound.
Factory tweeters are only available in top versions
However, the lack of such components does not stop sedan owners who install tweeters in the Lada Vesta themselves.
Recommendations for installing acoustics on Lada Vesta
Sound devices for domestic products are not very sensitive, but have a number of positive advantages: high-quality frequency indicators, a wide directional range and good sound balance.
It is recommended to mount car speakers for mid- and low-frequency frequencies at the rear, and for high-frequency speakers at the front, since a different position will affect the loss of playback perspective. The subwoofer can be installed in the trunk or under the seats.
Replacement and installation of radio in Lada Vesta
Radio for Lada Vesta It is necessary to understand that installing 16 cm speakers in the front doors is a simple matter, but for knowledgeable people. If you pry the case of the media player from the bottom, and then pull out the fixing rivets from the plugs, you can easily remove the radio cover. A picture with four connectors will open before us:
- universal bus for acoustics ISO consists of a pair of plugs and reduces dependence;
- The FAKRA port is designed to transmit information at high frequencies; in a car it provides a signal for the antenna;
- USB – a connector designed for connecting external media (flash drive);
- The AUX port is used to transmit external impulses and control the player without a standard panel (smartphone).
There is not enough space on the dashboard to install a 2DIN player for additional upgrades. A single-block media system fits into the interior of the Lada Vesta without much effort, you just need the right approach to connection.
We mount speakers in the Lada Vesta door frame
The first step is to prepare the space for acoustics. The sound insulation should be removed by removing the trim. Here the design is similar to that of Renault Logan. The installation area is equipped with only three mounts, rather than the usual four. For the audio element to work properly, you need to make or buy special stands and place them in this area. The dimensions must match; it is necessary to check the connections of the mounted part.
Installing speakers on a car Installing speakers in a Lada Vesta involves the use of holders. Spacers for speakers in Lada Vesta cost about 800 rubles. Their installation takes no more than five minutes. You just need to unscrew the two screws at the bottom of the trim, bend the trim towards the door and push the spacer into the space. They fit tightly between the skin and do not require additional fastenings.
The wires are already installed at the factory, but there is a slight problem with non-standard connectors. If you install speakers in the front doors yourself by mechanically replacing the plugs, there is a possibility of losing warranty service. A rational solution in such a situation is to use an adapter.
Rear fill – meaning and usage
The sound coming from behind gives the melody volume. The designed audio system eliminates high frequencies in the rear speakers. Two-channel or stereo designs will be adjusted if you can clearly distinguish between the “lows” and “highs” in the front seats.
How to connect to a car network
To connect a Pioneer or similar car stereo, you will need to purchase an antenna adapter and a harness with an ISO connector that matches your car's connector. The wires are connected to the wires from the main unit. The joints of the wires are connected by soldering or crimped with a tube. From the outside, the joint is insulated with heat-shrinkable tubing or fabric tape. When replacing, take into account the purpose of each of the cables installed in the car and on the radio. After switching, you need to check the functionality of the device.
When using standard equipment, no additional adapters are required. The radio settings in Lada Vesta depend on the type of standard radio used. The user programs the radio and adjusts the balance and EQ curve for optimal acoustics. The operating modes of additional equipment (rear view camera or AUX port) are also configured.
... Not described in the instructions, they allow you to adjust the tone and volume of the turn signals and alarms. This menu is a service menu and, as intended by AvtoVAZ, should not be available to a wide range of users, since, unknowingly, the sound of the turn signal repeaters may be turned off, which will be considered a malfunction.
| Lada Vesta sedan |
Hello, dear visitor, today we will talk about the hidden settings of the Lada Vesta on-board computer.
Hidden settings, not described in the instructions, allow you to adjust the tone and volume of the turn signal and alarm signal.
To access the hidden settings menu, simultaneously press and hold both trip computer control buttons located on the windshield wiper control lever (to the right of the steering wheel) for approximately 5 seconds).
| Steering column switch (to the right of the steering column) |
The P1 sound appears on the bot's computer display.
| P1 Audio Configuration |
Modification of parameters is carried out using the control buttons of the on-board computer. The transition to the next parameter occurs by simultaneously pressing these two buttons. After clicking we will see the following settings.
Now let’s see what P and mean in the settings of Vesta’s on-board computer:
P1 - sound signal for turning on the direction indicators.
d1 — volume of the turn signal signal.
| Sound configuration d1 |
P2—signal off tone.
| Setting up P2 audio |
d2 — volume of the turn signal off signal.
| d2 audio configuration |
After completing the settings, you need to press and hold again for about 5 seconds until you switch to the standard on-board computer screens. The entered settings will be automatically accepted.
It is recommended to turn on the alarm so that you can hear the sound while setting up.
The last item in the hidden settings, called Pre Set, allows you to restore factory settings.
| Factory Reset - Preset item |
Thank you for being with us, leave comments below, and if you still decide to open the lid, we recommend purchasing special plastic tabs.
Lada Vesta hidden video settings:
Similar
Vesta's standard MMS
All versions of Vesta, with the exception of the basic one, have MMS installed. The minimum configuration of the car is equipped only with an audio system. The main functions of the MMC are playing audio files from removable media, receiving radio signals, navigation, parking assistance with video playback from the rear view camera.
- processor CSR S3681 B036BK K609B CPU SiRFatlas VI 800mhz Cortex A9;
- RAM Micron D9PSK 2X 256MB DDR3-1600 Clock Rate 800 MHz MT41K128M16JT-125 IT:K;
- internal memory 2 GB Micron NQ283 NAND FLASH 2gb MT29F2G08ABAEAH4-IT;
- internal memory 8 GB SDMMC 8GB SAMSUNG KLM8G1WEMB-B031;
- bluetooth CSR 8311 Bluetooth v4.1 BlueCore CSR8311 QFN Automotive;
- WI FI CSR 6030 Wi-Fi IEEE 802.11b/g and n;
- digital video decoder AKM8859 DIGITAL VIDEO DECODER PAL/SECAM/NTNC AK8859VN;
- audio AK7757VQ Audio DSP with 24bit 3ch ADC + 4ch DAC + MIC Amp;
- power controller MPS MP4570 Automotive Power Systems;
- TPS65150 Low Input Voltage, Compact LCD Bias IC With VCOM Buffer;
- TJA1042 high-speed CAN transceiver;
- CAN and K-Line controller Freescale S9S12G96F0CLF;
- controller Fujitsu 32-bit ARMTM CortexTM-M3 based Microcontroller.
The following elements are used to manage and play files:
- seven-inch touch screen;
- “Mode” key – select modes;
- “MUTE” – mutes all sounds;
- Volume control – pressing once turns the device on or off;
- microphone for the ability to talk on the phone without hands - Handsfree;
- “Reset” – button to reboot the device;
- slot for reading a removable SD card;
- connector for reading information from removable USB media and connecting various gadgets;
- AUX connector for connecting headphones or external audio devices.
Additional control
In addition to the buttons near the touch screen, MMS functions on the Lada Vesta are controlled using duplicate buttons located on the steering wheel:
- volume control;
- selection of file and radio playback modes;
- turning off all sounds;
- button for navigating through folders and tracks on removable media; in another mode, the buttons are responsible for accepting/ending an incoming call.
Photo 2 (Additional controls on the steering wheel)
Such equipment first appeared on AvtoVAZ cars. Previously, a standard audio system and MMC without duplication on the steering wheel were offered. Thanks to this, Vesta can compete with budget foreign cars of the same class in approximately the same price segment.
Key Features
The system combines several different devices that should be in every modern car. The main one is the audio system, consisting of a 7-inch touch screen. Its peculiarity is its resistive base and the need to press with a stylus or other similar object. The input method is not the most progressive, but in weather conditions with sudden temperature changes, the resistive screen works without failure. The sound is reproduced through six speakers to create surround sound.
The system recognizes most SD and USB drives, but with a limitation - the media should not contain more than 1024 files and 256 folders. The flash drive must be formatted to FAT 16 or 32 with a maximum number of partitions - 4. Cards supported by MMC Lada Vesta:
- SDHC no more than 32 gigabytes;
- SD no more than 4 gigabytes;
- USB 2.0 and 3.0 no more than 64 GB.
The user is warned by the instructions that the download speed depends on the number of files on the drive. The optimal solution would be a medium that contains only audio and video files.
Files supported by MMC:
- WMA audio codec, bitrate no more than 128 kbps, sampling 44100 Hz;
- video codec WMV3 with a frame rate of 25, bitrate 750 kbps.
Before use, it is recommended to convert all files to the required parameters. For these purposes, the manufacturer recommends the free Freemake Video Converter program. When playing back, keep in mind that the files will be played in the order they were recorded.
New AvtoVAZ
The new Lada Vesta model in a “universal” body has long been discussed in media sources and on automotive Internet portals. Photos of the Lada Vesta in its new guise presented on websites have caused heated discussions among car enthusiasts. Photos of the interior are very similar to the current interior of the sedan. The similarity in size and appearance is largely due to the fact that the station wagon will be assembled at the same plant in Izhevsk where the sedan is currently being assembled.
Most likely, the new Lada Vesta, like the sedan, will be equipped with three configuration options. What a real station wagon will look like will become known in the near future. The start of sales is scheduled for this fall.
- Sign up for a test drive
- Back call
Options
- 15” steel wheels, decorative wheel caps
- Spare full size steel wheel 15” Driver airbag
- Front passenger airbag with deactivation function
- Rear seat headrests 2 pcs.
- ABS, EBD, BAS, ESC with shutdown function, TCS, HSA
- "ERA-GLONASS"
- Immobilizer
- Security alarm
- Engine and engine compartment protection
- Daytime Running Lights
- Electric drive and heated exterior mirrors
- Exterior mirrors with side direction indicators
- Central locking with remote control
- Electric power steering
- Power windows for front doors
- Seat upholstery is fabric. Color dark gray
- Cabin air filter
- Audio preparation
- Height and reach adjustable steering column
Heated front seats
- Air conditioner
- Cooled glove box
- Rear seat headrests 3 pcs.
- Rear disc brakes (for 1.8)
- Rear parking sensors
- Cruise control and speed limiter
- Seat upholstery is fabric. Color (optional) gray/brown
- Driver's seat with height adjustment and lumbar support
- Multifunction steering wheel
- Audio system (4.3” monochrome display, FM/AM with RDS function, USB, SD card, AUX, Bluetooth, Hands free), 4 speakers
- 12V socket for rear passengers
- Central armrest with box
- Driver and passenger sun visor with mirror
- Case for glasses
- Exterior mirrors and exterior door handles in body color
- 16" alloy wheels
- Spare steel wheel for temporary use 15”
- Heated windshield
- Three-level heated front seats
- Power windows for rear doors
- 15" steel wheels
- Decorative wheel caps
- Spare full size steel wheel 15"
- Rear View Camera
- Multimedia system with navigation (7” color display with TouchScreen, FM/AM with RDS function, USB, SD card, AUX, Bluetooth, Hands free), 6 speakers
- Heated front seats
- Without "Power rear doors"
- Without "Heated windshield"
- 16" alloy wheels
- Spare steel wheel for temporary use 15”
- Side airbags
- Fog lights
- Automatic headlight switch off
- Rain and light sensors
- Heated windshield
- Power windows for rear doors
- Seat upholstery combined fabric/eco leather. Color (optional) dark grey/brown
- Three-level heated front seats
- Climate control
- Audio system (4.3” monochrome display, FM/AM with RDS function, USB, SD card, AUX, Bluetooth, Hands free), 4 speakers
- LED interior lighting
- Illumination of entry and exit points in the front doors
- Without "Rear view camera"
- Rear View Camera
- Multimedia system with navigation (7” color display with TouchScreen, FM/AM with RDS function, USB, SD card, AUX, Bluetooth, Hands free), 6 speakers
- Heated rear seats
- Rear armrest
- USB socket for rear passengers
- Reinforced tinted rear windows
- 16" alloy wheels original
- Seat upholstery is combined eco-leather/Alcantara. Color (optional) black/beige
- Leather steering wheel
- Pads on the pedals
- Textile rugs
- Decorative exhaust pipe nozzle
- Spoiler
The selected discounts affect the final cost of the packages. *The maximum discount cannot exceed 40% of the RRP.
Installation of radio and speakers in the doors of Lada Vesta
AvtoVAZ does not equip all Lada Vesta trim levels with speakers and a multimedia system. In the simplest version, in the car doors, the place where the speakers should be is covered with sound insulation. Let's look at the instructions for installing and connecting speakers in Vesta doors.
Standard audio preparation is available on sedans, starting with the basic “Classic” configuration, that is, there is no need to lay wires (except for tweeters in the mirror triangles). The space in the doors allows for 16 cm (6 inch) speakers.
Installing a 1din and 2din radio
To remove the radio cover, you need to carefully pry it from below, and then unclip the latches. Below it are the connectors: ISO, FAKRA (antenna), USB and AUX.
On the Comfort package, the ISO connector pinout is as follows:
| 1 | white - reverse | red |
| 2 | white - backlight | black |
| 3 | red with blue stripe | |
| 4 | red with white stripe - + permanent | blue with black stripe |
| 5 | green with black stripe | |
| 6 | blue - antenna | pink with green stripe |
| 7 | red- +ass | red with white stripe |
| 8 | black - mass | white with black stripe |
In an empty space you can install a 1DIN radio or a standard multimedia system. The unpleasant point is that you cannot install a 2DIN radio on Vesta without significant modifications. See also: how to remove the original radio.
Installing speakers in front and rear doors
We remove the door trims and remove the sound insulation from the places where the speakers will be located. AvtoVAZ decided to borrow a solution from Renault Logan. The place where the speakers should be placed has three mounting holes, not four. Therefore, to install speakers (without cutting metal you can place speakers up to 16 cm in size) you will have to make special spacers for the front and rear doors (author). We select the thickness of the rings and the inner diameter individually (check that the speakers do not rest against the back).
The Vesta doors already have wiring for connecting speakers, but the connector for connecting the speakers is non-standard and came from Renault or Nissan. If you cut the block, you will lose the warranty. It is recommended to connect via an adapter (ZRS-AG-22 or CT55-17).
There is already a mesh in the door trims, so we simply perform the assembly in reverse order. By the way, dealers may require a certificate of qualified installation of an audio system, be prepared for this!
Video example of installing 16.5 cm speakers in the front doors of a Lada Vesta:
Photo: valiullin-amir in-flight magazine
Keywords: cassette player Lada Vesta | front speakers Lada Vesta | rear speakers Lada Vesta | Lada Vesta accessories | Lada Vesta doors | Lada Vesta torpedo
Found an error? Select it and press Ctrl+Enter..
What is the standard audio preparation for the Lada Vesta How to remove the radio of the Lada Vesta About the audio preparation of the Lada Largus or how to install the radio and speakers
Lada Vesta Classic
What is included in the cheapest version of the car? The equipment table indicates that there is audio preparation and this means:
- There is no radio, there is a blank instead;
- there are no front and rear speakers (their installation locations are sealed with sound insulation);
- there are wires for connecting the radio (behind the plug there are connectors: ISO, FAKRA (antenna), USB and AUX);
- there are wires for connecting speakers in the doors (hidden inside the door and wrapped with sound insulation);
- There are no wires for the tweeters in the mirror triangles.
To install the speakers you will need an adapter and spacers.
Firmware MMS Lada Vesta
If you have experience flashing smartphones, then you won’t have any difficulties reinstalling multimedia software. If there is a warranty, this should be done by the dealer. You can do the firmware yourself:
- A firmware image is downloaded to a FAT 32 SD card, which must contain the files chain.bin, NK.bin, chain.lst, TINYNK.bin.
- Exit to desktop.
- Open the file Windows/OEM_Settig.exe.
- Click the Upgrade OS button and start the firmware process.
After completing the procedure, you need to reboot the system while holding down the volume key - this is a radical measure. Updating to a more stable version will help eliminate malfunctions. Even a beginner can cope with this if he follows step-by-step instructions:
- Turn on the device.
- Insert removable media into the slot with the pre-loaded image for updating.
- Press “i” (information) on the display.
- On the pop-up window, you need to successively click on 4 dots in the corners of the screen.
- In the new window, click on “Software”.
- Click on “SW Upgrade”.
- In the pop-up menu, click “Upgrade”.
- The update application will open, where you need to select one of three modes. Update Radio will update the shell, Update Navi will update the navigation system, and Update OS will update the operating system.
- Having selected the desired mode, press “OK”.
All that remains is to wait for the process to complete, during which the system will reboot several times.
Firmware from third-party developers or violation of software installation rules can lead to freezes and inability to boot. The described method will help you deal with this problem by de-energizing the on-board network and starting the desktop using a removable card and an empty explorer.txt file. The situation can also be corrected by reformatting the drive or flashing the device using software from the manufacturer.
MMS modes
The multimedia complex involves the use of the following modes:
- "Radio". Allows you to receive and play radio signals, search for radio stations with an automatic memorization function for up to 8 positions. Displays the current radio station on the screen.
- "Audio". Intuitive audio player that plays audio files through 6 speakers. There is an equalizer with the ability to select presets or customize it yourself. Audio files can be played via Bluetooth from an external device, but in this case information about the file being played is not displayed on the screen. Supported formats: MP3 up to 320 kbps, WMA up to 320 kbps, WAV up to 24 bits and FLAC.
- "Video". To view videos, you will need a converter. Video files must meet the following requirements:
- AVI with a frame rate of up to 30 frames per second and a resolution of no more than 720x536;
- MP4 with a resolution of no more than 1920x1080, frame rate up to 30;
- MOV with support for standard codecs;
- MKV with support for standard codecs, frame rate up to 30 and resolution 1920x1080.
- "Photo". For viewing photos, the radio screen in the car is not the best option. But if necessary, you can view images in most formats.
- "Telephone". Used for hands-free phone calls via speakerphone. You first need to synchronize your smartphone with the system and download the phone book.
- "Navigation". Movement according to maps and according to the guidance of the navigation program "CityGID 7". Allows you to install third-party cards. Disadvantages include the lack of image rotation, the inability to download maps online, the lack of construction of alternative routes, it does not show traffic jams over long distances, and there is no satellite view.
Changing and installing a radio
Depending on the model configuration, a standard radio may or may not be installed. The beginning of the manipulations in this case is partially different:
In the Classic modification, the decorative plug is removed. The procedure is carried out with a plastic card, so the casing is protected from damage
The plastic latches are carefully removed. Inside there are four types of connectors with wires supplied: ISO, FAKRA, USB, AUX
The panel is ready for installation of an audio recorder. More advanced Grant configurations have a standard soundbar. To install a new product, the old version is removed. To do this, remove the top frame; under the cover is the central part of the radio. The main console latches unhook from the bottom. Next, the air ducts are dismantled and the module is removed, it is attached to the dashboard with screws. On the reverse side, carefully remove the connectors with wires. They are the same as in previous versions of the car.
Installation of the device occurs in the reverse order. The connectors are connected to the appropriate sockets, the pinout of the wires is carried out correctly. The radio is carefully inserted into the remote control and screwed with fasteners. All supply elements are connected, the cover is inserted into place.