It is important to know that on different cars the required socket is located in different parts of the car. Moreover, on some AvtoVAZ models it may be in a completely different place compared to another car. Let's look at several VAZ cars as an example:
Diagnostics of modern car models is carried out using a special diagnostic connector. It connects to a computer, which analyzes the current state of the vehicle, determines the malfunction and indicates it. If you have the appropriate equipment, you can look for breakdowns even at home. However, not all VAZ-2112 owners can find the diagnostic connector right away. Today we’ll talk about its location on the classic panel and on the Europanel. In which part of the car should I look for the required socket?
Nowadays there are scanner models with different versions of firmware and chips on sale. Scan Tool Pro with firmware 2022 is the most stable version so far. The scanner has maximum compatibility with cars manufactured since 2001, including VAZ 2112 with OBD2 connector and GM12 when connected via an adapter.
When is diagnosis necessary?
Computer diagnostics involves reading error codes, erasing them and correcting them. For this, various diagnostic adapters and systems are used. These include multifunctional stands, OBD connectors, portable readers and other devices. Thanks to diagnostic equipment and software, the slightest malfunctions in the vehicle’s control system and its main components are detected.
Using diagnostic systems, you can change parameters to increase the power characteristics of the machine. If a new car model comes out, you can reprogram the functions for the new equipment.
Computer diagnostics are usually carried out in the following cases:
- indicators on the dashboard light up, signaling any malfunctions;
- the driver has suspicions of a malfunction of any components or systems;
- check the condition of a used car before purchasing;
- Experts recommend diagnostics at least once a year.
Diagnostics using electronic equipment makes it possible to obtain real information about the technical condition of the car.
K Line connection problems
K-Line adapter (VAG COM) does not connect
When making a K-Line adapter yourself or purchasing it in a store, users in some cases encounter problems connecting the adapter.
This problem has two subtypes:
— Problem when connecting the adapter to a PC (with our K-Line 409 adapter, the kit includes a video instruction on how to use the device, we recommend that you read it if you have any questions)
— Problem connecting the K Line 409 (VAG COM) adapter to the car
To solve the first problem, you need to install the driver for the device located on the disk, then go to the device manager and see if your adapter is displayed correctly. If in the device manager you see your adapter in the COM ports and LPT section without any question marks, etc. then you can rest assured that the drivers are installed correctly. To be more confident, you can double-click on it to find an inscription stating that the device is working normally.
If your adapter is indicated with a question mark or is located in the other devices section, apparently you have not installed the driver and you need to reinstall it.
We select our device, select, update the driver and specify the folder with the drivers, then click next and see the installation process, otherwise select another folder and repeat the operation until we achieve success.
If you installed the driver correctly, but when connecting to the car the connection does not occur, first check the cable for functionality, to do this, install the Vasyadiagnostic program, then in the settings section select the port number on which your adapter is located and click the test button ( The car engine must be running or the ignition is on).
Instructions for performing diagnostics
To diagnose a VAZ, a computer or diagnostic equipment is connected using a diagnostic connector.
Computer diagnostic socket
All broadcast codes are read by the scanner. They are stored in the controller’s memory until its power is turned off. Using special software, specialists decipher the codes and determine what malfunctions and failures exist in the system.
The diagnostic procedure consists of several stages:
- Suspension diagnostics. This procedure is performed if uneven tire wear, knocking or humming is detected when driving at a constant speed, making sharp turns, or on an uneven road. And also in case of premature activation of the ABC, increased free play of the steering wheel.
- Engine check. The power engine should be diagnosed if it runs intermittently, takes a long time to heat up, is difficult to start, as well as with increased fuel consumption, loss of power, the appearance of extraneous noise, or a decrease or increase in idle speed. During diagnostics, the electrical supply and ignition system are checked, and the pressure in the cylinders is measured (the author of the video is Pavel Master).
An automatic transmission is diagnosed in the following cases:
- no gear is engaged;
- When changing gears, noises, jerking, and slipping appear;
- increased fuel consumption;
- Oil leak detected.
During diagnostics, the scanner reads error codes of the automatic transmission control system, evaluates the readings of the throttle position and cooling system temperature sensors, as well as the position of the automatic transmission selector.
First of all, diagnostics are performed using a scanner. The scanner readings are deciphered and conclusions are drawn about problems in the system. At the second stage, analog testing is carried out - wiring, contacts, and batteries are checked. Next, an online check is carried out. The screen displays indicators of sensors, fuel injection, etc. Then the data obtained during posting is analyzed. At the last stage, the error codes stored in the controller’s memory are erased. After this, reinitialization is necessary.
Types of equipment used to check LADA
List of diagnostic devices used not only in specialized car services, but independently, for example, in a garage.• Odometer correctors, with setting mileage values;• Models that support protocols, by reading information, erasing errors, codes are deciphered: ELM327 USB / Bluetooth / Wi -Fi running on the elm327 chip;• Vag adapter (cable) for later versions of the ECU and 12 pin pads;• Testers, the work of which is organized on the basis of oscilloscopes.
Diagnostic devices that support combination with ABS and SRS units, as well as using a CAN bus, are in demand.
Scan Tool Pro
Scan Tool Pro is a compact adapter without an external environment, built on a universal microprocessor elm327 (basic) Chip version v.1.5 (PIC18F25k80). This diagnostic OBD2 scanner is used in conjunction with a laptop or smartphone; it has Wi-Fi and Bluetooth versions.
The device is practical and reliable, so it is sold out from official dealers very quickly. Reviews for this adapter are mostly positive, but it is difficult to purchase due to the shortage of original versions. Supports all common protocols and car brands.
Launch Creeder VII
Launch Creeder VII. A semi-professional tool for self-diagnosis of modern engine control systems and ECUs. Suitable for domestic cars equipped with an electronic control unit. There is an external display and built-in software.
This version has a complete base for Russian cars, the adapter is even suitable for VAZ 21124. Optionally, the kit includes adapters for various brands of cars.
Bosch KTS 590
Bosch KTS 590. Refers to professional diagnostic equipment and is more expensive than the previous car scanner. The device is connected to a laptop or desktop PC, and there is also an external display.
The kit includes an oscilloscope and a digital multimeter. It is possible to carry out not only computer, but also instrumental diagnostics of electrical circuits and connections. Well suited for car repair shops
Scanmatic 2
Scanmatik 2. The device has shown itself very well with Russian cars. Scanmatic 2 is characterized by fairly high operating efficiency; it reads information using a tablet or smartphone.
Supported protocols: OBDII/EOBD (13 x ISO-9141/ISO-14230 (KLINE); 1x High Speed CAN (ISO-15765); 1x Single Wire CAN (GM-LAN). 1 x J1850 VPW; 1 x J1850 PWM; 1 x Medium Speed CAN (GM-LAN).The kit includes adapters for various brands of cars, additional adapters can be purchased from an official dealer.
Launch X431 Pro
Launch X431 Pro. Leader of the Russian market of equipment for auto diagnostics. Since 2016, it has been supplied with a DBS Car II adapter, as well as a tablet with large memory for programs and high-capacity batteries.
More than 100 supported car brands and maximum access to car electronics. The most expensive and presented options.
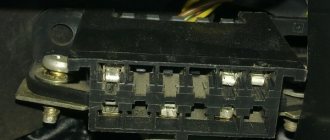
Pinout
If self-diagnosis is carried out, then you need to know the lining of the block. Pinout is the purpose of the contacts that are located on the block. Below is the OBD pinout.
Pinout of OBD II device for VAZ
“A” is the contact responsible for connecting the ground; “B” is the contact that is necessary to connect the L-Line; “M” is a contact that is used to connect K-Line; “G” - contact responsible for controlling the fuel pump; “H” - contact for +12V power supply.
You can diagnose your car yourself by connecting a scanner or other diagnostic equipment to the diagnostic connector. This will save time and money on visiting a car service center.
Connector location
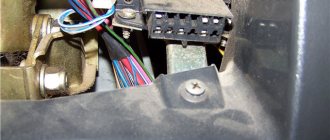
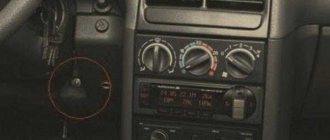
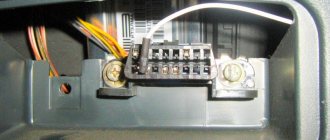
So, we plan to check our car and we even have the necessary equipment. Now you need to find the connector - it is located at the bottom of the steering column, to the right of the driver. This connector is also called OBD. Knowing this name, it will be easier to find a suitable adapter.
If you believe the reviews, the most successful adapter for VAZ cars is considered to be a device for connecting K-Line. It has a lot of free space, so you can connect almost any testing equipment to it.
As for the main diagnostic device, it will be a computer. Of course, it is easiest to work with a laptop, since the process can be performed right behind the wheel of a car. But if there is only a stationary option, then you should take care of a long cord connecting the computer to the adapter.
Pinout and where is the diagnostic connector for VAZ-2112
Diagnostics of modern car models is carried out using a special diagnostic connector. It connects to a computer, which analyzes the current state of the vehicle, determines the malfunction and indicates it. If you have the appropriate equipment, you can look for breakdowns even at home. However, not all VAZ-2112 owners can find the diagnostic connector right away. Today we’ll talk about its location on the classic panel and on the Europanel. In which part of the car should I look for the required socket?
What set of equipment will be required for troubleshooting and configuration.
In order to configure the systems and identify vehicle malfunctions, you will need:
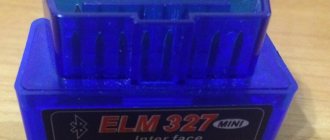
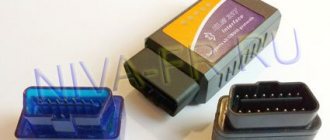
1. ELM327 adapter;
2. Computer, laptop, or PDA, smartphone;
3. Software.
Adapters model ELM327 are one of the best developments for working according to the OBD standard. The device ensures coordination of the vehicle diagnostic system and the computer, ensuring full data exchange between the computer and the vehicle system is necessary. It supports most OBD standard protocols and interacts well with free and paid diagnostic software.
The software required to work with the ELM327 is mostly free, but certain software with advanced capabilities will need to be purchased.
Key features of the ELM327 scanner
• Reading system operation error codes;
• Displaying fault codes and decoding them;
• Printing data;
• Removing fault codes (errors);
• Display of readings in one of two measurement systems – metric and US;
• Saving parameters and received data;
• There is an integrated acceleration time counter to a speed of 100 km/h.
Diagnostics and monitoring of systems using this scanner can be performed on the go.
The adapter comes with a software disc. You don't have to purchase it separately. If for some reason the program from the set does not suit you, you can always find an alternative on the Internet.
Where to look for the connector
It is important to know that on different cars the required socket is located in different parts of the car. Moreover, on some AvtoVAZ models it may be in a completely different place compared to another car. Let's look at several VAZ cars as an example:
- on the VAZ-2112, as well as on the 2110, as well as 2111, the socket is located to the right of the driver’s seat, immediately under the column;
- on models 2108, 2109 and 21099, the socket you need is located under the glove compartment, on a special shelf;
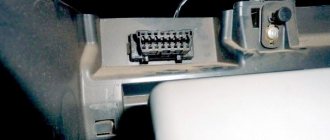
- on cars with a europanel it can be found in the center of the console, near the cigarette lighter. A special decorative cover is used to disguise it;
- on Lada Kalina cars, the connector can be found near the gear shift lever. As is the case with cars with a Europanel, it is hidden under a special cover;
- on a Priora you need to look for it right behind the glove compartment, on the wall.
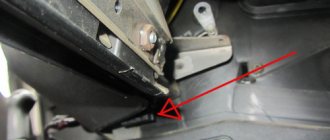
Thus, on the VAZ-2112 the diagnostic connector is located on the right side of the driver’s seat. It is located immediately under the steering column and, in principle, is not so difficult to find. Inspect the bottom of the panel.
Price for double windows with tinting for foreign cars with installation
Double glazing is installed by both professional companies and individuals. Moreover, the cost of their services is almost the same, the only difference is that in one case the client receives a guarantee and professional service, in the other none of the above.
As an example of prices in Moscow, you can consider the price list of one of the certified centers providing auto tuning services to KIC LLC, another unofficial name is “Kik tuning”.
Table 1. Prices for automatic glazing in Moscow.
| Vehicle classification | Cost, rub. |
| Imported passenger car | 35 000 |
| Imported crossover | 40 000 |
| Imported SUV | 50 000 |
In this case, the minimum cost of performing the work is given. It should be taken into account that this only includes installation and athermal film; other necessary parts are purchased by the car owner separately.
It is possible that prices in other salons may be different. Based on what region of the country the car is located in. The cost may vary slightly.
Table 2. Prices for automatic glazing in Russia.
| City | Passenger car, rub. | Crossover, rub. | SUV, rub. |
| St. Petersburg | 35 000 | 40 000 | 50 000 |
| Tyumen | 33 000 | 40 000 | 45 000 |
| Novosibirsk | 33 000 | 38 000 | 45 000 |
| Ekaterinburg | 34 000 | 36 000 | 40 000 |
| Krasnoyarsk | 30 000 | 35 000 | 41 000 |
| Saratov | 20 000 | 25 000 | 35 000 |
| Chelyabinsk | 29 000 | 32 000 | 40 000 |
| Penza | 25 000 | 29 000 | 39 000 |
| Krasnodar | 29 000 | 31 000 | 39 000 |
For unknown reasons, the cost of work varies significantly depending on the region. The maximum values are observed in Moscow and St. Petersburg, and the minimum in the Volga regions. The Urals and Siberia are confidently located in the middle.
Find out the types of films for tinting car windows here.
To get an approximate overview of the prices for front side windows, you can use another table.
Table 3. Prices for front side windows of some foreign cars.
| VIN code details | Automobile model | Year of issue | price, rub. |
| 5174 | Mazda 6 SED | 2008 | 1 400 |
| — | Lexus RX300 | 2002 | 1 500 |
| 7038 | Land Rover Freelander II | 2007 | 1 500 |
| 5166 | Mazda 3 lane | 2008 | 1450 |
| 5684 | Mitsubishi Lancer X | 2007 | 1 750 |
| 5670 | Mitsubishi Lancer 9 | — | 1 550 |
| 8032 | Suzuki Grand Vitara | 2006 | 1 600 |
| 8340 | Toyota Corolla 9 (E120) SED | 2006 | 1 550 |
| 8323 | Toyota RAV 4 5D | 2006 | 1 600 |
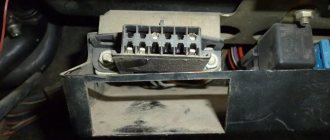
Pinout
Knowledge of pinouts may be required if a car enthusiast wants to make an adapter for computer diagnostics with his own hands, or if you need to connect without one. Experts recommend buying ready-made devices without the need to make a plug yourself. However, if you do not have such an opportunity, and diagnostics need to be carried out urgently, we will consider two main pinout options used on VAZ cars of various years of manufacture. Until 2002, AvtoVAZ products used the following pinout option:
- The 4th and 5th pins are GND outputs.
- Pin 16 – +12 V (power line).
- The 7th contact is the diagnostic line itself.
Since 2002, the pinout scheme has changed significantly. Now it looks like this:
- Pin H – +12 V (power line).
- Contact G – +12 V for the fuel pump.
- Pin A – GND output.
- Contact M – diagnostic line.
How can you tell if your car is faulty?
There is a special lamp on the instrument panel with the inscription CHECK ENGINE. When you turn on the ignition, it lights up, and until you start the engine, a special program reads data from all systems and components of the car, thus transmitting data to the on-board computer to identify faults.
After you start the engine, the lamp should go out, but if it stays on for another 10 seconds, it means that some problems have been identified and error codes have been entered into the on-board computer programs. Communication with the controller is carried out using the diagnostic block.
CHECK ENGINE control signal on the instrument panel of a VAZ 2110
Speed under control
Speed under control
It would seem, why do we need a tachometer? To safely travel around your native expanses, a speedometer is quite enough. If you also look at road signs from time to time, the speedometer will help you save money when meeting with law enforcement officers. The tachometer informs about something almost abstract: how many times the crankshaft manages to turn around in a minute. Why and who needs such information?
First of all, the driver of a car with a forced engine. It requires strict control of revolutions - here all the power is hidden in a narrow range of speeds in each gear, and the tachometer helps determine the moment of transition to the next gear - without dips or twists.
There is also an aesthetic side to the matter. People decorate their car as best they can, and a catchy dial on the dashboard is fashionable. Not everyone thinks about what is hidden behind the instrument readings. Is this why remote tachometers, which are plentiful in stores, are sometimes distinguished by an enviable - up to 25-30% - disregard for the accuracy of readings. We don’t recommend dealing with such people - fortunately, there are honest devices, which we’ll talk about.
In terms of price-quality ratio, the best tachometers are standard ones. Their work is based on different principles.
Calculation of codes
Most often, diagnostic program codes are “deciphered” using a special device. However, on VAZs it is not so difficult to do it yourself.
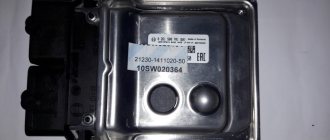
ECU January 4 for VAZ 2110
The diagnosis itself goes like this:
- Connect contact “B”, which has the diagnostic block and “ground”;
- Turn the ignition key to the third position, do not start the car;
- First, the aforementioned “CHECK ENGINE” lamp flashes code 12 three times in a row. It, in fact, does not signal any malfunction, but simply shows that the diagnostic programs are working. On the VAZ 2110 this happens in this order: the lamp blinks briefly once (which should be considered the designation of number 1). After a pause of at least two seconds, it flashes twice in a row (two). So we got the number two. And this is repeated three times so that the driver can understand these signs;
- Now you need to be careful not to miss any faults. After the diagnostic program has declared its serviceability, it will begin to display error codes, if any. In the same way - flashes and pauses.
Adapters based on the elm327 chip for Lada (VAZ) 2114 cars
There are several varieties:
- ELM327 Bluetooth;
- ELM327 Wi-Fi;
- ELM327 USB.
These devices support work not only with domestic cars, but also with imported cars (after 1996).
Elm327 for VAZ 2114 allows the car owner to do:
- diagnostics and error reset;
- monitoring and analysis of readings from main instruments and sensors;
- monitoring the current state of the car.
The elm 327 scanner is easy to use, even a novice car enthusiast can handle it.
Installing a new adapter
Modern adapters elm 327 with the OBD-II program (puncture) are suitable for the VAZ 2110 . You can also install them yourself. First you need to purchase an elm 327 and a cable for it. You already know the location of the diagnostic connector. Be sure to study the instructions, which indicate the pinout of the block and the location of each connector.
Connection diagram for ELM327 to 12 PIN diagnostic block
The pad can be removed quite easily. Insert your own cable into each connector of the block, making sure that the pinout of the elm 327 complies with the manufacturer’s instructions. Check that each connector is connected correctly and each cable is in the correct place. After this, the block is installed in its place.
OBD Review
As a rule, the equipment of modern cars includes an electronic control unit (ECU). This device is designed to collect and analyze data about the functioning of some of its systems. To prevent unauthorized connection to the ECU, you can choose one of three methods:
install an additional immobilizer with a data bus break;
install any additional connectors into the data bus gap;
blocking the OBD data bus by installing additional channels (must occur in the security mode of the alarm installed on your car).