Articles
- 2 Self-installation
2.1 Interesting points of the Navitel program
- 3.1 Old version of Navitel
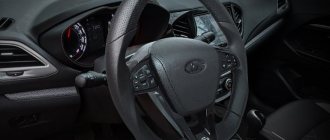
Navitel for car radios
You can install Navitel for car radios yourself. No special knowledge or any codes are needed. Knowing how to install Navitel on a car radio, you will be able to cope with this operation on your own, without using the services of specialists.
A little about Navitel
Navitel program
First, here are some interesting facts about this program:
- The Navitel program is ours, Russian. It is paid and is implemented well across a vast territory of the planet, including the CIS countries, Asia and Europe. Some versions of Navitel are also popular in South America;
- The program is released for GPS receivers on various bases, such as IOS, Windows Background, Android, etc.;
- Since 2006, the first sales of the program began. The high quality of map detailing increased product sales from the very beginning;
How to install Navitel on a car radio
- Already in 2009, there were about 80 thousand users of the service only within the capital, and throughout Russia the number of users was about 130 thousand people;
- The Navitel series of car navigators turned out especially good. They all had their own program and maps included;
- Navitel provides users with a large number of free services, which, in fact, can explain the wild popularity of the program. Among such services we can highlight Navitel. Events is an interactive portal that allows all users to see on the map the marks of other drivers about various important events on a certain section of the road.
How to install Navitel in a car radio
Note. For example, this service will help you find out that road work is being carried out on a certain section of the road or a security camera has been installed. In this way, motorists help each other, creating a cohesive team.
- The Navitel program supports all standard screen resolutions, including square ones;
- The program's capabilities include support for hardware acceleration of Open GL graphics, a custom display filter, search by address, and much more.
Hardware graphics acceleration
Method No. 1 Manual
Allex2010 from the 4pda.ru forum managed to launch Navitel on MMC Lada Vesta with firmware 4118 and 4119. To do this, he used GpsGate and MortScript, with the help of this software he was able to launch a combination (COM5 - portsplitter - GPSGATE - Navitel). As a result, the output was COM 7 with pure NMEA.
To eliminate the preliminary launch and configuration of additional programs, he made a script. As a result, Navitel is launched through the vestanavi.exe file without unnecessary manipulations. You can launch the file through the AppLauncher menu (run vestanavi.exe, and select “Navitel” in the application window).
Installation procedure
:
- Copy Navitel (with COM7 115200 settings or set them in the settings.005.ini file) to the SDMemory/Navitel folder
- Copy the “GpsGate 2.0” folder and files (START.REG, vestanavi.mscr, MortScript.exe, IRE.exe and vestanavi.exe) to Navitel
- Run vestanavi.exe
Download
:
- The first version of the “crutch” To download files you need to log in to the site
- The second version for installation in the internal memory of MMS - To download files you need to log in to the site
- Second version for installation on an SD card - To download files you need to log in to the site
Self-installation
Navitel for car radio
If the car does not have a connector for installing GPS (see 2 din car radios with GPS and their review), this does not mean that installation will not work. On the contrary, if the car has a USB port, the connector of which is located through the glove compartment, then the GPS can be connected here. So, you can get navigation in your car in 2 ways:
- By installing an altmenu with the Navitel program, but such an implementation voids the warranty;
- By installing the driver and application yourself, which will not void the warranty on the device.
Note. This means that only the GPS receiver driver will be built into the GU itself, and the file can be later erased.
How to install it in a car radio yourself
If, for example, a GPS receiver was purchased and the driver was downloaded for it, then the functionality of the device must be checked.
Note. Note that the driver for Windows CE 6 has a “cab” extension and needs to be written to a USB drive.
During the DIY installation process, you will definitely need an SD card. It will be the repository of the Navitel program. As for formatting the card, this must be done in the FAT32 system.
Note. We hasten to reassure you that the car radio menu will not change. To launch the program, you will need to go to the Windows desktop.
How to install it in a car radio yourself
So, here is a step-by-step algorithm of actions:
- Go to the main menu of the car radio (see 2din car radios with navigation and their detailed review);
- Click on the “Settings” icon and hold for about 10 seconds;
- The car screensaver appears, after which the “Desktop” opens;
- Find the “My Device” icon and double-click on the folder;
- We connect the navigator to USB at the stage when the “Desktop” is open. At the moment of connection, a window asking for a driver should appear on the screen;
Driver request
- You need to turn off the navigator, close the window, connect USB and go to it through “My Device”;
- Click on the “cab” icon and press OK;
- We go to the Windows folder and here we find the usbser.dll file:
- Now this file must be copied to the “Static Store” folder.
Note. The copy and paste buttons are at the top.
After the driver is installed, no messages should be displayed when connecting a device to the port:
- Now you need to restart the car radio;
- A window will appear again in which you must specify the correct path to the usbser.dll file.
Note. It is important to know that the standard Navitel program may not find the specified GPS receiver. For this purpose, before recording the program onto a memory card, it is recommended to patch it. You can install a patch to work with the COM-5 port, and then apply another patch that will reduce the speed to 4800 bps.
- Download Navitel to the map;
- We launch the program by double clicking on the exe file, which is located in the Navitel folder.
Note. To return to the standard menu, it will be enough to use the “Home” icon.
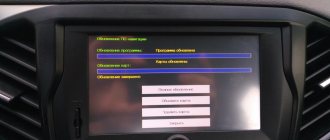
Interesting moments of the Navitel program
- You will not be able to use voice prompts if the radio or CD sound is on;
- It will be possible to use music simultaneously with the operation of the navigator. To do this, if the car radio does not have a separate button, you will need to first turn on the music, and only then start the program.
Nuances of multimedia firmware Grants (2190)
It is quite easy to carry out the firmware itself when installing the mms 2190 firmware. To do this, it will be necessary to use an SD card.
Let's concentrate! This card is subject to mandatory and preliminary formatting using the “FAT16” version.
Among the common flaws that occur after the dashboard firmware is installed, even if it is the latest version, is the Lada logo freezing on the display of the head unit.
This moment can be provoked by the following factors:
- failure to comply with required formatting principles;
- the presence of an outdated version of the SD card that differs from “SDHC”.
After successfully formatting the card and selecting software (for example, “New Menu V7.391 Nitro”), you will need to acquire the latest firmware and unpack the product onto a previously prepared SD media.
Regarding the “Firm Ware” folder, note: the files located in it will need to be redirected to the root directory of the card itself. Upon completion of the copying process, disconnect the flash card from the PC, not forgetting about the safe removal technique.
Now we confidently insert the SD card with the prepared files present on it directly into the MMC. Then turn on the head unit. We wait for the full download to complete and by long pressing the volume button, we reboot.
The act of rebooting is characterized by four stages, the display of which is implemented in 4 lines of process status. After filling out these lines, the device starts in the usual mode, as evidenced by the appearance of the corresponding original menu. After a few seconds, the device transitions to the altmenu.
Let's pay attention! If the USB multimedia connector is occupied by another device or connected to it, then the process of launching the altmenu becomes impossible. After the slot is released, the MMC will require another reboot.
The USB splitter “DNS ATH-08” has acquired a significant advantage – multi-polarity. The GPS receiver and other USB modules connected to the “head” are combined with the altmenu, but become inactive.
After the MMS 2190 firmware is completed on a Lada Granta car, its display displays a new type of desktop, namely “Wince”. The 4 files previously mentioned and copied into the depths of the root directory of the map are “responsible” for the presence of the interface on the desktop.
The subsequent manipulation is associated with the need to configure new software in the standard multimedia device of the Lada Granta car. For these purposes, click the “Start” button, after which we follow the following route: “Start\Setting\Control Panel”. Sometimes owners complain about the slowness of the “Control Panel” opening process, but this phenomenon disappears after rebooting the MMC in forced mode.
When the control panel is open, in its interface click on the “Stylus/Calibration” symbol. With this action, the user of the new software gets the opportunity to calibrate the touch screen for response accuracy.
Upon completion of the simple calibration procedure, a timer appears; you should not wait for the completion of the counting process. Feel free to click on the screen.
Now the long-awaited time has come for the forced reboot process. Long and holding pressure on the volume key (10 seconds or more) allows you to implement this process in MMC. At this moment, the removable media, which contains the new software, continues to reside in the connector of the head unit of the Lada Granta car.
Having completed the reboot action, the device will first display the standard menu, and then, similar to the preparation procedure, the altmenu. If you need to return to the “native” menu, you should hold down the “Native” key.
The process of rebooting the device, after the dashboard firmware has been flashed, requires its connection via a USB splitter of the specified model with the Globalsat BU-353S4 GPS wave receiver. If there is none, then upon completion of the process itself the “head” will display the normal menu mode on the display.
Alternator belt Lada Granta
Grant or Priora which is better
Lada Granta ground clearance
Such common settings as sound, as well as audio or video, are present in any multimedia device in the domestic Lada Granta car.
“NewMenu V7.391Nitro” needs a manual way to install the indicated options, which will require:
- log in to the “soft/radio” folder;
- resort to activating the “start.exe” file.
The procedure will agree to associate present files with the extensions “exe” and “ahk”. This manipulation is quite important and allows you to achieve stable functionality of the MMC, which is used to flash the dashboard firmware.
Method No. 2 Ready assembly
A little later, an easier way to launch Navitel appeared. User musak posted the finished assembly. Copy Navitel to the SD card and run VestaNavi.exe (it’s more convenient to do this through AppLauncher). All! Download the finished assembly:
Attention! You do not have permission to view hidden text. You must register on the site.
How to make your own Navitel assembly:
- Download the version of Navitel you need.
- Unpack two files into the Navitel directory (Vestanavi.dll and Vestsnavi.exe, link to the archive below), which were posted by the respected Alex2010.
- Copy the Navitel folder with all its contents to the root SDMMC folder (internal MMC flash memory).
- Set up a shortcut (Vestsnavi.exe) to launch Navitel in AppLauncher.
- We launch Navitel, set the initial parameters, wait until the automatic detection of the COM port and speed takes place (operating parameters: COM7, 115200, Aggressive).
To download files you need to log in to the site.
Let's remember that we previously told you how to install a different menu on MMS or make CityGuide a user-friendly interface and force it to show cameras/ambushes.
Key words: cassette player Lada Vesta
0 0 0 0 0 0
Share on social networks: