- Lada Vesta cars are equipped with a modern cityguide navigation system…
- Where to see coordinates
- Voice prompts help you avoid distractions
- Launching the cityguide program
- Navigation system interface
- How to enable the cityguide navigator program
- How to update maps
- How to update the city guide for Lada Vesta
- How to update the city guide for the Lada Vesta and make it show traffic jams – dustershop77
- How to use the "history" and "places of interest" function?
- How to view history
- Several ways to get directions
- Checklist: how to get directions
Where to see coordinates
In order to plot a route using coordinates, they must be entered into the program of the Lada Vesta multimedia system, but first you still need to know them. So, it's simple. We take the phone, open Google maps, point our finger where necessary, at the desired point, and hold until a red flag appears. The coordinates of the point indicated to you will pop up on the screen, and you need to show them to the navigator. Now let's talk about how to do this.
In the main menu, open the search, then select the “coordinates” section. We see two fields: latitude (N), longitude (E). Traditionally, coordinates are entered into CityGid in the form of decimal fractions. We enter the coordinates we already know and click “let’s go.” Please note that when entering coordinates, the letters N and E are optional.
CityGuide update
The navigator software needs to be regularly updated. The software provider periodically releases new versions of the application, with updated data and relevant information. You can download the latest versions of CityGuide from the official source probki.net. To update your navigator, you will need an SD card with a capacity of at least 4 GB, formatted in FAT 32 format.
The algorithm of actions is as follows:
- Registration on the official website of the manufacturer.
- Download the latest program update file.
- Unpack the downloaded information into the root folder of the memory card (a folder called “Update” should appear).
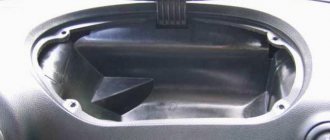
- Transferring a folder from a flash drive to the car’s multimedia system (there is a special slot for a memory card on the panel)
- After opening the MMC folder, you must select the “update maps” sub-item if you want to change only them, or “full update”, during which the entire program will restart along with the maps.
Updating the program usually takes about half an hour. During this time, you cannot use the multimedia system so as not to interrupt the information transfer process.
Voice prompts help you avoid distractions
Increased concentration is required on the road, but when using a navigator, there is often a need to be distracted by the screen. This is especially true for cities with high traffic, where a moment's inattention and looking off the road can have consequences.
To eliminate this problem, the cityguide program on the Lada Vesta is equipped with voice prompts: the voice notifies you in advance about turns in the route, when, what to do. This function makes driving a car safer and easier, since the driver does not think about how to avoid the turn he needs, but simply follows the instructions of the announcer.
Downloading and installing maps in CityGuide
The folder with maps can be downloaded from the same site as CityGuide updates.
- The files need to be unzipped
- Find the CGMAPS directory in the Update folder
- Move there a folder called SpeedCam.bkm.
- Turn on the device and insert a memory card into it.
- Wait for the complete installation without interrupting the process.
- Restart MMS
The original CityGuide maps are not suitable for all drivers. Often they may be incomplete (especially in remote regions), out of date or not correctly reflect the situation on the road. The most common alternative is to install an OSM (Open Street Maps) map. This can be done without MMS firmware.
Installation steps:
- Download the CityGuide program. Or update it on the Lada Vesta to a version that supports Cgnet format cards
- Download OSM maps from the site cgmap-osm.ru (you need to download maps for SitGuide) Unpack the archive on your computer.
- We transfer OSM cards to the CGMAPS folder, which is located in Update. If native cards are not needed, you can delete them.
- Copy the Update to the memory card and transfer the data to the MMS (the navigator must be turned off)
- Turn on the application and select “Full update”. Before this, you need to manually erase all old cards if your version is older than 7.9.7.238. If the CityGuide on the Lada Vesta is new, you just need to click “Update”.
Related link:
Choosing oil for manual and automatic transmissions of Lada Vesta
This simple installation is also good because it is very easy to remove without leaving any traces, so that the software does not void the warranty.
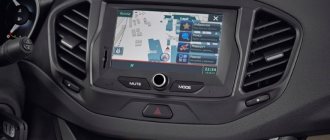
Navigation system interface
The navigator interface is pleasant and comfortable.
Most of the touch screen is occupied by a map, which displays streets with names, route numbers and all the information necessary for travel. The control buttons are located on the sides of the monitor and do not interfere with orientation and planning a route. They are located as follows:
- At the bottom of the screen there is a volume indicator, GPS and Bluetooth signals, as well as time and date
- On the right side there is a menu for controlling the map scale and its tilt angle.
- At the top there is a navigation menu, as well as a “collapse program” button
- Application function settings can be made using the buttons in the lower left corner.
To ensure that the driver is not distracted while driving, the program provides voice prompts warning about turns or other maneuvers and obstacles on the road.
In general, the navigator menu is simple and convenient and is easily perceived on an intuitive level.
conclusions
- The City Guide navigator, which Lada Vesta cars are equipped with, is a convenient and functional program. It helps you get from one point to another without any problems along the optimal route, taking into account the traffic situation and the driver’s wishes.
- The application must be updated periodically.
This must be done in order to have up-to-date information about roads and buildings. In each new version, minor inaccuracies and errors are eliminated, and the interface becomes more understandable and pleasant.
- For those who are not satisfied with the accuracy and reliability of standard maps, it is possible to install third-party maps. But such manipulations automatically remove the warranty from Vesta software.
How to update the city guide for Lada Vesta
The instructions for updating navigation for the Lada Vesta are very simple.
So, first, prepare the media. We need an SD flash drive with a capacity of at least 4 GB, formatted in FAT 32 format.
We open the official website of the cityguide manufacturer - probki.net, download the new update, to do this you must first register on the site. Unpack the file to the root of your memory card. The “Update” folder should appear there.
Now insert the flash drive into the connector on the panel and open the navigator. You will be offered two actions:
- full update (the city guide will be updated along with the maps);
- update maps (only maps will be updated).
Select the first item. You now have 30 minutes while the program is updated. From this point on, it is very undesirable to interrupt the process, because this may cause an error.
Updating maps using the utility
Required
: Windows version no lower than Windows 7, CityGID version no lower than 7.9, utility, download from our website: To download files you need to log in to the website
Attention
: The utility is at the beta stage.
1. Unpack the archive and run the executable file wince_uploader_vesta.exe if you want to update maps for LADA Vesta or wince_uploader_vaz.exe if the update is necessary for other LADA models. 2. Insert any SD card you already use (or will use) to update the maps. 3. Click the Auto Detect button.
4. Check the countries you want to add, uncheck the countries you want to remove, leave the check mark on the countries you want to update.
5. Start the map update process on the SD card and wait for it to complete.
6. If there are no updates, the message “No updates found” will appear.
7. If the process ends with the message “Completed, insert the SD card into the MMC and start the update,” you can exit the program, remove the SD card and go directly to updating the maps in the car.
8. After the process is completed, the Updates directory will appear on the SD card with all the data necessary to update the cards in the MMC. Insert the SD card into the MMC and start updating the maps (2) (optionally, you can delete all maps before updating (1) if you changed the set of maps when using the utility - for example, unchecked some countries and regions).
Let's remember that we previously told you how to make CityGuide show traffic jams.
Key words: cassette player Lada Vesta
0 0 0 0 0 0
Share on social networks:
How to update the city guide for the Lada Vesta and make it show traffic jams – dustershop77
On Vesta, the standard multimedia system (MMS) with a touch screen has built-in CityGID navigation. This navigation software provides the ability to reflect traffic congestion, road conditions and other factors that affect driving safety and speed. But first you need to configure and update CityGuide.
All questions regarding the operation of the CityGID navigation program should be addressed to the developer on the website probki.net. Here is the page for CityGuide updates on Lada Vesta, where you can find:
After updating the navigation program, it becomes possible to enable the display of traffic jams. To do this you need:
- Turn on mobile Internet on your phone and switch it to “Wi-Fi hotspot” operating mode.
- We connect MMS to the phone. To do this, in the CityGuide settings, in the “List of available networks” line, find your smartphone and enter the Wi-Fi password. Make sure the connection type is “Internet”. After this, the Internet indicator should light up on the main MMS screen (Fig. 2, item 1).
- In the CityGuide settings, click “Update traffic conditions”.
If everything is done correctly, traffic jams will appear on the map in the form of lines and arrows of different colors. A number is indicated next to each line that shows the speed of movement on this section of the road. In large cities, information about road conditions is more complete. And in small settlements it may be completely absent.
Let us remind you that there is a modified version of CityGuide, which has a more convenient interface and understands cameras and ambushes. In addition, on MMS Vesta it is possible to use another navigation program, for example, Navitel.
Categories of goods that may be of interest to you based on the article “How to update CityGuide on Lada Vesta and force it to show traffic jams”:
No entries found.
Products from the Dustershop77 range on the topic of the article:
| Image | vendor code | Name | Manufacturer | Price | Availability | Add to cart |
Copying cards manually
The point is to download CityGuide maps in cgnet format (for example, from here) to an SD card, and then copy them to the \SDMMC\CityGuide\CGMaps folder on Vesta’s multimedia system.
Procedure
:
1.
Before updating, you must shut down CityGuide. To do this, in the “Navigation” mode, press the “Menu” button, then the “Exit” button and confirm exiting the navigation program by pressing the “Yes” button.
2.
Insert an SD card with maps into the MMC.
3.
Exit to WinCE desktop
Show/Hide text
On the main screen, press the button with the letter “i”. Then click on the corners of the window that opens in this order:
- top left edge
- top right edge
- bottom right edge
- bottom left edge
Then select the “SYSTEM STATUS” section, a page with basic information about the system will open. All that remains is to click on the corners of the screen, departing about 1 cm from the edges. The sequence is the same:
- top left edge of the screen
- upper right
- lower right
- lower left
4.
Open “My Computer” (Start->Run->write “\” and press “Enter”)
5.
Open “SDMemory”, find the file with maps, click on it until a menu appears, select copy.
6.
Go back (yellow icon at the top), open “SDMMC” then “CityGuide” then “CGMaps”, press until the menu appears in an empty space of the window, select paste. Wait for the copying to complete.
7.
Exit to the standard MMS menu by clicking the first tab in the tray.
8.
Reboot MMS by holding the volume button for a few seconds.
After starting CityGuide, new maps will be installed automatically. The process is also shown in the video:
Several ways to get directions
As in other navigation systems, the route in CityGuide is laid from the starting point to the finishing point. It is compiled taking into account the shortest and most convenient route, and also allows the driver to make his own adjustments if he needs to stop at a gas station, store or any other place along the way.
You can get directions using one of the following methods:
- By typing the name of a street or locality into the search bar;
- By selecting the name of the starting and finishing point from the list in the search;
- By pointing at a point on the touch screen by pressing your finger;
- Using history data (if you've been down this path before).
How do I use the History and POIs feature?
The History function saves the last 10 routes taken. If the need arises to repeat one of them, the driver can refer to this list and select the desired route. This saves a lot of time, since you don’t have to pave the way again each time.
“Places of Interest” is also a very convenient feature. It allows you to add places of interest to your route. These could be gas stations, hotels, cafes, various attractions and natural areas. This option is perfect for travelers who want to make their route as comfortable and educational as possible.
How to download and install maps - instructions
You can download the folder with maps for the Lada Vesta navigator, again, on the official cityguide website - probki.net. This is done in exactly the same way as with updating the version of the entire City Guide, but with some additions.
Unpack the downloaded files before Update. Next, find the CGMAPS directory and drop a folder there called SpeedCam.bkm. Then everything follows the scheme: turn off the navigator (if it was turned on), insert the USB flash drive, turn on the navigator, wait. Under no circumstances should the installation be interrupted. Afterwards you need to completely exit MMS.
↑ Communication quality
GPS signals have a threshold for permeability of solid materials. If the car is in a tunnel or underground parking, the connection is interrupted and high-quality navigation becomes impossible. CityGuide Lada Vesta receives signals from several satellites at the same time, so its operation can be affected by active wireless gadgets located in the cabin, tall trees and buildings.
↑ How to run the program
CityGuide navigator for Lada Vesta is an application for the car's multimedia system. Launching the program is easy. To do this, just go to the main MMS menu and select the navigation option. The system activation indicator is the navigator start screen, in the lower right corner of which the CityGuide software version number is displayed.
To access the maps, you must accept the information message that will follow immediately after the splash screen. Before you get started, you should familiarize yourself with the capabilities of the navigator. It is strictly not recommended to manipulate the system while driving.
OpenStreetMaps
To plot a route, you can use the OpenStreetMaps . This project was founded by ordinary users to create location maps around the world. You can use the service absolutely free, without restrictions. It is also possible to add your data to OSM to increase the database and be viewed by other users. In addition, on the site you can read diaries and blogs of participants. You can get acquainted with the service on the “ About the project ” tab.
There are map databases based on updating data on CityGuide navigators. You can download them by entering a query in the search engine: “ osm maps for CityGuide ”. Such databases are not official, so the creators do not bear any responsibility for their accuracy. To play maps from the OSM server, they need to be converted using a special converter.
It is important to know that any update must be made only if you have the latest version of the software
The CityGuide application and navigator is used by a large number of the Russian population. Vector graphics make it easy to find the right place. At the same time, both the navigator and the application can be used without an Internet connection. Maps are updated frequently, so all regions of Russia show accurate terrain information. Using the CityGuide application, you can easily get to anywhere in the country.
Using LuckyPatcher (ROOT rights are not required):
Instructions from ivann099 from 4pna, which contains all the options for activating cards from users. 1. Method for those who are installing CityGuide 8 for the first time and have not finished trial 1.1 Install LuckyPatcher and launch it, wait a little for it to inform you that there is an update (the Internet must be turned on), agree and wait until it installs. 1.2 Launch LuckyPatcher at the bottom left, click “Switches” and turn on “License verification emulation” “Services for checking and issuing licenses in Google play store” “Goole Billing emulation” (experts write that only “Goole Billing emulation” should be enabled, but it’s better to enable everything 3) 1.3 Reboot the device. 1.4 Install CityGuide_v8.2.616.apk. 1.5 Launch CityGuide 8, see a message about the trial, Click No, a message pops up about the lack of maps (here I clicked no), go to the program MENU->Maps->INSTALL->CITYGUIDE MAPS->Russia->Select what you need and Click “install” and wait for the maps to download. 1.6 After the map is completely downloaded, go to MENU->Maps->INSTALL->CITYGUIDE MAPS->Russia and the map that you downloaded now has a “Buy” button, click, the LuckyPatcher menu will pop up, click YES and the whole map is purchased. Go to MENU->Maps->Licenses, a window about that will pop up. that # licenses received. We restart the program (you may need to do this a couple of times) and the whole trial will no longer pop up. 1.7 If the buy button does not appear, then go to MENU->Maps->INSTALL->CITYGUIDE MAPS->Europe->Latvia, here there will be a treasured BUY button, then follow the instructions. It is not necessary to download the map itself; as soon as you make a purchase and the download begins, you can interrupt the download. 1.8 Go to the Play Store, find CityGuide and update to the latest version (if you installed CityGuide_v8.2.616.apk) or install a new one from this distribution. I think further updates will also be installed normally.
Some tips for updating
First, let's look at how to update cards from other companies:
- “Roads of Russia” can also be updated using the MapChacker utility.
- If you have a Shturman navigation system, then just go to the manufacturer’s website (shturman.com) and select the desired map from the list. The archive will be downloaded to your computer. After this, you need to install the utility and follow the program’s recommendations.
Other navigation systems can also be updated either through the manufacturer’s official website or directly from the navigator.
In some situations, you need to enter a special UUID code, which will be provided to you during the download process of the utility. It’s better to write it down somewhere on a piece of paper or in your phone.
Today it is not difficult to download maps for GPS navigators for free, but what to do if the user does not have access to the Internet or he simply does not want to do this? It's simple, in such a situation you can purchase updated cards on removable media. This pleasure is more expensive, but you don’t have to download anything and understand the programs.
Important! The flash drive must be accompanied by an activation code.
↑ Accuracy of operation
Despite the fact that the CityGuide navigator allows you to lay out routes quite well, you should not rely on it completely. The accuracy of the program depends on GPS/GLONASS signals, the quality of which may vary depending on environmental conditions. Because these systems are under the control of the US Government, WHA cannot be responsible for the availability or quality of the information provided. Making any changes to the operation of GPS and GLONASS software may affect the efficiency of CityGuide.
CityGuide data, like any other navigator, should not be taken as an unambiguous guide to action. The driver must be careful and act in accordance with the rules of the road, taking into account the current situation. In cases that require precise calculations of direction, distance and coordinates, a navigation system will not be enough.