Today I decided to write a short article about replacing the front seat slides, since I found practically no information about this on the Internet, and I think that the material will be useful for many beginners and others. I’ll immediately write about the devices that will be needed for the most convenient dismantling and installation of these mechanisms.
- Large wrench, E10 torx head, extension - this is for removing the seats themselves.
- Head for 8
- Small ratchet and crank
- Extension
Main types of damage and defects
Most often, seats receive the following damage and defects:
1. Worn upholstery (usually the armrest)
2. Broken base of the structure
3. Problems with chair springs
4. The appearance of cracks in the casing
5. The appearance of mechanical damage (cuts, burns and other damage caused by the driver’s carelessness)
The type of repair will depend on the type of damage. The instrument is selected accordingly.
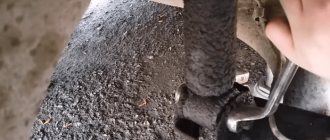
Removing and installing Kalina seat slides
Required tool: 8mm socket.
- Move the slide so that the fastening bolts are visible through the technological holes. Unscrew the bolts securing the slide to the seat using a 8mm socket.
- Remove the slide assembly with the moving mechanism lever.
- The slide is attached to the frame with 3 bolts. Remove the end of the travel lever shaft from the inner slide hole. A spring is installed between the lever and the outer slide.
When reassembling the slide, before installing the lever shaft into the hole of the outer slide, first put a spring on the shaft and place the short mustache of 1 spring on the latch. Then, squeezing the long mustache 2 springs (can be tied with wire), insert the shaft into the hole in the slide, so that this mustache goes under the slide.
Methods for eliminating minor defects
Cuts and tears can be easily repaired with a regular patch. To do this, you just need to have with you the same piece of fabric as the one that was used for upholstering the seats.
The problem with seams is also easily eliminated. If the seams on your car seat have come apart, the first thing you need to do is dismantle it to see the back of the seam. Old threads should be cut and then tied with knots to prevent further steaming. Then you just need to make a new seam over the old one.
Disassembling the panel
To dismantle the instrument panel in Kalina, you should arm yourself with a set of high-quality screwdrivers and patience. To work you will need:
Disassembly begins from the sides. How to remove a torpedo? The sequence is:
- The first step is to disconnect the rubber seal that prevents the panel from being removed. Using a flat-head screwdriver, bend it to make room for dismantling.
- Next you need to remove the plastic casing with three clips. It is located on the front pillar of the cover. Again, a flat-head screwdriver will come in handy, which can be used to pry off the socket.
- The next step is to detach the trims in front of the glass. You can unscrew them using a Phillips screwdriver by unscrewing the fasteners on both sides.
- After this you will be able to remove the black trim under the glass. It is secured with iron clips and screws, so there is no need to rush. Slowly pull towards you until it comes loose. It may happen that the clips get stuck under the panel or some of them will be missing altogether.
- We unscrew all the screws that are nearby and remove the covers from the side air ducts.
New Lada: About daytime running lights of Lada cars
After removing all the side and side elements, you can begin to dismantle the central part.
Execution order
Replacing the upholstery consists of several separate stages, which, in turn, will be described in detail below.
Stage No. 1. Disassembling the seat
The first step is to remove the seat from inside the car and completely disassemble it. It is better to do this on some flat surface (for example, a table), so that you can smooth out the parts so as not to lose them later.
To disassemble the seat, you must first unscrew all fastenings, and then undo the seams. However, it is worth remembering that in some places the seat will be glued, so everything must be done very carefully. It will be most convenient to steam the seams using a stationery knife.
Stage No. 2. Cutting out new elements
At this stage, it is necessary to make ready-made shapes for the seat upholstery from the prepared fabric. To do this, you can lay the old fabric seat pieces on top of the new fabric and trace with a marker.
The peculiarity of this process is that when cutting the fabric there should be no protruding threads on the sides. Therefore, you need to use either very sharp scissors or an electric knife, which immediately burns the edges of the fabric. You can also try burning the edges with a lighter, but you need to be very careful not to damage the fabric.
Stage No. 3. Connecting elements
All elements obtained in the 2nd stage must be fastened together. This can be done with thread or a glue gun. Some people combine these two methods, first treating the fabric with glue and then stitching it with thread.
When applying glue to fabric, you should be as careful as possible, as it can damage the structure of the future cover. It’s better to take small pieces and check how reliably the glue glues them together.
Everything should be done as carefully as possible, since even a single fold can ruin the upholstery of the entire seat.
Stage No. 4. Replacing gaskets
When replacing gaskets, first of all, you need to ensure that all the space inside the case is filled. If there are empty spaces inside, then such a chair will quickly begin to deform, which means it will become uncomfortable.
As a material, experts recommend using foam rubber with a fabric base. It has excellent compression resistance and also has a long service life.
It is best to glue foam rubber to the inside of the case not with ordinary glue, but with a special one - spray glue. It is applied to foam rubber without damaging its structure.
➤ How to unfold or remove the rear seat on a Granta Liftback
Unlike the “Sport” modification, the seats of the Lada Granta Liftback are not equipped with height adjustment. For a driver of average height this is not significant. But for those who are over 180 cm or under 165 cm, this becomes a problem.
Often, owners independently install seats from Opel, Ford, Mercedes-Benz, Audi in order to increase comfort.
Driver and passenger front seat overview. Adjustment mechanism
The ergonomics of the driver's seat are good, the range of settings for the steering column and seat allows a driver with a height of 180 cm to fit comfortably. However, the longer the distance, the faster fatigue sets in; the right leg increasingly becomes numb from the limited position.
For the first time in the Lada Granta Liftback model, the seat is equipped with lateral support. This was previously installed in the second generation Kalina, Kalina Sport. Scheme for manufacturing the structure:
- metal frame;
- foam pillow;
- back.
The frame is a supporting structure. The backrest and cushion are installed on the movable hinges of the frame. In the Liftback model, the backrest is solid, the height is proportional to the height of 170 cm. There are bolsters on the sides that provide a comfortable seat for the driver and passengers.
The seat elements have a spherical structure: springs covered with special foam and polyurethane are placed on a metal base. The top is covered with upholstery fabric.
Adjusting the front seats of the car
longitudinal: to adjust, pull the lever under the seat up. Move the seat, release the lever.
Note to the driver!!! Do not adjust the seat while the vehicle is moving. Even the slightest jerk with your hand will provoke an accident.
vertical: adjustment using the handle located on the left side of the seat. By rotating your hand, you select the most optimal position for the backrest.
head restraints: by mechanically pressing your finger on the bracket on the right side, set the appropriate height.
It is important to know!!! The natural position of the head restraint is when the upper perimeter is at the level of the driver’s (passenger’s) head. Optionally, the owner can install heated seats on the Grant Liftback. The process is not complicated and will take no more than half an hour
The process is not complicated and will take no more than half an hour
Optionally, the owner can install heated seats on the Grant Liftback. The process is not complicated and will take no more than half an hour.
Rear seat overview. Adjustment
In the back of the Lada Granta Liftback it’s already cramped for three, but there’s plenty of space for two. The sofa is flat, without ergonomics. For tall passengers, long trips will be painful.
Adjustment of the sofa is not provided, unless you move up and down around the perimeter yourself. Don't forget about the restrictions on the back of the seat back and roof lining.
In order to increase safety and reduce the likelihood of injury to passengers, the rear row of seats is equipped with seat belts.
How to fold out the seats in a Grant Liftback
If necessary, the back row folds completely onto the floor, forming a flat platform without steps or bends. Folding the seats is easy: just press the side hinges of the upper backrest. The lower sofa is fixed with metal hinges at the base.
How to remove the rear seat on a Grant Liftback
- Lower the top back.
- Unscrew the rear seat mount - three “13” bolts at the base.
- We remove the lower sofa.
- We take it out of the cabin.
When to think about repairs
The reasons for car seat repair can vary. Restoration may be required after an accident, or the upholstery of the chair will simply tear or become too worn over time.
As soon as sitting in your car becomes uncomfortable, it's time to get ready for seat repairs.
One should not discount the fact that driving in a damaged seat can not only cause unwanted stress on the lower back and spine, but also lead to an accident if the driver, instead of watching the road, pays too much attention to trying to get more comfortable in the seat.
Main types of damage and defects
The most common types of damage to car seats include:
- shabby condition of the upholstery, usually the armrests;
- failures in the base of the structure;
- deformation of the internal seat springs;
- the cushion gasket is sagging;
- the casing is cracking;
- mechanical damage, ruptures, cuts, burns, other results of careless handling;
- damage resulting from the deployment of airbags or seat belt pretensioners.
What repairs should be made depends on what damage needs to be repaired. The necessary tools, as well as materials for repairs, are selected accordingly.
Necessary tools and materials for replacing upholstery and filling
The seat upholstery in the cabin can be made of fabric, Alcantara (an artificial material similar to suede) or leatherette. Working with leather upholstery will be described below.
In addition to new upholstery material and lining foam, you may need:
- chalk or marker for cutting;
- assembly (stationery) knife, sharp scissors;
- a set of needles for hand sewing;
- awl;
- a spool of strong silk (“parachute”) threads;
- pliers;
- screwdrivers;
- portable (car) vacuum cleaner;
- hacksaw;
- hammer;
- glue gun
When selecting a new material for upholstery, a very important role is played by the competent selection of shade, as well as strict adherence to the direction of the pile for fleecy fabrics when cutting.
Restoring cuts on leather seats
If the seats in the car are leather, repairing them can also be done without resorting to expensive workshop services.
Leather chairs are perfectly preserved during temperature changes and high humidity.
, with good care they last a long time, but they have, perhaps, only one significant drawback - they develop tears and cracks when exposed to direct sunlight.
Considering the high cost of the material, complete replacement of the covers in this case is impractical, but the resulting gaps can be patched.
Repairs may require:
- “liquid skin” composition;
- paint matching the tone of the chair upholstery;
- degreaser;
- plastic mesh for patching small holes and cracks;
- thermal powder;
- fine sandpaper;
- small iron.
- Align the edges of the hole to remove any defects around the perimeter.
- Degrease the surface, including intact upholstery leather.
- Sand the edges of the hole with fine sandpaper.
- Cut it out of plastic mesh and install a patch of the required size, 1-1.5 cm larger than the hole.
- Apply thermal powder to the mesh and heat the surface with an iron.
- Level the surface with sandpaper.
- Apply several layers of liquid leather to the mesh, each time waiting until it dries completely.
Removing the console
Now we need to start sequentially disassembling the panel in Kalina into parts. How to disassemble the panel?
- Remove the ashtray: pull it towards you as far as it will go and unscrew the 4 screws that secure it.
- After this you can get to two plugs. They are located on the sides of the emergency lights. Use a flathead screwdriver to pry it off and set it aside.
- We unscrew the screws that are located under the plugs. These fasteners from below hold the console.
- After the two screws are removed, pull the console (shield) towards you, but slowly so as not to break the wiring. We disconnect the wiring, first marking the wires so as not to confuse which is which later.
- Now unscrew the steering wheel cover. It is held in place by 2 bolts, for which a 10mm wrench is useful, and 5 self-tapping screws.
- Next, disconnect the instrument panel cover. There are only 2 screws here.
- The top panel is secured with nuts. There must be at least 7 of them.
That's all the instructions on how to remove the instrument panel in the Lada Kalina.
Tuning the instrument panel is one of the main reasons why a torpedo and its adjacent parts are disassembled. Lada Kalina is not distinguished by its bright design and interesting design. What can you do about it? Install panel lighting.
New Lada: Test LADA Granta Cross: restyling of Kalina Cross
This solution will help improve the visibility of indicators. In addition, the perception of the interior will change. You can also change the panel to another one or repaint its parts. Such tuning of the instrument panel is a radical measure, but absolutely justified. The plastic the panel is made of is simply terrible.
Dismantling the panel is a painstaking task, but the hardest thing is to then put it all together so that the panel does not creak.
You need to fit the parts well and tightly, then no sounds will occur. If you first mark the wiring, then connecting all devices should not be difficult.
Repair of covers with heating system
If the heating system built into the seat cover has become unusable, you can also fix it yourself.
The first thing to do is to use a tester to accurately localize the location of the wire break.
Next, you should connect the broken wires and use a tester to check whether the pulse passes through. The corrected cover is installed back on the seat and the functionality of the system is checked.
In order to restore a presentable appearance to the seats in the car, you need patience and accuracy. In this case, it is quite possible to do without large expenses in a car repair shop.
Video about painting and restoring car seats:
During operation, not only technical parts wear out, but also the interior of the car itself. Most often, car owners have to deal with repairing seat upholstery or replacing covers. Let's figure out how to rehabilitate the seats with your own hands and save not only money, but also time.
If your seats are made of leather , check out our material on professional repair of leather seats in our other material.
Operation algorithm
- The front door seal will need to be bent and pulled towards you very carefully;
- The decorated plastic casing must be removed from the front roof pillar. This is easy to do - just remove the 3 clips that secure the cover;
- Now you will need to find two screws securing the air vent grilles, as well as the trim in front of the glass. The screws are on both sides, and to unscrew them you will need a shaped screwdriver (preferably with a short handle);
- We turn them inside out and take out the ashtray;
- After that, putting your hand under the ashtray, use a screwdriver to pry off the two side plugs. They are located on both sides of the emergency system key;
- This is done due to the fact that under the plugs there are two screws that are responsible for fixing the “beard” from below. We pull the lower part towards ourselves, but very carefully. You will also need to turn off all the chips, not forgetting where they were;
- We also remove the cover on the steering wheel and dashboard. The latter is held by 2 black self-tapping screws;
- We also unscrew the panel from above, using a 10-piece head. The panel is also secured with 7 or 9 screws, depending on the specific machine;
- At the windshield, the heater air duct sits on lock washers. It is better not to remove them, as the plastic rods will simply come off. For this reason, we tear them ourselves, and instead of them we use self-tapping screws during assembly;
- You don’t have to remove the steering wheel at all, although the panel comes out with some effort. But in order to reduce time, you can take such an adventure;
- The time has come to completely remove the torpedo, but we’re in no hurry yet. We carefully check all areas where the screws holding the panel could remain and unscrew them. We pay special attention to the side parts and niches;
- Carefully pull out the torpedo. It will come off easily if there is nothing holding it.
Let us note right away that it is easier to remove the panel through the passenger door. As for the method of draining the coolant and removing the stove, everything is done almost the same, except with some nuances.After soundproofing has been completed, we install the panel in place. Don't forget to first pass the block with wires for the switch. We also insert the glove box light in advance using the appropriate holes.
Thus, the operation can be considered completed. Having learned how to remove a torpedo on Kalina, you can safely take on this work, even without the help of an assistant. On the other hand, an extra pair of hands certainly won't hurt.
When do you need car seat repairs?
The situations and reasons why you have to restore seats in a car can be very different - from physical wear and tear of the device to serious structural damage due to accidents. It should be remembered that using a vehicle even with damaged seats is fraught with dangerous consequences. Aged upholstery or sagging seats can cause maximum inconvenience and discomfort to both passengers and the driver himself.
In addition, the dilapidated upholstery of car seats does not look very aesthetically pleasing. With the help of modern finishing materials, it is quite simple to reconstruct the coating and return it to its previous appearance.
Types of car seat defects
The most common car seat problems are:
- washing armrests, upholstery and pillows;
- failure of gaskets and the base of the car seat structure;
- damage to special springs;
- discoloration of the skin and its cracking due to temperature changes or ultraviolet radiation;
- mechanical defects not related to the operation of the device - burn-through, rupture, broken bases or cuts due to careless handling or exposure to external factors.
- deformation of the seat structure due to the activation of the car safety system as a result of an accident.
The choice of method for solving car seat problems is made taking into account the type and nature of damage. Tools and materials are also determined according to the situation.
Vehicle seat reupholstery
When changing car upholstery, it is important to consider the type of coating and working tools used. The complexity of the process itself and the quality of the final result depend on this. In order for the car interior to look harmonious after reupholstering the seats, the color scheme of the upholstery must be precisely matched to its main shade and not stand out from the overall picture.
Secrets! You can purchase most materials for reupholstery in China on Aliexpress! For example, artificial horse leather https://ali.pub/2jm5ix or alligator leather https://ali.pub/2jm6ii
Material and tools for changing seat upholstery with your own hands
The upholstery for car seats can be made of leather, fabric, leatherette or Alcantara. The latter is a material with short pile, somewhat reminiscent of natural suede. It is necessary to work with Alcantara very carefully, taking into account the direction of the fabric hairs when cutting.
To replace leather coverings, artificial or synthetic leather can be a good alternative to a natural surface. It is more convenient to eliminate defects in velor upholstery or leatherette using special compounds that are available at any auto store.
In addition to the coating material, you must have the following tools available:
- set of hand needles;
- awl;
- chalk or a piece of dry white soap;
- thick silk threads;
- glue;
- hammers;
- keys and nuts with washers;
- cold welding;
- tow strap;
- pliers;
- hacksaw;
- screwdrivers;
- machine vacuum cleaner.
Also, do not forget about foam rubber for lining car seats. All this can be found on the Internet, including on your beloved Ali.
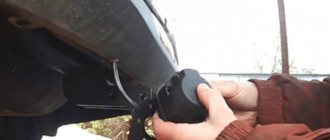
Front seat slides: features of removal and installation
Today I decided to write a short article about replacing the front seat slides, since I found practically no information about this on the Internet, and I think that the material will be useful for many beginners and others. I’ll immediately write about the devices that will be needed for the most convenient dismantling and installation of these mechanisms.
- Large wrench, E10 torx head, extension - this is for removing the seats themselves.
- Head for 8
- Small ratchet and crank
- Extension