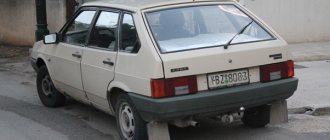
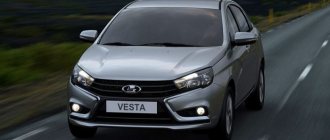
Tow hook for Lada Vesta
Installing a tow bar
A towbar is a towing device installed at the lower rear of a vehicle and designed to tow trailers or other vehicles. This device is selected individually for each car brand. The tow bar on the Lada Vesta can be installed at a gas station or with your own hands, which is a little more complicated.
Functions and types of towbars
The unit is a coupling device installed at the rear of the machine. It is designed for towing a trailer or other vehicles. Another function of a towbar is to protect the vehicle in the event of a rear-end collision.
Tow hooks existing on the market are conventionally divided into two large categories: European and American types.
The most common European towbar design in the post-Soviet space includes a frame and a towbar with a ball joint. Such devices are divided into several types:
- flange type,
- with removable tow hook.
- with rigid fixation,
Installation of a flange towbar (conditionally removable) is carried out on a special platform, screwed or welded to the car frame. The installation location can be set at the factory, making installation easier. Rotation is carried out by two or four bolts. As a rule, it is possible to adjust the height - for this purpose, several ball bearings are provided on the base.
Tow hooks with a rigid (or fixed) type of fastening are characterized by a high degree of strength and reliability, evenly distributing the force on the vehicle frame. Installation of such a towbar is carried out by welding or using bolts on the frame or in factory holes. And after installation, as a rule, they are no longer removed.
The design of the towbar with a removable towbar allows the protruding towbar to be quickly removed from the rear without special tools if necessary. In this regard, they are more practical than stationary ones, but also more expensive.
Standing apart are the American-style tow hooks, which have a slightly different 4-piece design.
- Rigid metal frame installed under the bumper;
- Mounting hole for mounting on the frame;
- The bracket is fixed in the mounting hole using a special stop;
- Ball hinge under the hook, mounted on a bracket.
A significant advantage of American tow hooks is the ability to install the bracket with any increase or decrease, which is convenient when adjusting the car chassis. However, installing this type of towbar on a non-US vehicle can be more challenging.
Law on towbars for passenger cars in 2022
Technical Regulations of the Customs Union 018/2011 “On the safety of wheeled vehicles” is a law that regulates the installation of a coupling unit on passenger vehicles. The need to legalize a trailer hitch depends on the technical characteristics of the vehicle.
If the documentation supplied with the car indicates that the traction device was installed on the vehicle at the factory, then additional registration of the element will not be required. In cases where the production did not provide for the presence of a trailer hitch, and the car owner installed a purchased or homemade hook, it is necessary to register the towbar on the passenger car with the traffic police.
From July 1, 2022, in accordance with the requirements of GOST 33670 “Single motor vehicles. Methods of examination and testing for conformity assessment”, before legalizing tuning in the traffic police, the car will need to be presented for inspection to an accredited organization for laboratory testing.
Previously, it was enough to send the expert photographs of the part of the vehicle to which changes were made. Based on the photographs, a conclusion was issued about whether the work was done well. At the client’s request, the expert could come to the parking lot himself and carry out an assessment. The rules have changed since July 1st. The owner of the car must bring the car for examination himself. However, after making changes, you cannot move on it: this is a violation of traffic rules. Therefore, to carry out the mandatory assessment, they resort to using a tow truck.
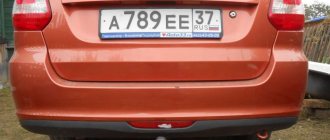
Installing a towbar on a Lada Vesta
The towbar installation process depends entirely on the type of towbar you decide to purchase. In most cases, for installation you need to carefully remove the rear bumper or make small cuts in the bumper, which will not look very nice and attractive.
If you're working on small countertops, installing a towbar means:
- alignment of the holes in the Vesta body with those on the towbar structure;
- assembly of all connections;
- complete or partial disassembly of the car trunk;
- installation and tightening of fasteners.
We strengthen the GPS signal using a repeater: cheap and effective
You can view availability, cost and sign up for installation on the catalog page
If you live in Volgograd, you can contact us. We will help you with the choice and directly with the installation of a trailer hitch suitable for your Vesta or any other vehicle.
Thank you all for your attention and activity on our website!
Subscribe, leave comments, be sure to ask relevant questions and share your opinion with us!
Source
How to choose a device
When choosing a towbar for Vesta (station wagon or sedan), you should proceed from criteria such as the trailer's carrying capacity and the weight of the cargo that is supposed to be transported. For a passenger car with a small-displacement gasoline engine, a tractor weighing 3.5 tons will be a dubious choice - you simply won’t be able to comfortably transport such a trailer and will waste it.
| Situations |
Recommendations
Among other things, it is worth paying attention to the trailer hitch sockets, they are 9 and 13 pins. Accordingly, you need to choose a hitch such that the socket fits into the trailer plug, so that you don’t need to modify it or look for an adapter.
Installation and connection
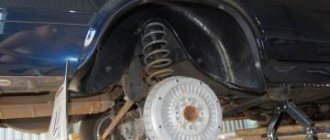
Let's look at the process using the Lada Vesta SW Cross as an example. Installation of the trailer hitch on other Lada Vesta models is carried out in a similar way, with minor nuances. Before installing the towbar, it is recommended to wash the car (especially the wheel arches). First of all, we disassemble the rear bumper in order to install the main part of the power structure under it. Before removing the bumper, it is recommended to record on your mobile phone the sequence of assembling the fender liners and gaps on the body.
Next, you need to remove the plugs for the rear side members and strengthen the power frame.
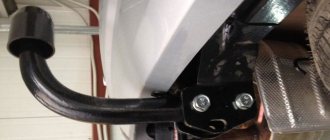
The open holes are where the towbar attaches. Install the tow bar and tighten the bolts. Then you can put the bumper in place. Before doing this, you should check the 3 lower holders located under the fog lights) to make sure it works correctly.
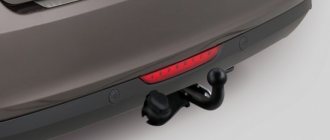
Now you can put the coupling part of the drawbar (hook with a ball) in the appropriate place and secure it with bolts.
During installation, it is recommended to treat the joints with lubricant, which will not only simplify installation, but also facilitate further disassembly. The towbar ball must be lubricated and a protective cap installed to prevent dirt from entering and to prevent contamination of your hands when removing or installing the towbar. The final stage will be the electrical connection. To do this, you need to remove the plastic protection of the trunk threshold and remove the wiring.
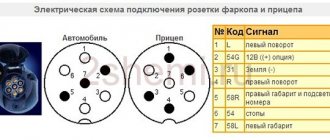
The corresponding block can be installed in the niche of the left headlight behind the trim. This is what the connection diagram looks like.
It’s easy to connect to the rear lights: a red wire with different stripes. We will need 2 sizes, 1 brake light and 2 turn signals. Connecting the flashlight.
With fog lights it's a little more complicated. The location of the corresponding connector is under the left lamp. The required thread is gray. It is necessary to cut it and connect the block as shown in the diagram.
Popular solutions
First, I’ll say a few more words about the installation. Be sure to buy good quality grease, which must be used to treat all joints during installation. This will not only simplify installation, but will also allow you to disassemble the structure in the future without any problems.
Also apply lubricant to the coupling ball, the types of which you can find here. It is better to install a protective cap over the ball treated with lubricant. It will prevent the adhesion of dirt and dust, and will also keep your hands clean when removing and installing the ball for connecting the trailer to the Lada Vesta.
Now regarding specific towbars. In Russia, Vesta owners actively buy products from Leader Plus and Bosal. I do not limit you to these companies at all, but I still advise you to take a closer look at them. Let's look at a few towbars.
- T-VAZ-41A Leader-plus. This is a removable hook that is secured with bolts. A type A ball is used. The hitch does not imply the need to cut out the bumper. Electrics are not included in the kit, but must be purchased separately. The cost of the towbar will be from 3.4 thousand rubles;
- Bosal 1234-A. An excellent trailer hitch with a type A ball. Also, there is no need to cut out the bumper to fit the structure. Includes wiring and socket. This set costs from 3.5 thousand rubles;
- Leader Plus T-VAZ-44A. Suitable for station wagon, bumper trim required. Socket and wires included, but costs about the same
The final choice is yours. Each product has its own article number, according to which you can easily find a suitable option. Search, watch, consult with specialists.
Basic criteria for selecting a part
Towing hook for Lada Vesta There are different types of towing hook for Lada Vesta:
- Trailer couplings equipped with a rigid mount are secured with bolts and a welding machine. Outwardly, they do not look entirely acceptable, but they are suitable for installation if you pay attention to the advantages that are associated with price and functionality.
- Just as reliable as a fixed one, the towbar has a ball joint that can be removed if necessary. Remove the top and the tow bar frame becomes almost invisible. This convenient overview costs a little more than a fixed hitch.
- Experts consider the best option to be a device with a flange. It is already designed for the fact that the car is equipped with prepared seats that provide an even distribution of traction force. If the requested area is not included in the purchased vehicle, then installation of the equipment will not be possible.
- There are four-piece American-style tow hooks on the side. Its metal frame is attached under the bumper, and a bracket is attached to it using a special stop. Installing such accessories can be difficult because the response balls are slightly larger than necessary. Since tow hooks are designed for American niche vehicles, the seats may also not be suitable for installation and adjustment.
Design options
At the moment, the selection of towbars for SV Cross is small. They are conventionally divided into two groups:
- removable – can be removed if not needed, which will not affect the appearance of the car;
- non-removable – they are rigidly mounted to the body and remain on it permanently.
Since this car model is quite new, there are still few manufacturers of this part, since companies have not yet managed to implement a full-fledged production of components and parts for Vesta.
You can purchase the original device from official AVTOVAZ dealers. There, the cost of a tow bar is approximately 7-7.5 thousand rubles. In addition to the original, it offers its own analogue - a removable tow bar, the price of which is about 3-3.5 thousand rubles. Among the major manufacturers, the Russian company AvtoS began producing designs for Vesta SW. The model has already gone into production, but the price needs to be clarified with the distributors. There are also several foreign companies that have already partially launched the production of components for this car.
The following structural models can be installed on Vesta:
- A flange-type device is considered the best option for Vesta, but only if there is a special seat for uniform traction force and load distribution.
- Models with rigid fixation cost less and are easy to install and functional. But they have an unaesthetic appearance, and fastening occurs using bolts or welding.
- Removable hitch ball devices have a removable top and are virtually invisible. The model is stable and reliable, but costs much more than other analogues.
- You can also find American-type towbars on the market, but they are rarely chosen. This is due to installation difficulties, the dimensions of the ball are slightly different, there is a difference in the seat, and the socket does not match.
Many experts recommend installing removable models. Even though they are the most expensive, they can always be removed so as not to spoil the appearance of the car. But most drivers are not particularly concerned about the presence of a constantly peeking towbar.
Required
Tow hitch
(original catalog numbers):
- Lada Vesta sedan (article 99999218007282), price about 6800 rubles;
- Lada XRAY (article 99999215007216), price about 5,000 rubles.
- Lada Vesta SW / SW Cross (article 99999218107282), price about 7,000 rubles;
A non-original towbar can be found at a price of 2,200 rubles.
Control unit (coordination)
:
- 99999215007182, price about 2900 rubles.
This unit is required to connect the towbar to the vehicle and is designed to coordinate the towbar's electrical system and the on-board computer. Instead, a matching block of five relays can be assembled (see below).
Connection
one.
The device is supplied with an electrical diagram of the towbar control unit (universal module or smart connect:
2.
The interface unit can be made independently on the basis of traditional 4-pin relays:
Almost all the contacts necessary for connection are located in the rear light area (see Electrical diagrams of Lada Vesta and Lada XRAY, or use a multimeter). It is also enough to pull the battery cable through the fuse on the left side (author of the photo).
ps see other photo reports on installing and connecting the towbar in the comments.
Let us remind you that we previously told you how to make an organizer for the trunk of Lada Vesta and Lada XRAY yourself.