It's no secret that the usual procedure for starting a car is being replaced by new, more advanced methods. This trend is observed everywhere and, according to many leading auto analysts, will soon find its application in all modern cars. As you may have guessed, this article will focus on the so-called “start-stop” option.
It is worth noting that at the moment such modification is found only on a limited number of cars of foreign brands, and there is no need to talk about the domestic automobile industry. Nevertheless, anyone can equip their car with such a device at any specialized car service center.
On the other hand, you can install the presented equipment yourself, without involving outside help, by adopting some rules and recommendations. Let's try to cover them in detail in this article.
Will installing a “Start Stop” button instead of the ignition switch protect your car from theft?
Some drivers believe that installing a Start/Stop button makes the car vulnerable to car theft. This is not true: you can install it, and it is safe. Almost all modern cars have contactless key fobs. If we assume that the attacker somehow opened the car door, but he did not use the “original” key, the button will not allow the engine to start. This most likely will not help protect your car from professional car thieves, because they use repeaters to intercept the radio signal from the car's control panel. One of these devices is called “Volna”, it can be bought on the Internet.
But you can protect yourself from theft. You should not store the key fob near windows and entrance doors so that criminals do not have the opportunity to intercept the outgoing signal. Try to keep it in a thick-walled box or Faraday bag. Can be wrapped in foil.
The presence of a Start / Stop key is, first of all, comfort and reduces the time spent on starting the engine. This is very important, because we are constantly in a hurry. To install a button using a simple diagram, you do not need deep knowledge of electrical engineering. The most important thing here is not to mix up the wires. If there is a button, the process of starting the engine becomes comfortable. There is no need to insert the key into the lock (which is very inconvenient to do in the dark). Also, the lock itself sometimes jams.
The button is especially convenient to start the engine when in a hurry. Beginners who have not yet developed the skills of “blind” control begin to get nervous and perform unnecessary actions. This can lead to the car not moving when the traffic light turns green.
Why is this necessary?
The reasons can be very diverse:
- changed (simplified) engine starting process;
- reducing the number of items in pockets;
- the desire to stand out and many others.
It is best to leave aside attempts to figure out why such a desire arises and understand how to install a button to start the engine (in further text it may be referred to as Start-Stop Engine or abbreviated SSE).
What do you need for installation?
The connection diagram for the Start Stop button may involve the use of an ignition key. In this case, it will be possible to start the Engine only after turning it. There are modifications that do not require a key - the engine starts after pressing a key. This option is less secure - the car becomes easier prey for attackers.
There are schemes in which the keys respond to short and long presses. A short press (a couple of seconds) and the starter will turn off after making a few revolutions. When pressed long, the starter will rotate until the engine starts completely.
In some circuits, the ignition is activated after pressing the key, but slightly before the starter. There are also combinations of the described methods.
Tools and Supplies
When connecting the Start Stop button, you will need the following tools:
- start-brake unit;
- special relays (3 pieces), each with 4 contacts;
- relay (1 piece), with 5 contacts;
- fog lamp relay;
- wiring kit;
- terminal set;
- pliers or pliers (crimping is worse when using pliers).
Connection diagram
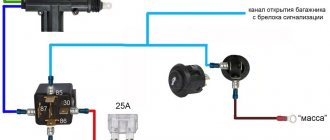
Here we are talking about the simplest version of the circuit, which can be installed in half an hour. We connect the relay with a brown wire to a 12-volt battery (positive terminal). We also supply the enabling signal + there. The general negative signal is output to ground. Make sure the contact is secure. We connect the working contacts of the load relay to 12V (blue wire). We connect the negative control signal to the Start & Stop key. We leave the enabling signal + unused.
Advantages and disadvantages of the device
First, we list the advantages of the “start/stop” mechanism:
- The driver no longer needs to use the ignition key every time he needs to start the engine. All it takes is a simple click;
- you can mount the “start/stop” anywhere. This means the car will become a little more comfortable;
- there are special schemes in which the start/stop button is connected to the immobilizer or alarm system, which is an additional security measure that prevents car theft;
The start/stop button can be linked to your car's alarm or immobilizer
But there were some downsides too:
- To start the engine, the driver must sit in the car and press the brakes. Getting used to this feature of starting the engine can be difficult, especially for novice car enthusiasts;
- if the driver decides to install an alarm with an auto-start function on a car with a button (to warm up the car in winter, for example), then problems may arise with this, which, fortunately, can be solved. The driver will just need to have a couple of key fobs with him. One of them will have to be given to alarm installers so that they can disassemble it, take out the microcircuit and put it in the car. After this, the current will be supplied only at the moment the engine starts. But for all this, the car owner will have to seriously pay extra to the craftsmen;
- If a button is already installed on the car, but there is no alarm yet, then installing it will cost the driver more, sometimes twice as much.
How to connect the “Start Stop” button: step-by-step instructions
The “principle of different colors” of wires remains the same for any system connection scheme.
Pay attention to the yellow wires. Many kits have 3 yellow wires. You will not confuse anything if you remember the following: the thin yellow cable, which is located on the harness, controls the brake system. The remaining cables are connected to the ignition system. The system may contain a purple wire - these are directly related to starting the engine.
It is no coincidence that the conversation turned to the color scheme of the wires. To avoid hassle, car enthusiasts purchase ready-made systems that come with detailed connection diagrams with detailed explanations of where each wire should go. Manufacturers produce kits with wires of the same color.
The Start Stop button instead of the ignition switch is mounted as follows:
- Dismantle the ignition switch, having first removed the cylinder.
- Each electrical wire emanating from the lock is carefully cut off.
- Using electrical tape, we connect the wires going to the ignition box into one bundle, then we bring them to the button (see the connection diagram).
The stop-start key is now connected. It can be mounted on the control panel or in another place convenient for the driver in the cabin.
If you think you can install the system yourself, it’s worth a try. But it’s still better if this work is done by professionals, since an incorrectly installed key will have to be changed.
Installation recommendations
Before starting work, you should take preparatory measures. A lot depends on what kind of machine you are dealing with. Some people remove the car ignition switch itself by installing a simple key in its place. In other situations, a hole is made to size, allowing access to the wiring and allowing connection to the electrical circuit.
To work you will need a set of tools and some materials, consisting of:
Cars
Instructions for installing the Start-Stop button (Start engine) on a BMW E36.
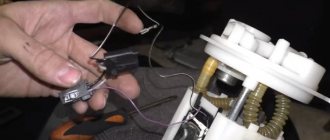
After the ignition switch started sticking on the E36, the idea of installing a Start engine button came up. The button was ordered here, at that time for 1378 rubles, the parcel arrived on the eighth day.
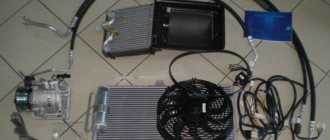
Inside the box there was everything necessary for connection and installation: a button with wires, a control unit, wiring, two immobilizer key fobs, an RFID ring-reader, a connection diagram.
First I put everything in its place. I placed the ring under the center console near the ashtray.
So that you can simply put your keys with the key fob in this pocket.
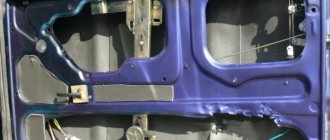
The control unit was attached with plastic clamps to a pipe under the dashboard on the driver's side.
At first I wanted to install the button instead of the cigarette lighter, but it turned out to be larger than I thought. The only suitable place for her is here.
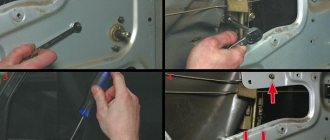
To install the button you need to bend the metal ears
and insert the button into the drilled hole, press it firmly and then bend the tabs on the back of the panel.
Advantages and disadvantages
Initially, it seems that the button has a number of advantages. After all, the driver just needs to press it and the car will start. There is no need to turn the key.
But don't rush to conclusions. Also, don’t rush to Aliexpress for a new button. Even though the price of such devices is insignificant, I first advise you to study the strengths and weaknesses of such a step. Let's start with the advantages, which include the following:
- There is no need to use a key every time you want to start a car engine;
- The button launch scheme is extremely simple;
- Installation is possible on many cars;
- The level of comfort increases;
- Start-Stop can be linked quite effectively to the alarm and immobilizer;
- The price of the button is low;
- Many drivers can install the system themselves, relying on instructions and video lessons;
- The work takes no more than a few hours.
Everything looks very rosy and promising. But take your time. There are pitfalls here.
The driver will have to press the brake to start. Not the most familiar scheme, which will take some getting used to. There are also difficulties in installing an alarm system with an autostart system, where the engine start button is located.
Installing the engine start/stop button (ready kit)
The easiest option to start the engine with a button is to buy a kit, which in a Chinese store is called something like this: “push start button start/stop car engine function working with car alarm system and remote central lock blue color back light.” Judging by the name of the product, the button and control unit can be connected to the alarm.
The most popular among car enthusiasts is the scheme where the engine starts with a button while the brake pedal is pressed. All presses are short, that is, you do not need to hold it for the starter to operate. This is exactly the algorithm we get:
- One press - ACC mode;
- second press - ignition is on;
- third press - ignition is turned off;
- To start the engine, you need to press the brake pedal and briefly press the start/stop button (if it doesn’t start well, you can press and hold the button, then the starter will work).
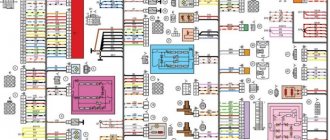
Universal connection diagram for the start/stop button included in the kit:
Now you can only carry the alarm key fob in your pocket.
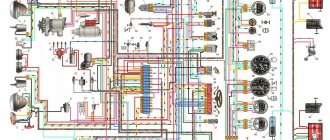
Starter circuit for VAZ 2110, 2111, 2112
Starters of type 57.3708 were installed on VAZ-2110 cars and had the following technical characteristics:
- Rated power 1.55 kW
- Current consumption at maximum power no more than 375 Amperes
- Current consumption in the inhibited state is no more than 700 Amperes
- Current consumption in idle mode no more than 80 Amperes
The connection diagram for the starter for the ten is shown above, here is its explanation:
- battery
- generator
- the starter itself
- egnition lock
| 1 – drive shaft; | 20 – contact bolts; |
| 2 – front cover bushing; | 21 – output of “positive” brushes; |
| 3 – restrictive ring; | 22 – bracket; |
| 4 – gear with the inner ring of the overrunning clutch; | 23 – brush holder; |
| 5 – overrunning clutch roller; | 24 – “positive” brush; |
| 6 – drive shaft support with liner; | 25 – armature shaft; |
| 7 – planetary gear axis; | 26 – tie rod; |
| 8 – gasket; | 27 – back cover with bushing; |
| 9 – lever bracket; | 28 – collector; |
| 10 – drive lever; | 29 – body; |
| 11 – front cover; | 30 – permanent magnet; |
| 12 – relay anchor; | 31 – armature core; |
| 13 – holding winding; | 32 – armature shaft support with liner; |
| 14 – retractor winding; | 33 – planetary gear; |
| 15 – traction relay; | 34 – central (drive) gear; |
| 16 – traction relay rod; | 35 – carrier; |
| 17 – traction relay core; | 36 – gear with internal teeth; |
| 18 – contact plate; | 37 – layering ring; |
| 19 – traction relay cover; | 38 – hub with the outer ring of the overrunning clutch. |
Combined modification option
As practice shows, a combined conversion scheme can be implemented even by a novice motorist who is at least a little familiar with the electrical structure of his vehicle. To do this you will need to acquire the following components:
- ZPTF relay;
- 4-pin relay;
- 5-pin relay;
- engine start and stop button;
- diodes and terminals.
Having prepared everything you need, including tools (nippers, pliers, insulating tape), you should connect the contacts according to the diagram with further installation of the diode, which can be installed almost anywhere.