The generator belt tensioner roller (hereinafter referred to as NR) on the Lada Grant is installed exclusively in the “Lux” configuration with a 16-valve engine. Budget 8-valve versions of Lada Granta: “Norma” and “Standard” do not have a roller in the standard design.
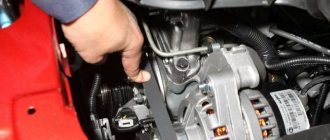
Violation of the belt tension moment leads to its breakage. Many car owners determine the tension “by eye,” which in most cases is incorrect.
In service stations, special devices are used for these purposes, for example, a multimeter. Which allows you to adjust the tension using the voltage indication at the “output” from the battery.
In order to prevent belt breaks and deformation, many motorists install a tension roller. The same one that is built into the “Lux” package by default.
Let’s look at how to do this on budget Lada Granta models and what is needed for this in detail using the example of the Lada Granta “Norma” and “Standard”.
New video
Photo 789
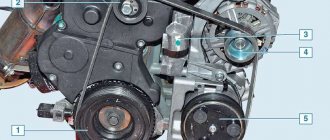
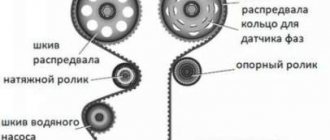
Diagram of the drive of auxiliary units: 1 - drive pulley of the auxiliary units;
2 — tensioner roller; 3 — tension device; 4 — generator pulley; 5 — air conditioning compressor clutch pulley; 6 — auxiliary drive belt; 7 — bracket for the right support of the power unit. Diagram of the drive of auxiliary units: 1 — drive pulley of the auxiliary units; 2 — tensioner roller; 3 — tension device; 4 — generator pulley; 5 — air conditioning compressor clutch pulley; 6 — auxiliary drive belt; 7 — bracket for the right support of the power unit
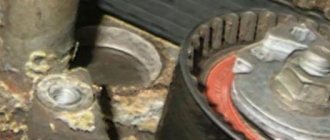
Where is the roller tensioner located on the Lada Grant?
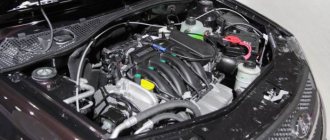
In the Lada Granta “Lux” modification, as well as the customized “Norma” and “Standard” versions, the roller tensioner (hereinafter referred to as NR) is installed at the end of the engine in the lower part. The location of the alternator belt pulley on the Lada Granta with air conditioning is identical.
Snapshot53252323
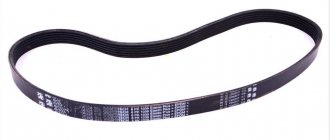
Marking of the drive belt for auxiliary units 6РК 995 (six-V-ribbed, length - 995 mm).
Marking of the drive belt for auxiliary units 6РК 995 (six-V-ribbed, length - 995 mm).
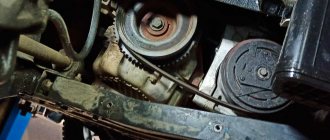
In order to improve visual control, remove the plastic engine casing. To check the condition of the belt, engage fifth gear in a manual transmission, push the car (or rotate the suspended wheel) and inspect the belt along its entire length. On a car with an automatic transmission, remove the right mudguard of the engine compartment and, by rotating the crankshaft by the bolt of the auxiliary drive pulley, check the condition of the belt.
With any of the gearboxes, the following method is also possible: apply chalk marks to sections of the belt and, turning on the starter for short periods of time, turn the crankshaft at small angles. We inspect the belt along its entire length, checking the areas covered by the marks.
The belt should not have cracks, tears or separation of rubber from the fabric base. A defective belt must be replaced. To do this, from the engine compartment side...
2302-6-01-03_cr
Holding the nut, rotate the lead screw clockwise, loosening the belt tension.
Holding the nut, rotate the lead screw clockwise, loosening the belt tension.
So far, we have shown operations that will allow, if necessary, to change the tension of the accessory drive belt. But to replace the belt, we have to dismantle the right support of the power unit, since it passes through the belt.
From the bottom of the car, remove the middle and right mudguards of the engine compartment. You can see how to do this in the article “Replacing Lada Granta coolant”. Next, we should remove the fender liner of the right front wheel or, having freed all the fastenings of the fender liner in the front and middle parts, bend the fender liner by the brake disc of the wheel.
We hang and remove the right front wheel and release the fender liner fastenings according to the diagram.
Checking and prevention
to prevent generator belt . You should make it a rule to check the belt tension before starting your journey. It should not sag or be overtightened. When you press the belt with your finger, it should press down a little, and when you try to turn it over, it should turn onto its edge without effort.
It should not be bent, its teeth should be intact. You need to inspect the seals. Leaking oil negatively affects the wear resistance of rubber. Granta users will have to listen carefully so as not to miss the moment when the alternator belt needs to be replaced. You can determine that the alternator belt will soon break: in wet weather or on a cold engine, it begins to whistle.
Lada kalina (Lada Kalina) replacing the generator roller, removing the Kalina generator belt
Lada Kalina (lada kalina) alternator belt
,
generator roller replacement
,
generator roller
, outsiders.
Tensioner for Lada Granta alternator belt
Catalog number 21230-1041056-11.
If the problem begins to appear in the middle of the journey and there is no opportunity to go to a service station, you need to check the condition of the belt tension. Most likely, the belt can be tightened a little and movement can be resumed. After this, it is necessary to replace it. Additional signals regarding an impending problem will include:
- dim light from headlights and dashboard;
- The interior heating is unstable;
- the sound of car horns has become lower;
- The turn signal and windshield wiper operating intervals have increased.
Take off777777777ok
Mounting points for the mudguard and fender liner: 1 — screw with a Torx T-27 key for general fastening of the mudguard and fender liner to the wheel arch;
2 — two Torx T-20 screws for general fastening of the mudguard and fender liner to the wheel arch and fender; 3 - Torx T-20 key screw for fastening the fender liner to the wing; 4 — four self-tapping screws “8” for fastening the fender liner to the wheel arch; 5 - four Torx T-20 screws for fastening the fender liner to the front bumper. Mounting points for the mudguard and fender liner: 1 — screw with a Torx T-27 key for general fastening of the mudguard and fender liner to the wheel arch; 2 — two Torx T-20 screws for general fastening of the mudguard and fender liner to the wheel arch and fender; 3 - Torx T-20 key screw for fastening the fender liner to the wing; 4 — four self-tapping screws “8” for fastening the fender liner to the wheel arch; 5 - four Torx T-20 screws for fastening the fender liner to the front bumper.
We install a height-adjustable stop under the engine oil pan so that it takes on the weight of the engine.
Addresses of companies providing roller replacement services
| № | Name | Address |
| 1. | Auto center service | Saint Petersburg, st. Siqueiros, 14 +7 +7 +7 |
| 2. | Body section | Saint Petersburg, st. Mineralnaya, 30A +7 +7 +7 |
| 3. | Car service | Saint Petersburg, st. Yesenina, 19 +7 |
| 4. | Auto service "Yan-Motors" | St. Petersburg, Sofiyskaya street, 8Bk1 daily from 10 to 20. |
| 5. | Car service station "STO Remzona Kupchino" | St. Petersburg, Sofiyskaya street, 63 daily from 10 to 21. |
| 6. | Auto service station "Remzona Nevsky" | St. Petersburg, Telman street, 27 daily from 10 to 21. |
With him
Using the E-14 head, unscrew the two screws securing the support to the engine cylinder block bracket.
Using a 17mm socket, unscrew the two nuts and the bolt securing the support to the body side member (shown by arrows). Using the E-14 head, unscrew the two screws securing the support to the engine cylinder block bracket. Using a 17mm socket, unscrew the two nuts and the bolt securing the support to the body side member (shown by arrows).
Procedure for independently replacing the alternator belt roller on a Lada Grant
Necessary tools, materials:
- set of car keys, sockets, ratchet;
- rags, liquid WD – 40;
- new HP;
- graphite-based lubricant;
- additional lighting.
We begin work after the engine has cooled down, the temperature is safe, which eliminates burns and injuries.
Replacement sequence:
- We place the car on a flat platform, maybe an inspection hole.
- We open the hood, “reset” the battery terminals to avoid a short circuit in the circuit.
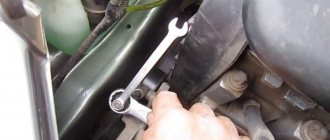
- Using a key set to “13”, loosen the tensioner locknut, pry it off, and remove the generator belt.
Link by topic:
Features of replacing the thermostat on the Lada Granta 8-valve
Removing the belt
Loosen the locknut
- Using a “10” socket, unscrew the three screws and remove the HP mount assembly.
Note to the driver!!! Not all motorists and mechanics agree with the above method, as they consider it labor-intensive. Instead, unscrew the central nut - the roller lock.
In part, the above method is less expensive, however, the fact that the fastening may be damaged or deformed is not taken into account. In this case, it must be replaced.
Removing the HP mount
- We remove the HP assembly, carry out troubleshooting, inspect the mounting location and roller bearings.
At this stage, it is important to identify possible damage to the fastening. If there are any, then the part must be replaced, otherwise we install only a new roller with a rolling bearing inside.
- We install and screw the HP assembly, put on the belt, and adjust the degree of tension.
- We start the engine and check that the mechanism is working properly.
2302-3-2-13-05 (Copy)
The belt deflection in the area between the pulleys of the engine and the air conditioning compressor with an applied force of 100 N (10 kgf) should be within 6–7 mm.
The belt deflection in the area between the pulleys of the engine and the air conditioning compressor with an applied force of 100 N (10 kgf) should be within 6–7 mm.
Attention! Do not overtighten the belt. Excessive belt tension causes premature wear of the alternator belt and bearings.
Next, assembly is carried out in reverse order.
However, please note that...
Let's summarize
To work with the generator and to replace the belt you need:
- set of spanners, Torx t20 and 27, ratchet with heads or wrench, knife;
- if there is no tensioner, you can assemble and install it;
- if there is no air conditioner, replacement is easiest;
- is there air conditioning? To work, you need a pit or a lift with dismantling the engine support;
- They change consumables every 30 thousand mileage according to regulations.
Write comments and share your experience.
VAZ 2190 was launched on sale in 2011. The car is a budget version of the Lada Kalina with a larger trunk and a more modern generator mechanism. The mechanism for adjusting the alternator belt tensioner that is missing in the Lada Granta is its feature, unlike other models. The economy class model was designed to replace its outdated predecessors, whose production at AvtoVAZ had already ceased.
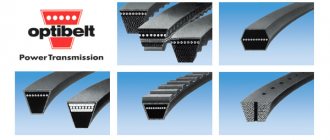
Granta generally appealed to its target audience. The low price of the car helped her gain leniency in the quality complaints that accompany AvtoVAZ products. Like any car produced by this concern, it has a number of disadvantages. The Lada Granta alternator belt is also accompanied by stable problems. The supplier of belts for it is Gates. In relation to Grants, their recommended service life is equal to the warranty period of the car.
However, as the experience of car owners has shown, closer to 5,000 km, a characteristic sound is heard, signaling that the alternator belt has broken, unable to withstand too much tension. Despite the fact that the generator belt is provided with an automatic tensioner, in practice it is often in an overtightened state, which leads to rapid rupture. The case is recognized under warranty without any problems; the alternator belt is replaced, but with significant time costs.
Those for whom it is not important to replace consumables under warranty make the replacement themselves. This is, of course, faster, but you still need to spend time buying a belt and installing it.
Sn323
The upper screw securing the support to the bracket is shorter than the lower one - do not mix it up during assembly.
The upper screw securing the support to the bracket is shorter than the lower one - do not mix it up during assembly.
[14 Lada Granta maintenance operations that will help you save]
[How to save money on scheduled maintenance of Lada Granta] [Maintenance of Lada Granta at 2.5 thousand km] [Maintenance of Lada Granta at 15,000 and 105,000 km] [Maintenance of Lada Granta at 30,000 and 60,000 km ] [Maintenance of Lada Granta at 45 thousand km] [Maintenance of Lada Granta at 75 thousand km] [Maintenance of Lada Granta at 90 thousand km] [Carrying out maintenance yourself - general recommendations] [Safety rules for doing it yourself carrying out maintenance] [Tools required for maintenance of Lada Granta] [Lamps used in the Lada Granta car]
Lada Granta and Kalina: checking and replacing the auxiliary drive belt
Review of Manufacturer Prices
Technical parameters of the roller:
- hole diameter for nut - 10 mm;
- width - 27 mm;
- height - 55 mm.
Related link:
How to buy a Lada Granta on credit
| Manufacturer | Price, rub.) | Resource (thousand km) |
| 1118-104102013 original Lada Granta | From 520 | 25 – 30 |
| GATES T42042 | From 450 | —/— |
| GATES T43228 | —/— | —/— |
| GATES T43147 | —/— | —/— |
| LYNXauto PB-1027 | From 480 | —/— |
| LYNXauto PB-1029 | —/— | —/— |
*prices are current as of October 26, 2018.
Cost of purchasing components separately:
- video: 450 – 500 rub.;
- belt: from 300 rub.;
- bracket: 430 RUR;
- axle: 85 RUR;
- tensioner: 380 – 400 rub.;
- studs, bushings: 300;
- bracket - adapter for generator: 2200 rub.
Total: 3800 - 4000 rubles.