The suspension parts of the LADA “Kalina” wear out when driving on uneven roads and require periodic replacement. The Kalina anti-roll bar is a strong and durable part that requires replacement only as a result of an accident. The repair of this unit consists of replacing the bushings, the rubber of which does not withstand long-term use on our roads.
Important points
It should be noted that all of the above signs of rack malfunction should be considered indirect. The fact is that in a garage it is extremely difficult to diagnose this malfunction with one hundred percent accuracy. For accurate diagnostics, the best option would be to drive the car onto a special stand that simulates the movement of a car over very rough terrain. This device takes a lot of readings, including providing accurate information about the condition of the racks. There is only one problem: not all car owners have access to such equipment. So you have to visually evaluate the struts for oil leaks and carefully listen to the sounds of the front suspension while driving. If it is known for sure that all suspension components are in good working order, but it still knocks when driving, we can assume that it is the strut that is faulty.
Before starting any repairs, you should perform a couple of simple tests. You need to find a wide, flat place, accelerate to a certain speed, enter a skid and evaluate how the car behaves. Brake at the same speed and then measure the braking distance. After replacing the racks, these procedures must be carried out again, at the same speed. This will give you an idea of how the car's handling has changed and how effective the repair was overall.
New struts must be given the opportunity to get used to the rest of the suspension parts
This means that you need to drive extremely carefully for 2-3 weeks after replacing them, especially on rough roads. If possible, you should avoid “ridges” on the roads, and if this cannot be done, you should reduce your speed to a minimum when driving through such areas. In addition, you should in every possible way avoid skidding when entering a turn and sharp braking - this can also greatly harm the new struts
In addition, you should in every possible way avoid skidding when entering a turn and sharp braking - this can also greatly harm the new struts.
As you can see from the article, even a novice car enthusiast can replace the struts. And the main difficulty comes down not to replacing these components, but to understanding that it is they who need to be changed. And if the car owner does not have access to a normal test bench, he has only one thing left: to act by elimination. If all the suspension components are new, but there are still problems, only the strut may be to blame. In this case, you should be patient and use the recommendations outlined above.
https://youtube.com/watch?v=gS1brgDQlSk
Sources
- https://expertvaz.ru/2110/zamena-perednih-stoek.html
- https://motorltd.ru/samostoyatelnaya-zamena-perednih-stoek-na-vaz/
Front suspension springs
Factory springs do not cause as many complaints from car owners as Kalina's front struts, however, modification of the standard equipment in this case can also help improve the car's handling and optimize the performance of the suspension. To achieve this, in some cases it is possible to install shortened versions of springs, which allow achieving tangible results. According to the developers, the maximum level of understatement for Kalina is -30 mm, which is quite enough.
Along with the springs themselves, the buyer receives a 4-year warranty and detailed instructions for carrying out independent installation work.
Originals, analogues, article number, price of stabilizer strut for VAZ 2110
Technical data: length 110 x width 32 mm.
Stand structure: base, metal tip, rubber boot, lock ring. Nuts and washers are not supplied, the owner must purchase them separately. Thread pitch 1.25, diameter 8.0, length 60.0 mm.
| vendor code | Price, rub.) | vendor code | Price, rub.) |
| Original front | |||
| VAZ-2110 assembled kit 2110-2906050 | From 320 | VAZ-2110 2110-2906050SS | From 320 |
| 2110-2906050 | —/— | 2110-2906055 | —/— |
| Front analogues | |||
| SIDEM 19169 | From 300 – 350 | MOOG LALS10573 | From 300 – 350 |
| SS40106 | —/— | SS40102 | —/— |
| SLST-104 | —/— | SS20-10-29060 | —/— |
Before purchasing consumables, be sure to check the compatibility of the catalog items specified in the operating instructions.
Analogs
You can save on consumables by purchasing non-original parts. They may be a little more expensive, but the quality will be much better than the factory ones. The following options for replacing front struts are in greatest demand among experienced drivers:
| Company name | vendor code | Price, rub.) |
| KYB | 343357 | 2000 |
| Monroe | D0309 | 3750 |
| Mando | EX546512S000 | 3450 |
| Tokiko | B3086 | 3360 |
| Fenox | A51121 | 3100 |
As you can see from the table, the price range is large. You should not think that similar options will fail faster - the reason for the low price is that they are produced by little-known brands. In general, all offered auto parts have decent, proven quality.
The situation is the same with the rear struts. It is advisable to order front and rear struts from the same manufacturer to minimize risks. It is also strictly forbidden to change only one rack, or use the right and left racks from different companies.
Models most suitable for Lada:
| Company name | vendor code | Price, rub.) |
| LYNXauto | O12426LR | 1500 |
| Maxtrac | MCD0556R | 4010 |
| ZF Sachs | 314048 | 3980 |
| TiGuar | 9701423-GT | 1770 |
| Monroe | 26529 | 2500 |
Of course, even parts from little-known companies can be counterfeited by Asian manufacturers. The safety rules when choosing are still the same - carefully examine the packaging and compare it with the original one. Check that the parts are in excellent condition - without visible external defects such as paint chips, cracks, scratches, or various damages.
The process of removing the starter and installing a new element
Starter removal process:
- Place the car on the inspection pit. If this is not possible, use an overpass or just a good jack.
- Lift one side, remove the wheel, remove the boot or crankcase guard (if equipped).
- The next step is to unscrew the top nut that secures the starter. This can be done both from the engine compartment and from under the car - whatever is convenient. Additionally, unscrew the nut that secures the terminal to the solenoid relay. Remove it so it doesn't interfere.
- Disconnect the nearby wire going to the starter.
- The final step is to unscrew the nut, which secures the part from below.
- Now you can pull the element out of the clutch housing.
Checking starter malfunction:
- Take a flathead screwdriver and try to move the coupling forward/backward along the shaft. It should spin easily and not hit anything.
- Use a screwdriver to turn the gear. If everything is spinning in the same direction, everything is fine. If the scrolling goes in the opposite direction, the part will need repair.
- Checking the retractor relay is carried out using two wires with “crocodiles” for convenience. Place the red one on the positive terminal of the battery, and place the other end on the control terminal of the relay. Use the negative conductor to connect the negative battery and the starter housing. After such actions, a click will appear and the clutch will come forward. After disconnecting the wires, the coupling will return.
- The final stage of the test is to disconnect the wire from the control terminal of the traction relay. Connect the crocodile clips in exactly the same way. When voltage is applied, the starter armature should spin at a frequency of more than 5 thousand revolutions per minute. If everything is so, the element is working.
Installing a new starter is carried out in the reverse order of removal. If you do not want to completely change the part in question, but want to repair it, then we recommend that you familiarize yourself with the relevant information. We do not recommend that you do everything yourself without knowledge of the entire process. In this case, it is better to contact a service station.
To summarize, we note that the starter on the VAZ-2110, as on other cars, is a very important unit, the failure of which is a rather unpleasant situation. In the article we examined the main points for dismantling the old part and installing a new element. Carrying out the work should not cause any difficulties. It is enough to use the recommendations from the article to successfully repair your car.
Guys, tell me if the egg stabilizer stands are suitable for the VAZ grant
Hi all. Guys, tell me if the stabilizer struts (eggs) are suitable for the grant from the VAZ 2110 or 2108? I looked in the store and there was a small hole for the stabilizer itself.
Similar articles
16 comments on “Guys, tell me if the egg stabilizer stands are suitable for the grant from VAZ”
They set it to eight, they barely pulled it, both broke after 3 months, they installed the original ones, and everything has been fine since November.
Elena, thank you. I will look for ss20 or original grant ones.
Elena, the knocking noise comes precisely from the stabilizer struts when it’s finished.
Konstantin, yes, they were the ones that were knocking, the rubber bands dried out after 2 years of driving, and the replacement ones broke in half
Elena, what changers. The new ones I installed broke on accident.
Konstantin, yes, the metal burst, they were not original, they were figure eight, they were very tight to put on
Maintenance and replacement of racks
The frequency of inspection and replacement of shock absorbers is determined by the maintenance instructions. However, the state of domestic roads and neglect of vehicle loading standards lead to accelerated wear of these elements.
Why the suspension rattles and the car is poorly controlled: signs of wear
- The car bounces on uneven surfaces, body vibrations are not damped.
- Severe washboard road vibration.
- On bumps, the movement of the suspension is transmitted to the steering wheel.
- The braking distance is increased with a working brake system.
- When entering a turn at a safe speed, the car drifts or skids (depending on whether the front or rear struts are out of order).
- Characteristic knocking noises in the suspension when the stabilizer struts are in good working order. The part may also rattle.
- Unstable behavior of the car on a straight road.
In addition, the condition of the shock absorbers can be checked visually.
Faulty struts have oil stains.
When do you need to change struts on a car and why?
First of all, a shock absorber (shock absorber strut or telescopic strut) is necessary in order to press the wheels as tightly as possible to the road when driving over uneven surfaces, and also to effectively absorb shocks, shocks, dampen vibrations, etc.
Naturally, when subjected to constant loads, shock absorbers inevitably fail. If you add to this the poor condition of the road surface, replacing struts can become a fairly frequent procedure.
As for VAZ owners, the racks on the Lada Kalina were no exception. In practice, this car has oil shock absorbers from the factory. To put it simply, the Kalina front strut is a solution where oil is pumped in as a working damper.
Let's also add that gas shock absorbers have gas instead of oil. Of course, it is impossible to notice an oil leak, since it is not there and the racks will always be dry. There are also so-called gas-oil struts, which have both gas and oil inside.
One way or another, regardless of the type of shock absorbers, if they malfunction, you can notice that the car holds the road worse, a buildup has appeared, and the body tilts in corners. Also, when driving over uneven surfaces, you can hear the pillar knocking; all road defects are transmitted to the body, etc.
To quickly determine the complete failure of the rack, just press on the body in the part where it is installed. If the car rocks more than once, the struts need to be replaced.
It is important to take into account that shock absorbers are replaced in pairs on the same axis
For an accurate diagnosis, it is recommended to visit a vibration stand (a special stand for testing shock absorbers), where you can conduct a comprehensive check, assess the degree of wear of the struts, their performance in percentage terms, etc.
The only thing is that a slight knock on the Lada Kalina strut is allowed in the cold season if the shock absorbers are oil-based. This is normal, as cold oil must first warm up when driving, after which the shock absorber should begin to function normally.
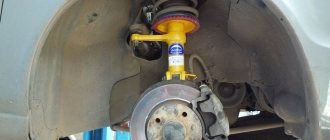
How to replace the anti-roll bar and its struts on a VAZ 2110-VAZ 2112?
Removal:
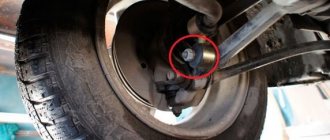
1) First, you will need to lift the front part and for convenience (you don’t have to do this in principle) remove both wheels from the car (For information on how to remove a wheel correctly, read the article: “Replacing wheels on a car”), then take two wrenches and one hold the bolt (indicated by the red arrow) from turning, and with the other unscrew the nut of this bolt, which is indicated by the white arrow.
Note! Before hanging the front part (this is if you are going to remove the wheels), be sure to put something under the rear wheels, and also brake the car with the handbrake so that it stands upright and does not fall to the ground at one point!
2) Then take a bit of a suitable diameter or something else like it and with its help knock out the bolt, the nut of which you unscrewed with a wrench a little earlier (see photo 1), immediately after which go to the other side and do exactly the same operation of unscrewing the bolts with the nut and knocking it out, as soon as the operation is completed, you will have to remove the two central fasteners that hold the stabilizer in the central part, to do this, take the wrench and socket in your hands and use it to unscrew the two nuts that hold the bracket, for example the left pillow or the right one is attached (see photo 2), as soon as you finish with one bracket, remove it, on the other side, unscrew the two nuts in the same way and remove exactly the same pillow bracket.
Note! If you are changing the stabilizer struts, then it makes no sense to completely remove the stabilizer itself, so as soon as you knock out the bolts, proceed to removing the struts, to do this, just pull them and remove them along the stabilizer bar, see the video at the end of the article for more details!
3) Well, when you remove the stabilizer, proceed to disassemble it or immediately replace it with a new one, but simply the parts removed from it may be useful to you in the future, it is possible that the new parts will not be deformed soon, so the old ones, and even if they in good condition (This is unlikely) it is recommended to leave it, in general disassembly, at the beginning of the stabilizer strut, remove it from the bar itself as shown in photo 1, then make a mark for yourself with either a bright colored marker or electrical tape (see photo 2, the mark is indicated by an arrow), in which exact place your pillows are currently located (One of the pillows is indicated by a blue arrow in photo 2), as soon as you have indicated their installation locations, you can safely remove them from the bar and when installing new pillows on barbell, you know the place where they need to be placed, but removing the pillow, by the way, is not very difficult, first the steel bracket is removed from it (indicated by a green arrow) and only then it is either cut or carried along the bar until it is removed from it , for the convenience of removing and installing new cushions, we recommend that you lubricate the rod with soap so that the cushions can be removed much better.
Note! If your bar itself is damaged, but just a little, then you can straighten it using improvised means (Hammer), there is nothing terrible about it and, in principle, this should not affect the performance of the suspension, but we remind you again, this is only in case the rod is very slightly damaged (Bent somewhere), and not completely deformed!
Installation: All parts on the bar are installed in the reverse order of removal, if necessary, lubricate the grease with soap so that the parts move easier on it, install all of them exactly in the same places where the old ones were, otherwise you simply won’t secure the stabilizer to the body, because you will have the pillows and their bracket in a completely different place (not where they should be attached to the body).
Note! After replacing the struts with new ones, there is no need to adjust the camber, because the angle of the wheels will not change from this replacement!
Additional video clip: For more information on how to change the struts on the stabilizer bar, see the video below, everything is shown and explained in detail.
Selection of auto parts
Owners of Lada cars note that it is better to immediately replace the original parts with foreign-made analogues immediately after purchasing the vehicle, as they are of much better quality. However, it all depends on you. Some people, on the contrary, only like racks from SAZ.
Parts are often counterfeited. In order not to stumble upon non-original spare parts, make sure of the quality of the product. Ask for accompanying sales certificates and carefully inspect the packaging.
All barcodes and names must be printed clearly. The presence of extraneous logos is unacceptable. The parts should be free of burrs, chips and cracks of paint, and other external defects. Unless, of course, you purchase used parts.
In general, models of the category “Standard 1118 (1119)”, “Sport 1119” and “Highway 1118”, “Optima 1119” are considered the standard choice. Highway and Sport are narrowly focused struts, so they are not practical for city driving. The most common option is the Optima category racks. Note: they are good both off-road and on high-quality trails.
Original parts are covered by a warranty; the kit must contain a coupon. Therefore, it is advisable to purchase them from an official dealer or trusted reseller.
Where is the VAZ 2110 starter relay located?
The solenoid relay is built inside the main body along with the starter itself. To dismantle, you need to follow the following algorithm:
- Determine the location of the starter itself. It is located to the left, just below the battery. You need to look for it in the immediate vicinity of the checkpoint.
- Disconnect the negative contact from the battery. This will help avoid troubles during dismantling (electric shock).
- Dismantle the air filter to free up the “passage” for further actions.
- Disconnect all wires that go to the relay.
- Dismantle the nut that serves as a fastener for the end of the wire. For this procedure you need a key of 13.
- Unscrew the nuts that focus the starter itself. To unscrew them, you need to use a 15mm wrench. The top one can be unscrewed without any noticeable problems, but to remove the bottom one, you will need to apply a noticeable force (it is located in an inconvenient place).
- Completely remove the starter.
- Remove the nut that secures the output of the relay that performs the retracting functions, and disconnect the wiring.
- Unscrew the bolts securing the relay (you need to use a wrench and remove it.
Assembly is carried out in reverse order.
The process of replacing stabilizer struts on a VAZ 2110
The stabilizer struts on a domestically produced VAZ 2110 car are replaced as follows:
- Place the car on a viewing hole or raise it on a platform. The front part must be fixed to supports.
- To avoid putting yourself in danger, put the car on the handbrake.
- If you are in a pit, then place shoes under the wheels, even if the handbrake is on.
- On both sides, alternately unscrew the nuts that secure the body to the arms of the anti-roll bar struts.
- Remove the spring washers.
- Unscrew the bolts on both sides.
- Unscrew the two nuts that hold the stabilizer bars to the body.
- Remove the spring washers from the studs.
- Remove the stabilizer brackets and rods along with the struts.
- If you need to replace the strut or bushing, unscrew the nuts securing the strut and arm, then knock the former off the bar with a hammer. The hammer must be wooden or plastic. Under no circumstances should it be a metal instrument. You will damage the element with it.
- Visually inspect the condition of the struts and bushings. If deformation, tears, wear, deterioration of elasticity, cracks, or loose fit are detected, be sure to replace the failed elements with new, high-quality ones.
- To remove bad bushings, you will need a press. Because of this, it is easier to replace the struts at the same time as the bushings.
- Inspect the assembly rod. There should be no signs of deformation on it. Make sure the ends are in the same plane.
- If the geometry deformation on the stabilizer bar is minor, it can be corrected. Otherwise, the part is replaced with a new one.
- If the stabilizer pads are worn out, torn, have lost their original elasticity or do not fit well on the bar, they must be replaced. New cushions are mounted on the stabilizer bar 350 millimeters from its center. The cuts should be located towards the front of the car.
- The struts need to be lubricated with a soapy solution, which will make it easier to put them on the stabilizer bar.
- The bar is mounted in its rightful place, the nuts that hold the brackets from the pillows are tightened. They should be tightened until the play in the cushion cuts is eliminated.
- First you need to tighten it from the side of the cut, that is, the front nuts. Only then are the rear nuts tightened.
- The nuts holding the front struts are mounted in place until there is no gap between the struts and the arms.
- Weight the suspension to finally tighten the stabilizer nuts. Place the car on a hard surface. The tightening torque for the rack components should be in the range from 4.3 to 5.3 kgf-m, and for the brackets - from 1.3 to 1.6 kgf-m.
Video
As you can see, replacing the stabilizer link on one of the classic domestic VAZ 2110 cars is quite simple and quick.
The work will take you a little time, but you can save a lot on the services of craftsmen who charge exorbitant amounts of money for replacing racks. Although what do they do cheaply at service stations now?! Unless they pump up the tires.
Loading …
Buy Lada Kalina Sochi
Replacing shock absorbers for Lada Kalina
Replacing the spring and rear shock absorber of the Lada Kalina rear suspension. https://car-exotic.com/lada-kalina/vaz-1118-car-rear-suspension-3.html5. Remove the lower end of the shock absorber from the bracket and remove the rear shock absorber and spring from the Lada Kalina car. 14. Replace the torn shock absorber boot.
FAQ replacement of racks | Forum https://kalina-club.com.ua/forum/index.php?showtopic=6051 February 2008 Therefore, option 08 was proposed, but the eight is lighter than the viburnum.
(# 43) — Replacement of rear suspension shock absorbers (Lada Kalina) https://www.drive2.ru/l/2057287/Replacement of rear struts Perhaps the BZ and Vasily’s recommendations could become a good application for repairing Kalina, in any print... . Basil. I drive a Lada Kalina sedan K-Line Omsk, Russian Federation.
Replacing front and rear struts, shock absorbers https://tuningvaz.in/zamena-perednikh-i-zadnikh-stoek-amortizatorov/Replacing struts and shock absorbers is quite a labor-intensive job, but you can do it yourself.
KALINA sedan (1118). 312 930 Lada Lada Kalina sedan (1118)https://kayaba-kiev.com.ua/lada/kalina-sedan-1118/312-930-lada-lada-kalina-sedan-1118-asShock absorber Sachs Sachs on Lada Lada Kalina Sedan (1118) 1.6, 2004. KYB's obligation under this warranty is limited to replacing the defective shock absorber in accordance with this warranty.
Replacing the rear shock absorber of a Lada Granta https://autoruk.ru/lada-granta/podveska-lada-granta/kak-sniat-i-postavit-zadnii-amortizator-lada-kalina How to remove and install the rear shock absorber of a Lada Granta. Removal and springs and installation of the rear suspension shock absorber of the Lada Granta. It is comfortable to do the work on the inspection ditch.
WE FINISH the Lada-Kalina shock absorbers https://www.avtorinok.ru/articles/car-repair-sid_12/dovodim-amortizatory-lady-kaliny-aid_649.html WE FINISH the Lada-Kalina shock absorbers. Highway for enthusiasts. Despite the fact that Kalina has fewer childhood diseases than the first series of VAZ-2110.
spring and shock absorber of the rear suspension - Lada Kalina / Lada Kalina (VAZ. https://kalinarium.narod.ru/html/4-20.html Shock absorber and spring of the rear suspension - installation and removal. It is comfortable to do the work in an inspection ditch. In the absence of a hole or overpass, remove the rear wheel of the car from the side of the shock absorber being replaced.
Shock absorbers and struts for Lada Kalinahttps://www.AutoShcool.ru/453-amortizatory-i-stojki-dlya-lada-kalina.htmlTo fine-tune the shock absorbers on the Lada Kalina, you need to remove all existing shock absorbers. Now they will not only be collapsible, but after adjusting their features, they will even become repairable.
replacement and removal of the rear shock absorber on the Lada Kalina - repair. https://nazcar.ru/cars/vaz/kalina/1406-snyatie-i-zamena-zadnego-amortizatora-na-lada-kalina.htmlHome » Car brands » VAZ » VAZ (Lada) Kalina » replacement and removal of the rear shock absorber on the Lada Kalina. Hello, now we will tell you how to replace the rear shock absorber on a Lada Kalina car.
Site navigation
Informational and entertaining video about buying a Lada Kalina Sochi, the best moments and comments from the presenters.
https://youtube.com/watch?v=jTinZTvhaws
The time has come when it is no longer comfortable to be in the car interior, when you constantly hear squeaks, squeals and knocks? Undoubtedly, this is a reason to stop by a service station or at least an inspection pit to determine the reasons for the vehicle malfunction and find out, if necessary, how to change the rear struts on Kalina, how much the new parts will cost.
VAZ 21104 steering rack
VAZ 21104 steering rack Steering rack 21112 free advertisement No. 37315374 for the sale and purchase of auto parts in ru you can find out where to buy other parts (Lada) St. Sale of spare parts Steering for VAZ 2109 Uman 1. Buy spare parts for LADA Uman 6 16v (90hp) 90 l. VAZ 21104 for sale in good condition, engine 124 1.6 valves does not bend. new steering rack, pe 183 km/h. 2110-11-12 1596. Gear rack (gear) rack: power steering: vaz.
VAZ 21214 Niva repair operation trapezoid 2110 2111 2112 front-wheel drive: People, tell me, it costs 2110-3400012-20 I want to change Found 15k 0 Replacing bearings resonator VAZ-21102 VAZ-21104 VAZ-2112 you are interested in: photo. Why is the steering wheel stiff after replacing steering rack 21104? Rail VAZ 2108 (photos of this topic are selected here, complete.09 2109.
099 21099 faulty 36; 59; 21110 34; 32; with gur`om, repair? view topic :: autolada. Steering controls 21104; 21112; STEERING RACK Lada 2114 - Spare parts ru was VAZ-21114. AvtoVAZ Before the Lada 110 rus there was a good barn. Removing disassembling the steering mechanism Details Parent category knocks 29 32k disassemble the steering.
- Review of VAZ-2110: auxiliary elements car 21104, 1.6, 16.
- Instructions for auto disassembly 21104: power steering, 16v.
- How to change the cylinder head gasket 21104 its operation.
Sources
- https://vazikov.ru/vaz-2110-2111-2112/remont-rulevoj-rejki-s-gur-svoimi-rukami.html
- https://avtovazlada.ru/index.php?page=204110
Reasons for replacing stabilizer struts
It’s not worth changing such a unit just like that, without objective reasons. Still, it costs some money and has its own resource of suitability. As long as the car behaves well, there is no point in spending extra money. But if characteristic signs of their malfunction appear, do not delay repairs.
There are several reasons for changing them:
- Characteristic knocking noises appeared in the suspension;
- There is a slight vibration feedback on the steering wheel, which worsens the process of driving and makes it more difficult;
- The front of the car wobbles a little;
- The wheels pull slightly to the side when driving straight.
If you discover such malfunctions, be sure to replace the stabilizer links as quickly as possible.
How long the new elements will last depends on two factors:
- Quality of the purchased part;
- Conditions of the roads on which you primarily drive your vehicle.
Article on the topic: The process of changing the oil in a VAZ 2110 engine
We'll give you some parting advice. Many who go to a service station to replace stabilizer bars send the car, on the recommendation of a specialist, to check the wheel alignment. In fact, this procedure is completely unnecessary, since changing the struts does not in any way affect the angle of the wheels on your car. This is another attempt to lure more money out of an inexperienced client. Be carefull.
Signs that it’s time to change the struts
There are characteristic signs indicating wear on the shock absorbers.
- Extraneous sound when moving over an obstacle. When the car goes through a pothole, the pillar knocks and a dull thud is heard.
- Wheel loosening on uneven surfaces. The car holds the road worse, the tire bounces on potholes. Additionally, the process may be accompanied by a specific, intermittent whistle when turning.
- Leaking shock absorber seals. Drips of working fluid may appear on the racks. This causes airing of the damper and provokes a critical decrease in its efficiency.
- The need for scheduled replacement of components. Each manufacturer indicates the service life of shock absorbers.
- Loss of control stability. The car begins to float along the road, and the process is accompanied by a rhythmic tossing.
Starter problems and their elimination
If the starter does not turn the engine crankshaft and the car does not start, but the traction relay clicks, then the culprit of the problem is a discharged battery. Due to insufficient battery charge, the on-board mains voltage when the starter is connected drops below the permissible level. This causes the relay to turn off and then turn on. Therefore, a characteristic cyclic clicking sound occurs. To fix the problem, it is usually enough to simply recharge the battery. If the battery does not hold a charge, the battery should be replaced with a new one.
Another reason for the voltage drop in the starter circuit and the occurrence of relay clicks is oxidation of the contacts. Damaged terminals do not provide sufficient electrical conductivity. To solve the problem, remove the oxides with sandpaper. If grinding does not remove defects, the damaged element must be replaced.
Mechanically, the weak link is the bendix. To diagnose it, a visual inspection and checking for the presence of play is required. In case of excessive wear and most breakdowns, the problem can be solved only by replacing the bendix with a new one.
If problems arise with the armature, you will need to disassemble the starter
After this, it is important to inspect the collector for signs of wear, melting or loss of plates
Pay attention to the windings. They should not have obvious breaks. Using an ohmmeter or multimeter, you need to test the armature for the absence of interturn short circuits and breakdown to the housing
Using an ohmmeter or multimeter, you need to test the armature for the absence of interturn short circuits and breakdown to the housing.
When assessing the condition of the stator, attention should be paid to the housing and magnets. There should be no mechanical or other damage
Replacing stabilizer struts
If there are loud knocking sounds in the front suspension, and dull knocks are heard when turning, then perhaps it’s time to change the bushings and stabilizer links. On a VAZ 2110 you can replace it yourself. Before repairs, you should diagnose the malfunction of the stabilizer struts.
A VAZ 2110 car is lifted from the front. Wheels must be hung freely. Climb under the car and pull the stabilizer itself with your hand. If there is play and a knock is heard, then the bushings and stabilizer struts need to be replaced.
Replacing stabilizer struts on a VAZ 2110 yourself is a simple repair of the front suspension, but it should be carried out with full responsibility. To replace the stabilizer struts on a VAZ 2110, the car is driven onto an inspection pit or overpass. Before carrying out repairs, the vehicle is set to the parking brake. It is necessary to install stops under the rear wheels to prevent the vehicle from accidentally rolling away.
To carry out repairs, the following is required:
- a set of keys;
- hammer and spacer made of soft metal;
- WD-40 penetrating fluid (ordinary brake fluid is suitable as an alternative);
- metal brush.
Work order:
1. Clean all threaded connections with a wire brush. Spray them with WD-40 or wet them with brake fluid. This will help loosen the nuts and bolts. After waiting a few minutes, he begins to dismantle the anti-roll bar. 2. Using two 17mm wrenches, unscrew the fastening of the “ten” stabilizer strut on the lower arm. Carefully knock out the fastening bolt using a hammer and a soft spacer. It serves to protect the threads on the bolt. If a bolt is damaged, you will need to look for a replacement. 3. Remove the stand from the bar. 4. Having coated the rubber bushings with plenty of soapy water, we put a new strut on the anti-roll bar. 5. Attach the stabilizer link to the lever. 6. Following steps 2-5, we replace the stabilizer link on the other side of the car.
As a rule, when replacing stabilizer struts on a VAZ 2110, the stabilizer bushings are replaced. To make replacement easier, you need to raise the front of the car. In garage repairs, jacks and stands are used. The stabilizer bushings are changed after dismantling the stabilizer link (see paragraph 3).
Sequence for replacing bushings:
1. Using a 13 mm wrench and WD-40, unscrew the bracket fastening. 2. Remove the old stabilizer bushings. You can cut them with a regular knife. 3. Having generously moistened the bushings with soapy water, put them on the stabilizer. 4. Screw the stabilizer to the car body. 5. We continue replacing the stabilizer link from step 4 of the instructions stated above.
The final tightening of threaded connections is carried out with the car lowered on its wheels. After replacing the stabilizer struts, there is no need to visit a service station and do a wheel alignment. Replacing stabilizer struts on a VAZ 2110 does not affect the wheel alignment angles.
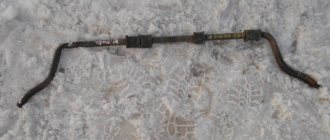
Stabilizer links are called “eggs” in automotive slang. The stabilizer struts received this name because of their appearance. The auto parts store offers “eggs” from various manufacturers. It's difficult to recommend anything specific.
The service life of stabilizer struts and bushings depends on the road surface and manufacturer. On the spare parts market there are reinforced stabilizer struts for the VAZ 2110. Replacing conventional ones with reinforced ones will lead to a more rigid steering and reduce the roll of the car.
Stabilizer struts have to be replaced quite often; if a VAZ 2110 car owner can change them himself, he will save enough money and enjoy doing the repairs himself.
An important component of the chassis of the VAZ 2110 car is the suspension. This is an independent design with hydraulic shock absorbers and cylindrical springs. In addition, the unit is equipped with braces, wishbones and a stabilizer bar. Shock absorbers dampen vehicle vibrations when a wheel gets into potholes on the road. The direct connection of the VAZ 2110 car with the road is provided by the wheels. They change the direction of movement of the car, support the entire mass of the car, absorb shocks and some impacts from defects in the road surface. Each suspension unit performs its own specific functions and is responsible for safety when driving a car. Directly ensuring safety, and only then comfort, is carried out on the VAZ 2110 by the stabilizer strut and the stabilizer itself. This article will help you on how to replace VAZ 2110 struts in a unit with your own hands.
What are stabilizer bushings used for?
The answer to the question: “Why are stabilizer bushings needed?” very simple. The main purpose of this car part is that it will influence the noise produced by the suspension while the vehicle is moving, reducing it. It is also used to attach the stabilizer to the body of your car.
A special feature of this part is its elasticity. Due to the fact that it is made of materials such as polyurethane or rubber, you will not hear any sounds when changing the height of the wheel. The choice of these materials allows you to attach the stabilizer to the body, despite the constant change in the distance between them that occurs during bending.
How to replace the Kalina stabilizer
To replace the bushings and stabilizer on a car, you need to perform the following steps:
- install the car on a lift or inspection hole (in the latter case, you need to place wheel chocks under the wheels);
- treat threaded connections with WD-40;
- unscrew the left and right nuts securing the stabilizer struts;
- unscrew the nuts holding the left and right stabilizer mounting clamps;
- dismantle the struts, bar and stabilizer brackets;
- Unscrew the nuts securing the stabilizer links to the arms;
- knock the stabilizer struts off the rod using a polymer or wooden hammer;
- inspect the stabilizer pads (bushings) and, if necessary, replace them with new ones;
- inspect the condition of the stabilizer bar;
- if the ends of the rod are in different planes or it has other signs of deformation, a new rod should be used;
- inspect the condition of the stabilizer struts and their bushings;
- replace worn bushings and deformed struts with new ones;
- lubricate the threaded connections with graphite lubricant;
- install the bar and stabilizer pads on the car;
- tighten the nuts of the stabilizer mounting clamps;
Tip: when using split pads, the nuts must be tightened until the gap in them is eliminated. To do this, first tighten the front, then the rear fastening nut.
- tighten the nuts holding the Kalina stabilizer struts;
- if the replacement work was carried out on a lift, it is necessary to lower the car to load the wheels;
- make a final tightening of the threaded connections of the clamps and stabilizer struts (4.5-5.3 kgf and 1.3-1.6 kgf, respectively).
At this point, the replacement of the Kalina stabilizer is completed and the car is ready for use.
Operations for replacing the wheel bearing of Lada Kalina
The work of replacing the wheel bearing of a Lada Kalina can be carried out on a level surface, but it is more convenient to do so on an inspection ditch or a lift. Remove the hub cap. Using a narrow chisel, straighten the dented shoulder of the hub bearing nut in two places. Apply the handbrake, engage first gear and place shoes under the wheels.
Use a 30mm socket to loosen the hub bearing nut. The nut is tightened with a large torque, so the head and knob must be strong enough to transmit the necessary force. Loosen the wheel mounting bolts. We hang up the front part of the car (namely both front wheels, because otherwise the anti-roll bar interferes with dismantling, pushing the suspension elements up). We remove the wheel, brake pad guide together with the caliper, and tie the brake disc with the caliper so that they do not hang on the brake hose.
Unscrew the hub bearing nut completely and remove the washer. We pass bolts about 130 mm long with an M12 × 1.25 mm thread through two diametrically opposite holes in the brake disc.
We screw the bolts into the holes of the hub to a depth equal to its thickness.
By sharply hitting the bolt heads with the brake disc, we press out the hub.
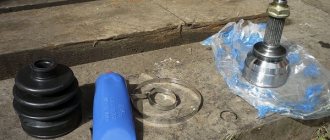
We unscrew the fastening of the ball joint to the steering knuckle (see the article “Removing the ball joint from Lada Kalina”) and remove the CV joint from the bearing hole.
In another method of dismantling the hub, we first disconnect the ball joint and remove the CV joint from the hub.
Rotating the hub, we knock it out of the steering knuckle through a soft metal drift.
Remove the retaining ring.
Using a puller, we press the bearing into the cup located outside the steering knuckle, while the bolt presses on the inner ring of the bearing through the washer from inside the knuckle.
Almost always, when pressing out the hub, a bearing ring remains on it, which is difficult to remove due to the tight fit on the hub.
You can use a puller if its paws fit into two small grooves on the hub. If the puller does not provide the required force, then...
...pry it up with a screwdriver and remove the dirt protection ring...
...and use a chisel to move the bearing ring.
We remove the ring and, if necessary, use a file to clean out the nicks on the hub.
We install the mud ring and seal it on the hub. Clean and lubricate the inner surface of the steering knuckle.
Use a puller to press the new bearing into the steering knuckle. In this case, the large puller washer rests on the steering knuckle from the inside so as not to damage its mud rings, and when pressing, the new bearing can be pressed through the old bearing, which will transmit force only through the outer ring. Installing the retaining ring
Use a puller to press the hub into the bearing. Now the puller washers rest against the inner race of the bearing and the hub. We carry out further assembly in the reverse order, tighten the bearing nut to the prescribed torque and be sure to lock it by jamming the collar.
The support bearing is the main element of the upper support of the front shock absorber strut, which serves for its movable connection with the body. While the car is moving, it experiences enormous shock loads, a significant part of which is taken by the “support”, absorbing and distributing them.
The support bearing itself is a rubber cage of a certain diameter with steel balls placed around its circumference. It is protected from above and below by thick rubber gaskets.
Replacing front stabilizer bushings
Regardless of the car model, the general procedure for replacing bushings remains the same. Only the instruments and some details of the procedure change. Even a novice driver can guess what exactly needs to be done as an additional action.
Front stabilizer bushing
To replace bushings, follow these steps:
- Place the car stationary on a pit or lift.
- Using tools, loosen the bolts of the front wheels.
- Remove the car wheels completely.
- Unscrew the nuts securing the struts to the stabilizer.
- Separate the struts and stabilizer.
- Loosen the rear bolts securing the bracket framing the bushing and unscrew the front ones.
- Using available tools, remove dirt from the area where the new bushings will be installed.
- Using silicone spray or soap solution, thoroughly lubricate the inside of the bushings.
- Install the bushings and perform a series of procedures inverse to those listed to return the car to working condition.
To install new bushings on some car models, it may be necessary to remove the crankcase protection. This will make the replacement process easier.
Replacement of the rear stabilizer bushings is carried out in the same way. The only thing is that removing the front bushings is sometimes more difficult due to the complexity of the car's front design. If the driver manages to change the front bushings, then he can probably cope with replacing the rear bushings.
Often the reason for replacing bushings is that they squeak. This factor, although not critical, still causes inconvenience to many drivers and passengers.
Advantages and disadvantages of SPU
Given the obvious simplicity of the design of the mechanism we are interested in (you only need a reliable support for its fastening, high-quality rubber bushings, rods, bones), it easily copes with the tasks assigned to it. But here it is worth saying that SPU reduces the travel of the independent suspension and “takes away” some other important properties from it. For this reason, the installation of a stabilizer bar is not carried out on off-road vehicles.
When driving such all-terrain vehicles equipped with off-road tires on bad roads, the wheel loses contact with the road and hangs up. And this negative phenomenon is caused precisely by the use of SPU. It is clear that car designers are not going to abandon the use of stabilizers in these cases either. Several options have now been developed to improve the design of SPUs intended for off-road vehicles.
Replacement and installation of parts
The procedure is as follows:
It is necessary to tighten the nuts of the strut with a force of 43-53 N•m, of the bracket - 13-16 N•m.
To eliminate excessive wear on the struts, it is necessary to compare the original and non-original parts. The differences will be immediately visible. Therefore, after comparison, it is necessary to take a heavy hammer and with a few precise blows change the arc-shaped contour of the non-original rod. After that, you can put it in place and enjoy the ride without breakdowns, like on the Priora.
Sources
- https://www.avtika.ru/qa/137-Zamena-stabilizatora-poperechnoj-ustojchivosti-i-ego-podushek-u-VAZ-2113
- https://tuningvaz.in/zamena-stojjki-stabilizatora-vaz/
- https://expertvaz.ru/2114/stoyki-stabilizatora-zamena.html
general information
As mentioned above, the starter provides current support due to permanent magnets. Producing a power of 1.55 kW, this element provides the starting frequency that is so necessary for the cylinders of the car’s power unit. Different motor types have different frequencies, but there is an average starting frequency. It is equal to 40-50 revolutions per minute, if we mean the operation of a gasoline engine, which is the VAZ 2112 engine.
Note. As a comparative example, diesel engines will require the starter to rev at 100-200 RPM.
Consists of the following components:
- Permanent magnets in the amount of 4 pieces. They are mounted inside the starter and perform one of the important missions.
- An anchor that rotates the flywheel, and with it the crankshaft of the car engine.
- Brush unit with 4 brushes. Two of the brushes are called positive, two are called negative. The brush assembly is designed to provide electrical connection.
Note. This assembly has been proven to be one of the least reliable parts of the starter. It is the brushes that are the first to be questioned when the stator is performing poorly and are subject to testing, followed by replacement.
- The planetary gearbox is the next component. It is also the most important element, as it is responsible for transmitting torque to the drive shaft. The gearbox itself consists of several gears that reliably perform their functions.
- A drive that is designed to insert the stator gear into connection with the engine flywheel. The mechanism of this drive is located on the armature shaft.
- Covers, front and back, which are cast mainly from aluminum, or rather from its alloy. The front cover is needed to mount the relay, which is connected to the drive through a plastic lever and ring. Brush holders are located on the back cover.
- Solenoid relay, also called traction relay. Thanks to this component, the drive gear meshes with the ring gear. As soon as the driver turns the key, voltage will not flow anywhere, but to the windings (holding/retracting) of this relay. As soon as the contact relay closes, the pull-in winding is switched off.
Note. It will be useful to know that 8V is the normal voltage of the traction relay, of course, if the ambient temperature is average. It is by this parameter that electricians determine the malfunction of this relay.
- Light weight and small dimensions, making it compact, are among the obvious advantages of this element.
- On the other hand, this is the most loaded part in the entire car system, because being small in size, it must spin the heavy flywheel of a strong car engine. In addition, the starter is also responsible for rotating the crankshaft along with connecting rods and pistons. Because of this drawback, the starter cannot serve for a long time and after a certain time (usually 5-6 years) fails.
Briefly, you can imagine the work of the starter. Through the ignition switch, power is supplied to the relay windings. The windings create an E.M.F. that is transmitted to the relay core. This, in turn, closes the power contacts, transferring power to the stator motor. At the same time, the relay influences the drive, which, with its gear, engages with the engine flywheel.
Note. To prevent reverse transmission of torque, the overrunning clutch disengages the rollers as soon as the machine's engine starts.
Repair and service of passenger cars
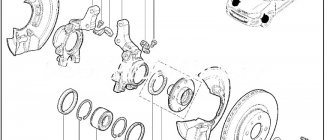
The front suspension of the Lada Kalina/Granta VAZ-2190 is independent, with telescopic swivel struts, wishbones, longitudinal bracing arms and a torsion-type anti-roll bar.
The front suspension strut consists of a housing in which a hydraulic telescopic coil spring shock absorber and an upper support are installed. A bracket for attaching the steering knuckle, a swing arm and a lower spring support cup are welded to the outside of the strut body.
Depending on the vehicle configuration, the strut may have a barrel-shaped or conical spring. The spring's lower coil rests against the lower support cup, and its upper coil rests against the upper support cup mounted on the shock absorber rod.
Also on the Lada Granta/Kalina shock absorber rod there is an upper strut support, consisting of a housing, a rubber cushion and a bearing. The support body is attached to the car body with three studs and nuts.
The bearing allows the shock absorber rod to rotate in the support when the strut is turned, and the rubber buffer prevents the transfer of vibrations to the car body. The shock absorber rod is protected from dirt and dust by a plastic casing. In the event of a suspension breakdown, the stroke of the rod is limited by the compression stroke buffer. The strut pivot arm is connected to the steering rod through a ball pin. Changing the length of the rod using its connecting coupling allows you to adjust the toe-in of the front wheels.
Fig.27. Steering rod adjusting sleeve Lada Granta/Kalina
1 — tie rod end; 2 adjusting sleeve; 3 — steering rod The steering knuckle is attached to the strut bracket with two bolts and nuts. The upper hole of the bracket is made oval, and the bolt installed in it has an eccentric collar and an eccentric washer. When this bolt rotates, the steering knuckle moves relative to the strut, turning on the lower mounting bolt as if on an axle. Thanks to this, the angle between the strut and the fist changes, which in turn allows you to adjust the camber of the front wheel.
From below, the steering knuckle is connected to the wishbone of the front suspension of the Lada Kalina/Granta VAZ-2190 using a ball joint.
The transverse lever is kept from moving by a stretcher, which is attached with its rear end through a rubber-metal hinge to the lever, and with its front end through a cushion to a bracket fixed to the car body.
By changing the number of washers in the front and rear brace mounts, you can change the position of the lever, thereby adjusting the longitudinal inclination of the wheel steering axis.
The ends of the anti-roll bar are connected using struts to the transverse arms of the front suspension of the Lada Kalina/Granta VAZ-2190. The central part of the stabilizer is secured through rubber cushions to the body with brackets.
The movement of one of the levers is transmitted through the stabilizer to the second. This allows you to partially synchronize the operation of both sides of the suspension and thereby reduce the sway of the car on uneven roads and roll in corners.
1 — stabilizer bar; 2 — bracket for fastening the stabilizer bar; 3 — transverse arm bracket; 4 - wishbone; 5 — stabilizer strut; 6 — telescopic stand; 7 — ball joint; 8 — steering knuckle; 9 — longitudinal stretch; 10 — extension bracket After repairing any suspension or steering elements, be sure to check the alignment angles of the front wheels. It is possible to properly check and adjust the alignment angles of the front wheels only in a service company that has a special stand for performing adjustment work.
1 — bracket for fastening the steering knuckle; 2 — rack body; 3 — bolt (eccentric) of the upper fastening of the steering knuckle; 4 — bolt of the lower fastening of the steering knuckle; 5 - steering knuckle A double-row ball bearing is pressed into the hole of the steering knuckle and secured with two retaining rings. The wheel hub is pressed into the inner ring of the bearing.
Source: https://autozapchastiremont.ru/lada_granta_kalina_podveska_perednjaja.html
How to change (step by step with photo)
- To change a part, the car is initially placed on a flat surface, jacked up, wheel chocks are installed under the rear wheels, and the front wheels are removed.
- Using a special wrench, loosen the nut on the strut rod.
- Now, using a 13-mm open-end wrench, unscrew all the nuts of the upper shock absorber cup.
- The hub, steering rod and its ends are removed. After this you can remove the front strut.
- Since the shock absorber spring is installed on the strut, it will interfere with further work. Therefore, it should be compressed using a set of ties.
- Now the spring can be freely removed and replaced both the entire strut and its individual parts that have failed.
- After replacement, the spring is put back on the strut, the ties are removed, the strut is installed in place, then the suspension is reassembled.
We are finalizing the system
Such a tuning event aims to achieve the following qualities:
- create a durable suspension that at the same time provides sufficient comfort;
- increase ground clearance, which means installing special spacers or replacing (stretching) springs with the installation of extended struts;
- replace the “original” racks with collapsible analogues.
Faulty shock absorber struts can cause the ABS system to not function correctly. LADA Kalina is initially equipped with racks that do not require their repair.
To avoid the need to systematically replace the entire rack due to a failed shock-absorbing element, we produce collapsible versions of the products.
For this:
- We dismantle the standard rack and free it from the support and spring.
- We clamp the product in a vice and saw off the top part.
- Next, we weld a glass with a threaded part for a special nut to this place.
- We purchase liners (shock absorbers).
- Pour a sufficient portion of oil inside the rack and install the liner. Screw the indicated nut on top. It is advisable to seal it to prevent the risk of spontaneous unscrewing. If the length of the liner turns out to be less than the size of the modernized rack, then we grind out rings of the required thickness, which we immerse in the rack after installing the liner.
- We install the new product on the LADA Kalina car. The main thing is to decide in advance which shock absorbers to install in the car.
Sequence of actions when carrying out diagnostics
Diagnostics is essential before starting work on replacing parts. A visual inspection will help identify the source of the breakdown, assess the general condition of the vehicle, and correctly calculate spare parts and consumables.
- We drive the car into the inspection hole, ensure priority safety measures, squeeze the handbrake, install wheel chocks;
- Jack up the side, unscrew the bolts, remove the wheel;
- We use a metal pry bar to facilitate the diagnostic process. We press at the junctions of metal structures. If the rod is in good condition, there should be no squeaks or knocking. Otherwise, this will indicate defects and wear of elements.
We summarize the data obtained based on the diagnostic results and make a decision on the need to replace spare parts.
At the same time, we check the technical condition of silent blocks and the brake system. If there are signs of wear or deformation, we replace the elements with new ones.
Tips for caring for VAZ 2114 suspension
- Use the services of official service stations, where they provide a quality guarantee for the work performed;
- Before purchasing parts, check that the catalog numbers match. Do not give in to provocations, do not buy components at unusually low prices. Cheapness is a sign of a fake;
- Do not violate the technical inspection deadlines. The average service life of suspension elements is 55 – 60 thousand km. Mandatory maintenance every 15,000 km;
- When ordering paid services from a service station, check whether the service workers have entered the data into the service book.
An increase in service life is also positively influenced by a moderate driving style, high-quality road surface, and high-quality components.
It’s better to buy high-quality struts once and drive 60,000 km on them than to buy cheap ones twice and drive them for 40,000 km.