Lada Granta brakes are necessary to control the speed of the car. They are responsible for smoothly reducing speed until the car stops. The main task of the braking system is to ensure the safety of the people inside the car.
Lada Granta appeared on domestic roads around the end of 2011. The car belongs to the budget class. I must say that this is a fairly reliable and easy-to-maintain machine. It has good handling and economical fuel consumption.
Granta was developed on the basis of Kalina. Initially, the car was produced as a sedan. Starting in 2013, a hatchback was created. There are three main configurations of Grants: standard, normal and luxury. In the “Standard” configuration, the car is equipped with a 1.6-liter power unit, its power is 80-90 horsepower. Manual transmission - five-speed. The car has front-wheel drive.
Bleeding the brake system without ABS
Pumping scheme:
1. Brake cylinder or caliper of the rear right wheel.
2. Brake cylinder or caliper of the rear left wheel.
3. Front right wheel caliper.
4. Front left wheel caliper.
Attention! On cars with distribution of braking forces along the axes (in common parlance “sorcerer”), while pumping the rear brakes, it is necessary to move the sorcerer lever (piston) to simulate a full load of the car. This will ensure maximum brake line flow and make bleeding the brakes easier.
Sequencing:
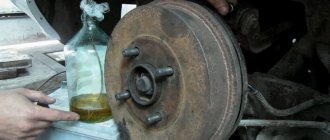
1. Remove the cap from the wheel brake cylinder ventilation outlet valve, clean the valve and install a clean transparent hose. Insert the other end of the hose into a container half filled with brake fluid.
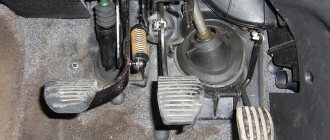
2. Ask your assistant to press the brake pedal until pressure is built up in the system. A sign will be increasing resistance to the brake pedal.
3. To create pressure, you must fully press and hold the brake pedal.
4. Loosen the air release valve half a turn. Liquid will flow into the container. The other end of the hose must be immersed in liquid.
5. After a noticeable drop in system pressure, tighten the vent valve.
6. Repeat the bleeding operation with the brake pedal depressed.
7. Repeat pumping again until there are no air bubbles in the liquid in the hose.
8. Remove the hose from the outlet valve and replace the protective cap.
9. Repeat the same steps for the brake cylinders of the remaining wheels.
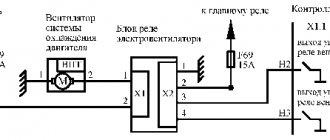
Notation system.
This diagram shows the address notation system.
Each device is assigned a number. And on each connection line in the diagram the number of the device where it goes is indicated, and through a slash (/) the designation of the contact of this device. If the connection is branched, more than 2 devices are galvanically connected, then addressing from the devices goes to a common bus for them, designated by the letter S and a number. This is done so that the communication line has one device address. After the connector, the device numbers of the circuit are independent of the device numbers before the connector. For ease of searching within the page, a fragment of the diagram, links are provided below. Return to the top of the page, Ctrl+Home keys.
List of elements of the electrical connection diagram of the front wiring harness
- 1 — right headlight;
- 2 — electric motor for washers;
- 3 — left headlight;
- 4 - starter;
- 5 — rechargeable battery;
- 6 — main fuse block;
- 7 - generator;
- 8 — sound signal;
- 9, 10, 11 — front wiring harness blocks to the instrument panel wiring harness blocks;
- 12 — air conditioning fan electric motor;
- 13 — electric fan of the engine cooling system;
- 14 — ABS hydraulic unit;
- 15 — right front speed sensor;
- 16 — left front speed sensor;
- 17 — automatic transmission controller;
- 18 — automatic gearbox;
- 19 — block for automatic gearbox;
- 20 — block to the automatic transmission selector switch;
- 21 — block to the automatic transmission speed sensor;
- 22 - air conditioning compressor.
List of elements of the electrical connection diagram of the ignition system wiring harness
- 1 — oil pressure warning lamp sensor;
- 2 - generator;
- 3 — throttle pipe with electric drive;
- 4 — coolant temperature sensor;
- 5 — ignition system wiring harness block to the instrument panel wiring harness block;
- 6 — solenoid valve for purge of the adsorber;
- 7 — pressure sensor of the air conditioning system;
- 8 — mass air flow sensor;
- 9 — crankshaft position sensor;
- 10 — oxygen concentration sensor;
- 11-controller;
- 12 — diagnostic oxygen concentration sensor;
- 13 — blocks of the wiring harness of the ignition system and the wiring harness of the ignition coils;
- 14 - noise suppression capacitor;
- 15 — ignition coils;
- 16 — spark plugs;
- 17 — nozzles;
- 18 — blocks of the wiring harness of the ignition system and the wiring harness of the injectors;
- 19-phase sensor;
- 20-knock sensor.
List of elements of the electrical connection diagram of the instrument panel wiring harness (Sheet 1.)
- 1,2 — blocks of the instrument panel wiring harness to the blocks of the front wiring harness;
- 3,4- blocks of the instrument panel wiring harness to the blocks of the rear wiring harness;
- 5 — lighting control module;
- 6 — ignition switch;
- 7 — on-board computer mode switch;
- 8 — windshield wiper switch;
- 9 — instrument cluster;
- 10 — light signaling switch;
- 11 — trunk lock drive switch;
- 12 — diagnostic block;
- 13 — block of the wiring harness of the instrument panel to the block of the wiring harness of the air supply box;
- 14 — rear window heating switch;
List of elements of the electrical connection diagram of the instrument panel wiring harness (Sheet 2.)
- 15 — alarm switch;
- 16 — brake signal switch;
- 17, 18 — blocks of the instrument panel wiring harness to the radio;
- 19 - rotating device;
- 20 — driver airbag module;
- 21 — sound signal switch;
- 22 — mounting block: K1 — relay for the electric fan of the engine cooling system;
- K2 - door lock relay;
- KZ - additional starter relay;
- K4 - additional relay;
- K5 - relay-interrupter for direction indicators and hazard warning lights;
- KB - windshield wiper relay;
- K7 - headlight high beam relay;
- K8 - sound signal relay;
- K9 - relay for low beam headlights;
- K10 — relay for turning on the heated rear window;
- K11-main relay;
- K12 - fuel pump relay;
- 24 — cigarette lighter;
- 25 — backlight lamp for the heater control panel;
- 26 — illuminator;
- 27 — block of the instrument panel wiring harness to the block of the ignition system wiring harness;
- 28 - controller;
- 29 — block of the instrument panel wiring harness to the block of the rear wiring harness 27;
- 30 — electronic accelerator pedal;
- 31 — additional resistor;
List of elements of the electrical connection diagram of the instrument panel wiring harness (Sheet 3.)
- 32 — heater electric motor;
- 33 — heater motor switch;
- 34 — control unit for the door lock system;
- 35 — relay (K16) of the electric fan of engine 3;
- 36 — relay (K15) of the electric fan of engine 1;
- 37 - compressor relay (K14);
- 38 — additional relay (K13) (reverse light relay);
- 39 — air conditioner switch;
- 40 — gear shift control drive;
- 41 — passenger airbag module;
- 42 — evaporator temperature sensor;
- 43 — block of the instrument panel wiring harness to the block of the rear wiring harness 3.
List of elements of the electrical connection diagram of the rear wiring harness
- 1,2- blocks of the rear wiring harness to the blocks of the instrument panel wiring harness;
- 3 — right side direction indicator;
- 4 — left side direction indicator;
- 5 — hand brake sensor;
- 6 — rear window heating element;
- 7 — interior lamp;
- 8 — switch in the driver’s seat belt;
- 9 — trunk lighting;
- 10 — electric fuel pump module;
- 11-light right;
- 12 — trunk locking motor;
- 13 — interior lamp switch;
- 14 - additional brake signal;
- 15 — left lamp;
- 16 — rear wiring harness block to rear left door wiring harness block;
- 17 — rear wiring harness block to rear right door wiring harness block;
- 18 — rear wiring harness block to the front right door wiring harness block;
- 19 — rear wiring harness block to the front left door wiring harness block;
- 20 — airbag control unit;
- 21 — rear wiring harness block to the wiring harness block for license plate lights;
- 22 — rear wiring harness block to instrument panel wiring harness block 3;
- 23 — right rear speed sensor;
- 24 — left rear speed sensor;
- 25 — driver’s seat belt pretensioner;
- 26 — passenger seat belt pretensioner;
- 27 - rear wiring harness block to instrument panel wiring harness block 29.
Wiring diagram of the front right door wiring harness
- 1 — block of the wiring harness of the front right door to the block of the rear wiring harness;
- 3 — right front lock;
- 4 — power window switch;
- 5 — blocks of the wiring harness of the front right door to the front right loudspeaker.
Wiring diagram for front left door wiring harness
- 1 — block of the wiring harness of the front left door to the block of the rear wiring harness;
- 2 — electric window lifter motor;
- 3 — left front lock;
- 4 — switch block;
- 5 — blocks of the wiring harness of the front left door to the front left loudspeaker.
Working on the brakes on a Grant is required when the car begins to wobble when braking, and extraneous noises are heard in the area of the rear wheels. What’s worse is if one of the wheels starts to jam when stopping. This article describes a step-by-step replacement of Grant's rear brake pads.
Bleeding the brake system with ABS
In vehicles equipped with ABS, the process is slightly different. If the fluid level in the reservoir drops too much during bleeding, air may enter the brake system, which will then end up in the pump. In this case, you will not be able to continue pumping the system and will have to contact service.
Front wheels:
1. Turn off the ignition and apply the brake approximately 20 times to release the ABS control pressure.
2. Fill the brake system reservoir to the very brim.
3. Place a transparent hose onto the right front wheel bleeder valve. Place the other end of the hose into a container of brake fluid.
4. Have an assistant press the brake pedal until pressure appears in the system. Then, while holding the brake pedal depressed, unscrew the valve. When the pedal resistance stops, close the valve.
5. Repeat this procedure several times until the liquid in the hose is free of bubbles.
6. Close the valve and fill the reservoir with brake fluid.
7. Pump the second “wheel” in exactly the same way.
Rear wheels:
1. Turn off the ignition and apply the brake approximately 20 times to release the ABS control pressure.
2. Press and release the brake pedal.
3. Turn on the ignition, put on the hose and open the air bleed valve of the right brake cylinder. Close the valve as soon as there are no more air bubbles in the hose.
Attention! The ABS pump should not run for more than two minutes, otherwise it will overheat. Thus, after every two minutes it is necessary to take a ten-minute break to cool the pump.
4. Turn off the ignition and prepare the left wheel brake valve.
5. Bleed the second “wheel” in exactly the same way.
6. Turn on the ignition and wait until the ABS pump turns off on its own.
7. Add fluid to the brake reservoir to the Maximum.
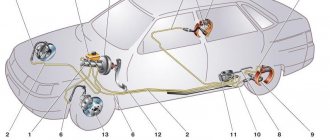
All vehicles of the VAZ family use a hydraulically driven braking system. This means that the force that the driver makes when pressing the brake pedal is transmitted to the brake mechanisms installed on the car's wheel hubs using fluid. But in order for the impact to have sufficient force, an amplifier is included in the design.
Design of the working brake system of the Grant model
The Granta brake system is a diagonal, two-circuit, hydraulically driven system that includes a working master cylinder along with a vacuum booster, one for each wheel of the brake mechanism, as well as a fluid pressure regulator in both mechanisms on the rear axle.
The front of the car has disc brakes without additional ventilation. The rear wheel system has a drum design.
Each circuit of the model consists of brake mechanisms for two wheels: one is located at the front, the second at the rear. Moreover, they are located diagonally. This was done so that if a malfunction occurs in one of the circuits, the other will be able, although not with maximum efficiency, to provide braking to the car.
With the help of a fluid pressure regulator, the ingress of fluid into the rear axle brake system is limited in the event of insufficient load on this axle. Thus, wheel locking is prevented, and the car is protected from skidding when emergency braking is necessary.
The body of this part has a small hole, which is covered with a plastic plug. If “brake fluid” leaks from the indicated hole, then the regulator track is leaky.
In order to make it easier for the driver to press the brake pedal, the brake system drive is equipped with a special part called a vacuum booster. Its operation is carried out thanks to the vacuum that forms inside the intake pipe of an unstopped engine. For this reason, you cannot turn off the engine until the car comes to a complete stop.
The fluid reservoir for high-quality operation of the system is located on the main cylinder body. A sensor is built into the tank lid that monitors the liquid level. When the level value drops to a critical level, the sensor sends a signal to the driver by turning on a warning light on the dashboard.
Domestic enterprises do not forget about equipping new cars with modern devices. For example, most versions of the Lada Granta are available with an anti-lock system or ABS in common parlance.
A little theory
To transmit force, one of the properties of the fluid is used - its incompressibility. That is, when a force is created on a liquid, its volume does not change, and it acts as a transmitter.
A hydraulic brake drive is more practical than a mechanical or pneumatic one, but it has one drawback - if air gets into the fluid, the transmission of force will be significantly reduced. This is because air, like any gas, is compressible. As a result, the presence of air leads to a change in the volume of the liquid when creating force (due to gas compression). Because of this, the force is no longer transmitted to the actuators, since it is absorbed by the volume change.
It turns out that effective operation of the brakes on a VAZ occurs only until air enters the drive system. And this can happen for several reasons.
note
The usual “graphite” or “Litol” is not suitable as a lubricant for the caliper. The material for calipers must meet high requirements, in particular, be resistant to temperature changes. Conventional lubricant, even in a boot, dries out quickly. Therefore, you only need to purchase a specialized product. Typically, this caliper lubricant is sold in 45 gram bags. They are enough to completely process the mechanism.
When is it necessary to bleed the brakes?
The first of these is that the drive pipelines are exposed to negative environmental influences. The rear brake pipelines on VAZs are made of soft metals (copper, brass) and they pass under the bottom of the car. Oxidation processes and possible shock loads during operation can cause cracks or breakdowns in the pipeline. The drive of the front mechanisms is composite, one part of the pipeline is metal, and the second is rubber. Over time, the rubber “ages” and cracks appear on it.
The second reason why there may be air in the system is scheduled maintenance of the brake system. The fluid used in the drive has its own resource, so it must be replaced periodically. It is during the replacement process that air gets inside the system. It can also appear in the system after repair of mechanisms, for example, during the replacement of pads. Therefore, it is imperative to bleed the brakes after replacing the pads.
But on VAZ cars it is possible to remove air bubbles by pumping - a process in which air is expelled from the liquid. For this purpose, special fittings are provided for the design of the brake mechanisms.
It is not difficult to identify that the system requires bleeding - the failure of the pedal, the ease of pressing it and a decrease in the effectiveness of the brakes, up to their complete absence, indicate that the system is airy.
But before you start pumping, you should carefully inspect all pipelines and components of the system for leaks, as well as the amount of liquid in the tank. If traces of leakage are detected, the malfunction should be eliminated by repair using repair kits (main and working brake cylinders), replacing the damaged section of the system (pipelines), and after replacement, carry out bleeding. If air has entered the system due to a lack of fluid, it must first be replenished to the level.
Problems
One of the common problems that arises when using rear brake calipers is squeaking pads. Moreover, they can be new and from a trusted manufacturer. The creaking occurs due to the fact that the elements are installed skewed. It only takes a small deviation for new pads to cause a terrible squeak. How is this problem solved? This problem is usually solved by installing anti-creaking metal plates. They are placed in the cavity between the pad and the caliper.
Tools
But it is important to know how to properly bleed the brakes on VAZs of different models and what is required for this. The operation itself is not complicated, so you can do it yourself. But it’s better to do this with an assistant - it will be both faster and easier.
Not many tools are required:
- Key for 8 (10);
- Silicone transparent tube according to the diameter of the fitting;
- Capacity;
- Brake fluid;
As for the wrench, you should use the cap type. There are also special keys on the market for unscrewing fittings, clamping. The fact is that the fittings often stick to the thread and are very difficult to unscrew. Using a regular open-end tool, you can easily “lick” the edges and then it will be completely impossible to unscrew the fitting.
The essence of pumping work is almost the same for all cars - VAZ-2101, VAZ-21099, and VAZ-2121 Niva. But the sequence of operations is affected only by the design features of the models.
Signs of caliper failure
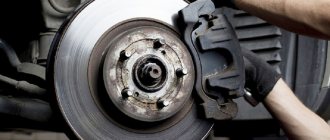
The wheel caliper must be of high quality. Under the influence of the friction that occurs during braking, the brake pads and the caliper itself heat up. Therefore, in addition to mechanical strength, they are subject to serious requirements in terms of heat resistance and high heat transfer rates in order to avoid jamming of the pistons and deformation of parts of the brake system.
The guide boot is an inconspicuous part at first glance, but its defect can lead to jamming of the caliper.
In addition to situations where the brake system is clearly no longer working, other signs may indicate that the brake caliper will fail in the near future. In particular, this is a creaking and knocking sound in the area where the calipers are located. The appearance of a squeak indicates an increase in friction processes in the mechanism, which gradually destroys it. The problems that lead to this are varied. These are skewed brake pads or their incorrect installation, as well as excessively worn brake discs (as a result, a runout in the steering wheel may appear).
Also, replacing the caliper may be necessary if the piston boot on it is torn. This is fraught with the fact that the insides of the caliper, in particular its cylinder, become defenseless against the penetration of dirt, which increases friction between the piston and cylinder, and also provokes the formation of rust, which leads to inevitable jamming of the piston.
Carrying out work on rear mechanisms on VAZ classic models
First, let's look at how to properly bleed the brakes on a Classic. To perform the operation correctly, it is necessary to take into account that on the VAZ-2106 or any other model, the brakes are dual-circuit. That is, the entire system is divided into two independent parts. This was done so that if one of the circuits depressurizes, the second remains operational and the car can stop. But it is important to understand that the separation into circuits occurs on the master cylinder, and if air enters the system due to lack of fluid, it will be in both components.
For all classic models, including the VAZ-2107 brakes, the circuits separate the front and rear wheel drives. This must be taken into account when it is necessary to bleed the brakes of a 2101 or another model.
By the way, if only one circuit is aired, then it is not necessary to bleed the second one, although it would not be superfluous to treat all mechanisms, both front and rear.
So, everything is prepared, and you can get started.
The sequence of actions is as follows:
- It is better to drive the car into a pit to make it easier to get to the fittings. At the same time, he is immobilized using a handbrake or wheel chocks;
- Remove the cap from the brake fluid reservoir, check the level, and if necessary, bring it to the maximum level;
- First, we bleed the rear brakes of the VAZ, since the entire operation is done from the brake mechanism, which is as far as possible from the master cylinder, that is, from the right rear wheel;
- We put the assistant in the driver's seat. We climb under the car ourselves, put the key on the fitting, and then put the prepared tube on it, the second end of which should be lowered into a container with a small amount of liquid poured into it. It is advisable to immediately tear the fitting out of place and immediately screw it back, even before pumping. This is done so that there is no hitch in the process due to a non-unscrewing fitting;
- We ask the assistant to press the brake pedal 5-6 times. At the same time, with each press the failure will be less and less - the drive is pumped with liquid, while air moves to the mechanisms. After downloading the system, the assistant should hold down the pedal - press and hold it;
- Unscrew the fitting half a turn, working fluid will begin to flow out of it. If a transparent tube is used, air bubbles will be clearly visible in it, and the pedal being held will begin to move down until it hits the floor. In this position, the assistant must hold it, at this time the fitting must be screwed back;
- This sequence of actions should be carried out for one mechanism 4-5 times to completely remove air;
- On the “classic”, the left rear wheel is pumped next (since they are combined into one circuit). But before that, you need to check the level of the tank and bring it to the maximum level. The sequence of actions is the same: pump the brakes and hold the pedal - release the fitting to drain the fluid with air (the pedal goes down) - tighten the fitting - pump again. And so 4-5 times;
Chassis
Brake system
The Granta has brakes: discs at the front and drums at the rear. We could have ended there, since the service life of disc rotors, pads and calipers is not very long, but sufficient, and their price is low. ABS is common, fortunately all trim levels above the “Standard” relied on it, although the “Norma” sedan version may not have it.
The bulk of the complaints concern the rear drum brakes and frankly unsuccessful drum cylinders. The design itself is not bad, although the high efficiency is achieved due to the large diameter of the composite drums with an aluminum body. But they “sag” a little over time, and therefore they are often replaced with all-cast iron ones, which are very heavy, which affects the driving characteristics. True, it is not the housing that fails, but the historical hydraulic cylinder, without limiters, with poor sealing and a short service life. It can leak over runs of up to hundreds of thousands of km, but whatever! – and at 40-50 mileage there are enough cases of leaks. Well, replacement, as you understand, involves a complete overhaul of the mechanism. It's not that expensive to rebuild, but often the rear brakes on cars without ABS are simply disabled. And some owners are trying to improve braking by turning off the rear axle brake force regulator. Numerous videos of Grants skidding when braking are precisely the result of such intervention.
Against the backdrop of problems with the rear brakes, increased noise from the front calipers, weak pins and boots that require constant monitoring are trifles. Fortunately, the consumables cost just a penny: for a hundred rubles you can buy a pack of spare parts in the nearest store. Buying a new caliper of quite decent quality, and even more so - fresh rotors and pads is also not a problem, prices are extremely low with generally good quality. True, fakes and frankly “crooked” copies are very common. At VAZ, alas, they still rivet the consumables “on the knee”.
Rotting tubes and swelling hoses are found mainly on cars in “advanced” years - all these elements serve their five years honestly, but after that it’s up to you to see how it goes.
For those who lack the standard brake system, and there are many of them among Grant owners, literally everything can be redone. Fortunately, there are certified HA kits, and enlarged rotors for the front wheels, and options with notches, perforations, and simply from good brands. Every whim for your money.
The main thing to remember is that all alterations often actually lead to a decrease in the efficiency of the brakes, because the standard ones were not so bad and were still made by engineers, and not by garage “practitioners”.
Suspension
The Granta also has a suspension, and what a charm it is. It is precisely for these suspensions that people in the outback still love VAZ. Here the ground clearance is good, the moves, and the energy consumption are quite decent. Cars in the “Standard” configuration are usually equipped with a basic suspension with classic twin-tube shock absorbers, while the “Norma” and “Lux” have gas-filled ones. Both the springs and the stabilizer are different. In any case, the brand is SAAZ, the markings of the first suspension elements, shock absorbers and springs start at 2190, and the second - from 21980.
In theory, the second option should handle better, but in fact both are designed more for confident driving on very bad roads and comfort. If you need controllability, then there are modification kits. Moreover, the scale is impressive; you can even buy a front subframe with wishbones. Thanks to the “factory tuning” in the person of Granta Sport with its sports tubular arms on the subframe and Demfi struts, which set a good standard for the quality of suspension tuning.
As in the case of brakes, in practice it is not so easy to obtain excellent handling by installing any tuning elements; many modifications lead to its deterioration. But installing upper and lower braces and stiffer crabs usually gives the maximum result for a car without special preparation of the body and rear suspension.
The peculiarity of the Granta suspension is that its front MacPherson strut is very archaic in design. There is no subframe, the rack is located high on the engine shield, and a scheme is used with the main support arm and a stretcher arm attached to a forward bracket (the so-called “crab”).
The main advantage of such a suspension is comfort and low quality requirements for rubber products in its composition. The disadvantages are the high compliance of literally all attachment points of the levers relative to the engine shield and rack and, as a consequence, the difficulty in adjusting the handling and its dependence on the design solutions of the body.
At Grant, the designers already understood the basic principles that gave the 2108 sharp steering, and the 2110, on the contrary, jelly steering, so that even the basic cars had taxiing and comfort characteristics that were quite acceptable at the beginning of the 2000s. But with an emphasis on comfort, of course.
In addition to constructive ones, there are other disadvantages. Thus, high bending moments acting on the strut support cup are not supported by the strength of the body, and as a result, the standard support amplifier and the cup itself bend. And the strut support suffers, although modern Grant ones are made with a large bearing, similar to foreign ones.
The high variable load on the front end of the spar does not have the best effect on the durability of its seams, and the strength of the tension brackets is always insufficient; making them stronger means worsening the already poor passive safety of the body. And for confident movement in the style of “more speed - fewer holes”, the strength of the standard one is not enough.
The rear beam is structurally almost ideal, but it has no margin of safety at all. Soviet weight discipline is still noticeable. As a result, its properties as a torsion bar for anti-roll bar are not very pronounced. And she really needs a separate stabilizer to help.
Okay, enough theory. In a large city like Moscow or St. Petersburg, the resource of the Grant suspension is limited mainly by the aging of rubber elements due to chemistry and has little to do with loads, unless we are talking about minor accidents and impacts on curbs. It confidently withstands its four to five years and a hundred to one and a half thousand kilometers, gradually losing the characteristics of the shock absorbers, especially quickly - the rear ones, which do not like loads. At the same time, the front support amplifier is bent. At high peak loads, the corresponding elements, bracing brackets, supports, and, less often, the transverse arms of the front suspension are usually given out.
To make a tragedy out of suspension repairs on a Grant means to be either a formalist or a very greedy person. Prices for decent spare parts are at the level of a mid-range budget foreign car and even lower.
Of course, you won’t achieve the legendary “Mercedes” suspension mileage, nor comfort, but in general you can get good performance for an inexpensive price. And you don’t need to order anything; completely normal spare parts can be found in any corner of the country. But, as with other spare parts for VAZ, you need to be careful: silent blocks made of raw rubber and brackets made of recycled materials, repainted used shock absorbers are found on sale alarmingly often.
Steering
The rack here is simple mechanical and well known to at least two generations of mechanics. It lasts 150-200 thousand if you keep the anthers intact and do not abuse off-road driving and flying over uneven terrain.
On cars with an electric power steering there is a shorter one, on cars without an amplifier there is a longer one, but they are structurally similar. The attachment to the engine shield is not very good, but the design is clearly forged in the fire of the old school of engineering. In the sense, it is optimized for minimum production cost, weight and acceptable resource.
The EUR on the Grant is an add-on for the steering column, and it exists in two versions. The domestic gearless one from Avtoelektronika from Kaluga pleases with its steering quality, and the Mando from Korea is simply more reliable due to a better torque sensor, but it can jam at the most inopportune moment. Unfortunately, it is difficult to combine the advantages, and even the latest versions of the Kaluga electric power steering suffer from not very good soldering, including the torque sensor cable, but Mando seemed to be completely abandoned in 2014 after a loud scandal with a jammed steering wheel on cars for journalists. And it’s true: it’s better without power assistance than with a steering wheel that’s tightly jammed.
But in fact, you can find Korean amplifiers on later cars: for example, almost all Granta Sport are equipped with them. By the way, many owners of cars with electric power steering advise lubricating the amplifier gearbox by adding new grease using a grease nipple through the hole of one of the bolts. According to reviews, this significantly improves responsiveness in the near-zero zone.
As for the rest, it is worth noting the regular problems with cardan joints, the short service life of rods and ends (but how elegantly the nuts are locked on the factory versions). And also the low cost of all consumables.
Bleeding the front brakes of a VAZ
Let's move on to the front mechanisms. On a VAZ-2104 or any other “classic”, the difficulty of operating the front circuit lies in the fact that they have a block brake caliper, that is, each of the two brake pistons is actuated separately.
Therefore, in order to gain access to the external piston fitting in order to bleed the brakes on a VAZ-2105, you will have to remove the wheel. Here, too, the principle of distance between the mechanism and the main cylinder applies, so the left wheel is pumped first. Everything is done like this:
- Jack up the wheel and remove it;
- There is no need to touch the fitting of the internal piston (and it is not always available; instead, there may simply be a plugged hole). Next, pumping is carried out according to the already familiar scheme: pumping - draining - pumping (4-5 times);
- The right front wheel is pumped last. The algorithm of actions is identical;
Replacing the front wheel brake cylinder
Remove the front wheel and securely fix the car on the support stand.
Turn the steering wheel all the way in the direction on which the cylinder is removed.
Remove the brake hose.
Unlock the bolts securing the cylinder to the guide pins of the bracket and unscrew the bolt securing the cylinder to the lower guide pin.
Using a 13mm spanner, unscrew the bolt securing the cylinder to the upper guide pin, holding the finger from turning by the hexagon with a 17mm wrench.
Remove the brake caliper.
We clamp the caliper in a vice with soft metal jaw pads.
Using a 14mm socket, unscrew the two screws securing the cylinder to the caliper
Separating the cylinder from the caliper
To replace the piston boot, use a screwdriver to pry up the retaining ring.
Remove the boot from the cylinder flange.
Install a new boot and assemble the bracket (cylinder with caliper) in reverse order
We remove the guide pin of the bracket from the hole in the guide pads
Apply a thin layer of graphite lubricant to the working surface of the finger. Install the bracket in reverse order.
We bleed the hydraulic brake drive.
Features of work on models starting from VAZ-2108
Now let’s look at the specifics of the operation on other cars of the VAZ family. Starting with model 2108, the circuit diagram has changed, and therefore the sequence is somewhat different. And you need to know it before bleeding the brakes on the VAZ-2108, 2109, 21099.
These cars already use a diagonal arrangement of contours. That is, one of them combines the rear left and front right wheels, and the second - the other two.
Bleeding begins, as usual, from the farthest wheel, that is, from the rear right one. An operation to remove air from its brake mechanism is carried out according to the described sequence.
But there is one caveat. The design includes a pressure regulator for the rear wheel drive mechanisms. If the rear of the car is hung out before bleeding, this regulator must be unlocked. To do this, just install a screwdriver between the regulator rod and the thrust plate.
After all work it should be removed.
Then it is pumped to the second rear wheel, and the front left one, since it is the one that is combined with the circuit with the already pumped rear mechanism.
After pumping each mechanism, it is necessary to check the level in the tank. If you omit this point, then during operation the liquid will go into the system and air will enter it again.
General issues
Let's figure out when you need to change the pads and what to choose from components.
When to change rear pads
Rear pads on Grant are changed at the following indicators
:
- the wheels make noise - rattle - vibrate when braking;
- 1.5 mm (or less) left on the pads;
- the pads have delaminated, causing the wheels to periodically jam;
- stopped holding the handbrake;
- You recently changed the front pads, but haven’t touched the rear ones yet.
As always, the obvious point: we change the pads as a set along the axes! You cannot replace only the right or left wheel and leave the other with the old brakes.
Even with severe wear on the pads, the car can slow down, but this is dangerous and unacceptable.
Selection of components for Grants
We have compiled a table of articles for spare parts
to replace brakes.
Here it is (can be used to search and order online): List of article numbers for all spare parts that may be required for work.
For example
:
Search results for pads in one well-known online store.
– the same in another well-known online store.
There are never too many options.
ABS allows you to shorten braking distances and maintain maneuverability when braking.
Self-pumping using the example of a VAZ-2110
On the Lada “Ten” everything is done in the same way as on the VAZ 2108-21099 models, since the design of the brake system is the same. Therefore, let’s look at how to bleed the brakes on models 2110-2112 yourself, without help.
To do this, you will need to use one additional element - an aerator, which you can buy or make, and a rubber hose with ends on both sides for connection to the nipple.
A homemade aerator is a lid from a “classic” brake reservoir (without a built-in sensor), into which a nipple from a tubeless wheel is installed.
The essence of pumping yourself is very simple and it is done like this:
- The car is immobilized. A bleeding hose is put on the fitting of the brake mechanism that is being pumped;
- The aerator is screwed onto the brake reservoir, and one end of the hose is connected to it. The second one is put on the nipple of an inflated car wheel (for example, a spare tire);
- Unscrew the fitting half a turn. In this case, the air pressure from the spare tire will begin to squeeze out the liquid. All that remains is to monitor when liquid flows through the tube without air bubbles, and tighten the fitting;
This way all mechanisms are pumped. The air pressure of one wheel is enough to completely bleed the system;
But there is one nuance in this - the pressure supplied to the tank should not be very high (no more than 1 atm). Otherwise, there is a risk of the lid falling off or the tank being damaged.
Bleeding the brakes using the described methods is also applicable for more modern VAZ models - 2114-2115, Priora, Kalina. And all because the design of the brakes is completely identical.
Features of work on the VAZ-2121 Niva
As for the VAZ-21213 Niva, this car has its own characteristics. And although the system on this car is dual-circuit, it is different from other VAZ cars.
On this SUV, one circuit combines all 4 brake mechanisms, and the second - only the front wheels. To ensure that the circuits are independent, the Niva uses a block caliper in front, to which two brake hoses fit; accordingly, there are two fittings for bleeding.
Bleeding the brakes on a Niva is done in the following sequence: first, air is expelled from the rear right mechanism, then from the rear left one. Next, the general circuit on the front brakes is pumped - first the right, then the left (the principle of the distance of the wheel from the master cylinder). In this case, it is important not to confuse the fittings - the upper one is responsible for the general contour, and it is this that should be used.
Only then is the front brake circuit pumped, for which the lower fitting is used. Here the pumping sequence does not matter; you can start with both the left and the right mechanism.
But the Chevrolet-Niva does not use such a brake design. A conventional diagonal dual-circuit system is installed there, so the pumping sequence is identical to the process on VAZ-2108 and higher cars.
New set of rear brake pads
To replace the old ones, a new set of rear brake pads was purchased from.
We bought these pads for the first time, so there is nothing to say about them. At the same time, they “lifted the mood” a little. Pay attention to the upper right corner. The manufacturer focuses the buyer's attention on the protection against counterfeiting that this set of pads supposedly has. Nearby you can see a protective sticker, which, according to legend, ensures that the original cannot be replaced “anyhow.” Now let's turn the packaging over.
As you can see, there is no sticker on the opposite side! Open the package, take out the pads and put whatever you want in there. That's protection, that's protection! We can only hope for the integrity of the seller.
Why does the air interfere?
Liquid, unlike air, is practically incompressible, which means it transmits force in full. Along with the brake system, in modern cars the power steering and automatic transmission are hydraulic (operating due to fluid pressure).
Let's imagine a situation where there is a certain amount of air bubbles in the brake fluid pipe of one of the rear wheels.
What will happen in this case when you press the brake? Where there is no air, the fluid will transmit force and the wheel will lock immediately. The air will be compressed and the force transferred to the brake pads will not be enough, the wheel will continue to rotate. For this reason, the car may skid.
Caliper repair methods
Caliper malfunctions can be different. However, we can highlight the most common cases, as well as recommendations for eliminating them.
Brake pads jam in caliper
This is noticeable when, with the caliper removed, the pads do not move freely. Usually the reason is rust on the stationary caliper pads, which prevents the pads from moving.
To eliminate the problem, you should arm yourself with sandpaper, a metal brush and a file (but only a small one). Then you need to clean off the corrosion from the metal, and then lubricate the surface with a high-temperature type lubricant. However, there should be no wear on the caliper - pits from corrosion. If they are present, cleaning will not help - the pad will not be pressed tightly enough or will not move away from the surface of the brake disc quickly enough.
When pumping is necessary
After renovation
The brakes will have to be pumped in all cases where the tightness of the system has been compromised:
- Replacement, repair of master or working brake cylinders;
- Damage and replacement of hoses, flaring of brake pipes;
- Repair of other components and elements of the brake system.
Periodic fluid replacement
There is no universal answer to the question “how often to change brake fluid”. If the technical documentation of your car does not clearly indicate the frequency of replacement, it is recommended to do this once every 2 years, or after 50 thousand mileage.
The main reason for replacement is the accumulation of moisture in the liquid. Why is this dangerous?
Moisture lowers the boiling point. Friction during braking causes the pads, calipers and the fluid itself to heat up, even to the point of boiling. When boiling, air bubbles are released, which is why air in the brake system is dangerous, as described above. In addition, water causes corrosion and can freeze. Both are fraught with consequences.
Unsatisfactory performance
As a rule, the driver notices a change in the operation of the brakes: decreased efficiency, pedal failure, slow response to pressure, and so on. In these and other cases, bleeding the brakes can be a solution to the problem.
About the piston
The next problem is the rear brake caliper piston. It can become unusable if there is no lubrication. Why is this happening? The most popular reason is the destruction of the rubber boot. It is through this that dust and water will get inside, which provokes corrosion processes. The lubricant dries out or is simply washed away. As a result, the piston runs dry. Why is this phenomenon dangerous? At one point, the piston may simply jam and not return to its original position. This will cause the wheel to completely lock at speed. The higher it is, the more dangerous the consequences will be. The way out of the situation is to purchase a rear brake caliper repair kit. This piston is not subject to further use. But if the problem is detected in time, you can limit yourself to just replacing the rubber boot. How much does it cost to repair a rear brake caliper? The cost of restoration in this situation ranges from five hundred to a thousand rubles.
Important points
Before you start pumping, you should remember a number of important rules that will help you avoid additional problems.
- Before work, inspect the main components for leaks. If the seal is broken somewhere, bleeding the brakes will be a waste of time and effort.
- Always monitor the brake fluid level in the expansion tank. If it becomes empty during operation, the system will become even more airy.
- Never use an open-end wrench to unscrew fittings - the edges are easily torn off.
- Be sure to clean the fittings from dirt; before pumping, it’s a good idea to spray them with WD-40 and wait 10-15 minutes. Often the fitting becomes tightly “stuck” to the brake cylinder and breaks off when you try to unscrew it. If the fitting does not budge, try gently heating and cooling it several times.
- On vehicles equipped with a brake force regulator (sorcerer), the rear of the vehicle must be loaded before bleeding. You can simulate loading by slipping a screwdriver between the regulator rod and the pressure plate.
- If there are no special instructions from the manufacturer regarding the bleeding order, the following scheme is recommended: rear right wheel, rear left, front right and front left.
Self-leveling
There are two ways to bleed brakes alone: by gravity, and by air pressure.
Gravity flow
Gravity bleeding is more suitable for replacing fluid when there has been no serious airing. Since the old fluid is displaced without pressure, air bubbles may remain in the places where the tubes are bent, in the upper cavities of the cylinders.
The idea is simple: the fittings on the brake cylinders are unscrewed, and new “brake fluid” is constantly added to the reservoir. It is recommended to put transparent tubes on the fittings; they will allow you to see the moment when new liquid begins to flow out.
The disadvantages include low speed and low efficiency.
Air pressure
If you don’t have an assistant, you can bleed the brake system yourself by making a simple device. To do this, you will need an additional expansion tank cap and a tubeless tire nipple.
We cut the nipple into the lid and the primitive device for creating excess pressure is ready. The maximum pressure should not exceed 1-2 atmospheres, otherwise there is a high probability that the expansion tank will burst.
Pressure can be created by a pump, or by using a spare tire. In this case, you will have to make an additional accessory - a hose with valves at both ends.
Now all that remains is to unscrew the bleeder fittings one by one, starting with the wheel farthest from the expansion tank. One end of the transparent hose is put on the fitting, the other is immersed in a container of suitable size.
Slowly unscrew the fitting so that the brake fluid mixed with air bubbles begins to leave the system. When we see that the air has run out (for this we need a transparent tube), we tighten the fitting.
Before moving on to the next wheel, be sure to check the fluid level in the tank and top up if necessary. » alt=»»>
Causes of a hard brake pedal
If the brake pedal is either soft or hard, or the pressure is too tight, there are also several possibilities for the problem. The main reasons here include:
- clogging of the air filter of the vacuum booster. Basically, here you need to replace the filter itself;
- increased sizes of sealing rings in wheel cylinders.
Typically, in this case, the pedal became hard after changing the brake fluid.
You should not use low-quality death; it is better to buy the liquid recommended by the manufacturer. As a result, such a problem will not occur; - presence of mechanical damage on the diaphragm. The element should also be replaced;
- problems with the functioning of the tip in the amplifier. It is necessary to replace it with a working part;
- check valve stuck. These components cannot be repaired, so they should be replaced;
- Vacuum booster valve sticking. You just need to replace this element;
- presence on the hose between the intake manifold and the deformation amplifier or loosening of the fastening. First, try tightening the fastening clamp. If this does not help, you need to change the hose.
We discussed why a soft or hard brake pedal effect occurs. Regardless of the cause of this problem, malfunctions of the braking system are quite serious, so you should take a very responsible approach to diagnosis and repair. If you cannot fix the problem yourself, you should immediately contact a professional - in no case is it recommended to get behind the wheel of a car in which the brakes do not work correctly.
Bleeding the brakes with an assistant
This method does not require additional devices; all actions are performed in the car with the ignition turned off. The assistant's task is to create pressure in the brake system.
If a person is doing this for the first time, explain to him how important coordination of actions is; he makes movements only at your command. Under no circumstances should you release the pedal before you tighten the fitting. If this happens, the system will suck in air and you will have to start the bleeding procedure all over again.
- Unscrew the cap of the expansion tank and fill it to the maximum possible level.
- Take a place at the right rear wheel, put a tube on the fitting, and immerse the other end in a container. It is important that the other end is in the liquid. Then, even if the assistant releases the pedal ahead of time, it will be drawn into the system, not air.
- On command, the assistant pumps the brake pedal until it becomes hard and loses its range.
- Without releasing pressure on the pedal, the assistant reports readiness.
- You slowly unscrew the fitting and watch how the “brake fluid” comes out along with air bubbles.
- When the pedal goes to the floor at about 3/4 of its travel, the assistant immediately reports this so that you tighten the fitting.
- As soon as this is done, the assistant begins to pump the pedal again. The number of iterations depends on the amount of air.
- If no air bubbles are observed after 3-5 iterations, move on to the next wheel. Don't forget to check the level in the tank.
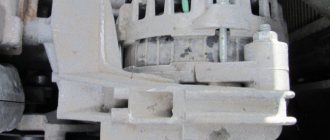
Working principle of brake caliper
The brake caliper performs its main task - it provides the necessary braking force required to slow down or stop the car.
Pressing the brake pedal causes pressure to build up in the brake line. It is transmitted to the caliper pistons, which at this time strictly parallel fixes the pads relative to the disc. When braking, the calipers compress the pads on both sides of the disc, causing it to slow down. But there is another effect. It involves heating, as friction energy is transformed into heat. This significantly heats up both the disc and the pads and calipers. The temperature of the brake fluid also increases.
This effect places certain demands on manufacturers. So the front brake caliper must have the following characteristics:
- high heat transfer rates;
- strength;
- high resistance to heat (so that increased temperature does not deform the caliper components).
Video: General principle of operation of the rear caliper
ABS brakes
The braking system is constantly being improved, and the presence of ABS in the first generations of the car did not in any way affect the method of pumping the brakes. Now EBD, BAS, ESP, SBC and other auxiliary functions have significantly complicated the process, and often made it impossible at home.
Hydraulic accumulator, pump, hydraulic valves - the presence in the system of these components controlled by the ECU requires serious diagnostic equipment. Therefore, if the instructions for the car do not contain clear instructions for bleeding and you are not sure of the correct actions, it is better to contact a service station.