Habit is a serious matter. Both used and relatively new 2106s will be in demand among the public for a long time. The car is over 40 years old, but people buy it and are happy. The point, apparently, is the lack of a reasonable alternative. The problems of the automotive industry will be the last thing that concerns us today. This same six, although ancient, is also a machine, with all its whims and requirements. There are not many of them, which is why they love the car for its endurance and unpretentiousness. And so that it not only drives, but also brakes effectively, the Italians came up with a simple hydraulic brake system, which is installed on all VAZ 2106s.
Typical malfunctions of the VAZ 2106 brake system
Since the VAZ 2106 is a very old car, the vast majority of problems with its brakes are well known to motorists. Let's list the most common ones.
Brake pedal too soft
At some point, the driver discovers that in order to press the brakes, he needs practically no effort: the pedal literally sinks into the floor of the cabin itself.
The photo shows that the brake pedal is almost on the floor of the cabin.
Here is a list of reasons why this happens:
- Air has entered the brake system. It can get there in different ways, but usually this happens due to a damaged brake hose or because one of the brake cylinders has lost its seal. The solution is obvious: first you need to find the damaged hose, replace it, and then remove excess air from the brake system by bleeding it;
- The brake master cylinder has failed. This is the second reason why the brake pedal sinks to the floor. Identifying a problem with the master cylinder is quite simple: if the brake fluid level in the system is normal and there are no leaks on the hoses or near the working cylinders, then the problem is likely in the master cylinder. It will have to be replaced.
Reduced brake fluid level
Bleeding the brakes may also be necessary when the level of brake fluid in the VAZ 2106 system has dropped seriously. This is why this happens:
- The car owner does not pay enough attention to checking the brakes of his car. The fact is that fluid can gradually leave the reservoir, even if the brake system seems sealed. It's simple: there are no completely sealed brake systems. Hoses and cylinders tend to wear out over time and begin to leak. These leaks may be completely unnoticeable, but they slowly but surely reduce your overall fluid supply. And if the car owner does not add fresh fluid to the reservoir in time, the effectiveness of the brakes will seriously decrease;
Over time, small cracks appear on the brake hoses, which are not so easy to notice. - decrease in fluid level due to a large leak. In addition to hidden leaks, obvious leaks can always occur: one of the brake hoses can suddenly break due to both enormous internal pressure and external mechanical damage. Or the gasket in one of the working cylinders will become unusable, and the liquid will begin to escape through the resulting hole. This problem has only one advantage: it is easy to notice. If the driver, approaching the car, sees a puddle under one of the wheels, then it’s time to call a tow truck: you can’t drive such a car anywhere.
If there is a large brake fluid leak, you should not drive the car.
One wheel does not brake
Another typical problem with the VAZ 2106 brakes is when one of the wheels refuses to brake along with the others. Here are the reasons for this phenomenon:
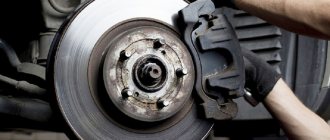
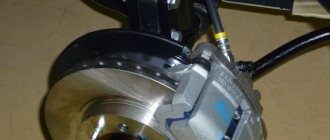
- If one of the front wheels does not brake, then the reason is most likely in the working cylinders of this wheel. It is likely that they are stuck in the closed position. So they cannot move apart and press the pads against the brake disc. The cause of cylinder jamming can be either dirt or ordinary rust. The problem can be solved by cleaning or completely replacing the device;
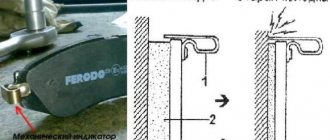
- The lack of braking on one of the front wheels may also be due to complete wear of the brake pads. This option is most likely when the driver uses fake pads, the protective coating of which does not contain soft metal. Manufacturers of counterfeits usually save on copper and other soft metals, and use ordinary iron filings as a filler in the pads. The protective coating of the pad, made on the basis of such sawdust, quickly collapses. Along the way, it also destroys the surface of the brake disc, covering it with potholes and scratches. Sooner or later there comes a time when the wheel simply stops braking;
Uneven wear of brake pads leads to a severe decrease in braking efficiency - lack of braking on one of the rear wheels. This is usually the result of a failure of the cylinder that spreads the C-shaped shoes in contact with the inner surface of the brake drum. This may also be due to a break in the spring that returns the pads to their original position. This may seem paradoxical, but it is a fact: if the pads do not return to the cylinder after the brakes are applied, they begin to dangle and constantly touch the inner wall of the brake drum. This leads to the destruction of their protective surface. If they wear out completely, then at the most critical moment the wheel may not brake, or the braking will be very unreliable.
Recommendations for performing work
The brake bleeding procedure usually involves inspecting the brake pads, discs and hoses. Brake pads must have the required minimum reserve, and microcracks are not allowed on the hoses. In the rear drums, it is necessary to maintain the adjustment of the brake pads (for an effective braking process).
A properly pumped hydraulic system produces equal force on each side of the vehicle when braking. If the car tends to change its trajectory, this indicates the presence of air in one of the sides.
Pushing to the right means there is air in the brake mechanisms on the left (and vice versa). The smaller the braking forces on one side, the greater the forces that tend to turn the car in the other direction. List of tools required for work:
- wheel wrench and jack;
- 8 key for fitting;
- rubber tube and jar;
- rags, WD fluid, pliers.
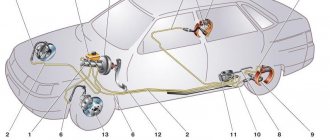
/> 1. Brake disc. 2. Front brake pad. 3. Piston O-ring. 4. Wheel cylinder piston. 5. Front brake wheel cylinder. 6. Brake hose of the front brake drive circuit. 7. Brake pad mounting pin. 8. Piston stroke limit screw. 9. O-ring. 10. Stop cup. 11. Rear brake drive piston. 12. O-ring spring. 13. Bushing. 14. Master cylinder body. 15. Front brake drive piston. 16. Seal. 17. Rod. 18. Vacuum valve. 19. Valve body return spring. 20. Valve body. 21. Diaphragm. 22. Vacuum valve body. 23. Vacuum booster housing cover. 24. Rod buffer. 25. Piston thrust plate. 26. Piston. 27. Vacuum booster valve. 28. Valve spring. 29. Valve return spring. 30. Air filter. 31. Valve pusher. 32. Pedal release spring. 33. Stop light switch tip. 34. Brake light switch. 35. Pressure regulator housing plug. 36. Pressure regulator piston. 37. Housing bushing. 38. Piston head seal. 39. Spring plate. 40. Piston spring. 41. O-ring of the pressure regulator piston. 42. Pressure regulator drive lever. 43. Rear brake pad. 44. Pad tension spring. 45. Rear brake wheel cylinder piston. 46. Piston spacer spring. 47. Wheel cylinder piston seals. 48. Brake pedal. 49. A. Vacuum cavity. 50. B. Channel connecting the vacuum cavity with the internal cavity of the valve. 51. C. Channel connecting the internal cavity of the valve with the atmospheric cavity. 52. D. Atmospheric cavity. 53. K. Hose. connecting the vacuum booster to the engine intake pipe. 54. I. The pedal is not pressed. 55. II. Braking. 56.III. The pedal is paused. 57. IV. Disinhibition.
A correctly performed bleeding procedure guarantees traffic safety and efficiency of the braking system of the VAZ 2106.
Changing the master cylinder of the VAZ 2106 brakes
Like the wheel cylinders, the brake master cylinder cannot be repaired. If this part breaks, the only reasonable option is to replace it. Here's what's needed for this replacement:
- new master brake cylinder for VAZ 2106;
- open-end wrenches, set;
- flat screwdriver.
Sequence of operations
Before starting work, you will have to drain all the brake fluid from the system. Without this preparatory operation, it will not be possible to change the master cylinder.
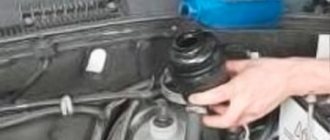
- The car engine turns off. You need to let it cool completely. After this, the hood is opened and the fastening belt is removed from the brake reservoir. Next, use a 10mm wrench to unscrew the tank’s mounting bolts. It is removed, the liquid from it is drained into a previously prepared container.
To remove the tank, you first have to unfasten the belt that holds it in place. - Hoses are connected to the brake fluid reservoir. They are secured there using tape clamps. The clamps are loosened with a screwdriver and the hoses are removed. Access to the master cylinder is provided.
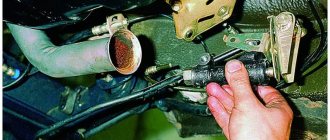
- The cylinder is attached to the vacuum brake booster using two bolts. They are unscrewed with a 14 key.
The main brake cylinder of the “six” is held on by only two bolts - The brake cylinder is removed and replaced with a new one. After this, the reservoir is installed in place and a new portion of brake fluid is poured into it.
Let's sum it up
Tuning a car's brake system is a very responsible job. Unsuccessful modernization of the appearance of a vehicle or its interior will only affect the unpresentable appearance of the car. A mistake in upgrading your brake system could cost you or other road users your life. Take responsibility for modifications that affect the vehicle's braking system. Buy only certified high-quality spare parts from reputable manufacturers. Proceed to independently improve the brake system of your car only if you are completely confident in your abilities and capabilities.
vote
Article rating
Bleeding the brake system of VAZ 2106
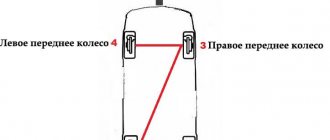
Before starting work, you should remember that the brakes on the VAZ 2106 are pumped in a certain order: the right wheel at the rear is pumped first, then the left wheel at the rear, then the right wheel at the front and the left wheel at the front. Violation of this order will result in air remaining in the system, and all work will have to be started again.
Violation of the wheel bleeding pattern leads to incomplete removal of air from the brake system
In addition, you should pump the brakes with the help of a partner. Doing this alone is very difficult.
Sequence of operations
First, preparation: the car should be driven onto an overpass or into a viewing hole and put on the handbrake. This will make it easier to access the brake fittings.
- The car hood opens. The plug is unscrewed from the brake reservoir and the fluid level in it is checked. If there is not enough fluid, it is added to the mark on the tank.
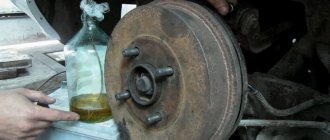
The liquid in the reservoir should reach the top edge of the horizontal metal strip - The assistant sits in the driver's seat. The owner of the car goes down into the inspection hole and puts a key on the brake fitting of the rear wheel. Then a small tube is put on the fitting, the other end of which is lowered into a bottle of water.
- The assistant presses the brake pedal 6–7 times. In a working brake system, with each press the pedal will sink deeper and deeper. Having reached the lowest point, the assistant holds the pedal in this position.
- At this time, the car owner unscrews the brake fitting with an open-end wrench until brake fluid flows from the tube into the bottle. If there is an air lock in the system, the escaping liquid will bubble strongly. As soon as bubbles stop appearing, the fitting is screwed into place.
Pumping continues until air bubbles stop coming out of the tube into the bottle. - This procedure is done for each wheel in accordance with the diagram mentioned above. If everything is done correctly, there will be no air pockets left in the system. And all the car owner needs to do is add a little more brake fluid to the reservoir. After this, the pumping procedure can be considered complete.
Video: pumping the brakes of a VAZ 2106 alone
Causes of problems with bleeding the brakes of the VAZ 2106
Sometimes the driver is faced with a situation where the brakes on a VAZ 2106 simply do not bleed. Here's why this happens:
- violation of the pumping order. This is the most common reason for unsuccessful bleeding of brakes on the “six”. Novice drivers forget that the brakes on the VAZ 2106 are dual-circuit, and therefore it is very important to follow the pumping schedule. And if you start pumping from the front wheels, and not from the rear, then it will simply be impossible to expel all the air from the system;
- poor quality brake fluid. It's no secret that in the modern market of fuels and lubricants there are a huge number of counterfeits, and, as a rule, the products of the most popular brands are counterfeited. Brake fluid is no exception. If the driver is “lucky” to buy just such a liquid, then its viscosity can increase greatly over time. In especially severe cases, the fake brake fluid thickens so much that its consistency begins to resemble grease. Of course, in this case there can be no talk of any normal bleeding of the brakes. The brake system will have to be disassembled and thoroughly cleaned.
So, the life of the driver and his passengers depends on the condition of the “six” brakes. Therefore, maintaining them in good condition is his direct responsibility. Fortunately, most troubleshooting operations can be done independently, in your garage. All you need to do is strictly follow the recommendations outlined above.
Bleeding the brakes when using a medical syringe
The sequence of actions is as follows:
- Brake fluid is drawn into the most ordinary medical syringe.
- The syringe is connected (hermetically) to the cap of the brake fluid tank. To do this, you can use sealants or mechanical seals if you don’t have time to wait for the sealant to dry.
- Place a bottle under the leakage area and unscrew the fitting.
- We press on the syringe plunger, thereby creating pressure. Thus, pumping brake fluid into the system.
- In turn, a trickle of brake fluid along with air should appear at the exit point.
In order to be completely sure that there is no more air left in the brake system, in this simple way you should push absolutely all the fluid through the system.
Removing air from the hydraulic drive
Bleeding the VAZ 2106 brakes should start like this: first, bleed the front circuit, and then the rear circuit. Partial bleeding is carried out only along the axles of the car, but not along the wheels. Removal and installation of the master brake cylinder ends with complete removal of air along all axes. When bleeding the brakes, it is recommended to work together with an assistant, since it is very difficult to do it alone.
At the same time, you will need to press the brake pedal and relax the caliper fittings. To ventilate the front axle, the car is lifted and the wheels are removed. After this, check the fluid level in the GTZ tank and put a rubber or silicone tube of a suitable diameter on the caliper air fitting.
Its other end is placed in a glass container, into which a little working fluid is poured so that the end of the tube is immersed in it. First you need to slightly loosen the fitting with a size 8 wrench; if this fails, then use WD fluid to clean the threads.
Other engine modifications: intake and exhaust
If you take into account the recommendations of experts, in order for the engine to turn out to be resourceful, you should not strive to increase its volume beyond the 1.6 liter mark. An increase in volume above this figure will mean that the engine becomes “heavier” and spins less intensively.
As for modifications, special attention should be paid not only to the block, but also to the cylinder head. The modification involves grinding the cylinder head channels through which fuel flows from the intake manifold. It is important to achieve not only a larger channel cross-section, but also a smooth transition, and also that all channels end up being the same.
The next step will be to upgrade the exhaust ports and valves. The channels are polished and the valves can even be replaced. For example, a suitable option is selected (it can also be from a foreign car), after which the valve stems are processed to the dimensions for a VAZ engine.
We also recommend reading the article about whether it is possible to install a turbine on an engine with a carburetor. From this article you will learn about the features and nuances of installing a turbocharger on a carburetor engine.
The valve plates should also be processed at the same time. It is important to adjust all valves according to weight. Separately, it is worth approaching the issue of installing the camshaft. In order for the engine to pull well from the bottom and at high speeds, it is optimal to select a camshaft that provides high valve lift. At the same time, a split gear is also required for precise adjustment of the valve timing.
Where to look for the cause in other components of the car
Now let's look at other elements that can cause knocking when braking. One of the reasons may be a banal loosening of the wheel fastening. In this case, it will play during braking and hit the hub.
You should also check the hub itself for play. If the wheel bearing is heavily worn, knocking noises may occur when braking.
The next component of the car that should be checked is the suspension.
Worn silent blocks and bushings may be the cause of this problem. Wear of the silent blocks of the steering mechanism can also lead to knocking noises.
Wheel rim bolt pattern for VAZ, Ford, Opel, Nissan, bolt pattern table
Finally, you should check the engine mounting. Loosening it on one of the cushions can easily cause a knock.
In general, when knocking noises appear, you should start checking from the brake pedal and go to the mechanisms. Moreover, you need to inspect and check carefully. Even a small amount of play can lead to this problem.
Along the way, you should also evaluate the condition of all elements of the car located near the hubs or connected to it.
Another reason is video.
labavto.com
The braking system is an important part of a vehicle. To ensure the safety of the driver and other road users, it must always be in good working order. Therefore, it is necessary to monitor its condition and correct faults in a timely manner. To do this, you need to know its structure, symptoms of problems and how to fix them.
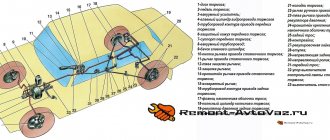
Purpose and design of brakes
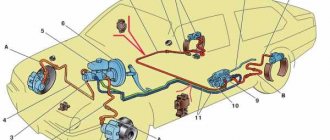
The VAZ 2106 has two braking systems: service and parking. The primary one is equipped with a hydraulic drive; it includes a vacuum booster, central brake and working cylinders, and a brake pressure adjusting device. It is designed to provide braking while the car is moving by blocking its front wheels. The second operates thanks to a mechanical drive after the car stops, blocking the rear wheel pair. The working system consists of two circuits that are activated by a brake pedal attached to the front panel of the body.
The operating principle of the primary system is simple. The driver presses the brakes, and pistons connected to the brake pads extend from hydraulic cylinders. They squeeze the disk, it rotates more slowly until the machine comes to a complete stop. Thanks to these actions, the car brakes smoothly.
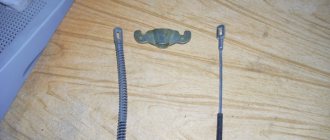
The parking brake includes a cable, brake lever, and C-shaped shoes. The principle of its operation is slightly different. When the handbrake is applied, the hydraulic cylinders extend the pistons. They act on the brake pads, which move apart and press on the drum from the inside, fixing the rear wheels, which prevents the car from moving.
Typical brake system problems
If problems arise with the brakes, they are manifested by the following symptoms:
- the car brakes incorrectly and at the wrong time;
- the car skids while braking;
- the car brakes slowly and ineffectively;
- When using the handbrake, the cable gets stuck.
The car brakes untimely when the engine is still running and the car starts to brake. A breakdown of the vacuum booster can cause a malfunction. Air enters the system through it. In this case, the seal or protective cover is worn out. The assembly may have been performed incorrectly. To eliminate the problem, it is necessary to completely replace the amplifier. The reason may be a lack of lubricant, so when replacing it, you need to generously lubricate the seal by first unscrewing the cap.