Everyone knows how important the performance of brakes is in extreme conditions; the lives of the driver and other road users often depend on them. Unless your brake pedal is working, you should stop using the vehicle immediately. Fixing a faulty brake will help prevent accidents. To know what problems may arise and how to repair the car, you need to know very well the principle of operation of the braking device. Let's take a closer look at how the brake system works on the VAZ-2109.
Read also How to check the Hall sensor on a VAZ-2109 (injector, carburetor)
How to improve the brakes on a VAZ 2109
Don't piss,
I turn around on it every day, soon there will be 2 and 3 clicks
I completely removed the springs from the side of the cable that goes into the drum, inflated the cables themselves with the transmission, changed the expansion plate and pads. The handbrake has become much lighter and holds much better.
I completely removed the springs from the side of the cable that goes into the drum,
+1 I do the same thing, only I bite off 3-4 turns. at the same time, you will forget about replacing the cable forever, and it will hold 100%
On the left is the normal one, on the right is the modified one.
I redid it 10 thousand ago, until nothing fell off.
What function does this spring actually serve?
In short, when the cable stretches, you pull the handbrake and think, 7-8 clicks. need to tighten up.
And this is useless because this same spring, when compressed, does not allow the pads to be fully extended.
And it seems to you that you lifted the handbrake with force and the brakes do not hold, this is the effect of a compressed spring which, having chosen its compression, allows the cable to be pulled further.
So . I don’t recommend throwing out the spring completely, but biting off 4-5 turns (in the drum) will really help.
gorodionok_igor
Listen, my friend’s Kalina car had this problem.
It all started like this, he says he doesn’t hold the handbrake well. I say I need to pull it up. I bring my key, climb under the car and pull it up. I tell him to check the clicks. He says 3 I get out, I think everything is ok I get into the car and pull as usual at home Result 8 clicks..
In short, a handbrake system without an amplifier. If there is not enough braking force, it means you are not pulling hard enough.
Messages 14
1 Topic by kanalia 2008-11-17 12:03:26
- kanalia
- User
- Offline
- Registered: 2008-11-10
- Messages: 25
- Reputation: [ 0 | 0 ]
Subject: Bad brakes.
The pedal is elastic at first, then soft and then terribly tight.
It doesn't brake well, to brake well you have to press the pedal hard.
That is, it starts to grab as soon as I press the pedal, but not hard, at a speed of 60 km per hour you have to press the pedal hard..
I feel like the efficiency of guarding has been lost.
1. Front and rear pads looked ok
2. Cylinders do not leak
My guess is that there is an air lock? How do you think? I think first before I start.
2 Reply from barsyya 2008-11-17 12:05:29
- barsyya
- Administrator
- Offline
- Registered: 2008-11-06
- Messages: 2,179
- Reputation: [ 2 | 0 ]
Re: Bad brakes.
what did they do? where did it all start??
3 Reply from kanalia 2008-11-17 12:07:22
- kanalia
- User
- Offline
- Registered: 2008-11-10
- Messages: 25
- Reputation: [ 0 | 0 ]
Re: Bad brakes.
It started with saving two salaries and buying a car)
Now I’m making sure everything worked as it should.
It was with such problems that I got it.
4 Reply from barsyya 2008-11-17 12:14:02
- barsyya
- Administrator
- Offline
- Registered: 2008-11-06
- Messages: 2,179
- Reputation: [ 2 | 0 ]
Re: Bad brakes.
laugh then first bleed it and look at the vacuum hose
5 Reply from Rus-yaz 2008-11-17 12:55:51
- Rus-yaz
- User
- Offline
- Registered: 2008-11-08
- Messages: 447
- Reputation: [ 0 | 0 ]
Re: Bad brakes.
Is the pedal hard when the car is off? if not, then it is VUT (vacuum brake booster) 100%.
If it's hard, pump it.
p.s. I think it's a replacement for VUT.
6 Reply from kanalia 2008-11-17 13:02:27
- kanalia
- User
- Offline
- Registered: 2008-11-10
- Messages: 25
- Reputation: [ 0 | 0 ]
Re: Bad brakes.
The pedal is hard, I'll bleed it and report back.
7 Reply from kanalia 2008-11-24 08:57:34
- kanalia
- User
- Offline
- Registered: 2008-11-10
- Messages: 25
- Reputation: [ 0 | 0 ]
Re: Bad brakes.
The pedal is hard, I'll bleed it and report back.
So, I changed the brake fluid, but the liter flask still fell out, and in the trunk there was a painfully old one lying around by date.
I also changed the front pads, the ones that were all chipped.
Well, that means now the pedal is soft at first and then it sticks and brakes normally, I didn’t do this, so I think that they left a water plug, I’ll probably just pump it again. (but slows down well)
8 Reply from XPum827 2008-12-05 12:34:49
- XPum827
- User
- Offline
- Registered: 2008-11-08
- Messages: 934
- Reputation: [ 1 | 0 ]
Re: Bad brakes.
The pedal is hard, I'll bleed it and report back.
So, I changed the brake fluid, but the liter flask still fell out, and in the trunk there was a painfully old one lying around by date.
I also changed the front pads, the ones that were all chipped.
Well, that means now the pedal is soft at first and then it sticks and brakes normally, I didn’t do this, so I think that they left a water plug, I’ll probably just pump it again. (but slows down well)
It is advisable to replace the gas turbine seals; it is possible that they are already worn out and do not hold well.
Also, when pumping, make sure that the sorcerer (brake force regulator) is turned on, otherwise the rear line will not bleed as it should.
Z.Y. It is better to take fresh liquid, as it is hygroscopic and absorbs moisture over time.
9 Reply from kanalia 2008-12-15 07:17:02
- kanalia
- User
- Offline
- Registered: 2008-11-10
- Messages: 25
- Reputation: [ 0 | 0 ]
Re: Bad brakes.
I haven't written for a long time, but the story has come to an end.
So, so, the second time I didn’t pump it, but recently I barely got home, the car didn’t move at all, it fell jerkily and stalled. The brake pedal is terribly hard, I already assumed that it was VUT, so I went and bought it - 1100 rubles. And I changed, but damn, the hose from the block, where the attachment to the block is old, the clamp has not changed since the car left the factory, and here too. In short, the hose became stiff and, literally, when I took it out, it just broke off and crumbled, I think that was the problem, but VUT installed a new hose and clamp, of course. With the new shoe, the pedal is unusually hard and brakes differently, but it still seems a little wrong to me, because from the beginning it grabs a little and then you have to press hard to get it properly, I don’t know, I’ll also look at the GTZ seals, how the weather will be.
How to improve the brakes on a VAZ 2109
Many traffic accidents occur because the driver loses control of the vehicle, especially when braking. Modernization is necessary in case of increasing engine power, as well as in case of constant movements at high speed. Also, it must be said that I would recommend it to the owners of our cars. Modernizing this system is the most dangerous and, moreover, prohibited procedure. But she's worth it. So... If you have read the review material on brake systems, we can talk to you about their modernization (of course, if necessary).
Let's start by replacing the front pads and discs (ventilated discs with special cutting), imported reinforced pads. We install a more powerful vacuum amplifier. They are now selling more powerful amplifiers for our cars. If you are the owner of a foreign-made car, then most likely you will have to select from more powerful cars. The more powerful the booster, the faster the brakes will apply. In addition, the installation of a more powerful amplifier is necessary when installing more powerful braking systems. if necessary).
Now let’s replace the rear drum brakes with disc brakes (read about replacement on the VAZ 2108-2110 in another article).
Advantages of disc brakes:
- As the temperature rises, the performance of disc brakes is quite stable, while drum brakes decrease in efficiency.
- The temperature resistance of disks is higher, in part because they are better cooled.
- Higher braking efficiency allows for shorter braking distances.
- Less weight and size.
- Increases brake sensitivity.
- Response time is reduced.
- Worn pads are easy to replace; on drum pads, you have to make efforts to adjust the pads to fit the drums.
- About 70% of the vehicle's kinetic energy is absorbed by the front brakes; rear disc brakes reduce the load on the front discs.
- Temperature expansions do not affect the quality of fit of the braking surfaces. if necessary).
In most cases, unless you have a rear-wheel drive car, of course, this is a fairly simple procedure. The only rather big minus: you will have to think about modifying the hand brake. You will need to change the hub, install a caliper, replace tubes with hoses, install a disc, and reconfigure the pressure regulator. If you have a rear-wheel drive car, then everything is more complicated for you. In most cases, the rear axle will have to be replaced. The easiest way is to pick up an axle from another car (this is a rather expensive operation and can only be done at Tuning Centers).
If you are concerned about the issue of increasing reliability, then you can try to remake the brake circuits in your car. Namely, make them as follows: - the first goes to the front brakes - the second to both the front and rear
In this form, in case of any damage to one circuit, you will have front service brakes, which will always allow you to brake quite effectively. You really have to think about how to implement this on the front axle. This solution exists on our Moskvich 2141 and Niva cars, so you can borrow it from them!
You can also install ABS, the easiest way is to pick one up from the same foreign cars. It also needs to be adjusted and configured. Installing such a thing on our car will require a more powerful generator (it consumes a lot of electricity). And there will still be problems with setting up and installing sensors. In general, a rather expensive idea.
In our country, interfering (interfering) with the operation of factory brake systems is PROHIBITED, you can forget about an honest technical inspection. This could be dangerous to your life. Well, in general, I warned you...
Why does the brake pedal fail when the engine is running?
Most often, the brake pedal fails when the car is running for the following reasons:
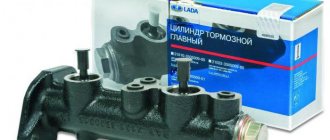
the main brake cylinder is faulty;
there is not enough brake fluid or it is of poor quality;
discs or pads are worn out;
the brakes are heated to too high a temperature, etc. If the pedal does not fall, but after starting it seems tight, and the car does not brake well, make sure that the VUT is in good working order. There are other signs of problems with this node:
engine speed fluctuates when you press the brake, although the fluid remains in the brake system reservoir;
When the engine is turned off, the pedal is always elastic, and not after several presses.
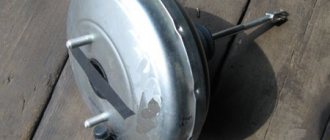
The vacuum brake booster is designed to reduce the driver's effort on the corresponding pedal during braking. Often problems arise due to damage to the vacuum diaphragm of the amplifier. Remember that this mechanism only works when the car is running.
Defects or wear in the diaphragm interfere with the vacuum in the booster chamber, so the brake feels very hard when applied after the engine starts. You can verify this by simply pressing the brake with the engine turned off: after 2-3 pumps, your leg should feel elastic, after which the engine starts. If the pedal does not become softer, you need to check the vacuum booster.
Diagram, bleeding and repair of the brake system of the VAZ-2109
Everyone knows how important the performance of brakes is in extreme conditions; the lives of the driver and other road users often depend on them. Unless your brake pedal is working, you should stop using the vehicle immediately. Fixing a faulty brake will help prevent accidents. To know what problems may arise and how to repair the car, you need to know very well the principle of operation of the braking device. Let's take a closer look at how the brake system works on the VAZ-2109.
Replacement
Since you can no longer be stopped and you want to equip the rear wheels of your VAZ 2109 with disc brakes, first prepare a set of necessary components that will be useful during the replacement process.
- Calipers. Take simple front calipers from a VAZ 2109;
- Hoses. Use front brake hoses as standard iron hoses will not reach into place;
- Pads. Any high-quality pads of the required size will do;
- Bolts, washers-grower. Requires M10x1.25 bolts 30 millimeters long. A total of 12 pieces and always with growers;
- Distance washers. Take the timing belt tensioner roller washers, which are used for the VAZ 2108. You need 8 of these pieces;
- Faceplate or caliper mounting plate. Need 2 pieces. Moreover, this part is non-standard; it will have to be made as accurately as possible using a coordinate machine;
- Disks. Front discs with a diameter of 240 mm are suitable. First sharpen them so that the hub seats coincide by 60 millimeters. You can machine the hub itself, not the brake disc. The choice is yours.
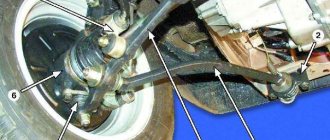
To achieve a high-quality result when installing disk mechanisms, you first need to ensure proper dismantling of the elements of the braking system.
Dismantling
Let's start the procedure. It is not the easiest, but it is quite possible to do it yourself.
- Remove the wheel.
- Release the tension on the handbrake cable and close the rear pads.
- Using a 12mm wrench, unscrew a pair of guide pins.
- Using a hammer, carefully knock down the brake drum. Before doing this, it is better to clean the seats with a wire brush, and also treat the surfaces with WD40.
- Apply gentle blows with a rubber mallet or use a wooden block. You should knock along the entire circumference of the brake drum. In some cases it comes off quite hard, but be patient.
- Using a screwdriver, pry up the lower tension spring TK and remove it. Using the same spring, you can remove the small springs (guides) that press the pads to the boot. This is the brake cylinder shield.
- Remove the springs, then grab the bottom of the brake pad and lift it up.
- Place the upper part against the brake cylinder and remove the spacer bar.
- Remove the shoe from the brake cylinder and remove the upper tension spring TK.
- Remove the handbrake lever from the handbrake cable and remove the second brake lever.
- Remove the bolts that secure the hub to the beam. Arm yourself with a split wrench or a regular open-end wrench 17 and a wrench to increase the leverage. Treat the bolts with WD40 and remove them.
- Proceed carefully, no sudden movements. Otherwise, you will simply lick off the edges of the fasteners.
- Before knocking down the hub, remove the brake pipe. To do this you need a split wrench. Having torn off the fastening, bend the tube slightly to the side and seal it with a cap, which must first be removed from the cylinder bleeder fitting. This will prevent brake fluid from leaking.
- The hub is held in the seat of the beam, and it is there from the factory. That's why she probably got attached to it. The blows will have to be delivered accurately and powerfully. Hit the support disk from the inside, alternating strikes from above and below.
- If you ruin the platter, no big deal. It's going to landfill anyway.
- When the hub begins to gradually separate from the beam, apply less strong blows. Knock off the hub completely.
Replacement procedure
Installation of HTD
Now comes the most crucial moment - installing disc brakes on the rear wheels of your VAZ 2109.
- Decide exactly how the caliper will be mounted. This can be done from behind or in front of the axle. Please note that this does not affect efficiency, so there is no need to think too much. To make it more symmetrical, we choose the rear location.
- Join the hub and faceplate into a single unit. Make sure the holes line up. If there are any inaccuracies, use gentle hammer blows to center the position. It is very important.
- Straighten the corners of the beam on which the caliper will eventually be able to rest. This can be done with a regular hammer. The processing of one or another corner depends on which side you chose for installation.
- Install the hub. Please note that you do not need to use an engraver for the upper left hub fixing bolt. Otherwise, you will have to work with a grinder, grinding off the fastener head. Without doing this, the caliper bracket will simply rest against the gromver.
- Place the purchased disc brake on the hub.
- Install a bracket on the faceplate, and place washers between the elements at the joints. This will give you the necessary clearances.
- In some cases, washers do not correspond to the required dimensions, so it is better to choose them specifically for your car.
- The connection between the faceplate and the bracket is tightened with an applied force of 3-4 Nm.
- Install the pads, connect the hose to the caliper, and then connect the tube to the hose. It is important not to do the opposite here.
- Seal the brake line and pressurize the system by pressing the brake pedal. Make sure the system is tight and there are no leaks.
- If everything works well, you can install the brake discs on the second rear wheel in the same way.
ZDT
After completing the assembly of the new brake system on the rear wheels, be sure to bleed the brakes. You cannot go on the roads without this.
It would be a good idea to visit a trusted car service center, where experienced specialists will analyze the quality of replacing drums with discs and make sure that the settings are correct. It would be nice to have friends here who won’t deceive you.
Improving brakes in the VAZ family
It's no secret that the standard brakes of the 910 VAZ family leave much to be desired. This didn’t suit me at all, so I firmly decided to improve the braking system. After a long conversation with Google, I settled on this option: VUT from Priora and GTZ from Shniva
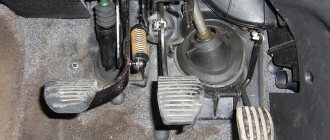
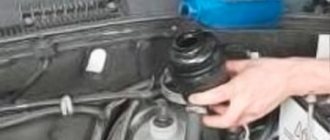
We disassemble the right side of the “fur coat”, remove the original VUT and pedal assembly
And now the most interesting thing: the attachment of the pedal assembly to the VUT on the Priora is mirror-image different from the desyatosh one. You need to drill 2 holes in the pedal assembly. At the same time, I didn’t have any room left for a nut on one stud; I had to drill out the side wall of the pedal assembly
Necessary materials
If you decide to install the HTD yourself, then you will need the following materials:
- Directly disc brakes, machined under the hub by 0.6 cm. The diameter of the disk should be 24 cm. Please note that it is not necessary to grind the disk itself. If you want to leave it unchanged, then you need to groove the hub.
- Front calipers and hoses.
- Faceplates necessary for attaching calipers. You will have to tinker with this part, since it is quite unusual and requires separate manufacturing to the exact dimensions.
- High quality pads that fit true to size.
- 12 bolts M10 × 1.25 with groovers.
- 8 spacers. You can use timing belt tensioner roller washers for the VAZ-2108.
When you have acquired all the necessary materials, it’s time to proceed directly to the replacement. The procedure is performed in several stages.
Stage 1. Removal of the PTA
First of all, you need to remove the wheel. After this, you need to loosen the handbrake cable and bring the pads together. The guide pins are unscrewed using a 12mm wrench.
If the car is old or the brakes have not been changed for a long time, it is recommended to treat the seats with a wire brush, and also lubricate all running surfaces with WD40. This will help you remove the brake drum without much effort.
Please note that even if the drum is tight, you need to remove it gradually, gently tapping it with a hammer along the entire circumference. If you do not want to damage the part, then use a hammer with a rubber tip or a rubber gasket.
Next, remove the tension spring and guides by prying them off with a screwdriver. After this, the brake pad needs to be lifted up, the spacer bar removed and the pad and tension spring removed.
To remove the second block, you need to remove the handbrake lever from the cable. The bolts that secure the hub to the beam should be treated with WD 40 and unscrewed with a split or regular 17 wrench.
At the last stage, the brake tube of the hub is dismantled. After this, you can begin installing the HCD.
VAZ 2109: tuning the brake system on your own
Tuning brakes VAZ 2109
Most accidents occur due to loss of control over the vehicle, especially when braking the VAZ 2109. Tuning the brake system is necessary when increasing engine power, as well as when driving at high speeds. It is worth noting that the modernization of this particular system is considered the most dangerous and prohibited procedure. On a VAZ 2109, to tune the brake system, you will need to replace standard parts.
Replacing pads and discs
VAZ 2109 brake tuning
First of all, they begin to consider the option of replacing pads and discs. In almost all cases, preference is given to ventilated discs with special cuts. The pads most often use reinforced imported ones. It would also be a good idea to install a more powerful vacuum booster. The superiority of disc brakes lies in the following facts:
- disc brakes are relatively stable as temperatures rise; in the case of drum brakes, their effectiveness decreases;
- since the disks are cooled better, their temperature resistance is much higher;
- Due to the high braking efficiency, the braking distance can be reduced;
- small size and weight;
- better brake sensitivity;
- response time is reduced;
- it is easier to change worn out pads, which cannot be said about drum brakes, where you need to spend time and effort on adjusting them;
- approximately 70 percent of the kinetic energy of the car is absorbed by the front brakes, the rear brakes help reduce the load on the front discs;
- Temperature changes do not in any way affect the quality of fit of the braking surfaces.
For more than 20 years, the VAZ 2109, created on the basis of the 2108 model, has been considered one of the most popular cars on the domestic market. But despite this, every car owner wants to make their own changes. For some, it is important to upgrade the headlights or perform body tuning, while others want to change the interior appearance of the cabin. Some drivers consider such measures to be secondary; they improve engines, suspensions and, of course, the brake system. It is precisely this system that needs to be given more attention.
Note. The simplest option for upgrading the brake system of a VAZ 2109 is considered to be replacing the “original” brake discs with discs from a VAZ 2110 or VAZ 2112.
What are the main differences between the new disks?
- Such discs are characterized by a ventilated design, thus the heat generated during braking is removed much more efficiently.
- The brake discs of the VAZ 2110 have a larger diameter, they cool much faster and brake vehicles more efficiently.
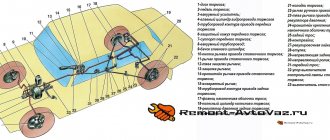
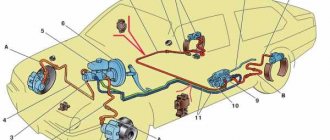
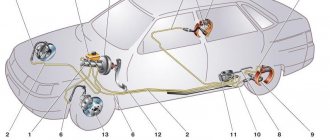
VAZ 2109 brake circuit
The effectiveness of ventilated discs can be assessed when braking at higher speeds. A simple disc heats up significantly, causing the brake fluid to “boil” and the brake pedal to “sink.”
Note! It should be taken into account that the rims of the 12th model are suitable only if the car uses 14-inch wheel rims. Classic 13-inch ones simply won’t fit on VAZ 2112 brake discs.
Before performing such independent work, you need to determine what size disks are installed on the machine. For example, if these are 13-inch products, it is better to give preference to brake parts from the VAZ 2110 model; in the case of 14-inch ones, it is advisable to install brake discs of the 2112 model.
Note! Experts say that the braking characteristics are much more noticeable during installation if you install brake discs on a VAZ 2112 car, since they are larger in size than parts from a VAZ 2110 car.
To modernize the brake system of a VAZ 2109, you need to acquire the following parts:
- two “tens” brake discs;
- two calipers and guide brackets of model 2110 or 2112. Since the brake discs of the “tenth” model are very thick, the caliper with the bracket must be larger accordingly;
- two protective covers.
VAZ 2109 front brakes
As a rule, brake cylinders with pads remain unchanged. Naturally, if these elements are damaged or significantly worn out, they will need to be replaced. In this case, you need to prepare the brake hoses and tubes in advance.
Note! If repair or modernization of the suspension is not intended, it is advisable to inspect the main parts of the chassis, namely levers, rods, hinges, etc.
VAZ 2109 brake hose
Let us pay attention directly to the process of installing brake discs on a VAZ 2110. In fact, the modification steps are similar to the technology of simply changing brake discs. So:
- Unscrew the four bolts, then remove the wheel.
- The brake cylinder and caliper are removed.
- Unscrew the fastening bolts securing the bracket.
- Unscrew the casing mounting bolts.
- Unscrew the two studs from the protective casing.
- Remove the studs from the brake disc.
- Remove the disk itself.
Now a model 10 or 12 brake disc is installed, with all front brake elements put in place.
- a new disk is mounted;
- The bracket is installed and secured.
When the brake disc is in place, begin to change the caliper. To do this, you need:
- disconnect the caliper from the brake cylinder and install a new element in its place;
- Next, the brake pads are inserted, the cylinder and caliper are mounted and secured.
What can cause the brake pedal to fail?
The first thing car enthusiasts look at is the brake fluid. The liquid should not escape, and leaks at the joints of the lines and calipers are not allowed. This is usually all right, so the composition is usually completely replaced with a new one, simultaneously expelling air from the system. The next suspect is the brake master cylinder.
Drivers often look with distrust towards the vacuum brake booster. Checking the VUT is as easy as shelling pears: before starting the engine, hold down the brake pedal. If after starting the engine the pedal immediately became softer and went down easily, then the vacuum brake booster is working properly. Continuing the conversation about the VUT, we note that in some cases, in addition to the new amplifier, a fresh pipe with a new check valve is installed, which connects the VUT to the engine intake manifold.
The failure of the brake pedal is also caused by substandard hoses connecting the calipers to the brake lines. When you press the pedal, the defective hose may swell, causing the pedal to go down, and there will be no meaningful deceleration.
Pads and brake discs are sometimes added to the list of reasons. However, replacing them does not eliminate the problem under discussion. In total, there are three main components, problems in which lead to the brake pedal failing:
- Defective GTZ.
- Airy ABS block.
- Problems with calipers.
Tuning the rear brake system on a VAZ 2109
Equipping all four wheels with a disc braking system is now used by all leading car manufacturers. This system is considered the most effective and guarantees a high level of safety during vehicle operation.
However, the VAZ 2109 has not been produced in the Russian Federation since 2006, and it uses outdated drum brakes. The model is equipped with a disc braking system only on the front pair of wheels, where the load is the heaviest. Replacing drum brakes with disc brakes or the so-called tuning of the rear brake system is of consistently high interest among the owners of these cars.
It should be noted that such an operation is fully justified, leading to savings in fuel and lubricants and increasing safety during vehicle operation.
Recommended types of brake discs for VAZ 2109
Brake discs for VAZ 2109
To carry out such an operation, it is possible to use three types of disc brakes:
- It is possible to use brake discs of the carburetor version of the VAZ 2108, VAZ 2109 or VAZ 2110 series cars, removed from the front wheel pair. Their size corresponds to 13 inches and is quite suitable for use. A negative feature is their low efficiency during fast and dynamic movement.
- It is possible to install a brake system removed from VAZ 2111 and VAZ 21102 cars, which has increased aerodynamic properties, appropriate size and sufficiently high performance characteristics.
- The most justified, in the opinion of the majority of owners of VAZ nines, is the installation of wheels mass-produced by the Russian industry, which are used for cars with a 16-valve engine of the VAZ 2112 and VAZ 21103 series. They are fully compatible with 14-inch wheels, have a diameter of 257 mm and with long operation and high loads are most effective. This option may be the most expensive, but it pays for itself quite quickly and is the most profitable from the point of view of traffic safety in a dynamic urban cycle.
It should be noted that the main positive differences of the disc brake system are constant external control over the degree of wear of the brake pads, the ease of replacing them, as well as improved braking quality and an increase in the cooling rate of the brake discs.
In addition, the appearance of the car with disc brakes is quite consistent with modern ideas about sports sedans.
Advantages and disadvantages
If you decide to change from conventional drum mechanisms to disc brakes, be sure to take into account the positive and negative aspects of such a decision.
| Advantages | Flaws |
| Braking distance is reduced | High cost of new disc brakes compared to traditional drums |
| Braking force is distributed evenly across all wheels | Requirements for precise adjustment and tuning, which not everyone can do with their own hands |
| Unsprung weight is reduced | If installation requirements are violated, the car skids, it brakes unevenly, and squeaks occur. |
| Provides more efficient heat dissipation and prevents brakes from overheating | Replacing drums with DT is illegal and not a certified action for VAZ |
| Increases the reliability of the braking system | There may be problems with the traffic police. People don’t often find fault with rear disc brakes, but if they catch you, you’ll have to competently “excuse yourself” |
| Replacement and maintenance of pads cause fewer problems and difficulties | There are problems with the handbrake that needs to be changed or improved |
| No need to regularly tighten the handbrake | In case of accidents, you will most likely be the culprit, since such design changes are unacceptable by law |
| Appearance noticeably changes for the better | Careful adjustment is required after replacement, which is best done at a service station |
| Disc brakes do not freeze during winter washing, which cannot be said about drums | If you make an error during assembly, the rear wheels may begin to brake more effectively than the front wheels, which will cause serious consequences and troubles. |
Think carefully about the feasibility of carrying out such work. Please note that all responsibility falls on you.
Technical specifications
| GENERAL INFORMATION |
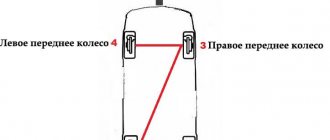
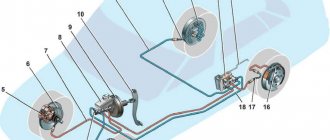
The service brake with anti-lock system is actuated by a hydraulic dual-circuit master cylinder (tandem type) and an additional hydraulic auxiliary device. The front (right and left) brake hydraulic circuits are separate and controlled by the master cylinder. The rear brakes (in the "Y" system) are controlled by a hydraulic assist device. The handbrake is mechanically actuated and operates the rear brakes. Front brakes
Front disc brakes. They use ventilated discs and single-piston floating calipers.
| Brake disc outer diameter | 260 mm (cars with 2.9 l 24V engine – 278 mm) |
| Disc thickness: | |
| – nominal | 24.05 mm |
| – minimum permissible | 22.2 mm |
| Maximum disc runout | 0.15 mm |
| Caliper cylinder diameter | 60.0 mm |
| Brake pad type | Ferodo 343 25 FF |
| Pad sizes | 38 x 111 mm |
| Pad thickness (without base plate): | |
| – nominal | 18.0 mm |
| – minimum permissible | determined by erasing the groove on the surface of the brake pad |
Rear brakes
Rear disc brakes. They feature full discs as well as single-piston floating calipers.
| Caliper: | |
| – brand and type | Ford L2 9024 |
| – piston diameter | 43 mm |
| Disk: | |
| - outside diameter | 252.7 mm (vehicles with 2.9 l 24V engine – 272 mm) |
| – thickness: | |
| nominal | 10.1 mm (on “Turnier” cars and with 2.9 l 24V engines – 20 mm) |
| nominal permissible | 8.9 mm (on “Turnier” cars and with 2.9 l 24V engines – 18 mm) |
| – maximum disk runout | 0.15 mm |
| Brake pads: | |
| – brand and type of pads | DON 8106/1 |
| – nominal thickness | 13.5 mm |
| – nominal permissible thickness | determined by erasing the groove on the surface of the brake pad |
Drive system
The system that operates the service brake is hydraulic, comprising a dual-circuit master cylinder and a hydraulic auxiliary device, as well as an anti-lock braking system.
| Brand | ABS Teves MK II, from 04.1992 – ABS Teves MK IV |
| Electronic control device | Teves |
| Wheel speed sensor resistance | 0.8 – 1.4 Ohm |
| Control pressure | 4 – 9 MPa |
| System safety valve response pressure | 21 MPa |
Brake fluid
| Quantity | 1.4 dm3 |
| Type | brake fluid Ford SAM 6C 9103 A |
| Replacement frequency | every 60,000 km or every two years |
Master brake cylinder
| Brand | Bendix or Ate |
| Piston diameter | 22.0 – 22.2 mm |
Vacuum brake booster
The vacuum brake booster operates on the master cylinder and contains a single diaphragm. Effective diameter: 227 mm.
Pressure regulator
The pressure regulator is installed on the rear brake line and limits the braking force of the rear wheels. Tightening torques
| Caliper bracket to wheel knuckle | 65 – 75 Nm |
| Attaching the front brake caliper to the bracket | 31 – 35 Nm |
| Rear brake caliper holder mounting | 51 – 61 Nm |
| Attaching the rear brake caliper to the guide pin | 51 – 61 Nm |
| Attaching the hydraulic control unit to the front bulkhead | 41 – 51 Nm |
| Attaching the hydraulic accumulator to the brake cylinder | 34 – 46 Nm |
| Brake cylinder mounting | 70 – 90 Nm |
| Fastening connectors (Banjo) of high pressure pipelines | 16 – 24 Nm |
| Brake fluid reservoir holder mount | 40 – 60 Nm |
| Mounting the wheel speed sensor | 85 – 110 Nm |
| Deaerator, maximum | 10.5 Nm |
| Wheel nut | 100 Nm |
How to repair a handbrake lever
Repairing the device consists of replacing the worn mechanism with a new one after removing it from the VAZ 2109 car. Damage can be: wear of the locking teeth, jamming or breakage of the lever, failure of the locking mechanism. So:
- The battery is turned off.
- Under the car, the nuts securing the equalizer to the drive cable are unscrewed, first the lock nut is unscrewed, then the adjusting nut.
- The equalizer is removed from the handbrake lever rod.
- In the car interior, all decorative trim between the front seats is removed. The plastic cover of the tunnel is removed, before this the cover is removed from the handle for shifting gears. The hatch into the tunnel is removed.
- The carpet is moved to the side.
- The retaining ring and drive rod are removed from the axle.
Repair of handbrake drive lever
- If necessary, the handle is unscrewed and removed, and the tension spring is changed.
- Assembly of the mechanism is performed in reverse order.