The interior of the VAZ-2170, surprisingly, did not cause any particular complaints from car owners. And this suggests that the Togliatti residents approached solving the problem more responsibly this time. And no wonder - even a design studio from Italy itself was attracted. But will all this stop connoisseurs of beauty in their desire to individualize the features of their car? And here everything depends on personal tastes, because the car is a budget car, and you can pour a lot of money into realizing your dreams, but, as you know, there are no limits to “perfection”. Therefore, it is important to stop in time so as not to particularly shock road users.
Dashboard upgrade
The main problem with the Priora dashboard is that it creaks a lot. The entire panel is made of fragile plastic. This is the source of creaking and rattling. Car enthusiasts who are tired of listening to these sounds glue all the joints on the dashboard with bitoplast (an alternative material is modelin, but the sound-absorbing properties of bitoplast are still better).
How to do
Before gluing, the panel will have to be removed from the car. To remove it, you only need a Phillips screwdriver.
To remove the entire panel, you only need a screwdriver
- All joints and places of contact of plastic parts are covered with a layer of bitoplast. Any universal glue will be suitable for this operation.
Bitoplast is ideal for gluing panels
- Particular attention should be paid to the edges of the air ducts. Practice shows that it is the air ducts that make the loudest noise, especially when the air conditioner is turned on.
The edge of the air duct should be glued especially carefully
- In some cases, electrical wiring harnesses are also wrapped in bitoplast (during movement they often shake and knock on the panel and walls of the air ducts).
- After gluing, the panel is reassembled.
Appearance
Currently, tuning for VAZ cars has a wide range of choices. Since Russian-made cars are quite inexpensive, this attracts their buyers. Tuning for Lada cars is also available and can be found in almost any city.
Tinted glass
To give your car a beautiful appearance, the first step is to tint it. Car tinting is relatively inexpensive, ranging from 2,000 to 3,000 rubles. But after tinting, your car will shine with new colors. It is legally possible to tint car windows only from the rear. Since the light transmittance of the film is not so high, viewing in the evening will be difficult.
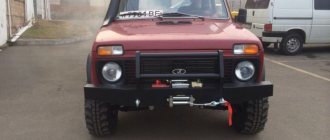
Lip installation
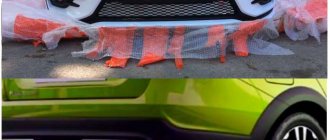
To give the car a stylish look, you can install a lip on the front instead of the standard fangs under the bumper. There are several types of lips. The rubber lip “Samurai” and the plastic lip from the Chevrolet Cruze fit perfectly on the Priora bumper. The lip should be secured under the bumper with self-tapping screws. The price of the lip is from 500 to 1000 rubles.
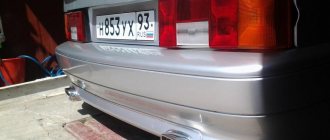
Lipspoiler
In the days of the nines, when our fathers raised the rear of the car by installing spacers under the rear shock absorbers and installing huge spoilers like in Need For Speed. Nowadays, it is stylish to lower a car; by the way, you can read how to properly lower a car on our website, and install a small spoiler that is glued to double-sided tape. The price of such a spoiler varies within 1000 rubles.
Alloy wheels
Everyone knows that the wheels of a car are the floor of the car, so the wheels of your car should be beautiful and you like them. On the Lada Priora you can install wheels with a radius ranging from R14 to R17. When installing R16 and R17 wheels, you will have to buy low-profile tires, which is very expensive and not practical, but at least beautiful. When installing disks with a large radius, comfort is lost and the chassis begins to work rougher since the rubber does not “eat up” minor road irregularities.
It is best to install R14 and R15 wheels. Such wheels are relatively inexpensive and the tires for such a radius are high profile. It follows that the comfort of driving a car will not be lost.
SE caps and mirror repeaters
In order to give your car a little luxury, you can install turn signal indicators in the prior mirrors and turn signal plugs in the wings on the SE. This modification is relatively expensive, but it significantly changes the appearance of the car and gives it a certain “richness”.
Sabers and bars
This is an amateur modification and is most often suitable for cars with a dark body color. The rear chrome-plated trunk saber and the front chrome-plated hood saber are painted matte black. This modification is very cheap and simple, but it has its own zest and is relevant when the chrome on sabers begins to swell, which is very common on Priors.
Antishildik
This modification consists of removing all nameplates from the car, but it also falls under the category of amateurs. Some car enthusiasts like their cars to look like they came from the factory. The nameplates must be removed using a hairdryer; they are glued with double-sided tape. After removing the nameplate, the remaining tape must be removed with gasoline or solvent.
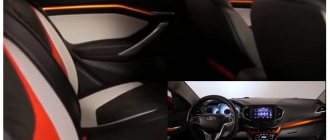
Interior reupholstery
The interior of a Priora is usually reupholstered only after several years of use of the car, or after some serious damage to the original upholstery. In other situations, car enthusiasts prefer not to bother with reupholstery, since it is an incredibly labor-intensive, although uncomplicated, procedure. Here's what you'll need to get started:
- knife;
- universal glue;
- construction hair dryer;
- scissors;
- marker;
- rubber roller;
- upholstery.
DIY finishing
The first thing to do is decide on the type of material. The most durable option is leather. But it is also the most expensive, so not every car enthusiast can afford it. In second place is leatherette. It lasts half as long as leather, but also costs half as much. Finally, you can use velor or carpet. These are the cheapest and shortest materials. But they are the ones who can make tuning the Priora’s interior incredible.
Leather is a durable, beautiful and very expensive material for interior trim.
- All old upholstery is removed from the car. It should be removed very carefully, since the elements of this upholstery (from the seat covers to the ceiling upholstery) will later be used as the basis for the pattern.
- After removing the upholstery, all surfaces in the cabin are thoroughly cleaned of dirt and dust.
- Based on patterns made from the old upholstery, new elements of the interior covering are cut out from the selected material. Then all the necessary holes are cut in them (for door handles, ceiling lamps, etc.).
- New upholstery is always installed on the doors first. Universal glue is applied to the material prepared for the doors. It needs to be allowed to dry for a minute. After this, the material is glued to the door and carefully smoothed with a rubber roller.
- Similar operations are performed with the ceiling upholstery and armrests. All air bubbles that arise under the material are removed using a roller.
- After gluing all the upholstery elements, the interior should dry. This requires 48 hours. To speed up the process, you can use a hair dryer. But it must work at minimum power.
Decor of plastic components
The sedan is equipped with a lot of plastic parts in the interior; fortunately, many of them have light colors and can be easily repainted. The process of painting plastic from an aerosol can requires not only a respirator and gloves, but also a degreasing liquid and a primer. During operation, it is important to prevent the formation of drips.
Another way to improve the appearance of plastic elements is to cover them with carbon film. According to many car enthusiasts, this material is durable and looks impressive. The blanks are cut with a margin of 20-25 mm at the edges, after which the film is glued to a degreased surface. Edges and curves are blow-dried to prevent kinks and kinks.
Source
Increased sound insulation
It was already mentioned above that the noise level in the Priora’s cabin is quite high. Therefore, drivers usually do not limit themselves to soundproofing the dashboard, and decorate the entire cabin with sound-absorbing material. Here's what you need for this:
- vibroplast. This material has excellent sound-absorbing properties. In addition, it dampens vibration well. The optimal thickness of vibroplast sheets for the Priora interior is 5 mm;
- isolon. The purpose of this material is to dampen those vibrations that the vibroplast did not dampen. That is why vibroplast and isolon are always used together. The thickness of the isolon must be at least 7 mm;
- foam rubber The noise-absorbing properties of this material are good, but it practically does not dampen vibrations. Therefore, it makes no sense to use it without a vibroplast. The optimal thickness of foam rubber is 10 mm.
Sequencing
Before starting work to improve sound insulation, the car owner will have to almost completely disassemble the interior of the Priora. It will be necessary to dismantle and remove all the seats, remove the dashboard and steering wheel. Then you will have to remove all the upholstery from the doors and floor.
Before starting work, you will have to remove literally everything from the interior
- After complete disassembly of the interior, it is necessary to prepare glue for the soundproofing material. It is prepared on the basis of construction mastic, to which white spirit is added. The mastic is mixed at the same time. The result should be a composition similar in consistency to thick sour cream.
- First, vibroplast is glued to the doors and to the front wall of the engine compartment under the dashboard. The mastic is applied to the vibroplast with a small paint brush. Then the sheets of material are laid on the floor of the cabin, and the place under which the Priora muffler passes should be especially carefully pasted over.
- The second stage is laying the isolon. Fragments of the appropriate shape are glued on top of the vibroplast using mastic.
- A layer of foam rubber is glued onto the isolon, and not mastic is used for gluing, but ordinary universal glue (mastic with white spirit can be absorbed into the foam rubber, negating its soundproofing properties).
- Only the doors and the wall of the engine compartment under the panel should be covered with foam rubber. There is no point in laying foam rubber on the floor: under the feet of the driver and passengers it will quickly crumble and stop absorbing sounds.
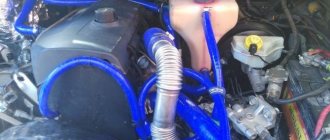
Tuning Priora and installing an advanced audio system
First of all, the acoustics in the front doors are being upgraded. The standard diameter of the speakers installed in the doors is not enough to provide high-quality sound. It is advisable to widen the hole and install at least a branded speaker with a diameter of 16 cm. The seat of the speakers in the door panel will have to be cut somewhat.
Acoustics in the front doors
The outer and inner walls of the door are glued on the reverse side with a sound insulator. Full noise and vibration insulation of the interior is carried out not least in order to create acoustic volume. First, the surface for sound insulation is degreased (with acetone or another solvent). The main thing is that the solution is not harmful to the car’s paintwork.
In addition to the main speakers, tweeters are also installed (generating high-frequency sounds) in the front windshield pillars or in the dashboard. There are also good additional speakers installed in the rear for the passenger seats. To preserve the natural acoustic volume, they should be packed in soundproof niches.
To ensure high-quality sound of low frequencies, it is also worth installing a subwoofer with an amplifier in the car interior. The most optimal solution would be to install a subwoofer in the luggage compartment area of the Lada Priora. You will also have to make your own case for it using the technologies already mentioned above.
Braid on the steering wheel
Initially, the steering wheel on the Priora was trimmed with leatherette, which has its drawbacks. Firstly, it is very thin and short-lived. And secondly, this material seems slippery. This, in turn, can have a very negative impact on driving safety. Therefore, a responsible car owner, after purchasing a car, first of all strives to install a new braid on the steering wheel. Its size is M1. Purchased at your local parts store, placed on the steering wheel and sewn together using a clamp needle.
The braid on the steering wheel is sewn together with a clamp needle
Lighting system
First of all, the headlights are modified:
- replacement of standard lamps. Initially, Priora is equipped with conventional halogen incandescent lamps, which cannot boast of either particular brightness or long service life. Therefore, instead of them, drivers install more durable and brighter LED bulbs;
- replacing lenses in headlights. Usually new lenses come with xenon illumination. On the one hand, it looks very beautiful. On the other hand, too bright headlights may raise questions among traffic police officers. Therefore, car owners prefer not to take risks, and after installing new lenses, they darken them slightly using special sprays that can be purchased at the same store.
Replacing the steering wheel
Some car owners do not like the standard Priora steering wheel and they prefer to get rid of it, replacing it with something more acceptable. This could be a “sports” steering wheel of small diameter, or a steering wheel of some non-standard shape. To remove the standard steering wheel from a Priora, you need the following tools:
- flat screwdriver;
- crosshead screwdriver;
- set of hexagons;
- 24mm socket and long ratchet driver;
- new steering wheel.
Sequence of operations
The Priora's steering wheel has an airbag. So first you have to get rid of it. And only then remove the steering wheel itself.
- The negative terminal is removed from the car battery. Now you need to wait until the protective system capacitor discharges (usually this happens after 45–50 minutes).
- The steering wheel is turned so that the wheels are straight.
- The cover is removed from the steering wheel, under which there is an airbag. It is held on by 7 screws, which are unscrewed with a screwdriver.
The cushion cover is held on by 7 screws
- The pillow itself is attached to two screws; they can only be unscrewed using a hexagon.
- The airbag is removed. Provides access to the steering wheel nut.
- The nut is unscrewed using a socket head. As a rule, such nuts are tightened very tightly, so you will have to apply serious force to unscrew it.
After unscrewing the central nut, the steering wheel can be removed
- After unscrewing the central nut, the steering wheel can be removed and replaced with a new one. The airbag then returns to its normal position.
Video: removing the steering wheel on a Priora with an airbag
Chassis
When it comes to changes in the chassis, the first thing drivers do is remove the standard brake booster and replace it with a vacuum one, always with two membranes. This doubles the reliability of the brakes. Stiffer springs and ceramic-coated discs are installed in the clutch basket, and a lightweight flywheel is installed on the crankshaft. This measure significantly reduces the vehicle acceleration time without premature wear of the clutch and gearbox.
The rear wheels of Prioras are often equipped with disc brakes from “tens”
Finally, the rear drum brakes are removed from the Priora and replaced with disc brakes from the VAZ 2110. The drum brake design is no longer used almost anywhere, since it is considered obsolete. Installing a disc system on the rear wheels increases braking reliability and requires virtually no modification.
About replacing seats on a Priora
Priora seats are another element of the interior that many car enthusiasts prefer to get rid of. The reason is simple: the standard seats are not comfortable. And this feels very good on long journeys. Most often, instead of the standard ones, the Priora is equipped with seats from a Mazda 6 (second generation). These seats are distinguished by the highest comfort, and in addition, their dimensions are almost the same as those of the standard “Prior” ones.
The Mazda 6 is an ideal “seat donor” for the Priora
But these seats have serious problems with fastenings. It will have to be cut off almost completely, and then welded again, fitting it to the Priora mounting holes. It is impossible to do all this in the garage without a grinder, a welding machine and the skills to work with it. Therefore, there is only one option: take the car to a car service center, having previously agreed on a price. Now the cost of installing Mazda seats on a Priora starts from 20 thousand rubles.
Trunk
Many people prefer to install speakers complete with a subwoofer in the trunk. This is done with both sedans and hatchbacks. And this is the most preferred option for lovers of powerful sound. There is only one problem: it will be impossible to use the trunk for its intended purpose. There simply won't be any room left in it.
Powerful audio systems are installed in the trunks of both hatchbacks and sedans
Not everyone is ready to make such sacrifices. Therefore, instead of powerful audio systems, LED lighting made from the strips mentioned above is often installed in the trunk. This is a very common phenomenon, because the standard lighting in the trunk and rear parcel shelf has never been bright.
Norma
A richer version, such a car will cost 417 thousand and include the following:
- Engine 1.6 liters with a power of 106 hp.
- Five-speed manual transmission.
- The driver will be protected by one airbag.
- The rear seats will have two headrests.
- The rear row has an ISOFIX system for installing child seats.
- The car already has an immobilizer installed.
- A modern alarm system is provided.
- Running lights for daytime use.
- ABS, BAS, EBD.
- The engine is protected from below by a solid steel sheet.
- The instrument panel includes an on-board computer.
- There is an armrest for rear passengers, and between the front seats there is a container for storing small items.
- The rear seats can be folded down.
- The passenger visor has a mirror.
- There is a 12 V socket in the cabin.
- There is a case for storing glasses for the driver.
- The steering rack and seat belts are adjustable, and power steering is installed.
- The windows are tinted from the factory.
- Central locking is installed, which can be controlled from the alarm key fob.
- Audio preparation is provided.
- The side mirrors are electrically heated.
- The front door windows are raised by electric windows.
- The wheels are size R14, steel sheets, decorated with caps.
- All door handles will be painted to match the body color.
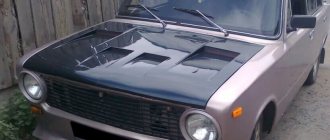
Manufacturer's modifications
Air intake mesh in frill
To ensure the supply of clean and fresh air to the interior of the Priora, the manufacturer has provided a cabin air purification filter. But since the holes in the frill for air intake are very large, which contributes to the fact that foreign objects and debris get into the filter and render it unusable. In order to correct this ailment, it is necessary to solder a metal mesh into the frill, which will protect the filter from debris. This will extend the life of the cabin filter.
Interior noise insulation
As you know, Russian cars are not famous for sound insulation, so domestic Kulibins do the sound insulation of their cars themselves. In order to make sound insulation in the Lada Priora, it is necessary to completely disassemble the interior and glue all the necessary places such as the floor, ceiling, doors, trunk and engine compartment. Sound insulation is glued in. several layers such as vibration, heat, noise. After which the car will be unrecognizable
Acoustic shelf
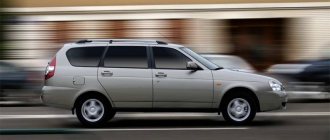
In a hatchback body on a Lada Priora, it is best to replace the rear parcel shelf with an acoustic one made of wood. Since the original shelf simply loses its shape and bends at extreme summer temperatures. In addition, a standard shelf creaks quite often.
Installation of the 5th gearbox support
On 16 valve engines, 4 engine mounts are installed from the factory. Two guitars and two props. On 8 valve engines there are 3 supports. Two supports and one gearbox cushion. Most owners of 16-valve cars prefer to install such a support on their engines. This support allows you to reduce the rattling of the gear shift lever, its jerking when moving and simply helps to securely secure the engine in the engine compartment. It should be noted that after installation, some vehicles experience increased vibration at idle.
Masses
On modern cars, it is becoming more and more common that manufacturers reduce the cost of the production process. Also in Priora, the plant saved on the cross-section of ground wires. Experienced prior engineers advise transferring redundant masses from the generator to the ECU. This is necessary to ensure reliable voltage on the on-board network without sags.
New covers - new seat
The covers are easy to install and at the same time significantly change the interior of the Lada device. Most often, they are used in a new car, so that when later sold, the seat upholstery remains in its original condition. A new cover will easily “update” the atmosphere and can add comfort. The most popular are fur covers. In winter, they warm the driver, and they are also much softer than the standard Priora seat upholstery.
It is also better to refrain from installing leather covers. They do not allow air to pass through well and cause active sweating in the driver. At low temperatures, such covers will “tan” and quickly become unusable. Therefore, the best option is universal covers. They will fit any seat model. You can purchase “station wagons” in almost any store at a relatively affordable price. The disadvantages include the likelihood of wrinkles appearing, which cause discomfort. Therefore, if you want to get maximum comfort, it is better to order a model case from specialists.