Any modern car needs diagnostics and repairs. The condition of the suspension, vehicle load and some other factors have a significant impact on the direction and inclination of the light flux. The VAZ 2114 headlight hydrocorrector will help correct the negative consequences associated with headlight illumination.
Hydrocorrector of headlights VAZ 2114
This is especially important on the highway, because incorrectly adjusted headlights can shine not on the road, but directly into the eyes of oncoming drivers, which can lead to an accident. In order to prevent such a scenario from happening, you should monitor the technical condition of the lighting devices and carry out all the necessary preventive procedures in a timely manner.
What is a proofreader for?
Probably every driver has found himself in a situation where an oncoming car is blinding and it is impossible to see anything. Vision is restored only after some time. To prevent this from happening, headlight spotters are installed on cars. The device maintains the position of the optical axis during changes in the position of the vehicle body. The light generated by the optics should be adjusted when the machine is not yet loaded. After loading, the light flux changes direction, moving relative to the optical axis. To correct the situation, a correction system is needed.
If the trunk of the car is heavily loaded, the front part of the body necessarily rises a little. The light from the headlights goes up and can blind the driver of an oncoming car. The auto-corrector adjusts the tilt of the light - the beam remains at the same level when the trunk of the car is overloaded or for some reason its front part is raised.
Video “How to adjust the light with your own hands”
This video shows how to independently adjust headlights (the author of the video is avtomobilistTV).
All VAZ models, starting with the “fives”, are equipped with a device that allows you to adjust the direction of the luminous flux of the headlights in the vertical plane. Simply put, the driver, without leaving his seat, can lower/raise the reflector while driving to optimally direct the light. The VAZ 2114 headlight hydraulic corrector is installed on models 2113-2115. Owners of these cars will be interested in learning how to determine whether the headlight range control is faulty and, if necessary, replace it.
Causes of hydraulic corrector malfunction, repair
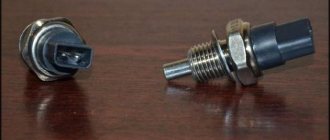
Most often, the corrector stops working during periods of sudden changes in external temperatures, when the rubber seals on the cylinders can crack and leak. Damage to the connecting tubes can also lead to loss of fluid from the system. Whatever the reason, the working cylinders freeze in one position and do not respond to switching.
It will not be possible to repair the hydraulic system itself, since the manufacturer does not provide such a possibility. Therefore, if an all-season fluid leaks, the hydraulic corrector assembly must be replaced with a new one. However, there may be a situation when the reflectors stop rotating due to something other than a faulty corrector. This occurs if the adjustment lever that transmits force to the headlight reflector loses contact with the working cylinder rod. The presence of such a malfunction can be suggested by the fact that one of the reflectors has stopped turning.
Adjusting the hydraulic corrector rod
In order to eliminate such a breakdown, it is necessary to restore the engagement of the working rod (there is a recess on it) with the spherical end of the adjustment lever. You should do the following:
- Tighten the bolt that regulates the position of the lever fulcrum until it stops.
- Move the reflector to its lowest position.
- Align the lever ball and the rod notch, then unscrew the adjusting bolt to the required position.
Replacing headlight hydraulic corrector
If you decide to install a hydraulic corrector, which is installed standard on Lada cars of previous years of production, you can do the work yourself. On more modern cars (Priora, Kalina, Granta, etc.) electrical systems can be installed.
Parsing and removing old
Algorithm of actions for dismantling the hydraulic corrector:
- unscrew the screws on the clamps securing the tubes to the corrector parts;
- disconnect the actuators attached to the snap-on latches from the headlight units;
- from the passenger compartment, remove the rotating handle of the hydraulic regulator from its place (it is located directly on the main cylinder);
- unscrew the plastic nut with which the main cylinder is screwed to the “torpedo”;
- pull it out (after pushing the rubber seal into the cabin) complete with plastic tubes and actuators.
Hydraulic corrector in the cabin with the handle removed
Installation and connection of a new
Installation of a hydraulic corrector instead of a faulty one is carried out in the reverse order of dismantling - nothing complicated is observed here.
If you decide to install an electric device (it is ideal instead of a hydraulic one), the algorithm of actions will be slightly different:
- remove the negative terminal from the battery;
- dismantle the old hydraulic corrector along with the pipes, main and working cylinders;
- replace it with an electrical device;
- dismantle the lever of the old mechanism in the cabin;
- connect the “plus” of the electrical corrector to the 20th contact of the block, the “minus” can be “found” under any body stud in contact with the metal;
- instead of plastic tubes, lay the wires from the kit and, for reliability, secure them with dielectric clamps to the common wiring harness;
- attach the actuators to the headlight housings;
- Replace the removed negative battery terminal and check the operation of the system.
Installing a new device (master cylinder)
During the installation of the electric corrector, it makes sense to simultaneously check the efficiency of the optics. If you notice condensation inside the headlamp, it is better to replace it, because in the future the level of road illumination will only worsen.
More:
- a black coating inside indicates that the light bulb does not have long to “live”, so it needs to be replaced and it is better to do this in advance, and not on the way;
- if you notice peeling of the reflective layer, you will also have to buy a new headlight (it is better to change both units together);
- inspect the block lens - if the scratches and chips are serious, it is recommended to replace the old glass, using a special sealant when installing a new one;
- Before installation, clean the protective caps from dirt.
The best and most expensive option is to install an automatic correction system. In this case, the driver does not need to do anything: the device will automatically adjust the beam of light. The design includes sensors installed at the front and rear. Their task is to determine the ground clearance on both axles of the car. This allows you to “calculate” the tilt of the body and send the necessary information to the electronic control unit. He gives a command to the actuators, and, taking into account the speed of movement, the latter, through a gear motor, change the angle of inclination of the head optics. The system is quite complex and requires a professional approach during installation.
Light adjustment
After installing a new corrector (no matter hydraulic or electric), it makes sense to adjust the light beam. To do this, you need a flat wall, which must be marked in accordance with the manufacturer’s recommendations (see
in the car's operating instructions). The marking can be done independently, in accordance with the figure below.
Further:
- stop the car five meters from the marked wall;
- use the hydraulic corrector handle to set the correct light beam;
- Each headlight can be adjusted individually;
- if the “efforts” of the hydraulic corrector are not enough, use the mechanical levers located on the headlight unit.
Wall marking scheme for light adjustment
Design and principle of operation of the headlight range control
It is worth noting that the operating principle of different types of headlight range control units is approximately the same. At the same time, a distinction is made between automatic and manual settings. In the latter version, the position of the headlights is adjusted using a special regulator installed inside the car, and with the help of its rotation, the driver independently changes the angle of the optics. In the first case, the electronics automatically configure everything itself, depending on the landing of the car.
Manual headlight range control
This headlight range control is installed on many budget cars, so it is familiar to a large number of car enthusiasts. As the name suggests, the corrector is activated directly by the driver. To do this, as a rule, you just need to turn the wheel, or as it is also called, the rotary switch. The electromechanical drive of the headlight range control is most often used, so we will consider it.
The adjustment wheel usually has digital or graphic markings that indicate the position of the headlights. Adjustments are made by the driver as necessary, depending on the vehicle’s load and changes in its tilt in the longitudinal direction relative to the center of gravity.
Simply put, if three people sat in the back seat, and you had to put four bags of potatoes for your mother-in-law in the trunk, then obviously the back of the car will lower and the front will rise, causing the headlights to shine too high and blind oncoming drivers.
To prevent this from happening, you need to turn the wheel so that the beam of light goes down.
Turning the knob gives the corresponding command to the gear motor, which is needed to turn the headlight to a certain angle. In fact, a gear motor is nothing more than a worm gear, which is necessary to convert the rotational movement of the electric motor (located inside the gear motor) into the translational movement of the rod, which directly acts on the headlight, changing its angle.
Structurally, the headlight is hinged at the top, and the rod with a ball end (resting against a spherical latch) holds the lower edge of the headlight. And it is the back and forth movement of the lower part of the headlight, with the upper attachment point remaining unchanged, that gives the necessary change in the angle of inclination.
A manual headlight leveler is very simple, very reliable and, most importantly, a useful device, but it has one very significant drawback: most drivers forget to use it and blind their colleagues, despite the fact that they have the opportunity not to do so.
Automatic headlight leveling system
Automatic headlight leveling is a more advanced technology because it does not require any action from the driver. The cut-off line is adjusted automatically based on sensor readings.
Automatic headlight leveling can be installed on vehicles equipped with either halogen or xenon headlights. For xenon, this is even necessary, since this type of headlight emits light of very high intensity, and in the absence of auto-corrector, it can pose a serious threat to traffic safety.
As for the design of the headlight auto-corrector, the following elements can be distinguished:
- Control block;
- sensors that measure the vehicle's ground clearance at various points;
- device that adjusts the headlights (actuator).
Typically, the system uses two or three sensors that measure ground clearance. Either one sensor or a pair can be installed at the front. And one sensor is located at the back.
Early systems used potentiometric sensors, but they were not reliable enough, so they have now been replaced by non-contact angle sensors.
The operating principle of these sensors is based on the Hall effect. The mechanism of operation of the sensor is quite simple.
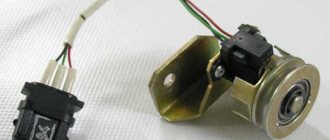
Structurally, the sensor consists of a rotor (moving part), with permanent magnets built into it, and a stator (fixed part), which, in fact, is a Hall sensor.
The sensor is attached to the bottom and is connected to the suspension using a rod. The change in suspension travel is transmitted through the rod to the rotor, which rotates, causing a change in the magnetic flux, which is detected by the Hall sensor.
The magnitude of the change in the magnetic flux is subsequently recalculated by the control unit into the required angle of rotation of the headlights, and the corresponding signal is sent to the actuator. In its work, the control unit takes into account not only the angle of inclination of the vehicle, but also the speed, as well as the nature of the vehicle’s movement.
What does the automatic headlight leveling system consist of and how does it work?
The autocorrector system can install from one to three ride height sensors; they are placed in front and behind the body. In addition, the system uses a non-contact rotation angle sensor, the operating principle of which is based on the Hall effect. The sensors are attached to the body and connected to the suspension using special rods. The sensor itself consists of a moving rotor with permanent magnets and a stationary stator in the form of a Hall sensor.
The position of the body in relation to the suspension is recognized thanks to sensors and a rod that changes its position by turning the rotor, which in turn changes the magnetic flux. This flow is taken into account by the Hall sensor, after which the headlights are adjusted taking into account the specified algorithms. Cheaper automatic headlight leveling systems use only one sensor - ultrasonic. The only sensor is mounted in the rear of the body according to the principle described above. The signal that comes from the sensors is received by the ECU (electronic control unit) of the automatic headlight leveling. The control unit is guided by certain algorithms that take into account information about the current speed of the vehicle, as well as the state of the sensors. After this, the ECU issues a command regarding the angle at which the headlights need to be raised or lowered.
Such a simple and at the same time useful system allows you to always keep the headlights in the correct position, eliminating the possibility of dazzling other road users. More perfect and advanced in terms of traffic safety and automatic headlight adjustment is the adaptive lighting system, which allows you to adjust the light beam not only in the vertical, but also in the horizontal direction, but that, as they say, is a completely different story...
I have everything, I hope everything is clear to you? Thank you for your attention, and see you again at Fara Info
Universal adjustment methods
In principle, the methods discussed are suitable for any passenger car and are used to adjust low and high beam headlights. But the PTFs are configured somewhat differently, just like the headlights on a truck.
The proposed setup methods can be used on the following cars:
- on Grant;
- on Gazelle;
- Renault Logan 2nd generation;
- VAZ 2110;
- Skoda Octavia;
- Lada Kalina;
- Suzuki Grand Vitara;
- VAZ 2106;
- Ford Focus;
- Ssang Yong Action New;
- Nissan X-Trail T31;
- Daewoo Lanos;
- Renault Clio;
- Nissan Almera, etc.
The main thing is that we are talking about a passenger car.
To achieve your goal, you will need to meet several important conditions. To begin, prepare a flat vertical wall and an equally flat horizontal surface on which the car will stand.
The recommended sufficient distance for passenger cars is about 7-8 meters.
Also prepare regular white chalk or masking tape. These materials are needed for marking. Since cars have different dimensions, ground clearance and distance from the surface to the center of the headlights, the markings are applied individually. But there are also standard parameters that are often used for most machines.
There are a few more things to take care of in advance:
If there are problems or inaccuracies on these points, be sure to prepare the car, pump up the tires or release excess pressure, and bring the suspension back to normal. After that you can start.
First method
Here you need a flat horizontal area for the car and one empty vertical wall onto which the light will be directed. Having approached the wall, you need to mark the center of the car, as well as the center of the optics axis, with chalk or tape.
For correct marking, take measurements from the floor to the lamp, and directly from the car lamp to the center of the vehicle on the wall. Next, another line is made, which will run 5 mm lower than the previous one. You should move 7.5 m away from the wall, and then draw another horizontally directed line connecting the center points of the two low-beam headlights. Vertical lines are drawn through the resulting central points of the optics. Plus another vertical line runs through the center of the car. The latter should be located 7.62 cm lower than the line connecting the center of the optical instruments.
Next, turn on the low beam and begin adjusting the headlights. Their angle of inclination should coincide with the horizontal markings. In the area where the beam of light begins to go up or rise, there must be a coincidence in the markings.
The adjustment is carried out using special adjustment screws provided by the design. It is necessary to ensure that the light beam passes slightly lower than the center mark of the headlights.
If the car has combined optics, then the far one is adjusted first, and the near one is adjusted automatically.
Second way
Here you also need a flat wall. Only the car will be located 10 meters away from it. Marks of the center of the optics are made on the wall at their height from the floor in conditions corresponding to real ones, that is, with a driver behind the wheel and standard equipment.
The resulting 2 points must be connected with an even horizontal line. 2 more horizontal lines are made relative to it. The first will be 22 centimeters higher, and the second 12 centimeters lower.
Now set the regulator responsible for the width of the lighting to the zero position. The upper boundary-guideline will be the second line. The third executed line will be a reference point in a situation when the upper limit of the PTF is being adjusted.
Before you make decorative eyelashes on your headlights, and also think about using LEDs in car optics, make sure that your headlights work correctly, do not interfere with anyone, and provide you with the required level of visibility of what is happening on the road and side of the road.
That's all for me.
Thank you all for your attention! Don't forget to subscribe, leave comments and ask relevant questions!
Watch this video on YouTube
OPERATING PRINCIPLE
When the driver decides that the headlights need to be adjusted, he turns a special knob inside the car to do this. It controls the pressure in the corrector piping system. Accordingly, when it is necessary for the headlights to go down, everything happens as follows:
- The handle turns down;
The switch in the cabin looks like this - The pressure in the system drops;
- The operating rod enters the housing;
- The headlight goes down.
Based on this, we can say that most of the time high pressure is maintained in the working mechanisms; this is necessary to maintain the horizontal position of the headlight.
In winter, or during the transition period, when the temperatures outside and in the engine compartment are very different from each other, pipelines and rubber seals can delaminate, and working fluid can leak out. In this case, the headlight range control will most likely fail, and the working cylinders will jam and require complete replacement.
In terms of calibrating the device, the instructions from any domestic hydrocorrector will do. This is due to the fact that structurally they are all made very similar and you can figure out any of them yourself.
The case described above is the only malfunction that can be eliminated. In other cases, you will have to change the hydraulic corrector. There is nothing complicated here either. The first thing to do is remove the faulty device. To do this, unscrew the screws with which the pipeline clamps are attached to the brackets.
Now you should install a working device. There is nothing complicated here either. We take a new hydraulic corrector and install it in place of the old one. All actions here are carried out in reverse order. It should also be noted that many owners of “fourteeners”, faced with such a problem, make certain improvements to the design.
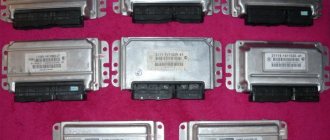
In particular, instead of a hydraulic one, they install an electric headlight range control. The latter is more reliable and durable, but it also costs more. The best option for the VAZ-2114 is an electrical corrector of the Silich Zenit type. The thing is that it fits perfectly into its regular place. Accordingly, no problems or difficulties will arise here.
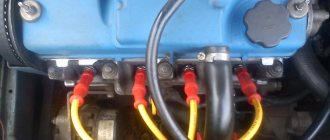
Next you need to remove the adjusting lever. It, as mentioned above, is located in the cabin. After this, the negative terminal of the device must be fixed on one of the body studs located under the dashboard, and the positive terminal must be connected to the block socket number 20. The wiring of the electrical corrector is laid along the power supply harness.
When the driver decides that the headlights need to be adjusted, he turns a special knob inside the car to do this. It controls the pressure in the corrector piping system. Accordingly, when you need the headlights to go down, everything happens as follows:
The handle turns down;
The switch in the cabin looks like this
In winter, or during the transition period, when the temperatures outside and in the space under the hood are very different from each other, pipelines and rubber seals can delaminate, and working fluid can leak out. In this case, the headlight range control will most likely fail, and the working cylinders will jam and require complete replacement.
How to identify problems with optics
The need to adjust the light will be required in the following cases:
- lamps shine strongly up or down;
- the beam is shifted to one side;
- uneven brightness of headlights when inspecting the car;
- insufficient light intensity, a clear jackdaw is not visible;
- One of the headlights does not work.
The tuned optics of the VAZ 2114 or model 2115 cope perfectly with any weather conditions. To identify deficiencies, a visual inspection of the performance of the lamps should be carried out once a week, and adjustments should be made at least once a season.
Malfunctions and why it breaks
- Loss of tightness in tubes, places where they are attached to the cylinders, leaks in the cuffs of the main or working cylinders;
- Jamming of working pistons
The main problem in the system of hydraulic adjustment of the reflector position is depressurization. Since it uses liquid as a working medium, its leaks lead to the fact that pressure is not transmitted from the master cylinder in the car interior to the workers on the headlights. No matter how much you turn the regulator, the position of the light beam will not change.
The second reason is souring of the pistons of the hydraulic corrector cylinders in certain positions. For example, if the piston is “stuck” in the maximally extended position, then the light will shine upward, while in a recessed position it will shine downward. When rotating the handle of the regulator, a lot of tension will be felt and when it is released, it will return to its original position and will not be fixed as necessary.
This happens because the pressure changes as the regulator rotates and the pistons cannot move. When you release the handle, the system tries to return to its initial state, equalize the pressure, the handle returns to the position from which you started turning it.
The listed types of breakdowns are prone only to the hydraulic drive of the corrector. Let the manufacturer claim that it is not repairable, but this is not so. There are examples of self-repair of a hydraulic corrector, which we will discuss in the following articles. In order not to bother with restoring it or replacing it with a new one, it is recommended to install alternative types of headlight range control units.
Installation of a new device
If you decide to install a new headlight range control unit, then there are detailed instructions for this as well. We will look at the order in which to remove the old hydraulic corrector and how to adjust the headlights on a VAZ 2114. And simply install the new one in exactly the opposite way. So, the step-by-step instructions look like this:
- We find all the clamps that secure the pipelines with the working fluid and remove them by unscrewing the bolts;
- We return to the cabin, where we carefully remove the rotating handle from its seat on the main cylinder;
- We unscrew all the bolts that hold the main cylinder and remove it;
- We remove the working cylinders from the headlights and pull them out through the interior;
Purpose of the Zenit Automatic Headlight Level Corrector
Auto-corrector "Zenith" keeps the headlights in one position, regardless of changes in the load on the vehicle's axles. The tilt of the headlights is adjusted through the standard electric headlight leveler using standard gear motors located in the headlights.
Automatic headlight leveler "Zenit" is intended for installation on vehicles equipped with a manual electric headlight leveler using a single-wire circuit.
In most cases, on a foreign car, its work will be no different from the standard autocorrector, i.e. "Zenith" is a direct replacement for the standard one. Most often, the sensor from the standard autocorrector fits the Zenit and our sensor fits the standard one, the connectors are just different.
The reliability of the Zenit Autocorrector is ensured by the use of a non-contact axis loading sensor based on a Hall sensor and a rotating magnet; there are no variable resistors with sliding contacts inside. In Russian conditions of dirty roads, it is much more durable than ultrasonic sensors.
Who needs the Zenit automatic headlight leveler?
Luxury cars are usually equipped from the assembly line with xenon or LED headlights, auto leveling and headlight washers. No one doubts the advantages of these light sources anymore
It is important that on the conveyor all light parameters comply with technical regulations
Owners of middle-class foreign cars, which also have luxury segment trim levels, always have the option of replacing halogen headlights with xenon ones and installing standard auto-corrector and headlight washers. Another thing is that the prices of official dealers stop many people.
Owners of economy-class foreign cars and all Russian cars in possible factory configurations do not have xenon light. Therefore, it is not possible to use standard solutions.
It is precisely for the last two categories, which solved the issue with xenon headlights and washer, that the Zenith Automatic Headlight Corrector is intended. Automatic headlight corrector "Zenith" is the most affordable solution on the market.
How exactly xenon headlights, washer and auto-leveling headlights are installed on various cars is described in the articles, links to which are given on the left in the menu. At the same time, it is quite possible to register the installation with the traffic police as fully complying with the technical regulations. The photo on the right shows the registration certificate for the 2110 with the changes made.
Automatic headlight leveling system "Zenith" - with one or two axle load sensors?
In most cases, one sensor installed on the rear axle is sufficient. The autocorrector itself has two sensor channels, the second one can be connected later if necessary.
Connecting the electrical corrector BUK02-01 to a VAZ-2110
Installation of the BUK02-01 autocorrector on a VAZ-2110 (2111) car is carried out without modifications to standard places. In this case, you must first change the length and adjust the stroke of the rod depending on the specific model:
- VAZ-2110: stroke 2.0 with length 34.0.
- VAZ-2111: stroke 3.63 with length 34.0.
The stroke of the BUK02-01 rod is 7.0 with an offset of 38.8. Therefore, you will have to cut off the rod and reduce its stroke.
To cut the length of the rod, connect power to the drive so that the rod extends to its maximum stroke. First, we cut off part of the rod, then grind it off with a 9 mm file. After this, we glue the sawn-off part back with superglue.
The headlight electric corrector is adjusted in the “0” position, which meets the technical inspection requirements. Each division of the switch allows you to shift the axis of the light flux by 0.06 m, provided that the adjustment stand is installed at a distance of 1.2 m from the car headlights.
Features of operation of various installations
| Pneumatic punches of various diameters, “Mole” type |
- Installation of GPU-600. When laying pipes with a diameter from 104 to 630 mm and a length of up to 80 m using the puncture method on soils of groups I-IV (without large solid inclusions), we use the GPU-600 installation. Its operating principle is called “walking jacks”. First, using hydraulic jacks of 1.2 m (rod stroke length), workers push the movable pressure plate with a pipe, turning on the oil station. Having completed the working cycle by moving the jacks in reverse, the released moving cycle is pulled up behind the pipe being laid. These operations are repeated until the first link is inserted into the ground. Then the slide with jacks, the movable stop and the pressure plate take their original position. After this, we install the next section of the pipeline and the process repeats.
- Installation of Glavmosstroy. It is advisable to place pipes with a diameter of 209 to 426 mm in soils of groups I–IV (regardless of humidity) for a length of up to 45 m using the Glavmosstroy installation - it works on the same principle of “walking jacks” as the GPU-600.
- Soil piercers and pneumatic punches of types IP-4605, PR-400 (or SO-134), PR-60 (or SO-144) and IP-4603 are used by us for laying pipes with a diameter of 63 to 400 mm using the closed method. Pneumatic punches of the “Mole” type allow you to create wells of any type (open/closed, inclined/horizontal) with compacted walls up to 40-50 m long. The hammer, located in the body, under the influence of compressed air, carries out reciprocating movements along the body of the pneumatic punch, which is its working body, thus driving it into the ground.
- Hydropuncture. Using the kinetic energy of the water flow, we can pierce pipes using the hydropiercing method. In this case, a stream of water coming out of a special nozzle on the front of the pipe blurs a hole up to 500 mm in diameter. This is where the pipes are laid. Water consumption is calculated taking into account the pressure, flow speed and soil type. This method has its own characteristics: the work is simplified and the speed of well formation increases to 30 m/shift, but deviations from the design axis may occur and the length of penetration cannot exceed 20-30 m. At the same time, the working conditions themselves become more complicated - the working pit becomes dirty .
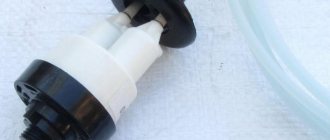
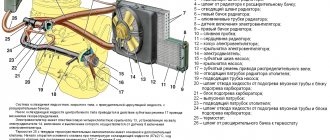
Hydrocorrector
In the article “Why the headlight range control does not work,” we examined the main malfunctions of the system, as well as the repair method by completely replacing all components of the system. However, in most cases the hydraulic corrector is perfectly repairable. In order for the hydraulic corrector to stop working normally, the loss of even a small amount of working fluid is sufficient. You can make up for the loss with regular antifreeze.
6 – knob for adjusting the light beam; 1 – main adjustment mechanism; 2 – working cylinders with a rod acting on the headlight reflector.
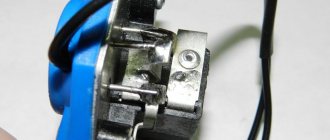
Barbaric repair method
Many drivers do not burden themselves with either repair or replacement of the hydraulic corrector. When the headlights begin to shine downwards, they simply screw in screws from the back of the working cylinder. Adjustment of the position of the rod and the level of the headlights is carried out by screwing in and unscrewing screws. After such a repair, the concept of a headlight range control is no longer applicable to the system, since the possibility of quickly adjusting the angle of the headlight reflector from the interior disappears. But such repairs have a right to life if the malfunction caught you on the road and there is simply no other way to raise the headlights.
Recovery without removal
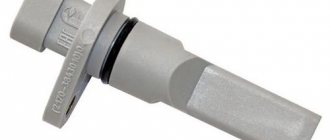
- Pull the actuators out of the headlight assembly.
- Remove the tubes from their seats, and then secure the tubes so that the remaining working fluid does not leak out of them. It is better to preheat the landing site, but you can simply cut the tubes at the edge of the landing sites. Check the stroke of the actuator cylinders by moving them by the rod using pliers. The pistons should move without jamming.
- Each actuator has a plug for bleeding the system, which must first be pulled out.
- Turn the switch on the dashboard to position O. Fill the tubes with antifreeze so that a small drop remains on top, then put them on the fittings of the actuators.
- Position the slave cylinder bodies so that the bleeder hole is the highest point.
- Holding the rod in the maximum retracted position, fill the working cylinder with liquid until a small “hill” forms above the bleeder hole.
- Close the plug.
The system should work, but since the seals of the connections at the main cylinder, the regulator at the dashboard and the seals of the working cylinders were not checked, one cannot be sure of the long service life of the hydraulic corrector after such repairs. This restoration method will not work if the system is airy at the master cylinder in the cabin.
Restoration of headlight hydraulic corrector
You need to know where the headlight hydraulic corrector is located and how to remove it, since for a complete troubleshooting you will need to dismantle the working cylinders and the main adjustment mechanism. Take 2 small pieces of tube to connect the working cylinders to the main mechanism after removal, fill the system with water. If the device is operational, set the switch to the maximum headlight raise mode and leave the mechanisms in this position for several hours. If no leaks have appeared during this time, the system can be filled with antifreeze and installed on the car. If the leak does not appear in the pipe connections, it is better to replace the hydraulic corrector with a new one or install an electric corrector instead.
Only new coolant should be used so that dirt particles do not interfere with the normal movement of the pistons. Remember that the system must be completely filled with working fluid. To restore, you will need a syringe and a blunt needle so as not to damage the cylinder seals. Do-it-yourself repairs, the assembly and disassembly process are perfectly shown in the video.
Read with this
- Features of self-adjustment of headlights on a gazelle
- Headlight adjustment
- How to repair headlights yourself? Let's look at different ways
- How do Audi LED matrix headlights work?
- How to polish headlights with your own hands? polishing headlights at home
- DIY taillight tinting
- How to seal a headlight on a car
- Types of car lamp bases and their markings
- How to improve the light on a VAZ 2107
- Wheel width
What else can be done to more effectively illuminate the road when a car is moving?
In other words, how to improve the headlights on a VAZ 2114? What should be done?
- Replace existing lamps with improved ones that have a larger light output angle. You can install xenon.
- If the car's reflective surface peels off from the metal body, then it would be correct to install a new headlight instead of the old, non-functional one.
- Regular cleaning of headlight covers from dirt; protective film can be used as a preventative measure.
- If black deposits appear on the headlight bulb, the quality of lighting decreases. Therefore, you need to replace the lamp in time.
- If condensation gets inside the lamp, the level of efficiency of road lighting decreases. To avoid an accident, the correct solution would be to replace the defective headlight.
Dear motorists, check the quality of functioning of car headlights in a timely manner and place increased demands on the operation of these units. Eliminate all possible causes and remember that traffic safety guarantees peace and order to all road users.
Have a good trip and easy repairs!