Modern new cars are stuffed with sensors (outside air, coolant and intake air). The basic and standard configuration of the car comes with basic sensors; the higher the class and equipment of the car, the more sensors and all kinds of electronic gadgets. The outdoor temperature sensor is popular and is used every day. Let us consider in this material the correct installation procedure for this sensor.
Don't worry about temperature error
The external thermometer displayed on the dashboard shows the outside temperature at any given time depending on the situation in which the car is located. If you continue driving on the highway for a long time, the temperature will drop, and if you park in a parking lot where the asphalt reflects heat and sunlight for a long time, the temperature will tend to rise.
It's best not to worry too much about the outside temperature and the error of plus or minus 3 degrees. However, if there is a significant deviation, such as 5 degrees or more, there is a possibility of sensor failure, so please carry out diagnosis. And remember that you don't need outside temperature values as a normal comfort function.
An outside air temperature sensor is built into your car so that you know what temperature is most comfortable to set in the cabin. Let us remind you that for an optimal climate in the cabin and more efficient fuel consumption, you should not set the air conditioner to too large a difference between the outside temperature and the temperature in the cabin. It is optimal when the difference is 3-5 degrees.
conclusions
Connecting sensors to Arduino is the transformation of an algorithmic robot, controlled automatically or manually, into a full-fledged environment for the interaction of devices and circuits with the environment. Do not forget - this is not a panacea for all ills. And not the final high-tech product or the final application. Arduino is a set of hardware and software solutions that will help:
- master algorithmization systems for novice engineers;
- master basic design skills;
- learn to program.
Regardless of your level of training, your knowledge, you can always choose tasks within your capabilities. You can put together a simple solution to automate some simple task without soldering together with a schoolchild; Or you can set a global task, which requires, in addition to knowledge and logic, the ability to solder efficiently and correctly draw and read drawings. And active communities, forums and knowledge bases on the Arduino system will help solve almost any issue.
“Lada Granta”: sensor installation
This car is equipped with a controller only in the maximum configuration. In other cases, there is preparation, that is, there are all the necessary connectors and wires for connection. This is done so that the driver has the opportunity to carry out the installation himself.
However, before installation, it is advisable to check whether the dashboard will display controller readings. To do this, press the daily mileage button and turn on the ignition. This is how we run self-diagnosis, as a result all indicators are displayed. During diagnostics, press the daily mileage button again, which should bring up version 090 or higher on the display. This will indicate the possibility of installing a sensor
Types of sensors that monitor coolant temperature
All sensors installed on modern cars are divided into magnetic and bimetallic. You can independently determine the specific type installed on your personal car by the speed of its reaction after starting the engine. The magnetic one has an instant response, and after starting the motor it immediately shows the current temperature. The bimetallic version does not differ in such “efficiency”, showing the correct temperature after a short pause.
The operating principle of a bimetallic (tape) sensor is quite simple. The existing control unit changes the current depending on the current temperature of the circulating fluid, which leads to heating of the coil on the metal strip. It is able to change its length according to the temperature, and rotate the arrow attached to it, showing the current temperature of the liquid.
The design of the magnetic sensor is also not complicated. It consists of an armature with an arrow attached to it, on the sides of which there are two coils powered from the on-board electrical network. The resistance of the coils changes depending on the passing current, and it is determined by the current temperature of the engine. There is another type of sensor - capillary. Currently, it is practically not used due to the inconvenience of the design.
Introductory information
If previously there were specialized construction sets with limited sets of functions and strictly defined parameters, today’s variety of construction sets is simply amazing: real microprocessor systems, assembled on the knee, have almost unlimited functionality. Rich imagination, a wide element base, large communities of fans and engineers, and manufacturer support are the main distinguishing features of such robotics kits that are in demand on the market.
One of them, and the most popular, naturally, is Arduino. Constructor for instant assembly of electronic automatic devices of any degree of complexity: high, medium and low. This platform is otherwise called “physical computing” for its close interaction with the environment. A printed circuit board with a microprocessor, open source code, standard interfaces and connecting sensors to Arduino are the components of its popularity.
The Arduino system is a board that combines all the necessary components to provide a full development cycle. The heart of this board is the microcontroller. It provides control of all peripherals. Sensors connected to the system allow the system to “communicate” and interact with the environment: analyze, mark, change.
Where is the coolant temperature sensor located?
If installing an ambient air temperature sensor is not a priority, as is regularly checking its functionality, monitoring the coolant temperature is extremely important. To do this, the car is equipped with a special device that helps the driver constantly monitor the situation and prevent the engine from overheating.
A working sensor will allow you to turn off the vehicle’s engine in time, if there are prerequisites for overheating - this will prevent the onset of serious consequences associated with this. The location of the device itself may differ on different car models, but it will always “stand” on the path of fluid from the engine to the radiator:
It helps not only to avoid overheating. For example, at negative temperatures outside, this device will allow the driver to judge how warm the engine is. Naturally, you should not start driving on a supercooled engine, since this not only leads to a sharp increase in fuel consumption, but also seriously increases the percentage of engine wear. Information from the coolant temperature sensor will help you choose the “correct” engine warm-up mode, “telling” the driver whether to increase the idle speed.
Where is the temperature sensor installed?
Most often, such a useful device is mounted behind the radiator grille of a car or installed under the front bumper. Manufacturers thus minimize the risk of heat from the air conditioner or power unit of the car. In addition, this installation option allows you to protect the element from direct sunlight, under the influence of which the device may show unreliable readings. To prevent this component from heating up from the hot asphalt surface in the summer, it is mounted at a height of more than 30 cm from the road surface. With these important considerations in mind, manufacturers can place the temperature sensor in the most accessible location without having to install a lot of additional wiring. In practice, the exact placement of this device directly depends on the company that manufactured the car.
Application
The scope of application of temperature sensors covers both household appliances and equipment for general industrial use, the agricultural industry, the military industry, and the aerospace sector. Each of you can find them at home in heating appliances - boilers, ovens, multicookers or bread makers.
In heavy industry, thermal sensors make it possible to control the degree of heating of furnaces, air in the working area, and the condition of rubbing surfaces. In medicine, they are used to control temperature in hard-to-reach places or to simplify various procedures.
Many car enthusiasts often come across temperature analyzers that monitor the condition of oil or other coolant. On the railway network, they make it possible to monitor the heating of axle boxes and wheel sets. In the energy sector, they are used to examine contact connections and the quality of surface contact.
CHECKING THE AIR INTAKE TEMPERATURE SENSOR: TROUBLESHOOTING
SEARCHING FOR THE PROBLEM:
Intake sensor operation schedule
- Read fault memory ✓
- Check for proper connections, breaks and corrosion of the electrical connections of the sensor wiring, connector and sensor ✓
Test step 1
The internal resistance of the sensor is determined. Resistance depends on temperature. When the motor is cold it is high impedance and when the motor is hot it is low impedance.
Depending on manufacturer: 25°C 2.0 - 6 kOhm or 80°C approx.
300 ohms Please note the special characteristics of the reference value.2
Test step 2
Check the wiring to the control unit, checking for continuity and short to frame for each wire to the control unit connector.
- Connect an ohmmeter between the temperature sensor plug and the removed plug of the control unit. Reference value: approx. 0 Ohm (requires pin assignment diagram on control unit).
- Check the corresponding contact on the sensor plug relative to ground using an ohmmeter and remove the control unit plug. Reference value: >30 MΩ.
Test step 3
Check the supply voltage at the removed sensor plug using a voltmeter. This is done with the control unit connected and the ignition on. Reference value: approximately 5V.
If the voltage value is not reached, it is necessary to check the supply voltage of the control unit and grounding in accordance with the circuit diagram. If everything is fine, a control unit error occurs.
Examples of work for Arduino
One sensor
Let's consider a simple example - connecting one sensor.
The sensor is connected to the control board via one signal pin. When connecting to an Arduino in a compact form factor, such as an Arduino Micro or Iskra Nano Pro, use a breadboard and a couple of push terminals.
Between the signal wire and the power supply, install a resistance of 4.7 kOhm.
When communicating the sensor with standard Arduino boards of Rev3 format, Arduino Uno or Iskra Neo, use Troyka Slot Shield in conjunction with the pull-up module.
Program code
Let's output the sensor temperature to the Serial port.
simple.ino // library for working with the 1-Wire protocol #include // library for working with the DS18B20 sensor #include // signal wire of the sensor #define ONE_WIRE_BUS 5 // create an object for working with the OneWire library OneWire oneWire(ONE_WIRE_BUS); // create an object to work with the DallasTemperature library DallasTemperature sensor(&oneWire); void setup(){ // initialize the operation of the Serial port Serial.begin(9600); // start working with the sensor sensor.begin(); // set the sensor resolution from 9 to 12 bits sensor.setResolution(12); } void loop(){ // variable for storing temperature float temperature; // send a request to measure the temperature sensor.requestTemperatures(); // read data from the sensor register temperature = sensor.getTempCByIndex(); // output the temperature to the Serial port Serial.print("Temp C: "); Serial.println(temperature); // wait one second delay(1000); }
Sensor series
Each DS18B20 sensor stores a unique number in its memory; this solution allows you to connect several sensors to one pin.
Let's add a couple more sensors in parallel to the previous connection diagrams.
Program code
Let's scan all devices on the bus and output the temperature of each sensor separately to the Serial port.
multipleSensors.ino // library for working with the 1-Wire protocol #include // library for working with the DS18B20 sensor #include // signal wire of the sensor #define ONE_WIRE_BUS 5 // create an object for working with the OneWire library OneWire oneWire(ONE_WIRE_BUS); // create an object to work with the DallasTemperature library DallasTemperature sensors(&oneWire); // create an array pointer to store sensor addresses DeviceAddress *sensorsUnique; // number of sensors on the bus int countSensors; // function for outputting the sensor address void printAddress(DeviceAddress deviceAddress){ for (uint8_t i = ; i 8; i++){ if (deviceAddressi 16) Serial.print("0"); Serial.print(deviceAddressi, HEX); } } void setup(){ // initialize the operation of the Serial port Serial.begin(9600); // wait for the Serial port to open while(!Serial); // start working with the sensor sensors.begin(); // search for devices on the bus countSensors = sensors.getDeviceCount(); Serial.print("Found sensors: "); Serial.println(countSensors); // allocate memory in a dynamic array for the number of detected sensors sensorsUnique = new DeviceAddresscountSensors; // determine in which power mode the sensors are connected if (sensors.isParasitePowerMode()) { Serial.println("Mode power is Parasite"); } else { Serial.println("Mode power is Normal"); } // make a request to get sensor addresses for (int i = ; i countSensors; i++) { sensors.getAddress(sensorsUniquei, i); } // print the received addresses for (int i = ; i countSensors; i++) { Serial.print("Device "); Serial.print(i); Serial.print(" Address: "); printAddress(sensorsUniquei); Serial.println(); } Serial.println(); // set the resolution of all sensors to 12 bits for (int i = ; i countSensors; i++) { sensors.setResolution(sensorsUniquei, 12); } } void loop(){ // variable for storing temperature float temperature10; // send a request to measure the temperature of all sensors sensors.requestTemperatures(); // read data from the register of each sensor in turn for (int i = ; i countSensors; i++) { temperaturei = sensors.getTempCByIndex(i); } // output the temperature to the Serial port for each sensor for (int i = ; i countSensors; i++) { Serial.print("Device "); Serial.print(i); Serial.print(" Temp C: "); Serial.print(temperaturei); Serial.println(); } Serial.println(); // wait one second delay(1000); }
What is needed to determine a sensor malfunction
Unfortunately, like any other mechanism in a car, the outside temperature sensor can fail over time, after which unreliable information will be displayed on the dashboard. As for the exact data, it is available in the morning at a time when the vehicle has not yet warmed up, and in addition, a working device is installed on the car. If the motorist begins to notice that this component shows inaccurate information, then, most likely, replacement is required, however, before doing this, it is worth checking the device for functionality. To do this, you do not need to go to a service center, for the simple reason that you can do everything necessary yourself.
As a rule, the process of checking the outside temperature sensor consists of the following series of fairly simple and sequential actions on the part of the motorist:
- Initially, you need to compare the readings of the sensor, as well as a regular thermometer installed outside the window;
- information from different devices should be approximately the same (an error of one degree is allowed);
- Next, you need to start the engine in the car, warm it up, and also drive it for a distance of a couple of kilometers;
- if during the trip the readings on the instrument panel change periodically, then most likely moisture has entered the sensor housing;
- As a rule, moisture gets into the temperature sensor housing when this element is installed incorrectly;
- if moisture is actually to blame, then after stopping the car the device will need to be dismantled, removed from the casing and wiped;
- The clean component should be returned to its original place, and then connected to power.
If after these manipulations the readings still do not correspond to reality, it will be easier to purchase a new device and replace the air temperature sensor outside the car.
Why does DTNV break down?
The main difficulty for novice drivers is the search for a device. The manufacturer has hidden the mechanism in such a way that sometimes experienced drivers are not immediately able to detect the DTNV. The controller itself is reliable, but breakdowns often occur.
see also
The most common reasons for its breakdown:
- from being hit by crushed stone while driving;
- critical temperature level (often breaks down during severe frosts);
- damage to wires;
- oxidation of contacts.
The driver may not notice for a long time that the ambient temperature sensor of the VAZ-2114 has failed. The system will not generate any signals if there is a small difference between the actual air temperature and the air temperature displayed by the sensor. However, with large deviations, when in the summer the display shows sub-zero temperatures, serious troubles will arise.
The resistance in the circuit will increase, and the control unit will perceive this information as an urgent need to increase the amount of fuel supplied to the cylinders. Ultimately, your gas mileage will increase.
What is the purpose of the inlet air temperature sensor?
Another temperature sensor that any vehicle is equipped with is the intake air temperature sensor. At first glance, its role is quite insignificant, and most motorists may not even be aware of its existence. In fact, the uninterrupted operation of the car engine largely depends on the performance of this unit. Most modern temperature sensors are designed based on a semiconductor thermistor, so there are practically no problems during operation.
If difficulties arise, as a rule, they are as follows. During long-term operation, there is a discrepancy between the temperature readings on the sensor body and its electrical resistance. This leads to a smaller error in calculating the actual temperature of the incoming air. As a result, the computer, which calculates the parameters of the fuel mixture, sharply reduces the air supply and at the same time increases the “portion” of fuel. The resulting mixture entering the cylinders is “incomplete,” which makes its combustion process difficult. This results in unstable engine operation; in addition, an overly enriched mixture easily causes spark plugs to flood, which makes starting the engine impossible.
There are no recommendations regarding the frequency of checking this sensor, and each car owner decides for himself
To independently check the functionality of this important incoming air temperature sensor, you will need an ohmmeter and a table with normal resistance values, which is included in the instructions for the car itself. The test begins with the engine cold and continues with the engine running until the cooling fan starts. If there is reason to believe that the sensor is faulty, it makes sense to replace it with a new one
The cost of the device is low, and all replacement work is completed in a matter of minutes and does not require special skills or experience
If there is reason to believe that the sensor is faulty, it makes sense to replace it with a new one. The cost of the device is low, and all replacement work is completed in a matter of minutes and does not require special skills or experience.
An external air temperature sensor (ATS) is installed on cars to ensure driver comfort.
AvtoVAZ specialists began to include an external air temperature sensor in the car’s on-board computer. It is included in the standard equipment of the VAZ-2110. The fifteenth model already has a VDO dashboard with two windows and a temperature display on the display.
Various options for installing DTVV on a VAZ-2110 car are widely used. The most suitable sensor for this model is the one with catalog number 2115-3828210-03 and the cost is around 250 rubles. Its serviceability is usually checked using a test: when the part is cooled and heated, the current resistance indicators change.
DTVV must be insulated from moisture, and direct sunlight must also be prevented. The sensor must be protected from heat coming from the vehicle's engine compartment. Therefore, the most suitable location for mounting the device is at the front of the vehicle or in the immediate vicinity of the towing eye.
The sensor itself is equipped with a pair of contacts: one of them is directed to ground, and the second gives a signal about a change in temperature. The last contact is made into the car interior through a hole next to the fuse box. The VAZ-2110 is equipped with on-board computers in two versions: MK-212 or AMK-211001.
In such on-board computers, the second contact of the sensor must be connected to C4 on the MK block. In this case, I take out the outgoing free wire and then carefully insulate it.
If the DTVV is not connected correctly or there is an open circuit, the following will be displayed on the on-board computer display: “- -”.
It is quite easy to connect DTVV to a VAZ-2115, since this car is equipped with a VDO panel with two displays.
The sensor wire is attached to the red block X2 in socket No. 1 on the car’s dashboard.
Is there an error in the outside air temperature sensor?
In most modern cars, in addition to engine temperature, you can now find another temperature indicator. It's about the temperature outside
Have you noticed that sometimes the temperature shown on the dashboard or infotainment display changes suddenly? Have you ever thought about the veracity of this temperature? Do you know where the external thermometer is located in the car? The online publication 1gai.ru explains the mystery of the outside air temperature sensor in a car.
The outside air temperature sensor is often located at the rear of the front bumper.
The outside temperature sensor of the Prius is located just behind the license plate, inside the bumper, about 30 cm from the ground.
First, let's find out where the temperature sensor that measures the outside air temperature is most often installed.
Let's take cars like Toyota as an example.
For example, on Toyota Prius and Toyota Aqua vehicles, the temperature sensor is located at the lower end of the front bumper panel, below the end of the radiator, about 30 cm from the ground towards the outer peripheral grille. In the Toyota Sienta, the sensor is located in almost the same place: in the lower right part of the front radiator grille, at a height of 30 cm from the ground, only, unlike the Toyota Prius and Toyota Aqua, it is shifted to the right.
In the case of Toyota cars, there is not much difference in the mounting position of the temperature sensor, no matter what model we are talking about (sedans, hybrids, SUVs, etc.). Almost always, this auto component is mainly installed between the inside of the front grille and the radiator
Note the air temperature sensor on the right side of the bumper, around the inside
Since the air temperature sensor is located close to the engine compartment, it is likely affected by engine heat. But in fact, such sensors are located in such a way that the outside air has a sufficient influence on them.
For example, when the vehicle is in motion, the influence of engine heat is minimal because the temperature sensor is exposed to the environment. That is, this sensor is designed to monitor the outside air temperature only when the car is in motion. When a car stands still for a long time with the engine running, the air temperature readings may differ significantly from the actual value.
What about, for example, Volkswagen cars? In response to our request, a company representative replied that basically all cars of the brand have an air temperature sensor in the rear of the front bumper.
By the way, thanks to this sensor, Volkswagen cars have a warning system for the formation of ice on the street. For those who do not know, let us remind you that this is a driver warning system that informs about the danger of freezing the road surface. Typically, when the temperature drops to 4 degrees Celsius, a warning tone sounds in the car and an ice warning appears on the dashboard display (depending on the type of vehicle).
By the way, an alarm is issued, for example, when the temperature with a minus value rises above zero degrees, but does not exceed 4 degrees Celsius. But as soon as the outside air temperature rises above 4 degrees, the road frost warning system stops informing the driver of the danger.
Self-installation of outside air temperature sensor
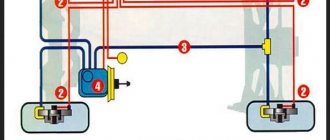
Many VAZ car models do not have an air temperature sensor, so to increase comfort, many car enthusiasts install it themselves. This does not require any special skills, but first you should determine whether the dashboard is able to identify the readings of the new device. This is not difficult to do, and, for example, on Grant it is done as follows:
If the version supports the ability to connect a temperature sensor, you can go to the auto store to purchase it and begin the installation process. Initially, you should correctly determine the location of the outside air sensor - it should not be influenced by temperature flows from the engine. The optimal place is considered to be the space close to the radiator - it can be seen when the hood is open, there is a pin welded to the frame. It is convenient to “throw” the mass from the device onto it.
After securing the device itself, you will need to run a “plus” wire into the interior. To do this, you can use the clutch cable plug or another convenient place. After this, you will need to remove the instrument panel; you need to find the 25th contact, intended specifically for the temperature “controller” of the ambient air. The “outboard” temperature readings appear automatically in the menu. If this does not happen, the positive terminal is removed from the battery for 10 minutes. After power is restored, the temperature will appear. The installation process can be seen in the video:
OneWire library for working with DS18B20
The DS18B20 uses the 1-Wire protocol to exchange information with Arduino, for which an excellent library has already been written. You can and should use it so as not to implement all the functions manually. You can download OneWire here. To install the library, download the archive and unpack it into the library folder of your Arduino directory. The library is included using the #include command
Basic OneWire library commands:
- search(addressArray) – searches for a temperature sensor; if found, its code is written to the addressArray array; otherwise, false.
- reset_search() – a search is performed on the first device.
- reset() - Perform a bus reset before communicating with the device.
- select(addressArray) – the device is selected after the reset operation, its ROM code is written.
- write(byte) – a byte of information is written to the device.
- write(byte, 1) – similar to write(byte), but in parasitic power mode.
- read() – reading a byte of information from the device.
- crc8(dataArray, length) – calculation of the CRC code. dataArray – selected array, length – code length.
It is important to set the power mode correctly in the sketch. For parasitic power, in line 65 you need to write ds.write(0x44, 1);
For external power, line 65 should be written ds.write(0x44).
Write allows you to send a command to the temperature sensor. Basic commands given in the form of bits:
- 0x44 – measure the temperature, write the resulting value to SRAM.
- 0x4E – Write 3 bytes to the third, fourth and fifth bytes of SRAM.
- 0xBE – sequential reading of 9 bytes of SRAM.
- 0x48 – copying the third and fourth bytes of SRAM to EEPROM.
- 0xB8 – copying information from EEPROM to the third and fourth bytes of SRAM.
- 0xB4 – returns the power type (0 – parasitic, 1 – external).
How to choose a temperature sensor
In order for this component in the car to work properly, it is necessary to choose the right device, guided by some recommendations from experts, namely:
- you should choose a device based on the make and model of the car;
- in the selection process, you should abandon the cheapest options;
- It is recommended to buy an original sensor or a high-quality analogue;
- It is also necessary to compare the old element with the new device, since completely different devices can be installed on the same cars in different years in terms of the type of fastening or connection.
In such a situation, the manufacturer recommends choosing the original part; however, you can use a cheaper analogue, but only from a proven and reliable company.
Prices
| Manufacturer (intended for manufacturer's boilers) | price, rub. |
| Specialized | |
| BAXI | 1 400 |
| Protherm S010075 for boilers Panther, Cheetah, Skat | 2 550 |
| Ariston | 2 100 |
| Ferroli | 1 100 |
| Universal | |
| Shuft ATF2-NTC10K | 2 100-2 250 |
| Gira 130200 | 2 280-2 900 |