- 01 September 2022 Lada.Online 1,339
- the total play in the steering should not exceed 10°;
- axial play in wheel hub bearings for front-wheel drive vehicles should not be more than 0.05 mm;
- Dents and deformation of wheel rims, deformation and cracks of levers, braces and hinges of the front and rear suspensions are not allowed (visual inspection);
- The air pressure in the tires must be correct.
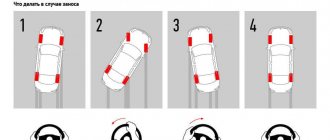
- After turning the steering wheel, the wheels do not immediately obey the command.
- The tires look worn and old.
- During braking, the car does not listen well and tilts to the side.
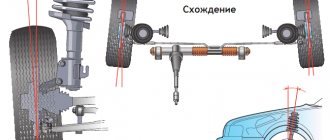
The camber angle is the angle between the center plane of the wheel and the perpendicular to the road surface. The correct camber angle ensures good traction and stable driving. Incorrect camber setting can lead to uneven tire wear and handling problems. Do you know what the wheel toe angles should be on a LADA Largus?
To check and adjust wheel alignment angles, it is recommended to use stands whose characteristics comply with the requirements of GOST R 51709-2001.
Before checking and adjusting wheel alignment angles, the technical condition of the vehicle must meet the following requirements:
Lada Largus must meet a number of technical requirements, including the parameters of the alignment angles of the front and rear wheels of the equipped vehicle:
| Front wheel alignment angles | Rear wheel alignment angles | |||
| Wheel camber, deg. | Angle of longitudinal inclination of the steering axis of the wheels, degrees. | Total wheel toe (angular), degrees | Wheel camber, hail | Total wheel toe |
| -0 o 10’±40′ | 2 O 42’±30’* | -0 o 10’±10′ | -0 O 51’±15′ | +0 O 44’±15′ |
* — the difference in angles between the right and left wheels should not exceed 1
O
The angles of the rear wheels are set by design and cannot be adjusted (with the exception of Lada Granta Sport 219059 and Lada Kalina Sport 219259). If the parameter values deviate, replace the rear suspension arms.
Signs that clearly indicate that your car needs to have its wheel alignment checked:
LADA service centers recommend diagnosing vehicle wheel alignment in the following cases:
- After 10-15 thousand kilometers.
- After completion of the chassis repair work.
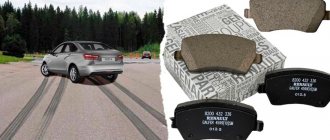
- When replacing tires, their rapid or uneven abrasion.
- When changing the vehicle's ground clearance.
- If the car pulls to the side when driving in a straight line or after the wheel hits an obstacle.
- If the car does not hold the road well, and the steering wheel has changed position while driving along a straight section.
- If the discs are deformed or the suspension is punctured after hitting an obstacle.
How often do you adjust the wheel alignment of your car?
Keywords: front suspension Lada Largus | rear suspension Lada Largus
2
0
labavto.com
The suspension of the Lada Largus ensures comfortable movement. It is recognized by many motorists as unkillable. This is especially true on domestic roads. This detail is completely borrowed from Renault Logan. It is energy-intensive, soft and reliable. But sometimes problems arise with it. You can solve them yourself.
Design and characteristics of suspensions
The front suspension is a simple, comfortable and inexpensive MacPherson strut design, but with some modifications. It is mounted on a subframe. The front arms are attached to it. At the ends of the levers there is a ball joint, through which the lever is connected to the steering knuckle. Vibrations are dampened by shock absorber struts with coil springs. To avoid lateral rolls, a torsion stabilizer is installed.
If in old VAZ models the lever was changed separately from the ball joint, then on Largus the ball joints are changed simultaneously with the lower lever, as on Renault Logan. Largus also differs in that the stabilizer is secured to a lever located below. Due to the simplicity of the design and maintainability, you can find faults yourself at home.
The main part of the rear suspension is a semi-independent beam, in the cavity of which there is a stabilizer, rigidly connected to the lower arms. The rear shock absorbers are attached to the lever at their lower end; its springs rest against the lever bracket through a gasket. The difference between the largus suspension is that the shock absorber and spring are separate parts that are not combined into a single unit. Each lever is attached to the body using silent blocks. The rear suspension is a reliable unit; it rarely breaks, but is easy to repair.
Diagnostics and signs of suspension malfunctions
One of the advantages of the Lada Largus is its reliable and durable suspension. But despite this, over time the elements wear out. If proper maintenance is carried out in a timely manner, faults are identified and corrected, you can extend the life of the suspension and prevent failure of its parts.
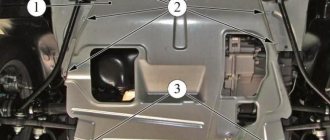
The subframe is the main element of the front suspension, so timely diagnostics will avoid problems with the chassis and unit failure. The levers, rear part of the engine and exhaust system cushions are mounted on it. Subframe malfunctions should be looked for in the places where the hanging elements are attached. Typical symptoms of malfunctions are a knocking sound in the front suspension, and wheel alignment changes.
To maintain a smooth ride, dampen road irregularities, ground clearance and level the vehicle while driving, shock absorber struts are installed. They limit body sway. The following signs indicate the presence of malfunctions:
- The body sways when driving on uneven roads;
- oil smudges;
- knocking, vibration and creaking when moving;
- poor handling;
- When hitting even small potholes, impacts and jolts are felt.
When some of the coils of springs break off, the ground clearance decreases, and body roll is noticeable if you place the car on a flat surface.
The function of the anti-roll bar is to prevent the body from swaying and maintain vehicle stability on the road. Problems with the node are determined by the following symptoms:
- when driving on an uneven road, a metallic knock appears;
- if you brake sharply, the body sways strongly;
- On sharp turns there is a noticeable roll.
Using levers, the angle of rotation of the wheels is adjusted. Structurally, the lever is a metal pipe; thanks to a ball joint, it is connected to the steering knuckle. Problems are possible due to wear of the fixing silent blocks.
Malfunctions manifest themselves in the form of a knocking sound that occurs when the car hits an uneven surface, the drive wheels become unbalanced, the vehicle pulls in different directions while driving, and play in the steering wheel is felt. If the hub wears out, the steering knuckles fail. The malfunction can be determined by the uneven wear of the tire tread; when you turn the steering wheel, you can hear a creaking sound, and the car pulls to the right and then to the left.
Diagnostics of suspensions is carried out only on a flat plane. It makes it possible to determine which parts and assemblies need to be replaced. The suspension is checked in stages:
- First, we inspect the shock absorber strut supports. There should be a distance of no more than 1.5 cm between the glass and the top of the support.
- The steering wheel should rotate easily both left and right, and there should be no play or extraneous sounds in the form of crackling or squeaking.
- Check for play by rocking the balls, arms and rods from side to side.
- Try to rock the car. If the shock absorbers are working properly, after a few vibrations the body will return to its previous position.
- Make a visual inspection of the silent blocks. If defects are found on them, they must be replaced.
Front suspension diagnostics.
Most suspension elements, excluding shock absorbers, cannot be repaired. If they are faulty, they must be replaced with new parts.
Restoring the suspension
Suspension repair work includes dismantling and replacing worn and faulty elements.
To do this you will need to prepare the following tools:
- Screwdriver Set:
- a set of keys;
- set of heads;
- jack;
- hammer.
Replacing the anti-roll bar
To restore the performance of the stabilizer, it is necessary to replace worn parts, which is performed according to the following algorithm:
- Place the car on a hill or hang the front part of it.
- First, clean the screw from dirt.
- Next, unscrew the nuts that secure the stabilizer to the lever. To prevent the screw from turning when unscrewing the fasteners, it must be held.
- After this, remove the bushing from below.
- Now remove the screw, bushing and washer.
- Similarly, unscrew the second bolt securing the anti-roll bar and arm.
- We install new parts instead of old ones.
- We reassemble in the reverse order of disassembly.
To replace the rod cushion, use a spanner to unscrew the subframe and bracket mounting bolt. Next, remove the part and install a new element. If a visual inspection of the rod reveals signs of wear in the places where the cushions are attached, it is advisable to replace it.
Replacing levers
Levers are mainly changed when replacing silent blocks and ball joints. To do this, hang the car from the front, remove the crankcase protection, and unscrew the fastener of the rod to the lever. At the next step, we unscrew the fastening bolt, with its help the ball is fixed in the steering knuckle. If you cannot unscrew the bolt, knock it out with a hammer.
Using a flat-head screwdriver, loosen the connection between the ball joint tip and the steering knuckle. At this moment, press the lever down to disconnect the parts. After unscrewing the fastening bolt that secures the bracket to the subframe, remove the subframe. Next, sequentially unscrew the rear and front bolts. Now we dismantle the lever and install a new one in its place. Then we assemble the unit in the reverse order of disassembly.
Installation angle data
Applicable to Renault Logan, the following alignment angles are regulated:
For front axle wheels:
Rear suspension wheels:
- Toe-in: 0°44'±15'.
- The camber amount is 0°51'±15'.
The longitudinal inclination of the steering axis for the front wheels is as follows: 2°42'±30'.
The maximum permissible difference in the values of the installation angles should not exceed 1°. If there are deviations, camber adjustment is required.
How to understand that adjustment is needed and why it is important
This procedure should be performed twice a year when replacing tires seasonally. Modern cars are most often serviced in specialized car repair shops. Specialized stands and computers are used here. This procedure can be carried out on your own.
First, it is important to learn to recognize the need for such adjustments. In this case, you should focus on the following signs:
- uneven tire wear;
- constant pulling of the car to the side during straight-line movement;
- difficulty driving a car;
- uneven wear of the edges of the front wheel groove.
If at least one of the listed signs is present, then you need to immediately take adequate measures to solve the problem.
What are the signs of this defect?
The process of operation implies gradual wear of the entire list of parts in the suspension, which is accompanied by a change in the angles of the wheels. If you neglect problems with the suspension, this circumstance will negatively affect safety or cause irreparable consequences. You can fix minor problems with your own hands.
Like any other malfunction, corner violations have their own symptoms. The main symptom is a moving car pulling in any direction. This symptom most characteristically manifests itself during a sharp deceleration.
When traces of uneven tire abrasion are discovered, you must immediately check the correctness of the wheel angles and the condition of all components in the Renault Logan chassis.
Additional factors indicating the progression of the malfunction we are considering may be:
- “howl” of rubber;
- increased force on the steering wheel when turning it.
As indicated, if the slightest symptoms of wheel angle violations occur, you should immediately check the correctness of their installation.
Model features
The main advantage of this station wagon, without a doubt, is its affordability. Prices for Largus start at 499 thousand rubles. This is a little for the opportunities provided: a spacious car is designed to transport the whole family and impressive luggage. As for reliability, the model is assembled almost entirely from imported parts, so you won’t have to think about repairs for a long time, even with intensive use. The car has enhanced anti-corrosion protection, increased ground clearance, and an impenetrable suspension that is energy-intensive. All this allows the Lada Largus to easily overcome difficult obstacles and operate uninterruptedly in the harsh Russian climate. The car is offered in both 5- and 7-seat versions with a 1.6 liter power plant and a 5-speed manual transmission. Travel with a large group on any roads and carry serious luggage!
Lada Largus uses an innovative interior heating system. Even in severe frost, the car is warm. For additional ease of operation and operation, a rear window wiper is provided. In the “base” the salon is equipped with:
- height-adjustable steering wheel;
- airbag for the driver;
- LCD display on the dashboard;
- MP3 player;
- air conditioning.
The luxury package adds:
- front passenger airbag;
- electric drive and heated exterior mirrors;
- on-board computer;
- power windows for rear doors;
- central locking with remote control;
- trunk curtain shelf;
- rear parking sensors.
Causes of malfunction
The following aspects may occur in the form of negative factors:
- natural wear and tear of most chassis components;
- serious damage to any part in the suspension;
- violation of body geometry (especially important after an accident);
- overloading the vehicle beyond the limits allowed by the passport.
Note that operation in poor-quality road conditions contributes to the violation of Renault Logan wheel alignment angles. Transporting cargo with an exorbitant mass has a detrimental effect on the angles of the rear wheels, which is accompanied by a simultaneous deterioration in the condition of the suspension as a whole.
To timely detect violations of the angle settings, it is recommended to perform the verification procedure at every maintenance, that is, at least every 15,000 mileage. Adjustment actions should also be carried out when changing tires to new analogues or running in a new car.
Lada Largus wheel alignment
Figure 10 — Adjusting the toe-in of the front wheels of LADA LARGUS R90 and F90 cars: 1 — wheel toe adjustment locknut; 2 - steering linkage coupling
| Automobile model | Tire size | Air pressure in tires, MPa (kgf/cm2) | |
| front wheels | rear wheels | ||
| LADA Largus R90 | 185/70 R14, 185/65 R15 | 0,24=0,01 (2,4=0,1) | 0,26=0,01 (2,6=0,1) |
| LADA Largus F90 | 185/65 R15 | 0,24=0,01 (2,4=0,1) | 0,30=0,01 (3,0=0,1) |
| Automobile model | Front wheel alignment angles: | |||||||
| Car under load | Curb car | |||||||
| Wheel camber, deg. | Angle of longitudinal inclination of the steering axis of the wheels, degrees. | Wheel alignment: | Wheel camber, deg. | Angle of longitudinal inclination of the steering axis of the wheels, degrees. | Wheel alignment: | |||
| Linear, mm | Angular, deg. | Linear, mm | Angular, deg. | |||||
| R90, F90 | — | — | — | — | -0°10=40′ | 2°42’±30′ * | — | -0°40′..0°20′ |
* — the difference in angles between the right and left wheels should not exceed 1 o
| Installation angles of the rear wheels of the equipped vehicle | ||
| Automobile model | Wheel camber, deg. | Wheel alignment, deg. |
| LADA Largus R90, F90 | -0 o 51±15′ | +0 o 44'±15' |
1. On LADA R90 and F90 vehicles, the longitudinal inclination of the steering axis and the camber of the front wheels are built into the design of the vehicle and are not subject to adjustment; the values of the angles for reference are given in Table 2. If the values of the parameters given in the table deviate, check the front suspension parts and mounting points suspensions to the body. If necessary, replace damaged parts of the front suspension and eliminate deviations in body geometry.
Wheel alignment adjustment 3D Granta, Largus, Vesta, XRay (1.6/1.8 16V, 2WD)
In order for the car to function properly throughout its entire service life and not require frequent repairs, the maintenance regulations must be strictly followed. Adjusting wheel alignment angles (wheel alignment) of Lada Vesta and Lada XRay makes it possible to reduce operating costs and not have to worry about the condition of the chassis under maximum loads. Any violation of the wheel alignment angles not only affects the rapid wear of the tires, but can cause an accident. The car may suddenly lose control.
Instructions
Before you start adjusting the wheel alignment, you should definitely check the chassis of the car. If necessary, you need to repair it by replacing worn components and suspension parts. In addition, before work you need to equalize the tire pressure and unload the trunk.
Tools and materials
To perform wheel alignment adjustments with your own hands, you will need the following items and tools, which will not be difficult to find:
- ruler;
- chalk;
- standard set of wrenches;
- cord with a plumb line.
Work should be carried out on a level area with an inspection hole or a lift.
Replacing the tie rod cover
We replace the protective cover of the steering mechanism if it is cracked, lost elasticity or torn.
We prepare the car for the job. We install the car on a lift or inspection ditch.
Remove the wheel from the side of the cover being replaced.
Remove the outer tie rod end as described above
Unscrew and remove the wheel toe adjustment locknut.
To prevent dirt and dust from getting into the steering mechanism, before removing the protective cover, clean and blow off the surface of the cover with compressed air.
Activities in service station conditions
Before the wheel alignment check procedure, the Renault Logan car must be prepared. This involves completely unloading the contents of the trunk, the fuel reserve in the tank should not exceed 50 percent level, and the air pressure in the tires should be brought into line with factory parameters.
After placing the car on the stand, the technicians perform wheel alignment, followed by “selection” of play in the suspension. For this purpose, fairly strong pressure is applied to the trunk, and then to the hood.
Subsequent verification actions are carried out according to the scheme. The first step is to check the angles of the axle and the wheel camber itself. As noted, these parameters cannot be adjusted structurally and bringing them into compliance is carried out by repairing the suspension.
If there are deviations in toe-in, then its adjustment is carried out by lengthening or shortening the total length of the tip with the rod.
Measuring individual wheel alignment
To measure the toe-in of each wheel, it is necessary to create a corridor consisting of two parallel lines. To create them, you can use strong threads, fishing elastic bands, and laser beams. The lines must run strictly horizontally; they must be aligned to the height of the wheel centers. A basic corridor can be created in three ways:
- The first is to attach the threads directly to the wheels. This is the simplest, but least accurate method. The wheels may have different offsets relative to the arches, which disrupts the parallelism of the lines.
- The second is fixing the threads on stationary supporting structures. The method is more accurate in comparison with the previous one, but it is inconvenient because during the process of adjustments and rolling the car, the chassis may shift relative to the constructed lines.
- The third is to create a corridor around the car body using rack and pinion fastenings. The slats are fixed in the front and rear of the car, strictly in the centers of the wheels.
There are many examples of such constructions on the English-language Internet. For example, type “BG rasing string lines kit” in the search.
In garage conditions, it is appropriate to use the most budget-friendly and simplest method. To measure alignment and camber, you will need two aluminum slats, which can be purchased at any hardware store. One of them needs to be placed on the floor near the rear or front axle of the car. Next, you need to make marks on the rack at a short distance from the wheels - about 5 cm. Then the distance between the marks is determined, the resulting value will be the width of the measuring corridor. By dividing this parameter in half, you can calculate the location of the midline. Next, you need to attach a second strip to the marked tube and transfer the resulting marks to it.
Two additional marks are applied to the car’s bumper exactly in the center. They are set using a tape measure and marked with a piece of electrical tape or masking tape.
Aluminum tubes are fixed using ordinary office clothespins. They are attached to bumpers, mudguards or other body elements, depending on the design features of the car.
Next, you need to tighten rubber cords on the slats in the previously marked places, which can be purchased at any fishing store. Instead, you can use non-elastic threads, which can be secured to the tubes with rubber bands for money. This will avoid breaking the threads, ensure the necessary tension and minimize the error in determining the wheel toe angles.
At the next stage, the measuring corridor is centered along the marks that were previously marked on the bumpers. Next, you need to set the steering wheel to the zero position; for greater accuracy, you can use a building level.
After the above steps, you can already detect the lateral displacement of the wheels. To do this, measure the distances from the centers of the hubs to the threads of the base corridor and determine the difference between them. This is relevant for drivers in whose cars the wheels extend out of the arches at different distances.
Now you can start measuring the individual alignment of each wheel. Measurements are carried out by determining the distances from the lines of the base corridor to the symmetrical points of the rim of the discs in front and behind the center of the wheel. The results obtained must be recorded in a notebook or, in the absence of one, written down with chalk on the asphalt in the garage.
Then you need to roll the car forward or backward half a revolution of the wheel without changing the position of the lines of the measuring corridor. It is important that the steering wheel remains in the same position. Next, you need to take repeated measurements of the individual wheel alignment several times. If there are no significant differences between two measurements, they can be accepted as true. If the difference is significant, you should roll the car a few tens of centimeters more and find “crooked” wheels. This way we calculate the wheel curves. To compensate for wheel runout during calculations, we find the most frequently repeated values of individual toe-in alignments.
To convert millimeters to degrees and minutes, we use the table below.
When all half-toe angles have been determined with sufficient accuracy, the steering angle of the rear axle can be calculated. The presence of such an angle may be indicated by differences in the parameters of the semi-convergence of the rear wheels relative to the center line.
If adjustment of the rear wheels is not planned, you can reorient the base corridor along the trust line laid through the rear axle. To do this, you need to move the fixed slats so that the semi-convergence of the rear wheels is aligned with the new position of the corridor. Then you will need to adjust the position of the front wheels according to it, fixing the car’s steering wheel strictly in the center. Thus, the car will drive slightly sideways, but the driver will not notice it.
When determining the parameters of semi-toe-in, it is necessary to take into account the total toe-in of the wheels on the axles (on the front and rear axles), which consists of individual angles taking into account their signs. It is this indicator that determines whether the tires will wear out evenly and how controllable the car will be while driving. To find out the optimal value of overall toe for a specific car model, you should study reference materials that contain the manufacturer’s recommendations.
Three options for constructing the longitudinal axis of a car
There are three different methods to choose from that can be used to create a “baseline” line when calculating individual wheel alignment angles:
- The longitudinal axis can be taken as a horizontal line that passes through the axis of symmetry of the body. It can be easily constructed by marking their midpoints on the front and rear bumpers.
- The second option is the longitudinal axis of the chassis. This line is lined up along points that are located at the centers of the distances between the wheel hubs.
- Quite often, the trust line is used as the longitudinal axis. It is laid strictly in the direction of movement of the rear axle of the car. This vector does not always coincide with the longitudinal lines built along the body or chassis, as in previous versions. A similar phenomenon is typical for cars in which the rear axle is turned slightly to the side. At the same time, the car drives sideways, which is often observed on old Zhiguli, Gazelles, etc.
The angle between the “trast line” and the central longitudinal axis of the machine should ideally tend to zero. But in some cases, rear suspension defects cannot always be eliminated. Therefore, when diagnosing alignment and camber, measurements are taken based specifically on the “trast line”.
Measuring the longitudinal and transverse angle of inclination of the axis of rotation
Of greatest interest is the measurement of the tilt parameters of the rotary axes. Their position is determined by two key characteristics: lateral inclination and longitudinal (caster).
A short video (2 min) about what a caster is
If the wheels of a car could turn 90 degrees and stand across the body, these parameters could be easily calculated using an inclinometer. But in real conditions this is impossible to do, so you need to limit yourself to a rotation of 20 degrees in both directions relative to the zero position. The difference in the obtained angles must be multiplied by an additional factor of 1.5 - this is necessary to compensate for errors that are allowed during the measurement process.
To determine caster, you first need to turn each wheel 20 degrees in front of the steering axis: right to left, and left to right. In this case, you need to set the inclinometer to zero or write down the results. Next, the wheels are turned behind the turning axis: right to the right, left to the left. If the angle measured behind the steering axis is greater than the angle measured in front of the steering axis, then the caster is positive. If it's the other way around, then the caster is negative. The protractor should show a slight difference of a few degrees. This difference should be multiplied by the same factor of 1.5. For example, if the protractor showed a value of +2 degrees, then the caster value should be taken as +3 degrees.
The transverse inclination is calculated in a similar way, but the protractor is installed in a slightly different position. For additional convenience, you can use a smartphone, on which you should install in advance an application that simulates two mutually perpendicular bubble levels. An ordinary building level, preferably with a rotating bubble, will also work for these purposes.
If the task is not to measure specific numerical values of slopes, but only to compare them (they are not adjustable on most cars anyway), then the results do not need to be multiplied by a correction factor of 1.5. The main thing is to make sure that the angles are equal on both axes (right and left).
In the process of self-measurements, it is not necessary to strictly observe the rotation of the wheels exactly 20 degrees, especially when there are no appropriate tools to determine these angles (for example, graduated turntables). You can turn the steering wheel about 3/4 of a turn. It is necessary to ensure that when turning left and right, the steering wheel is locked in symmetrical positions. To do this, you can put some marks on the bottom of the steering wheel. When the steering wheel is in zero position, the line connecting the marks must run strictly horizontally.
Another way to get accurate results is to draw corners on the asphalt near the wheels using a protractor. If you don't have this tool, you can use a square sheet of paper with equal sides. Folding it diagonally, we get an angle of 45 degrees. Then one corner is folded in half again, resulting in an angle of about 22.5 degrees, which is close to the standard 20. Next, you need to attach the sheet to the wheel and outline its edge with chalk, thereby creating the necessary marks on the asphalt.