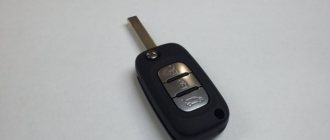
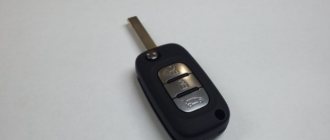
The remote control key for Lada Priora, Kalina, Granta, UAZ Patriot, Niva is programmed on the car without any devices. To do this, you need to have a so-called training key in your hands - which has a red pip on the head of the key. Used in cars with APS-6 unit.
The remote control key looks like this:
IMPORTANT ANNOUNCEMENT!!!
We work and consult ONLY in Nizhny Novgorod. If you are from another region, do not write or call us - we will not answer. We do not treat keys or cars from other cities: contact specialists in your region.
Purpose:
The remote control is designed for remote control of locking and unlocking of car doors, turning on and off super-locking doors, turning on and off the alarm system, raising the windows, controlling the locking of the tailgate (trunk lid), and also as a coded electronic key for the APS-6 immobilizer
The remote control is mounted on the blade of the ignition switch key type 1118-3704010 and is designed to operate:
1)via radio channel:
- with electrical package control unit 1118-6512010
- with driver's door module 1118-3763080, 2170-3763080-00/10
2) via transponder channel:
- with immobilizer control unit APS-6 2123-3840010-ХХ;
- with immobilizer control unit APS-6.1 1118-3840010-ХХ;
- with electrical package controller-2170-3763040.
What does the standard Priora alarm system consist of?
Any standard anti-theft system consists of several elements, it includes:
- training key;
- key fob;
- signal receiver antenna;
- APS block;
- lock activators;
- sound signal;
- EEPROM section in the ECU.
Training key (transponder)
The key set includes two ignition keys. One of them is the so-called educational one. It has a built-in special semiconductor chip with characteristic magnetic radiation. It is inserted into a special recess in the end part of the key, closed with a red decorative cover. Because of this, such a key is sometimes called a red key. This element is necessary to activate the standard anti-theft system. And for using the car if the anti-theft is not activated.
Key fob
This ignition switch has a key fob built into the handle for a standard alarm, just like a regular car alarm. It has only three buttons:
- "open;
- "close";
- "trunk".
Accordingly, when the APS is activated, each button performs its own function.
Signal receiver antenna in the ignition switch
To read signals from the training key and key fob, a special antenna is built directly into the ignition switch. It is made in the form of a kind of coil, and is connected to the APS electronic control unit. Its task is to read the key signal and transmit it to the block.
APS block
This is an electronic unit that receives a signal from ignition keys equipped with a chip, or key fob, and gives a command to the car’s computer, which controls the entire ECM system and allows starting and driving, via a special channel. In addition, the APS standard alarm unit transmits signals to the activators of the door and trunk locks, and an audible signal to sound an alarm. On the Priora, the APS unit is built into an additional electrical package control unit, that is, a unit that controls power windows, heating and rotating rear-view mirrors, and other additional devices.
Lock activators and sound signal
These devices (activators) in the standard Priora alarm system operate as a central lock, that is, when the driver's door is closed with the key, the latches of all doors are closed. They are in a locked position and cannot be opened by simply pressing the handle. Their principle is ordinary electromagnetic coils that move the lock lever, closing all doors upon a signal from the control key fob.
The usual type of sound horns are connected under the front bumper of the car.
EEPROM file
Just an area in the flash memory section of the control ECU. Upon receipt of a certain message, it is activated in the recorded program. From this moment on, all actions: starting, moving away, central locking are possible only with an activated key fob and a training key. Otherwise, this file blocks operation and turns on the standard Priora alarm system.
Training procedure:
Carrying out the training procedure leads to the following consequences:
- the engine control controller activates the anti-theft function if it has not been activated;
- the system changes its password to a new one chosen at random;
- a new system password is written into the training key;
- all remote controls that were previously trained are erased from memory;
- The codes of those remote control units that were trained in this training procedure are stored in memory.
The training procedure is applied in the following cases:
- activating the anti-theft function in the controller (for example, in a new car or replacing a faulty controller);
- erasing old and training new remote controls if lost;
- changing the system password if the owner admits that his system password may have been read (for example, when selling a car from one owner to another)
- remote control training when replacing a faulty immobilizer with a new one.
Only new remote control units or those that were previously trained using the training key used in this training procedure can be trained. It is impossible to learn a remote control key from another car into your car.
Please note: Due to the importance of the training key, it is not recommended to use it for everyday use and should be kept in a safe place.
Before starting the training procedure, fill the car with at least 10 liters of gasoline so as not to get confused by the squeaks.
Standard alarm
The Lada Priora car is equipped with a standard electronic anti-theft remote control system, built into the glass control module, which includes the following basic functions:
- Engine start blocking;
- Turn on the sound and light signal remotely or after turning on the ignition using the key;
- Locking all door locks when turning the key in the driver's door lock;
- Unlocking and locking all doors by pressing the control button inside the car;
- Turning on a sound and light signal when the state of the protected zones of the vehicle changes;
- Remote locking/unlocking of door locks with simultaneous activation/deactivation of vehicle protection mode.
The anti-theft system requires the connection of an additional sensor, which is recommended by the manufacturer of the Lada Priora.
When the vehicle protection mode is operating, the following zones are monitored:
- Hood;
- Car doors;
- Driver's door lock;
- Luggage compartment lid;
- Egnition lock;
- Battery voltage.
Alarm Lada Priora
The standard anti-theft system includes an alarm in the following cases:
- Unlocking the driver's door;
- Opening car doors, trunk lid or hood;
- Reaction of additional sensor;
- Turning on the ignition using a foreign key;
- Connecting the battery after disconnecting it.
The standard alarm, which is installed by the factory manufacturer of the Priora car, must be triggered when a certain key is pressed on the remote control key, which is equipped with a remote control and sends a signal to the main APS-6 unit, which issues a command to open and close the car doors. This happens only after activating the remote control using a training code key from the immobilizer.
The most common reason for the cessation of functioning of the standard anti-theft system of the Lada Priora is the remote control, or as it is abbreviated as the remote control, which is located on the ignition key.
Sometimes, in order for the anti-theft system to work, you need to press the button several times. If, after pressing the key several times, it still works, then the reason for its malfunction may be an increase in the distance between the electrical board and the button. The distance may increase due to slight sagging of the electronic board located in the remote control. This problem can be corrected by using a thin dielectric plate, placing it under the electrical board to bring the board closer to the remote control buttons. Also, the cause of a key malfunction can be the presence of small microcracks in the electronic board, and this leads to a complete malfunction of the electrical circuit. In this case, the only solution is to replace the board.
Alarm connection points
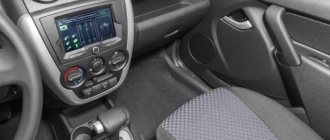
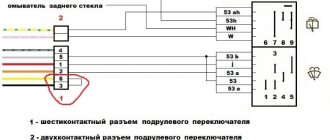
Typically, installing an alarm system on a Lada Priora car raises a question among car owners: Where are the alarm connection points on the Priora? There are a large number of alarm connection points on a Lada Priora car, but there is no need to be afraid of this. The convenience of connection lies in the fact that almost all alarm connection points are located in the electronic package controller. It is from the electronic package controller that the main wiring is taken out and the limit switches are connected. Alarm connection points can be located not only here.
Key programming instructions for Lada Kalina, Priora, Granta, etc.
- Close all doors. Turn on the ignition with the training key and wait in the on state for at least 6 seconds.
- Turn off the ignition. The indicator light in the warning lamp unit should flash quickly (at a frequency of 5 times per second) while the learning procedure is being carried out correctly. If the lamp stops flashing quickly, it indicates an incorrect operation, an out-of-time interval, or a malfunction. Remove the training key from the ignition switch.
- While the warning lamp is flashing (about 6 seconds), insert the remote control and turn on the ignition. The immobilizer buzzer should emit three beeps. If the buzzer does not sound and the indicator has stopped flashing, this means: - the time interval of 6 seconds has been exceeded and it is necessary to repeat the learning procedure, starting from step 1; -immobilizer is faulty
- Wait 6 seconds for the buzzer to emit two more beeps and turn off the ignition.
- If it is necessary to train the second remote control, then you should perform steps 3...4 again, using the second learning remote control to turn on the ignition. If not, continue from step 6.
- After turning off the ignition for no more than 6 seconds, while the indicator is flashing, remove the remote control, insert the learning key and turn on the ignition. The buzzer should beep three times. Wait 6 seconds until the buzzer beeps two more times.
- Turn off the ignition without removing the training key, wait 6 seconds until the buzzer sounds a single sound signal. The indicator should flash twice as fast. If the sound signal does not sound and the flashing indicator stops, you should return to step 1 and repeat the learning procedure. If a repeated failure occurs when performing step 7, this means that the ECM was previously trained with a different key, in which case the controller should be replaced.
- After the buzzer gives a single sound signal, no later than 3 seconds, turn on the ignition for 2...3 seconds and then turn it off (after turning on the ignition, the buzzer will sound three times and the indicator will stop flashing). The hazard warning lights should flash and the car horn should beep.
- Remove the learning key. Wait with the ignition off for at least 10 seconds. Insert the working key and turn on the ignition. Wait 6 seconds, if the indicator does not flash, test start the engine, the engine should start. If the indicator flashes, turn off the ignition and wait at least 10 seconds. Turn on the ignition. The warning light should not flash and the engine should start. If, after turning on the ignition, after 6 seconds the indicator lights up with a constant light, then the learning procedure must be repeated, starting from step 1.
Troubleshooting the immobilizer
It may happen that the immobilizer has broken down for some reason. What to do in this case? VAZ developers came up with a system with which the driver can make one trip without unlocking the immobilizer. In order for the car to move, you need to enter a special code consisting of 6 digits, which only the owner knows. This code is entered by pressing the gas pedal.
Visual repair instructions
If the device is not working correctly, you can try to fix it yourself. It's not that easy, but it's quite possible. First you need to find the immobilizer itself. It is located at the bottom of the console, in the engine control unit. The side covers of the console need to be disconnected, then unscrew the controller and terminals screwed to the control unit.
The control unit is then disassembled to solder a new resistor chip. To do this, you need to connect the control unit to the computer and read files for firmware such as flash and eeprom. They need to be preserved. The second firmware must be returned to the unit and the chip resistor soldered back. Before returning the control unit to its place, you should disable the immobilizer lock so that the system does not lock during installation. To do this, you need to perform some manipulations with the contacts.
First, disconnect the 12-pin connector. Wires numbered 9 and 18 need to be disconnected from the connector and both contacts connected together. Now you can connect the connectors to the control unit and return the console to its place. The immobilizer repair on the Priora has been completed!
A modern immobilizer includes another device that should ensure the safety of the car - an alarm system. This is the first car theft tool that should notify owners that someone has made unauthorized entry into their car. It emits sound and light signals that will immediately attract attention and make thieves retreat.
The standard alarm system is available in all Priora trim levels with an immobilizer. It not only emits sound and light signals, but also locks doors and electronics. How to turn off the standard alarm? The answer is simple! In order to disable the standard alarm system on a Priora, you need to use the button on the alarm key fob or the working immobilizer key. It unlocks the entire vehicle security system.
Replacing the remote control battery
The remote control is equipped with a CR2032 lithium battery, the initial supply voltage of which is 3 V. If the remote control supply voltage is within normal limits, then each time you press any button on the remote control, the indicator lights up with a short flash. If, when you press any button on the remote control, the indicator lights up with two short flashes or does not light up at all, then you should replace the battery with a new one.
To do this, you need to unscrew the screw from the side of the case opposite the control buttons, separate the halves of the case, remove the board from the case, replace the battery with a new one, observing the polarity; insert the board into the case; snap the housing halves together and tighten the screw.
Alarm connection points
Typically, installing an alarm system on a Lada Priora car raises a question among car owners: Where are the alarm connection points on the Priora? There are a large number of alarm connection points on a Lada Priora car, but there is no need to be afraid of this. The convenience of connection lies in the fact that almost all alarm connection points are located in the electronic package controller.
Connecting the Lada Priora alarm system
So let's look at the most common alarm connection points on Priora:
- The hood tip is white/black on the block to the right of the gas pedal in the middle connector;
- Ignition - orange on the block to the right of the gas pedal in the middle connector;
- Opening the luggage compartment - blue/red on the block to the right of the gas pedal in a small connector;
- The door limit switch is white/black on the block to the right of the gas pedal in a small connector;
- Luggage compartment limit switch - yellow/red on the block to the right of the gas pedal in a small connector;
- Original siren - gray/black on the front block;
- Central locking - cut the brown wire in the driver's door and hook it up according to the diagram indicated in the alarm instructions.
Design
The ignition switch consists of two parts: contact and mechanical. Each part performs its function and is subject to wear.
Contact part of the lock
This part is put on the lock cylinder and has several contact paths, which, when the key is turned, close and send a signal to turn on the ignition or turn on the starter.
Mechanical part of the lock
This part is the cylinder into which the key is inserted; on all cars the mechanical part of the lock is individual and the possibility of selecting a key is reduced to a minimum. It happens that on an old lock whose turning part is broken, it is possible to turn the cylinder using a similar key from another car.
Common breakdowns
Below is a list of the most common breakdowns.
Contact group breakdowns
Most often, the contact part in the ignition switch fails. This occurs due to the flow of large currents during starter operation. The contact tracks wear out, the reliability of the contact decreases, because of this the tracks heat up, which leads to the formation of carbon deposits on the contact. Carbon deposits on the track prevent the passage of current, thereby making it impossible to turn on the starter.
Such damage can be repaired by cleaning the tracks, but this is not always possible due to the formation of high temperatures there, which can distort the plastic.
Mechanical breakdowns
In the mechanical part, breakdowns occur due to wear of the cylinder, which leads to jamming of the rotating mechanism or to its large backlashes. This damage cannot be repaired and in case of such damage it is necessary to replace the lock with a new one with a key.
FACTORY IMMOBILIZER (IMMOBILIZER)
Everything in a modern car is controlled by a computer: from fuel injection to brakes. This feature allows car manufacturers to create car security systems themselves. In the ECU (Electronic Control Unit) there is a special section in the memory - EPROOM. It contains a special file with the same name. It is this file, just a couple of kilobytes in size, that is responsible for the security of the machine. To explain it simply, when this subroutine is activated, the ECU turns off spark generation and fuel supply in the system if it does not receive a signal through the wire from a small block, this same immobilizer. It is also essentially a miniature ECU. Just like a regular alarm, it receives a signal from the key fob. More precisely, the key fob contains a miniature chip that independently sends a unique signal to the APS receiver. Having received the signal, the anti-theft device gives permission to start and disables the circuit blocking that was set when arming. In other words, the mechanical part of the key can be faked. He will crank the cylinder and turn on the ignition. But the Priora will not start until the standard APS is turned off.
Lock lighting
Illumination of the ignition switch in a Priora car is a convenient modification in the dark. There are ways to tune anything inside your Priora. One of the most practical ways is to help yourself find the ignition switch by highlighting it. But getting a flashlight or phone out takes a long time and is impractical. Instead, you can put a backlight on this part, which will also be aesthetically pleasing to the car owner.
Such an upgrade can be purchased on Chinese websites - preferably only for Priora. To connect, climb under the steering casing, place the LED strip, and the wire soldered to it needs to be “powered.” When connected to contacts No. 8 or No. 9, when the dimensions are turned on, the backlight turns on.
Algorithm of actions
- Make sure there are no signs of damage to the key fob. Check the functionality of buttons and contacts.
- Check the power supply. If necessary, replace with a new one.
- Check the functionality of the central control unit. If the central unit breaks down or malfunctions, you will need to contact the service center installers to install new software.
- The device that detects impacts on the surface of the car may not work if the settings are incorrect.
- Drivers often encounter the opposite problem - the system reacts to the slightest contact with the body as a result of falling leaves, wind, rain, snow, etc. You will also need help with setup here.
Another common problem that the driver cannot cope with on his own is the loss of connection between the power supply and the electromagnetic contact. The contact ensures uninterrupted opening and closing of the prior doors. To determine the problem, you need a special device - a multimeter. Depending on the reasons that caused the malfunction, reinstallation of the software or replacement of parts is required.
Button instead of ignition switch
As a replacement, the Lada Granta and many foreign car models have a START-STOP button. We can say that the start button is a matter of driver convenience, but if you want to make your car unique, you can use different options:
- removing the standard module - the steering wheel will not be blocked;
- The standard module remains, but the steering wheel lock does not work;
- The standard module remains in place, the steering wheel lock works.
You can supply a pre-formed kit, or assemble it yourself - it will be several times cheaper, but not faster.
The cost of the set will be from 1,300 to 1,800 rubles, individual parts in total from 300 to 500 rubles.
How to put
To place a button instead of a module, perform the following steps:
The first and probably the last domestic car with an injection engine and a conventional ignition key was Svyatogor with a Renault F3R engine. Everything there was like on a carburetor car. The ignition switch supplied power to the “brains” of the engine, which ensured the operation of the spark plugs and fuel supply.
With the advent of the fuel injection system, VAZ cars immediately acquired an APS unit (automotive anti-theft system), which communicated with the chip in the ignition key and only after identifying its key gave the ECU (electronic control unit) permission to start the engine. Now the block has greatly decreased in size and is located under the steering column cover. The car's ignition switch body is surrounded by a frame that is connected directly to the immobilizer unit. When the ignition is turned on, the unit sends impulses to this frame and goes into reading mode, that is, it begins to receive a response from the chip key. From the impulse, the chip key receives energy and begins to transmit the code embedded in it to the immobilizer frame. The immobilizer frame receives the code and, if the code matches, makes it possible to start the engine. After this, everything runs as usual and the mentioned starting circuit is no longer needed.
It is clear that with this approach, a regular ignition key gives way to a chip key. There is nothing complicated about this: even people who do not have a car at all encounter chip keys every day. After all, the same technology was used to make the key to the intercom, which now stands on the entrance door of almost any apartment building.
Chip keys come in four main types.
- A key with a chip that allows you to only start the engine by turning a blade in a conventional ignition switch. The chip is a small cylinder or plastic parallelepiped containing an inductive coil and a microcircuit in which the individual code of this key is programmed. The chip in this design is sealed, which allows you not only to use it in the rain, but even to go swimming with it.
- A key with a chip and a radio transmitter that allows you to open and close the car using buttons on the key fob at a distance of no more than 30–50 m, starting the engine by mechanically closing the contacts in the ignition switch. In some cars, such buttons on the key activate the standard car alarm, which includes a siren, as well as tilt and motion sensors. But the tightness of such keys is limited to a splash-proof design: they cannot be immersed in liquid.
- A key that does not normally use a mechanical blade. The car is opened and locked using the buttons on the key. To start the car, the key is inserted into a special slot on the instrument panel, after which the “start-stop” button is pressed. The design of the key is splash-proof.
- Key for so-called keyless entry. The car doors are opened by pressing a small button on the handle, and the engine is started by the “start-stop” button. In this case, the key must be in the owner's pocket. There is a slot in the car's interior, but the key can remain in your pocket throughout the trip. At the same time, all control buttons on the key remain at the owner’s disposal. If desired, you can open and close the car by pressing the corresponding button on the key.
Do such chip keys have a future? We think not: this is just an intermediate stage in the development of access systems. Systems have been known for a long time that respond to fingerprints, iris and anything else. There are also strange, to put it mildly, solutions: for example, introducing a control chip into the owner’s body. And just yesterday there was a large-scale premiere of the next iPhone, which recognizes the owner by his face. True, there was an embarrassment at the presentation: the smartphone still managed not to identify its creator...
The ignition switch in a Lada Priora car is used to start the car and turn on the ignition. To start the engine, there must be power to the starter; it is the ignition switch that takes on this task.
This part is subject to frequent use, which is likely to damage the contact and mechanical part of the lock.
In this article we will talk about the ignition switch on a Lada Priora car, namely the reasons for its breakdown, methods of replacement and repair possibilities.
The most famous and popular security systems
Many different companies produce car security alarm kits. Moreover, one company has in its assortment both one-way and feedback systems. For Priora owners, the most popular were the following:
These are the top 10 alarm systems that dominate the domestic market. They are the ones that are most popular among Russian car owners. Of course, in principle, any of them can be installed on the Priora with your own hands, you just need to know what and where to install the Electrical package from Priora