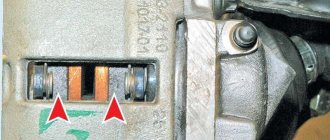
We replace the pads of a Lada Largus car in case of maximum permissible wear of their linings - the minimum thickness of the pad, including its base, must be at least 6 mm. The pads also need to be replaced when the brake disc is replaced, the linings are oily or have deep grooves, cracks and chips on them, as well as when the linings detach from the base of the pads.
We carry out the work on a flat area, inspection ditch or overpass.
Attention! The brake pads of the front wheels must be replaced only as a set - all four pads. Replacing the pads of only one brake mechanism can lead to the car pulling to the side when braking.
If the fluid level in the hydraulic brake reservoir is at the MAX mark, then before installing new pads, use a syringe or rubber bulb to pump out some of the fluid from the reservoir. This operation must be performed so that when the piston is pressed into the wheel cylinder of the brake mechanism while installing new pads, fluid does not flow out from under the reservoir cap.
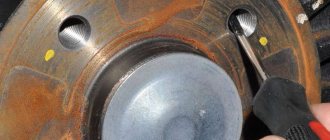
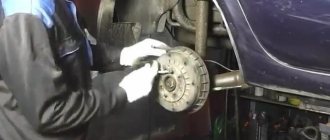
We remove the front wheel and securely fix the car on a factory-made support stand. Before installing new pads, it is necessary to move the wheel cylinder piston as much as possible inside the cylinder.
2283-14-02-01 (Copy)
To do this, insert a screwdriver with a wide blade through the hole in the caliper between the brake disc and the caliper and rest it on the caliper, move the bracket, recessing the piston into the cylinder.
To do this, insert a screwdriver with a wide blade through the hole in the caliper between the brake disc and the caliper and rest it on the caliper, move the bracket, recessing the piston into the cylinder.
To do this, insert a screwdriver with a wide blade through the hole in the caliper between the brake disc and the caliper and rest it on the caliper, move the bracket, recessing the piston into the cylinder.
Front pads Lada Largus with ABS
The front pads of a Lada Largus with ABS are no different from the pads of a Lada Largus without an anti-lock braking system. In fact, it all depends on the brake system installed on the car. It is generally accepted that front brake pads are installed depending on which engine is installed under the hood - 8 valve or 16. But this is not always an accurate decision, since it is better to navigate using your old pads.
If your car has mounting plates (they are also called squeakers or brake pad wear indicators), then take the one with article number 410608481R or LS0K4-3501800-81. When the brake pads wear out, the squeaker begins to touch the brake disc, making an unpleasant squeaking sound.
If the car has pads with springs, then choose the second article - LS0K7-3501800-81 or 410602192R.
2283-14-02-02 (Copy)
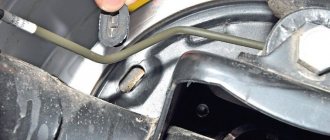
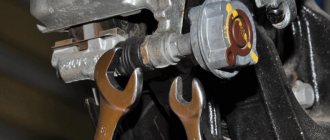
Using a 13mm spanner, unscrew the bolt securing the bracket to the lower guide pin, holding the pin with a 15mm spanner.
Using a 13mm spanner, unscrew the bolt securing the bracket to the lower guide pin, holding the pin with a 15mm spanner.
Using a 13mm spanner, unscrew the bolt securing the bracket to the lower guide pin, holding the pin with a 15mm spanner.
Lada Largus signs of replacing front pads
The main signs of replacing front pads on a Lada Largus are:
1. Grinding noise when braking. 2. Squeaking or whistling of signaling plates. 3. Reduced braking efficiency, which leads to an increase in braking distance. 4. The brake pedal is too soft. 5. Reducing the brake fluid in the reservoir. As brake pads wear, the pistons move toward the disc and the brake fluid in the reservoir decreases.
These are the main signs by which you can determine the wear of the front brake pads on the Lada Largus (including the Cross version). But the surest way is to visually inspect and measure the pads with a measuring tool.
2283-14-02-05 (Copy)
Remove the two spring clamps of the pads.
Remove the two spring clamps of the pads.
Remove the two spring clamps of the pads.
Using a metal brush, we clean the spring brackets and pad seats in their guide from dirt and corrosion.
Before installing new pads, we check the condition of the protective covers of the guide pins. We replace the torn or lost elasticity cover.
Lada Largus - when to change the front brake pads?
The front pads are not replaced at a certain interval or after reaching a certain mileage, but as they wear out. The minimum permissible thickness of the front block must be at least 6 mm including the metal base.
If the thickness has become at least 1 mm less, then it needs to be changed immediately. Moreover, you need to change the front brake pads on a Lada Largus as a complete set for one axle of the car. It is not recommended to change the pads on only one side, as this may cause the car to pull to the side when braking.
In addition, it is necessary to replace the pads if cracks have formed on the friction lining or it has peeled off from the metal base.
If you change Largus brake discs, then you must immediately change the pads. Since old pads may be worn unevenly. This will increase wear on the new brake disc and reduce brake performance.
2283-14-02-06 (Copy)
To do this, remove the guide pin from the hole in the guide block and replace the cover.
To do this, remove the guide pin from the hole in the guide block and replace the cover.
To do this, remove the guide pin from the hole in the guide block and replace the cover.
To replace the upper guide pin cover, you need to unscrew the bolt securing the bracket to the pin and remove the bracket from the pad guide.
Before installing the pin, put a little grease into the hole in the pad guide.
Lada Largus front pads article number
Where do you start replacing brake pads? Of course, from their selection. Few people first disassemble the brakes and then go to the store for spare parts. Recently, all auto parts are selected using article numbers. But to find out the article number, you need to be able to use auto parts catalogs. Below you will find the articles of front brake pads for Lada Largus.
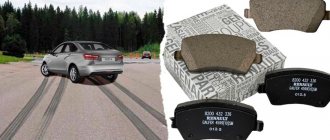
Front pads Lada Largus 16 valves article number (K4M, 21129)
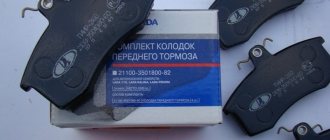
On Lada Largus 16 valve front brake pads have article number 410608481R. Pads from two brands are produced under this article: Renault and Nissan. The latter are much more expensive, although essentially the same pads are inside the box.
The pads look like this:
There is also a Russian replacement with the article number LS0K4-3501800-81. These are similar pads that are produced under the LADA Standart brand.
It is generally accepted that front pads with article number 410608481R are installed on Lada Largus with a Renault engine, and LS0K4-3501800-81 - with an AvtoVAZ engine. In fact, there is no connection to the motor here. Both items are identical and interchangeable.
Front pads Lada Largus 8 valves article number (K7M, 11189)
The 8-valve Lada Largus comes with front brake pads with springs:
The article number for these pads is LS0K7-3501800-81 (LADA packaging) or 410602192R (Renault packaging).
2283-14-02-08 (Copy)
If the part of the piston protruding from the wheel cylinder prevents the installation of the caliper on the brake pads, then use sliding pliers to recess the piston into the cylinder.
If the part of the piston protruding from the wheel cylinder prevents the installation of the caliper on the brake pads, then use sliding pliers to recess the piston into the cylinder.
If the part of the piston protruding from the wheel cylinder prevents the installation of the caliper on the brake pads, then use sliding pliers to recess the piston into the cylinder.
Similarly, we replace the pads on the other side of the Lada Largus car. After replacing the pads, press the brake pedal several times to set the gaps between the pads and discs. We check the fluid level in the tank and, if necessary, bring it up to normal.
During operation, the surface of the brake disc becomes uneven, as a result of which the contact area of the new, not yet worn-in pads with the disc decreases. Therefore, during the first 100 km after replacing the pads, until the new pads have broken in, be careful, as the car’s braking distance may increase. In this case, the pads may become hotter than usual, up to the appearance of slight smoke and odor, especially in hot weather.
[How to save on maintenance of Lada Largus] [Maintenance of Lada Largus at 15,000/45,000/75,000/105,000 km] [Maintenance of Lada Largus at 30 thousand km] [Maintenance of Lada Largus at 60 thousand km of run] [Maintenance of Lada Largus for 90 thousand km of run] [Maintenance of Lada Largus for 120 thousand km of run] [Independent maintenance - general recommendations] [Safety rules for self-carrying out maintenance] [Tools required for carrying out maintenance Lada Largus maintenance] [Lamps used in the Lada Largus car]
Lada Largus: replacing the brake pads of the front wheels
Rear brake pads - removal and installation (drum type)
Attention. Replace brake pads as a set on wheels of the same axle. Installation of brake pads from different manufacturers or different types on wheels of the same axle is not allowed.
For catalog numbers of rear pads and other brake components, see here.
CAUTION: Brake pads have slightly uneven lining wear or wear that varies between pad linings. Pads can also have significantly different wear on opposite ends of the lining. If everything else is in good condition, these features do not indicate any problems.
Note: it is not recommended to disassemble the rear brake mechanism unless absolutely necessary, or remove the brake drum. Use inspection holes to check rear pad wear. (see below)
Checking the wear (thickness) of the rear pads without removing the brake drum
The rear pad, located closer to the front of the car, wears out faster than the rear one. Therefore, for control...
... there is an inspection hole in the rear brake shield.
Remove the rubber plug
The minimum permissible thickness of the rear brake pads (linings) is 1.5 mm
For more complete control, you need to remove the brake drum (see below)
When measuring the thickness together with the base of the pad, the minimum permissible thickness is 5 mm
Replacement
The brake should be disassembled from one wheel first. While this job can be done with regular hand tools, there are several special brake repair tools that will make the repair much easier. It is recommended that you have a tool available to remove the springs on the brakes.
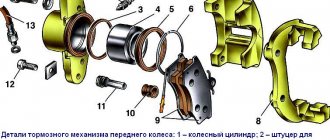
Figure 14-1 — Replacing brake pads: 1 — stop; 2 - lower tension spring; 3, 12 — brake pads; 4, 11 — guide springs; 5, 9 — springs for fastening the automatic clearance adjustment mechanism; 6 — spacer bar with automatic gap adjustment mechanism; 7 — upper tension spring; 8 — brake cylinder; 10 — lever for manual drive of the pads; 13 — manual brake cable
Removal
Apply the parking brake and turn off the ignition. Jack up the vehicle on one side and install safety stands, or place the vehicle on a two-post lift.
Remove the rear wheel.
Release the handbrake lever.
If you are working on a lift, raise the car to a height convenient for performing the work.
To make removing the brake drum easier, you need to bring the brake pads together. To do this, using a flat screwdriver through the hole in the brake drum, we rotate the gear nut of the mechanism for adjusting the gap between the shoes and the drum, due to which the length of the spacer bar is reduced and the shoes converge. The direction of rotation is from top to bottom.
This is what it looks like with the drum removed:
Using suitable tools, pry and knock off the wheel bearing cap.
And take it off
Using a 36mm wrench (socket), unscrew the hub nut
And remove the brake drum
Note: Do not press the brake pedal after removing the brake drum.
Remove springs 4 and 11 guide pads (pliers). To do this: Use pliers to turn the spring cup until the groove in the cup aligns with the shank of the strut.
Then remove the spring with the cup, and also take out the support post (guide).
Do the same on the other side of the mechanism
Remove the lower tension spring 2 (Figure 14-1). To do this, pry up its hook with a suitable tool and disengage it.
Remove the spring completely
Holding the pads with your hands, carefully move them away from the shield together with the adjusting mechanism
And having disconnected the end of the handbrake cable (13, Fig. 14-1), completely remove the pads from the shield
After removing the pads, it is advisable to secure the working cylinder pistons in some way, for example, tie them with wire or rope. This is necessary in case the pistons are squeezed out and brake fluid may leak out.
Remove the upper tension spring from the pad assembly (7, Fig. 14-1)
Having disconnected the spring of the adjustment mechanism from the front block...
And by disconnecting the spacer bar from the rear block...
Remove the spacer bar with the automatic adjustment mechanism assembly.
Mechanism for automatically adjusting the gap between the pads and the drum:
1 — threaded tip spring; 2 — threaded tip of the spacer bar (left-hand thread); 3 — spring regulator lever; 4 — spacer bar; 5 - leaf spring; 7 - ratchet gear nut (left-hand thread)
General view of the elements of the rear brake mechanism in a disassembled state
Installation
Clean the rear brake elements (metal brush).
Apply Litol 24 lubricant to the threaded surface of the spacer bar.
Before installing the pads on the brake shield, connect the pads to each other using a spacer bar with an automatic gap adjustment mechanism and fastening springs, connect the manual brake cable to the drive lever (flat-head screwdriver, pliers).
Install the pads on the brake shield.
Install the upper and lower tension springs (brake spring pliers).
Install the guide shoe springs (flat-head screwdriver, pliers).
Figure 14-2 — Rear brake elements: 1 — spacer bar mounting spring; 2 — ratchet of the automatic clearance adjustment mechanism; 3 — spacer bar with automatic gap adjustment mechanism; 4 - upper tension spring
Adjust the outer diameter of the pads by rotating ratchet 2, Figure 14-2, of the automatic clearance adjustment mechanism with a screwdriver. The outer diameter of the pads should be 227.5 ±0.1 mm (flat-head screwdriver, caliper).
Install the brake drum.
The tightening torque of the hub bearing nut is 175 N∙m. It is advisable to use a new nut (nut article number: 7703034275), but you can also use a restored old one by hammering its collar in three places, as shown in the photo:
Install the rear wheel.
Press the brake pedal 2-3 times, check and, if necessary, bring the brake fluid level in the brake hydraulic reservoir to normal.
Check the functionality of the mechanism for automatically adjusting the gap between the pads and the drum (when you press the brake pedal several times in a row, you should hear a characteristic click).
Adjust the parking brake
Check the effectiveness of the service brake system.
About modern brake pads
The pad is the most important element of the brake system. This consumable has a very hard time, which is why it wears out faster than other elements. In this case, it is necessary not only to brake effectively, but also not to overheat, and also to minimize environmental pollution with harmful wear products.
Time passes, technology improves. About 20 years ago there was not much variety offered when choosing brake pads. Both disc and drum mechanisms used friction linings, which for the most part contained either asbestos or semi-metallic mixtures. Asbestos is very good in terms of braking efficiency and smooth operation. In addition, it is technologically advanced in production and attractive in price. This unique natural mineral would have served in brake systems to this day, but doctors and environmentalists intervened. The fact is that during the process of wear and tear, asbestos breaks down into tiny fibers, almost microneedles. These particles enter the human body through the respiratory system, settle there and are not excreted. Brake dust containing asbestos particles was found to be carcinogenic, that is, not just harmful, but deadly. Tightening legislation did not have to wait long: in Europe, the use of asbestos in brakes was banned by UNECE Rules and EU Directives, and in 2010, Russia took similar measures, introducing the “Technical Regulations”.
Non-asbestos linings come in several types. Inexpensive options use a mixture of organic and inorganic fibers, which provide good performance with a relaxed driving style and a low rate of wear on the brake discs. But such pads cannot provide rapid heat removal from the friction pair during frequent vigorous braking, and when overheated, they noticeably lose efficiency.
To improve heat dissipation, so-called low-metallic mixtures began to be used. They consist of a compound based on organic fibers with the addition of up to 30% steel or copper powder. True, the age of copper use turned out to be short-lived - its presence in wear products was recognized as unecological, since when released into the environment it creates harmful oxides and salts, such as copper sulfate. So this ingredient is gradually being abandoned. Low-steel linings demonstrated good heat transfer and, accordingly, good braking performance over a wide temperature range. But then it turned out as in the saying: “We treat one thing, we cripple another” - the operation of the mechanism became noisier, the rate of wear of the discs increased.
Further improvements in formulations led to the introduction of semi-metallic overlays, which became quite popular. The role of the reinforcing structure in them is played by metal shavings or pieces of thin wire, steel wool and various polymer compositions. The share of metal in the friction mixture can reach up to 65%. To form a solid mass, these particles are supplemented with inorganic fillers in combination with friction modifiers. Semi-metallic linings show high braking efficiency and good heat dissipation, but they wear out quite quickly and accompany the operation of the mechanism with increased background noise.
Currently, many companies are developing the use of ceramics and alternative fibers in onlays to replace metal ingredients. These fibers have high strength and optimal braking properties. A ceramic pad is noticeably lighter than a conventional one, is very gentle on the disc in terms of wear, and is much quieter than mechanisms with other materials. This type of pad has not yet reached the ideal: for example, with a wide range of permissible operating temperatures of the pad itself, there are some difficulties with heat transfer in the contact area with the disc. But they have more stable and predictable characteristics than their metal-containing analogues. In addition, among the strengths of ceramic pads, we should note a clearly informative feel on the pedal and a lower tendency to vibrations and increased noise. Well, don’t forget about environmental friendliness: there are few wear products and they do not contain metal dust.
Now about pad manufacturing technologies. Here, each manufacturing company has a lot of secrets, while there are no trifles: the components selected exactly according to the recipe are thoroughly mixed until a homogeneous mixture is obtained and kept for 24 hours so that all possible chemical reactions and physical interactions between them are completed. Next comes pressing, during which the mixture is combined with the frame, when heated, the desired structure of the material is formed and gases are released that release the resins included in the composition. Then there is a sintering process with alternating heating and cooling according to a special cycle, and depending on the purpose of the pad and the features of the technology of a particular manufacturer, different schemes can be used.
In this case, the resins are finally sintered, the lining material and the adhesive joint are completely stabilized. If such multi-stage processes are not used, gas evolution may continue during operation, the lining will “float” in friction pair with the disc, and braking efficiency will be lost. The technical process also affects such properties of the pad as the speed of break-in and heat resistance. Some manufacturers complicate the design of the support plate by providing it with special projections or notches, thus ensuring a guaranteed strong connection with the friction lining.
The higher the complexity of the design and manufacturing technology, the better the combination of braking efficiency, heat resistance and stability of properties in general. Naturally, this increases the price. It is not surprising that budget car models are equipped with simpler pads, while expensive, heavy and sporty ones are equipped with the most advanced ones. Conclusion: there is no ideal brake pad design that is universally suitable for all types of cars and different operating conditions. The requirements for the properties of this important part are too varied and contradictory. (D. Lazo, Automotive Components)
Video
Brake pad replacement process
To replace the rear brake pads of the Lada Largus, you need to prepare tools. For work you will need: a jack, a wheel wrench, pliers and a flat-head screwdriver. When everything is prepared, you can proceed directly to the process:
- Engage 1st or 3rd gear at the gearbox.
- Place wheel chocks under the front wheels.
- Raise the rear of the car, where the pad will be changed, using a jack.
- We dismantle the wheel.
- Remove the cap from the brake reservoir.
- We dismantle the top cover of the brake drum.
- We move the working piston inward and fix it in this position.
- We squeeze the sliding parking brake levers inward.
- Compress the spring and unhook the handbrake cable.
- Turn the pressure spring a quarter. In this case, it is worth holding the support stand.
- Now, you can remove the cup, spring and support post.
- All operations described below must be done with the second block in the same drum.
- By stretching the upper spring, we remove the pads from the slots.
- Now, stretch the lower spring and remove the pads from the restrictor plate.
- Next, we dismantle the pads along with the springs.
- We unhook the springs from the pads, first the upper one, and then the lower one.
- Now, it is necessary to dismantle the spacer strips.
- Next, we inspect the drum for defects: chips, grooves, grooves.
- Now that everything is ready, install everything in reverse order.
- If necessary, add fluid to the brake reservoir.
Before using the handbrake, right in the garage, it must be gently pulled and released several times. This will help the new pads adjust.