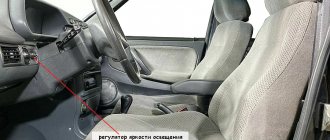
The problem with the first modifications of the Lada Vesta is insufficient lighting of the dashboard. In sunny weather, the driver cannot see the readings of sensors and instruments. Excessive distraction on the “visor” provoked accidents, crashes, and collisions with oncoming traffic.
In order to eliminate the defect, engineers developed and made publicly available on-board computer firmware with an increased brightness coefficient. However, the program code did not always work correctly, and malfunctions occurred from time to time.
Self-taught people worked together with the official VAZ developers and came up with a much better method - installing a 2-channel PWM controller.
The cost of a set of equipment is from 650 rubles in online catalogues, perhaps it will be cheaper in the car market. There is no catalog article, look for the production name: “KIT, PWM power regulator set, 12-50V 30A, 20kHz.”
Dashboard lighting Lada Vesta
On cars of the Lada Vesta family, dual-mode instrument panel lighting is used. What does it mean? The vehicle dashboard has two backlight modes - day and night. The driver switches these modes constantly, without even realizing it; the daytime backlight mode works when the lights are off, and the night mode works when the lights are on.
There is no fundamental difference between the backlight modes, however, the very fact of their existence makes it possible to adjust the backlight brightness depending on the time of day. When driving in the daytime, usually the brightness is set to the maximum value or close to it, since under the rays of the sun the instrument panel indicators become difficult to see. This mode is completely unsuitable for an evening or night trip; the high brightness of the dashboard will “hit” the driver’s eyes and distract from the road, so in night mode the brightness of the indicators is reduced.
On Lada Vesta cars, the backlight brightness is divided into three parameters: LCD backlight (on-board computer readings), scale backlight and arrow backlight. For each parameter, the brightness is set separately, allowing for flexible settings.
Instruction sections
- Audi
- BMW
- Chevrolet
- Citroen
- Daewoo
- Datsun
- Ford
- Honda
- Hyundai
- Infiniti
- Isuzu
- Jeep
- Kia
- Land Rover
- Lexus
- Mazda
- Mercedes-Benz
- Mitsubishi
- Nissan
- Opel
- Peugeot
- Renault
- Saab
- Skoda
- Subaru
- Suzuki
- Toyota
- Volkswagen
- Volvo
- AZLK
- VAZ
- GAS
- Izh
- UAZ
Lada Vesta, self-adjustable brightness via ELM, dashboard lights
We copy the APK file from the archive to any place on your phone, the ecu.zip archive, without unpacking, we copy it to the root of the phone’s internal or external memory. Run the APK file on the phone (provide installation rights if necessary) - the software will be installed. We launch the installed Ecu Tweaker program (after launch it will detect the archive that we placed in the root of the memory and install it) and connect to our ELM scanner.
Click the “Meter Cluster” button:
Now the button: “PP_VESTA”
Select “Settings 2”:
We get to the brightness settings screen:
On the screen, the fields are empty, since the application is not connected to the Lada Vesta, they will be filled in with values.
In this window, we adjust the brightness of the backlight to suit you. In the right columns we enter the values (indicated in percentages) opposite the desired parameter (LCD, scale or arrow). Then press the record button, depending on the parameter being edited, the record buttons will differ; Daybacklight_CF - when adjusting brightness in day mode and Nightbacklight_CF in night mode.
In the same window, you can completely turn off (or turn on if you have it turned off) the instrument panel backlight in daytime mode. We remind you that these instructions are relevant for updated instrument panels (with an orange scale); they have not been tested on previous versions.
Source
Adjusting the brightness of the Lada Vesta dashboard backlight
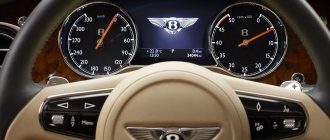
The Lada Vesta dashboard was developed from scratch and turned out to be easy to use, as well as attractive in design. But at the end of 2016, an announcement appeared that AvtoVAZ had developed a new dashboard for the Lada Vesta, which implemented a number of qualitative changes. It is assumed that drivers will be able to tune the car themselves by purchasing an updated version of the instrument panel.
New dashboard
Reviews
| № | Positive |
| 1. | Gennady: after buying the car I decided to upgrade it a little, starting with the instrument panel. The standard backlight is not enough, and some colors are too bright at night. The replacements were carried out by StoVesta, the guys were smart, they did it quickly and efficiently. |
| 2. | Vasily: my positive review of the AvtoSTOLITSA car service center. Installed new diodes on the shield. I am satisfied with the quality and efficiency, no comments. |
| 3. | Dmitry: I recommend Auto Service on Lithuanian, I recently installed new wiring. They got it done quickly, the price was affordable, and the craftsmen knew their stuff. |
| 4. | Vladlen: my comrades advised me to get service at 6+, service station. Initially I doubted it, but now I’m happy with the advice. Masters are what you need. Feel free to take your car in for repairs, you won’t regret it. |
| 5. | Kirill: a month ago I underwent another maintenance, and at the same time I tuned the dashboard. I am satisfied with the quality of the work of the “STO Autopride-SPB” craftsmen, I recommend it to others. Modern equipment, special premises, qualified personnel. |
| 6. | Victor: my positive review of the service station “Station No. 1”. They always work by appointment, there are no queues and delays like other service stations. My recommendations, keep it up. |
| 7. | Gennady: I visited the StoVesta service station for the first time on the advice of my friends. The guys are great, they know their job. We replaced the dashboard diodes in half an hour, and at the same time carried out a comprehensive diagnostic of the entire car. |
| Negative | |
| 1. | Vladlen: I visited Auto Service on Lithuanian twice, I didn’t like it. The staff is small, the mechanics are periodically distracted, we can talk about the quality of work. |
| 2. | Kirill: I was serviced at “6+, service station” for six months, now I’m moving on to others. There are no spare parts available, they are inclined to pre-order, the cost of services has increased. |
| 3. | Konstantin: after buying Vesta, I was serviced at AvtoSTOlitsa, but now I decided to change the workshop, since the quality of the work has deteriorated, while the prices remained the same. |
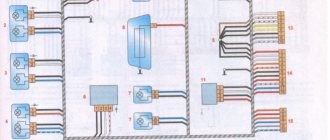
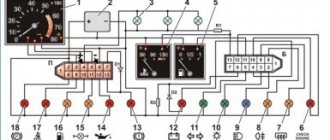
Description of the instrument panel
The instrument cluster includes the following control and measuring devices:
- speedometer
- tachometer;
- engine temperature indicator;
- fuel level indicator in the tank.
All this is located in three “wells” above the steering wheel.
The central instrument is the speedometer. Its scale is marked up to 200 km/h, although the Lada Vesta does not accelerate to this mark with any of the engines. There are also several indicators on the speedometer:
- unlocked trunk;
- open hood;
- alarm;
- unlocked doors;
- Cruise control;
- speed limiter
- direction indicators.
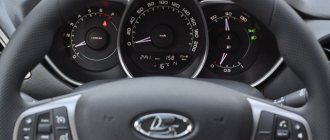
What has changed in the new dashboard of Lada Vesta
It is known that cars going for export will be the first to receive the update, however, the Russian market should also be replenished with such versions of Vesta in 2022.
In the front part, the changes affected the following:
- font increased;
- daytime instrument lighting appeared;
- The scale backlight color turned orange.
In theory, changing the instrument lighting will correct problems with reading readings. In the photo of the Lada Vesta instrument panel you can see that it has become much more presentable.
The new instrument panel is illuminated at the proper level at night and during the day.
There are also several useful functionality improvements:
- added voice accompaniment;
- the volume of sound signals has increased;
- the time is now automatically synchronized with the satellite (the driver only needs to set the time zone);
- “Unfastened passenger seat belts” and “Low tire pressure” indicators appeared.
It is still unknown whether backlight brightness adjustment will be implemented.
Multimedia system
And here we are again reminded of the previous version of Duster. The multimedia was installed from him. However, it is worth noting that it did receive a number of changes. The system now works with both CarPlay and Android Auto.
It is very difficult to call the work of the entire system good; rather, it is simply normal. It slows down, sometimes even a lot, but still works without critical failures. The same can be said about the speakers, they play and play, but special music connoisseurs will still want to change them soon. A rear view camera has also appeared.
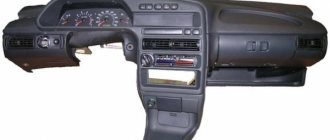
How to remove the dashboard of Lada Vesta
It is assumed that the new version of the panel can be purchased and installed on a torpedo. Its price will be approximately 8,000 rubles.
The procedure for removing the dashboard involves the following steps:
- Disconnect the negative terminal of the battery.
- There are two bolts at the top of the panel that hold it in place. They need to be unscrewed using the T20 socket.
- Now you can remove the instrument panel by pulling it towards you so that the latches release.
- Using the T20 socket, unscrew the exposed screws that secure the devices.
- Now you can pull the panel towards you and disconnect it from the wires.
Installation is in the reverse order. The connection diagram should not change.
Dismantling
First you need to remove the glove box. To do this, you need to open the box and then press out the plastic hooks that secure the top of the lid.
Then you need to pull the cover towards you. It is held in place by 3 clamps from below. You just need to pull and the cover will come off.
The next step is to remove the glove compartment light, which is located in the upper left corner. First, you need to press out the lampshade using a knife or a thin screwdriver, and then disconnect the wires.
When you are done with the lampshade, you will need to unscrew 5 screws using a Torx T20 sprocket and remove the glove compartment.
Find out the firmware number
If you are faced with the problem of the lack of backlight on the Lada Vesta dashboard during the day, first you need to find out the current firmware number. This can be done in one of 2 ways:
- Display the current software directly on the on-board computer display. To do this, during testing, you need to press the up button on the right steering column paddle.
- Dismantle the entire shield and look at the label that is glued to the back. The software version is also indicated on it.
The video clearly demonstrates the first method. You don't have to unscrew or remove anything to do this.
As you can see, the issue of the lack of backlighting on the Lada Vesta tidy is resolved quite simply. However, for those who live far from the dealership, it is easier to wait for the next maintenance and replace the firmware on it.
Solution
Due to numerous requests to resolve the issue with the lack of instrument lighting in the Lada Vesta, which were sent to AvtoVAZ, the Russian plant produced new firmware. After this, already in the last days of June, all the necessary materials were sent from the factory to the dealership centers to update the firmware of the Lada Vesta dashboard.
And from the first days of July, dealership centers received new firmware. This software is marked with the index 35, while the previous version, which is installed on many sedans, is indicated with the index 26. Software 35 is focused on turning on the backlight of Vesta’s instruments when the daytime running lights are turned on.
The video demonstrates the backlight at PO 35
The firmware changes quite quickly - usually no more than a quarter of an hour. In addition, as reported by Ladnaya Mechanics, this service is paid and costs about 600 rubles.
It's much more comfortable to drive with the lights on.
Dashboard lighting Lada Vesta
On cars of the Lada Vesta family, dual-mode instrument panel lighting is used. What does it mean? The vehicle dashboard has two backlight modes - day and night. The driver switches these modes constantly, without even realizing it; the daytime backlight mode works when the lights are off, and the night mode works when the lights are on.
There is no fundamental difference between the backlight modes, however, the very fact of their existence makes it possible to adjust the backlight brightness depending on the time of day. When driving in the daytime, usually the brightness is set to the maximum value or close to it, since under the rays of the sun the instrument panel indicators become difficult to see. This mode is completely unsuitable for an evening or night trip; the high brightness of the dashboard will “hit” the driver’s eyes and distract from the road, so in night mode the brightness of the indicators is reduced.
On Lada Vesta cars, the backlight brightness is divided into three parameters: LCD backlight (on-board computer readings), scale backlight and arrow backlight. For each parameter, the brightness is set separately, allowing for flexible settings.
Lada Vesta, self-adjustable brightness via ELM, dashboard lights
We copy the APK file from the archive to any place on your phone, the ecu.zip archive, without unpacking, we copy it to the root of the phone’s internal or external memory. Run the APK file on the phone (provide installation rights if necessary) - the software will be installed. We launch the installed Ecu Tweaker program (after launch it will detect the archive that we placed in the root of the memory and install it) and connect to our ELM scanner.
Click the “Meter Cluster” button:
Now the button: “PP_VESTA” Select “Settings 2”: We get to the brightness settings screen:
On the screen, the fields are empty, since the application is not connected to Lada Vesta, they will be filled in with values.
Installing a handbrake warning light
The parking brake, according to reviews from Lada Largus owners, is quite powerful for this car. So attempts to move with the handbrake raised usually end in failure.
Although slightly releasing the handbrake, even after several tens of meters of movement, does not add life to the rear pads.
To protect your brake pads, install a handbrake warning light.
Tuning the backlight of the Lada Vesta instrument panel
Lada Vesta has an original and modern dashboard. For ease of reading at night, the hands, scales and indicators are illuminated. Want to make your instrument panel unique? Change the backlight color! Do you think that the Vesta panel backlight is dim? Install brighter LEDs!
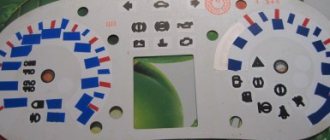
Vesta’s instrument panel differs from those that the plant installed on previous LADA models. But from a technical point of view, these parts have a lot in common; SMD LEDs are used to illuminate the readings. The main idea of the modification is to replace them with alternative ones (of a different color or brighter).
- Remove the instrument panel;
- Take it apart;
- Unsolder the required SMD LEDs and solder your own in their place;
- Reassemble and install in reverse order.
What malfunctions occur?
For some motorists, the Lada vesta sw cross control panel stops functioning over time and works intermittently. Such problems arise if the following malfunctions appear:
- The contact between the on-board network and the instrument panel is deteriorating. Such problems arise if the contacts or connectors have certain damage.
- Indicators and sensors fail. Inaccurate information is displayed on the dashboard if the fuel level indicator, speed sensor, etc. have failed. This causes the master data to fail.
- The integrity of the shield is compromised due to strong vibration or mechanical stress. The front shield is being replaced. This procedure is performed by masters.
- The included electronic board is faulty. Its functionality is restored by specialists. No backlight indicates that certain bulbs have burned out.
About SMD LEDs
Here are the most commonly used:
- very bright SMD 5050 (luminous flux - 15 Lumens);
- bright SMD 3825 (brightness 7-9 Lumens)
- medium brightness SMD 3528 (about 5 Lumens);
- medium brightness SMD 3028 (about 5 Lumens);
- not bright SMD 3020 (about 4 Lumens);
- not bright SMD 3014 (about 3 Lumens).
You can buy everything you need on AliExpress (see catalog).
The numbers after SMD mean the ratio of width and length, for example, an SMD 3528 LED has dimensions of 3.5 mm by 2.8 mm.