When does the steering rack need to be tightened on a Priora?
The first sign indicating the need to adjust the rack is the appearance of a knocking sound when driving over small uneven surfaces. The knocking will be felt especially clearly when driving on country roads. In this case, the driver will feel shocks and vibrations on the steering wheel, which will also be transmitted to the entire car body.
In addition, if the steering wheel adjustment nut is loosened when driving on the highway, the car will “float” a little, and additional steering will be required from the driver, which will also immediately become noticeable.
Experts also say that a tightening is necessary if the driver begins to notice the appearance of a clearly audible crunching sound in the area of the steering column, as well as an increase in the amplitude of the steering wheel rotation.
Non-standard cases
It may not be the suspension or steering parts that are knocking. Shocks and body pecks lead to the movement of units. If they “sit” loosely and there is metal-to-metal contact, clinking cannot be avoided.
- Single dull knock when starting off. See rubber-metal engine or gearbox mounts, transmission driveshaft. For example, when starting, the motor may tilt and hit the spar.
- Rattling on small bumps and in turns. Listen to see if there is a knocking sound in the steering wheel when braking; if there is, the brake caliper guides are worn out.
- Intermittent impact sound, more common when turning at low speeds. Malfunction in the differential of a front-wheel drive vehicle.
Tighten the key bolts and nuts more often, refuel only at gas stations with high-quality gasoline, and remember: a worn CV joint does not knock, but crunches, and does this with the wheels turned out.
When tightening doesn’t help and the mechanism needs to be changed
It’s worth thinking about replacing the rack when tightening it does not in any way affect the car’s behavior on the road, and also does not help get rid of the unpleasant knocking noise. A failed steering rack will cause significant play in the steering wheel. Moreover, it may begin to jam (this happens extremely rarely, but similar cases are known). If the rack begins to jam, then it is better to stop using the car, as this can lead to the most dire consequences.
You cannot do without a replacement even if after tightening it you managed to get rid of knocks and vibrations, but they reappeared later.
How to guarantee safety
The safety of a vehicle on the road requires regular checking of the serviceability of vehicle controls. After all, bumps on the road, impacts, braking and other factors negatively affect the technical condition of the steering controls. Steering play and increased wear of parts negatively affect vehicle controllability and road safety. A knocking sound in the steering column and a worn rack are indicators that it's time to work on the car.
Quite a few car enthusiasts, in order to save money, try to put their car control mechanisms in order with their own hands. If this does not apply to new VAZ cars, and the driver is able to perform the work at a professional level, this approach is acceptable. But, if there is a need to repair and maintain the steering control of modern car models, it is advisable to entrust this work to experienced car service technicians.
The steering rack on the Priora has approximately the same design as on earlier front-wheel drive cars. This machine has a lot of advantages that play an important role when purchasing: low cost, relatively high degree of comfort, availability of spare parts in all stores. But if you pay attention to the conditions under which the car is operated, it becomes clear why the steering rack fails.
What is needed for work and how to tighten the steering
To perform the tightening you will need the following tools:
- Slotted screwdriver (in simple terms, a “flat” screwdriver);
- Wrench 13;
- A special 17mm wrench designed to adjust the steering rack.
To make the work more comfortable and faster, it is recommended to drive the car into a special inspection hole or overpass, and also use an assistant, whose role even a child can handle.
To get to the rail, you should perform a number of simple steps:
- Disconnect the battery terminals and dismantle it;
- Using a 13mm wrench, unscrew the bolt securing the battery stand, and then remove it;
- Directly under the steering rack, using a slotted screwdriver, you need to pull out the small plug of the adjustment system.
After this, you will have access to the nut responsible for adjusting the thermal gap in the rail.
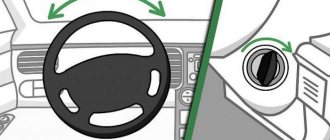
Next, you need to put your hand under the steering rack and try to put the rack wrench on the nut. It is necessary to tighten the nut clockwise, but since the rack itself is located upside down, from the outside it may seem that the nut must be tightened counterclockwise. Experts recommend tightening the nut no more than 25–30 degrees at a time, after which you should try to rotate the steering wheel, which should turn without jerking or biting.
It is also necessary to listen to the sounds coming from the steering wheel - if there are no knocks when turning the steering wheel, and there are no other noises, then the rack is tightened correctly, and you can put the battery and rubber plug in their place.
The tightening process on video
How to adjust the gap
Carefully put your hand into the space under the Priora steering rack and try to place a special wrench on the edge of the nut. Tightening is done clockwise. But note that the rack is located in an inverted position, so you may first decide that the tightening should occur in a counterclockwise direction.
It is advisable to tighten the nut by 25-30 degrees, no more. After this, be sure to check how the steering wheel rotates. There should be no biting or jerking. Be sure to listen for knocks and other noises while turning the steering wheel. After making sure that the steering rack is tightened and this is done correctly, you can assemble the unit and install the battery in place. And don’t forget about the plug - if you don’t install it, then foreign objects, dust and water will definitely get inside.
Standard rail: article number and price
Lada Priora is a “converted Lada 2110.” Some parts from the tenth family may be suitable for it, but they are already structurally outdated. In the set for the old Lada 2110 you can find:
- Rake and rasp from VAZ 2108, straight-cut (3.7 turns). Article 2108-3400009-20
- The body is different, the rasp is from 2108, straight-toothed (3.7 turns). Article 2110-3400009-20
In the set for the new Lada 2110:
- Rasp 2110-3401068 with helical gears and variable pitch (4.2 turns). Article 2110-3400012
- Short rack with power steering (2.7 turns). Article 2110-3400010-30
The factory steering rack set for Priora contains:
- Rasp 21100-3401068-00 (4.2 turns). Article 11183-3400010-20;
- Rasp 2110-3401068 (4.2 turns). Article 11183-3400010;
- Short with power steering (2.7 turns). Article 21100-3400010-30;
- The article number for the rack set for Lada Priora with ESD will contain the model number - 2170.
EUR - electric power steering - is called an improved mechanism compared to hydraulic power steering. The fact is that power steering is more demanding on driving style. As an example, power steering does not tolerate moments when the steering wheel is held in the extreme position for several seconds - the working fluid simply overheats. In addition, you have to monitor the oil level in the tank, the pump, and carry out diagnostics twice a year - servicing the mechanism.
With an electric booster everything is a little simpler, but at the price of a rack for a Lada Priora with an electric power steering it will cost almost 2.5 times more - its average cost is 25,000 rubles.
Adjusting the steering column of the VAZ LADA PRIORA
Useful tips for do-it-yourself car repairs.
Recommendations from car service specialists and experienced car owners.
Useful tips on car repairs for ordinary drivers and professionals. All the necessary information about repairing and maintaining your car is available in e-books
and
regular printed publications
. Electronic manuals are convenient to use on a computer, smartphone or tablet. They will always be at your fingertips.
Lada Priora: Steering rack tightening
This video shows the process of tightening the steering rack on front-wheel drive VAZ cars using the example of a car...
The steering rack on a Priora is knocking - how to tighten it?!
Detailed video review of tightening the steering rack on a Lada Priora car. How to determine what is knocking...
Removal and repair of the Priora steering rack with electric power steering. Is it worth buying a complete repair kit?
Knock in the steering wheel of the Priora! Fiasco with replacing the steering shaft =)
knock on the steering wheel of the Priora #Prior #VAZ.
Adjusting the steering rack of a VAZ (how to tighten the rack) Is it possible to adjust the steering rack of a VAZ 2115
Sorry for the quality of the footage, I'll fix it soon. How to tighten the steering rack on a VAZ-2115...
Eliminating play in the steering column of LADA GRANTA and KALINA
Eliminating the possible cause of play in the steering column of LADA GRANTA and KALINA: a Phillips screwdriver + a 13mm wrench.
REPAIR OF PRIORA STEERING RACK WITH EUR PART 2
If your car's steering rack is knocking, don't rush to go to a service center.
For those who didn't know! That the steering rack is tightening! Our group on VK https://vk.com/club145658677 Join.
Adjusting the VAZ steering rack! (how to tighten the rack)
Tips and recommendations for adjusting the steering rack on VAZ cars!
PRIORA steering column 3
You can make the steering wheel harder, but not only that.
Watch the video “Adjusting the steering column of the VAZ LADA PRIORA”.
We share our experience of car repair. A large selection of video clips on the topic “Adjusting the steering column of the VAZ LADA PRIORA”.
You will find more detailed information about repairing and maintaining your car in
e-books
and
regular printed publications
.
For those who are accustomed to using regular printed publications, we recommend buying car repair manuals in the online store of the Legion-Avtodata publishing house
Automotive literature stores:
krutilvertel
— Electronic books of printing quality in PDF format
autodata
— Online store of the publishing house Legion-Avtodata
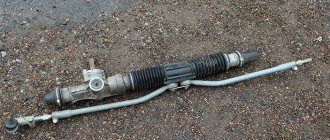
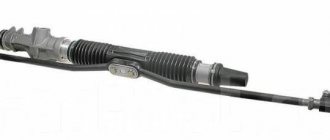
Why do you need a steering rack and its structure?
With the invention of front-wheel drive cars, the place of the simplest device of levers was taken by the steering rack. Its design and compactness made it possible to fit the engine and wheel drives under the hood, which would interfere with the operation of the levers. The rack acts as an intermediary between the rotation of the steering wheel and the force with which the steering arms act on the wheels of the car.
This mechanism can operate without any amplifiers, as well as with a hydraulic or electric booster. Steering is not installed on the Priora without power amplifiers - it would be too inconvenient and ancient. When the steering wheel turns, the rack moves so that it creates the desired pressure, the rods are activated, and the wheels turn at the desired angle. It is a metal pin hidden inside a metal casing and moving horizontally from one rod to another.
How to calibrate the steering wheel
Comfortable driving while driving and maneuvering is one of the important comfort conditions for every driver. During operation, for one reason or another, large backlashes and other deviations may appear, which create discomfort and difficulties in driving the vehicle. In this article we will look at how to calibrate the steering wheel in various car models. It should be noted that depending on the type of steering, there are certain nuances in setting the steering wheel. However, the main condition for high-quality calibration is wheel alignment. Therefore, first of all, you need to go to a service station and adjust the camber and toe angles. Without this condition, any adjustment of the steering wheel may be ineffective and will not bring the desired result.
Electric power steering calibration
The operation of the control system of vehicles with electro-hydraulic amplifier is monitored and controlled by the on-board computer. All information coming from various sensors is processed and analyzed in a microprocessor, which generates the necessary commands for the corresponding actuators. Therefore, to calibrate the steering wheel, you need to reconfigure the program or record it again.
Malfunctions of the steering rack of a Priora car
A malfunction of the mechanism is determined by the following symptoms:
- The so-called “knock on the steering wheel”, when the steering wheel begins to knock when turning the steering wheel;
- When turning the steering wheel, vibration appears;
- When turning, you have to put in more effort than usual;
- When turning the steering wheel, a grinding or knocking noise is heard from under the hood;
- The permissible play of the steering wheel has been exceeded;
- When turning the steering wheel, a hum is heard.
Any unusual sound is evidence of a vehicle malfunction. It cannot be ignored, especially if the part is repairable. With the steering mechanism, everything is simple: its individual parts can be replaced, and the degree of their wear can be determined even visually. As an example, the grooves on the rack should be clearly visible, and if their boundaries are smoothly erased, this means that the grooves do not engage with the grooves of the steering shaft and cannot reduce the force required to turn the steering wheel.
In many cases, tightening the steering rod will help, and if several parts fail at once, completely replacing the steering rod. But this is an extreme case.
Some operating tips
To make a full repair, you need to have not only knowledge and a sufficient set of tools, but also time. If you don’t have anything, it’s better to contact a car service. But their services are not cheap, so in order not to visit them often with the same problem, you should adhere to these simple rules:
- Try not to run over curbs and rails. This leads to cracks appearing on the rail. But most importantly, the steering shaft may become deformed.
- Try to twist the steering wheel to extreme positions as little as possible. This contributes to very rapid wear of the car's steering elements.
- Be sure to monitor the condition of the anthers. If they have cracks or cuts, replace them as quickly as possible. It's cheaper than replacing the entire rack.
- If your car has a hydraulic booster, be sure to keep track of what kind of fluid is in it. If it leaks or changes color, this will cause the Priora steering rack to break.
Be sure to carry out a complete diagnosis of the vehicle's suspension, steering and braking system. This way you will ensure that the car is operated as safely as possible.
Lada Priora is a Russian-made car that is highly popular among our compatriots due to its low price and attractive appearance. However, even despite this, the Lada Priora has one vulnerability associated with the poor quality of the road surface - the steering rack or, in the language of specialists, the “power steering/power steering gearbox”. Fortunately, you can tighten it with your own hands.
When tightening the steering rack on a Priora is enough
A tightening on a Priora is performed in cases where the driver is bothered by knocking, sticking, or play in the steering wheel. The process looks like this:
- Prepare for work a wrench number 13 and a special wrench number 17, a slotted (flat) screwdriver);
- Remove the battery terminals and dismantle it. After using a 13 key, remove the bolt of the battery stand, remove the stand;
- Find the adjustment system plug under the steering rack and remove it with a flat-head screwdriver. Take a 17mm wrench, put it under the steering rack and put it on the nut to adjust the thermal gap in the rack;
- Move it clockwise only. You can turn the nut a maximum of 25-30 degrees at a time;
- Put on the plug, install the stand under the battery, the battery itself and connect the terminals;
- Start the engine and check that when you turn the steering wheel, the wheels spin without snagging or jerking.
Tools for repairs
In order to independently repair the Priora steering rack, you will need certain tools and equipment. In particular, the following tools are needed:
- Slotted screwdrivers (flat).
- Spanners, open-end wrenches, heads 13.
- Special wrench 17 for adjusting the steering rack.
In order to complete all the work as quickly as possible, you need to install the machine on an inspection hole, lift or overpass. Help won't hurt you either, so you should have a partner. He will not be required to know the components and assemblies of the car, so you can use the help of your child or wife.
Checklist: replacing the Lada Priora steering rack, what keys are needed
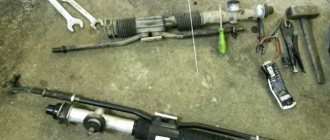
To replace you will need:
- Mounting blade;
- Flat screwdriver;
- Hammer;
- Pliers;
- Socket wrench 19;
- Head number 13;
- Wd-40
- Key number 15.
Armed with a set of tools, you need to lift the car. Of course, a lift is unlikely to be available, so an overpass with a pit will work well, or in extreme cases, just jacks. It will be more convenient to work if you remove the steering rods. First, two wheels are removed, and then active actions begin:
- Sprinkle wd-40 generously on everything so as not to cut the threads, break anything and, in principle, harm the car;
- Unscrew the nut from the fastening bolt with a 13mm head. Remove the nut and bolt. Using a flat-head screwdriver, loosen the fasteners and remove the lower part of the intermediate shaft from the splines of the gear shaft;
- Use pliers to pull out the cotter pin. Using a 19 mm spanner, remove the ball pin fastening nut. Take a mounting spatula, fix it between the outer tip and the swing arm, and lightly hit the end of the swing arm with a hammer several times to press out the ball pin. At the end, you can help yourself with a flat-head screwdriver;
- Using a 13mm head, turn the nuts securing the rack bracket, remove the brackets;
- Approaching the side of the left wheel arch, pull the steering rack towards you, before moving it slightly forward (closer to the bumper);
- During the installation process, do everything the other way around, but be sure to make sure that the mechanism is in the middle position. If this is not the case, everything will have to be redone. Also, after assembly, do not forget to do the wheel alignment.
Quiet in place: knocking only when turning the steering wheel while driving
If it is not a cardan shaft, a rack, or the consequences of flushing the internal combustion engine with dimexide, feel free to inspect the suspension. Anything can tap:
- Racks.
- Support bearings.
- Ball joints.
- Anti-roll bar.
- Wheel bearings.
Most parts are checked with the vehicle stationary:
- "Supports". Ask an assistant to turn the steering wheel while you put your hand on either the strut rod or the spring. Extraneous crunches and play indicate bearing failure.
- "Ball" Drive the car onto a lift, pit, or overpass and swing the lever on which the support is fixed using a pry bar. There should be no tapping.
- Shock absorbers. Place your finger on the strut rod and swing the car up and down by the wing. The knocking sound most often occurs due to a decrease in pressure in the strut due to a worn oil seal or scuffing on the rod. After a while it starts to flow. If you have already removed the shock absorber, make sure the diagnosis is correct - tug on the rod to see if it is loose or not. When installing a new one, make it a rule to bleed it, otherwise clunking will soon occur.
Short stroke
A short-throw steering rack is more suitable for sports cars, but, as is often the case, a “sports” part provides many advantages in daily use:
Before we begin describing this repair, if it can be called such at all, let's look at the main reason why you have to tighten the steering rack on a Priora.
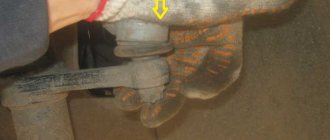
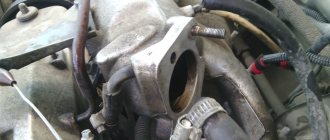
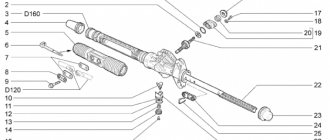
So, I think that many owners know that when a knock appears from the steering rack or its rod, it is necessary to make an adjustment, or rather, tighten the rack using a special nut, which is located on the inside of the case, which is clearly visible in the photo below.
To understand where this nut is located, look at the photo below, everything is shown from above - from the hood side, of course, in this case this nut is located on the reverse side:
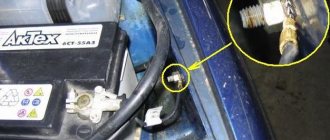
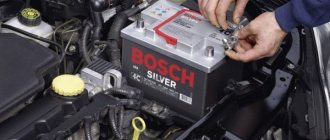
To get to this adjusting nut, you will most likely have to remove the battery, since without it there is more free space under the hood. Although the good news is that even the battery in the Priora does not interfere with this repair (unlike cars such as Kalina or Granta).
It is worth noting that you may need the following tools for work:
- 10mm wrench or socket wrench
- key for 13
- the key for tightening the rack is exactly 2110 and not 2108
Now, using a special key from the inside, as shown in the photo below, insert it into the hole:
It is enough to make less than half a turn, and then try the play on the rods. If it disappears and there is no more knocking, then there is no point in tightening it further, since you can overdo it, and in this case the rail may bite. For a more visual example and description of the entire procedure, watch the video report below.
Tips for use
A complete replacement and repair is a series of actions, for the implementation of which you need to have not only special knowledge, but also a considerable amount of free time, so if the car owner does not have either the first or the second, it is preferable to go to the nearest service station.
At the same time, in order not to become their regular guest, you should know some secrets for operating the steering rack, which can significantly extend its service life.
- We strongly do not recommend “jumping” your car on curbs, or driving at high speed on rails, since each such trip causes cracks to appear on the rack itself, as well as deformation of the shaft that is part of the steering mechanism.
- It is not recommended to frequently turn the steering wheel all the way. Of course, in this case it will be very difficult to demonstrate your maneuvering capabilities, but this will significantly increase the life of one of the most important parts of the machine.
- Carefully monitor the condition of the protective anthers, which must maintain their tightness. Replacing anthers is several times cheaper than replacing the entire rack.
- It is also worth monitoring the level and condition of the hydraulic fluid, since its decrease or change in color is associated with problems in the vehicle’s hydraulic system, which can result in rack failure.
From time to time you need to undergo a full maintenance, which will allow you to eliminate faults in advance, which can cause irreversible consequences, injury to yourself, your loved ones and other road users. And also, if problems are detected in the operation of the car, it is better not to take risks and go to the nearest car service center as quickly as possible.
Lada cars are famous for their “sores”, one of them is related to the steering mechanism. A knock in the steering rack of a Lada Kalina, Grant or Priora may appear after the first thousand kilometers. Next, we will look at the main reasons for this knocking noise and how to eliminate them.
A knocking sound when turning the steering wheel, or when driving on an uneven road, may come from the steering mechanism (rack). Most often, to eliminate it, it is enough to adjust (tighten) the steering rack using a special wrench.
If the knocking noise remains after adjusting the steering mechanism, you should pay attention to the steering shaft crosspiece. To make sure of this, you should lift the car on a lift and shake the steering wheel from side to side with one hand, and hold the steering universal joint with the other.
If the car has high mileage, then the steering rack may need repair. Diagnostics in this case is quite simple, you should open the hood and grab the steering rod with your hand in the area where it is attached to the rack. If you pull the steering rod up and down, there should be no play.
A knock when turning the steering wheel may not always be caused by the steering rack; sometimes extraneous noise is produced by the electric power steering.
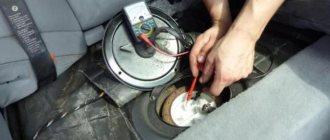
Self-removal and installation of the amplifier
You can do the procedure for dismantling and installing a new electric amplifier yourself, but for this you will need to prepare all the tools. To complete the job, you will need two screwdrivers - one with a flat head and the other with a Phillips head. You will also need a set of socket wrenches.
How to complete the DIY removal and installation task:
- Before performing work, you will need to turn off the power to the on-board network of your Priora. To do this, turn off the ignition, then open the hood and disconnect the battery from power. After this, you will need to remove the steering wheel, but first remove the plastic trim located under the steering wheel and under the dashboard. The casing is attached to several bolts; they must be unscrewed and set aside. Removing the steering wheel is carried out taking into account the recommendations described in the service manual.
- When the trim is removed along with the steering wheel, you will see the connectors of the steering column switches to which the wires are connected. These plugs will need to be disconnected. The contact ring must also be dismantled.
- Using a 8-mm wrench, you will need to unscrew the bolt that secures the connector with the wires from the ignition switch. Set the bolt aside so you don't lose it.
- Once these steps are completed, press down on the plastic fasteners and disconnect the wiring connectors at the top and bottom of the steering column.
- Having done this, you will see a plastic curtain in the place where the electric amplifier is fixed directly to the speaker. You will need to remove it, which will also require you to remove the fasteners.
- Using a socket wrench, you will need to slightly loosen the nuts that secure the amplifier to the bottom of the speaker. Just loosen it, not twist it. When the nuts are loosened, you need to remove the electric amplifier from its seat; its removal is carried out with the intermediate shaft. But we recommend that you still disconnect the amplifier from the shaft; this will allow you to quickly clean the EUR and simplify the installation procedure. To disconnect the shaft, you will need to unscrew the screw that secures the universal joint to the shaft using a 13mm wrench. Having done this, you will also need to unscrew the two nuts located on the end parts, after which the entire steering column must be removed.
- Then you will need to remove the bolt and cardan from the splined pulley of the mechanism. In this case, pay attention to the labels - during further installation they must match in any case. The marks are located on the protective cover, pulley and starter mechanism cover. Now you can clean the electric booster and other system components or replace the failed EUR with a new one. The assembly procedure is carried out in reverse order.