"LADA Kalina" are popular domestic cars in sedan and hatchback bodies, which were produced by AvtoVAZ OJSC from 2004 to 2013. Then the second generation models were launched into production - LADA Kalina 2 (hatchback and station wagon body styles). Changing the oil on Kalina is a mandatory procedure carried out during routine maintenance and largely determines the reliability and durability of the vehicle.
The rules for the maintenance of cars of the Kalina family (first and second generations) require periodic replacement of used motor oil, in common parlance “working out”, in power units and stipulate that it should be carried out no later than through:
- 3000 km (first replacement);
- every 15,000 km traveled or once a year thereafter.
Getting ready for replacement
Changing the oil in the Lada Kalina engine can be carried out not only during scheduled maintenance, but also when it is discovered that its volume in the engine crankcase has decreased significantly. Control is carried out using a special probe.
The volume is considered sufficient when the oil mark on the dipstick is located between the MIN and MAX marks. If it is located below the MIN mark, then the engine oil needs to be added, and if the MAX mark is higher, then drain off the excess. In both cases, it is necessary to identify the reasons that led to such a picture and eliminate them.
Recommendations for selection
The choice of oil for Kalina is considered the most important stage of replacement, since the procedure for changing the fluid itself does not cause big problems even for beginners. The work takes 1 – 2 hours.
Therefore, try to choose the mixture that you are going to pour into the engine of your Lada Kalina as correctly as possible.
All oils available on the market are divided into 2 categories:
- all-season;
- seasonal (summer and winter).
Most car owners prefer universal all-season vehicles, but in harsh winter climates this is not always a wise choice.
The best solution would be to use seasonal oils. If more viscous compounds are suitable for summer, then in winter it is recommended to use low-viscosity liquids. Based on what the temperature is in your region.
As the maximum cold start temperature of the power unit increases, oils with the following viscosity classes are used for Kalina:
Among them, 20W40 is used in the temperature range from -15 to +45 degrees Celsius, and 0W30 is suitable for severe winters when the temperature drops below -35 degrees and does not rise above +25 degrees Celsius.
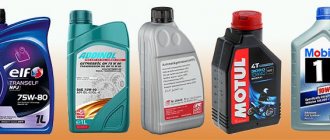
In terms of manufacturers, the following brands and their motor oils performed well:
- Luxe Hit;
- Teboil Gold;
- Lukoil Lux;
- GT Turbo SM;
- TNK Super;
- Esso Ultra;
- Mobil 1, Synt S and Super S;
- Extras 1, 5 and 7;
- Liqui Moly Optimal;
- ZIC A Plus.
These are motor oils recommended by experts and Kalina car owners that optimally meet the engine requirements.
Oil consumption rates are up to 1 liter for every 1000 kilometers according to the car manufacturer’s tolerances. The amount of oil consumed is influenced by a number of factors, including the quality and viscosity of the motor fluid used.
The level of engine oil consumption will reach maximum levels during aggressive and active driving, as well as at high speeds. Plus, the piston rings, pistons themselves and cylinder walls will additionally wear out.
Try to drive slowly and do not overload the engine unless absolutely necessary. Otherwise, you will have to change consumables much more often than indicated in the instruction manual.
Another pressing issue is how much oil is in the Lada Kalina engine. The amount of lubricant purchased directly depends on this. Taking into account washing, it will require 2–3 times more.
The amount of oil on the Lada Kalina engine with a volume of 1.6 liters and 8 valves is 3 liters. Be guided by the marks on the dipstick, since the actual amount of lubricant to be filled is somewhat different from what is indicated in the motor specifications.
After pouring the required amount of oil into the engine, check the level with a dipstick. The oil film should be exactly between the minimum and maximum o and “Max”).
The Lada Kalina will consume working fluid as it is used, so be sure to periodically check the level and add the missing amount. If the time for replacing the lubricant is approaching, it will need to be drained as completely as possible in order to refill with fresh composition. Some of it will still remain in the system.
What kind of oil to pour
Recommendations of AvtoVAZ OJSC regarding types of motor oils are given in the operating manual for the LADA Kalina car and include more than 18 products from various manufacturers. All of them are certified in the Russian Federation and have the appropriate viscosity grade (SAE classification).
Among owners of LADA Kalina family models, the most popular are semi-synthetic oils produced by Shell, Mobil and Lukoil.
When should you change your engine oil?
It is not always clear to beginners how often to change engine oil. As a result, they delay their work. The result is excessive contamination of the lubricating fluid, reduced engine life and new breakdowns. That is why it is so important to carry out the necessary work in a timely manner.
The timing of filling new oil depends on a number of parameters:
- The age of the car and the condition of the power unit.
- Machine operating activities.
- Driving manners.
- Seasonality of vehicle operation.
- Quality of oil and gasoline.
If the car is new, then the first oil change on a viburnum should be done after about three thousand kilometers. In the future, filling should be done as needed, but at least every 10-15 thousand kilometers.
Please note that the timing largely depends on the quality of the oil. For example, mineral water should be changed every 5-7 thousand kilometers, and synthetics – 10-15.
Engine oil volume
The amount of engine oil to be filled is almost the same for all engines of the Lada Kalina car. Its volume is 3.5 liters. An exception is the VAZ 21126 power unit, in which the amount of lubricant filled depends on which gearbox (gearbox) it is equipped with:
- Manual transmission – 3.2 liters;
- AMT robotic gearbox - 4.4 liters.
In addition, you need to take into account that when replacing the oil filter, about 300 ml of engine oil is poured into it, so the total amount will be less than that indicated above.
Tools and materials
To change the oil, you will need to prepare a standard set of tools and materials.
This list includes:
- hexagon size 12;
- rags;
- funnel for pouring fresh oil;
- empty container for draining waste;
- socket or socket wrench 17;
- oil filter puller;
- personal protective equipment to avoid getting burned by hot oil;
- new filter;
- fresh engine lubricant.
Step-by-step instruction
Having installed your car on the inspection pit/overpass/lift, begin step-by-step operations to replace the mining, during which you must:
- raise the hood of the car;
- open the oil filler neck;
- clean the oil pan from dirt;
- place an empty container under the drain hole of the oil pan;
- Using a 17mm wrench, carefully unscrew the drain plug;
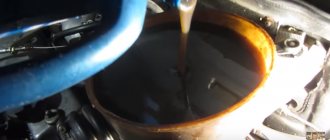
Important: you need to be careful when draining waste. Contact with skin may cause burns.
- after all the waste has drained, which takes about 10 minutes, screw the drain plug into place. Pre-clean it from dirt and waste residues;
- Using a special puller, unscrew the oil filter, not forgetting to replace the container with the drained oil;
Tip: If you don't have an oil filter remover, use a large screwdriver. To remove the filter, use a screwdriver to pierce its housing. Then, using a screwdriver as a wrench, unscrew the filter.
- Using a clean rag, thoroughly wipe the filter seat from dirt and waste residues;
- carefully pour motor lubricant into the new filter (about 300 ml) and lubricate the rubber sealing gasket with it;
- Carefully install the oil filter, tightening it by hand. After the rubber sealing gasket comes into contact with the cylinder block, turn the filter another 3/4 turn;
- insert a funnel into the oil filler neck and pour new motor oil into the engine (somewhere around 3.2 liters). At the same time, do not forget to control the level of auto-lubrication in the crankcase of the power unit using a dipstick. A level is considered normal when the mark is in the middle between the MIN and MAX marks. If the mark is located above the MAX mark, then drain the excess auto-lubricant by unscrewing the drain plug;
- Pour a sufficient amount of engine oil into the engine, tighten the filler neck with a plug, having previously cleaned it of dirt and traces of carbon deposits.
- This completes the oil change process. Before starting the engine for the first time, it is recommended to check for signs of leakage on or under the engine.
If no leaks are detected, then the power unit can be started. The first time they run it for 1-2 minutes. During this time, the red emergency oil pressure warning lamp located on the instrument panel should go out. If the warning light goes out within a few seconds, then the work has been done efficiently and you can drive out onto the road.
2302-3-2-07-a-02 (Copy)
Attention! Be careful - the oil is hot and harsh on the skin.
Drain the oil until it begins to drip from the drain hole. After wiping the plug and removing any remaining dirt from its thread, we wrap the plug in place. We remove oil leaks from the engine oil pan. We place the waste oil container in the area where the oil filter is located and unscrew it, rotating it counterclockwise. If this cannot be done manually, use a puller. To avoid damaging the sensor wiring harness and the crankshaft position sensor itself.
About the types of transmission oils for Kalina
Traditionally, AvtoVAZ recommends products for use. Lubricant produced by the same company is poured into the gearbox of new VAZ cars; it acts as a break-in and flushing lubricant until the first maintenance; after replacing it, you can select a product from another company.
Brand and volume of oil for LADA KALINA gearbox
The manufacturer specifies that the new oil must be synthetic or semi-synthetic and meet viscosity grade SAE 75W-90. This is an all-season liquid that works at ambient temperatures from -40 °C to +35 °C. 75W-80 and 80W-85 oils are also suitable. 80W-90 liquids can be used in regions where winter temperatures do not drop below -10...-12 °C.
In addition to viscosity, the oil must comply with API GL-4 class. This includes transmission fluids that are designed to operate in medium-loaded gears: hypoid, bevel and spiral-bevel, operating at oil temperatures up to +150 °C and contact pressure up to 3000 MPa.
Let's consider which oils are most popular in the LADA KALINA gearbox.
- LUKOIL TM-4 (GL-4) 75W-90. This is a semi-synthetic transmission fluid used in manual transmissions, differentials and transfer cases of cars and trucks. It is made from highly purified mineral base oil, synthetic components and a multifunctional additive package. The oil has high anti-corrosion, anti-foam, anti-wear and viscosity-temperature properties. It reliably protects transmission elements under high loads, ensures smooth operation of the gearbox at low temperatures and has high oxidative and thermal stability.
- SHELL SPIRAX S4 G 75W-90. Semi-synthetic gear oil API GL-4 for manual gearboxes of cars and small trucks. Used in VAG cars as a first fill fluid. The oil does not destroy synchronizers, ensures smooth operation of the gearbox, and protects transmission elements from shock loads, corrosion and wear. It has an extended service life and improves the performance of the gearbox.
- ZIC GF TOP 75W-90. Synthetic transmission oil for manual transmissions and drive axles. Compatible with synchronized boxes. In Hyuindai and Kia cars it is used as a first fill fluid. Belongs to material class GL-4/5. Meets the requirements of 75W-85 GL-4 oils. The fluid ensures reliable lubrication of all transmission elements at high speeds and heavy loads, cleans the gearbox and axles, increases the service replacement interval, reduces wear, protects against corrosion and has excellent thermal-oxidative characteristics.
- Castrol Syntrax Universal 75W-90. Synthetic multi-purpose gear oil for gearboxes and manual transmissions. Suitable for use in synchronized manual transmissions of cars and trucks, as well as final drives and differentials of trucks and construction equipment. The fluid has excellent fluidity at low temperatures and effectively protects against wear under high loads. It has an extended service life and is compatible with conventional mineral oils and sealing materials.
- LIQUI MOLY Hochleistungs-Getriebeoil GL4+ (GL 4/GL 5) 75W-90. Synthetic transmission oil for manual transmissions and drive axles. It is compatible with synchronizers and is resistant to aging. Thanks to a special additive package, the fluid reliably protects transmission elements. The oil prevents wear and corrosion, works well under high loads and maintains its characteristics at high temperatures. Can be used in gearboxes that require GL-4 oils and manual transmissions that are combined with a hypoid transmission.
What points should you pay attention to?
The main factors to consider when choosing a lubricant:
- Its compatibility with the manufacturer's requirement. Read service books, study information on the Internet, consult with consultants of the Lada Kalina brand.
- Remember what kind of engine oil was poured into the car before. If it does not disappoint you, and the car worked properly on it, stop searching and fill it up. Experts say that each new brand negatively affects the performance of the car.
- The oil should be changed if its consumption is high.
Carefully study the characteristics of the oils sold.
Often consumers are not satisfied with the product itself, but with its price. Therefore, they are forced to look for analogues. And as practice shows, they are not inferior in quality, and sometimes even better than popular brands.
Rules for replacing lubricant in a Lada Kalina car
DIY car repair and maintenance
Step-by-step plan for replacing the CV joint (grenade) So, the grenade (both internal and external) on front-wheel drive models of domestic cars (God forgive me) starting from the VAZ 2108 and ending with at least 2115 is the same (well, maybe different manufacturers and different final service life). The same principle applies to Priora, Kalina and Grant.
Greetings, dear visitors! I want to devote this article to replacing the external grenade. If you follow the sometimes unclear terminology (which I don’t always like) - replacing the constant velocity joint, i.e. CV joint. I try to write my articles in everyday language, in which people ask for information.
The photo above shows a damaged Lada 2114, already repaired. The front right side, which we are repairing, was collected in a heap by a frontal impact along with the entire front end (look at the gaps between the parts after the repair, in my opinion, the repair was done perfectly). Looking under the front right wheel I noticed that the drive was bent.
If you don't loosen it while the wheel is on the ground, it will be very difficult to unscrew it later. After which, I jacked up the car completely and removed the wheel and unscrewed the grenade nut. There is a washer under the nut (don't lose it, as the new CV joint doesn't come with one).
Next, you need to unscrew the ball. This can be done by unscrewing two 13mm bolts, or you can unscrew the bottom nut of the pin by 17mm and knock it down by pressing it down with a pry bar, while simultaneously tapping it with a hammer (not on the pin or ball), which is what I actually did. Additionally, release the brake caliper hose.
By moving the hub to the side (having previously pushed the grenade inward with the mounting tool and pulling the hub towards us), we release the outer grenade, which we would simply replace without pulling out the entire drive along with the inner CV joint,
...if it weren't for the drive that was bent into a ram's horn. And you see the fate of the outer grenade in the photo - it crumbled.
So, let's replace the drive too. The photo below shows a CV joint from an Italian manufacturer called TRIALLI (Trialli) for 900 rubles. Quite a cheap product of very good quality.
And the photo below illustrates the components of the CV joint:
- The grenade itself.
- Two clamps.
- Protective cover (boot).
- Retaining ring.
- A tube of special lubricant (calculated for the entire service life of the hinge, if the case remains intact all this time). There is another cheap but excellent CV joint - 4 for lubricating a grenade for 50 rubles in any auto store
- Hinge nut.
Since we were changing the drive, we had to knock off the support washer from it and replace it with the new drive, which should fit clearly into the lower groove (photo below). In theory, they should be installed on the new drive anyway. After that, put on the boot and lower it into its seat.
And install the retaining ring. If it is too stretched, first squeeze it and place it in the upper groove. The easiest way to do this is with cone-shaped pliers, inserting them inside the ring and stretching the ring to fit it into the groove. And then, using a special wrench or simple pliers, tighten the lower clamp, but do not tear it off.
Next, you need to inspect the inside of the hinge for any flaws or debris. Then fill it with lubricant. Insert the neck of the tube into the separator, press it firmly and press the lubricant until it comes out through all the cracks. Usually almost the entire tube fits there.
Oil filters
All filter components present on the market today can be classified into two categories.
- Rough cleaning. Such an oil filter is included in the lubrication system in series, so the entire volume of lubricating fluid passes through it.
- Fine cleaning. These components are included in the line parallel to other oil channels. The oil filter is used to pump part of the lubricant (within 10-20%). This volume is mixed with the rest of the liquid in the oil receiver.
The disadvantage of this scheme is that the filtered oil is redirected directly into the crankcase, and not to the operating parts of the engine.
The oil filter for Lada Kalina with an engine of 8 and 16 valves, designed for rough cleaning, can be plate-slotted. Components for fine cleaning are available in cardboard, felt or paper versions.
Granta headlights fog lights
Long mudguards on Granta
Installation of Lada Granta tow bar
Filters for coarse cleaning interact with a system of bypass valves, which, if the working component itself is significantly clogged or in extreme operating modes of the engine, direct oil directly into the crankcase, past the cleaning circuit. Here, the stiffness of the spring component is adjusted depending on the magnitude of the pressure variation within the range of 0.8 - 1.2 MN/m2.
Fine filter elements are capable of filtering oil, trapping particles with a minimum size of 0.001 mm. Therefore, it is important what kind of oil to pour.
Markings
Let's look at oil manufacturers, as well as markings that can help you find out whether Lada Kalina supports a particular oil.
- Lukoil Lux. SAE class – QW-40, 10W-40, 5W30; group – SL/CF
- Luxe Hit/Best. SAE class – 10W-40; group – SL/CF
- Novile Super. SAE class – 5W-30, 20W-50, 15W-30; SJ/CF
- Rosneft Maximum/Premium. SAE class – 5W-40, 10W-40, 5W-40; SL/CF
- Tatneft Synthetic/Ultra. OW-40, 5W-30, 5W-40; SM/CF, SL/CF
- Esso Ultra. 10W-40, SJ/SL/CF
- Mobil 1.OW-40, 5W-50, 10W-40; SJ/SM/SL/CF
- Shell. 5W-40, 10W-40; SL/CF
- ZIC A. 5W-30, 10W-30; SL
As you can see, Lada Kalina owners have a wide selection of oils with different classes and standards. Based on these standards, a car enthusiast can safely fill in any oil from the specified list.
Preparing the car for changing consumables
Any manipulations with the elements of the fuel line are carried out after comparing the pressure in the line with atmospheric pressure. After stopping the engine, the fuel in the line is still under pressure. It can be bled only after de-energizing the power supply circuit of the fuel pump module. This procedure is carried out as follows:
- turn off the ignition;
- remove the cover of the central tunnel lining using a flat screwdriver (forms the bottom of a niche for small items near the cigarette lighter);
- remove the 15 A fuse responsible for power supply to the fuel pump (second from right to left) from the fuse box located under the removed cover of the power supply and engine control system;
- turn on the ignition (there will be no usual buzzing from under the rear seat) and start the engine;
- After the engine stops spontaneously, crank the starter for 5 seconds.
You can prepare the Kalina fuel system for filter replacement in an alternative way:
- remove (on a sedan) or fold down (hatchback and station wagon) the rear seat;
- remove the fuel pump hatch, which is attached to the bottom with two self-tapping screws;
- disconnect the wiring block from the fuel pump module with the ignition off;
- start the engine;
- After running out of fuel, crank the starter for 5 seconds.
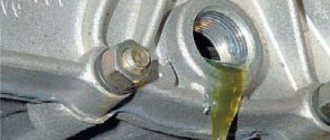
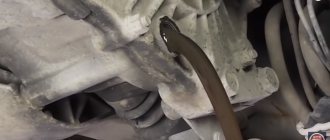
Oil leaks and breakdowns
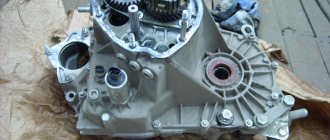
The first thing a novice motorist needs to remember is that it is very difficult to repair a gearbox on your own. This transmission unit has a rather complex design, and any mistake in repair can lead to an accident (and additional waste of money, time and nerves). But the main points regarding gearbox repair are still worth listing. At least in order not to pay at a car service center for incorrectly done repairs.
But it’s worth understanding the signs and causes of breakdowns in the Lada Kalina manual transmission, and the main methods for eliminating them:
- Noise and knocking heard from the gearbox. If the circumstances are successful, the problem here will be the exhausted life of the lubricating fluid. A more unpleasant option is that the bearings or gears have worn out. In the described case, only replacing parts will help. And it is not recommended to change it yourself - only with the help of a professional and under his direct supervision.
- Gears are switched with some difficulty. In the described case, the problem is incomplete disengagement of the clutch (the disc does not release completely), deformation of the gear shift drive rod, wear of the plastic parts of the shift mechanism, or loosening of the screw fastenings of the lever. The last two cases are the most common. Breakdowns are corrected as follows: if there are problems with the clutch disc, there is only one recommendation - contact a specialist (self-repair is impossible without special tools and skills);
- if the rods are deformed (their appearance is shown in the service book), they must either be straightened (leveled to the required level) or replaced entirely by purchasing spare parts in advance;
- Breakages of plastic parts are corrected by replacing them. But you should take into account that replacing certain parts takes a lot of time and is impossible without the help of an AvtoVAZ car repair specialist;
- loose fasteners can be corrected most easily - you need to screw in the screws and bolts that hold the mechanism in the desired position. Standard wrenches and screwdrivers are used here. But it is recommended to purchase the appropriate set in advance, since the fasteners in the mechanism are of different sizes and for different tools.
Separately, it is worth describing the problem with oil leakage in the manual transmission in the Lada Kalina. There are two likely sources of the problem: sealant damage or oil seal wear, or a crack in the transmission housing. The second case is less common, but in this case it is often necessary to change the entire manual transmission (and this is a considerable expense). And if the sealant is damaged or the seals are worn, the box is pulled out, disassembled (with certain technical knowledge, even a beginner can do this), and either the gaskets are changed or a new sealant is applied.
There is an additional reason for oil leakage - loosening of the gearbox mounts. It can be solved by simply tightening the bolts. And if resolved in a timely manner, it can be eliminated easily and without any problems.