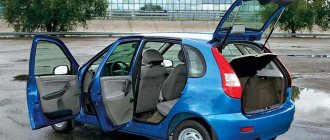
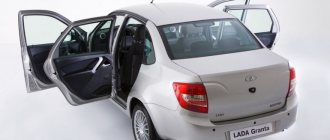
LADA Kalina was produced by the Volzhsky Automobile Plant from 2004 to 2018. The equipment belongs to the small class family of group 2; over the years of production, the model has undergone one update. In 2013, the second generation of front-wheel drive hatchbacks, station wagons and sedans entered the market.
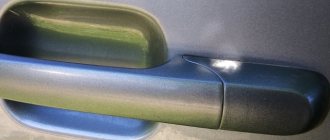
Kalina belongs to the budget price segment. The owners appreciated the model’s unpretentiousness to fuel quality, its minimal consumption, and a large number of spare parts. Replacing the Kalina rear door handle is not one of the common consumables. The part breaks relatively rarely; repairs are carried out both at a specialized service station and independently.
Step-by-step instructions for repairing and replacing a door handle on Kalina
05.12.2019
LADA Kalina was produced by the Volzhsky Automobile Plant from 2004 to 2018. The equipment belongs to the small class family of group 2; over the years of production, the model has undergone one update. In 2013, the second generation of front-wheel drive hatchbacks, station wagons and sedans entered the market.
Kalina belongs to the budget price segment. The owners appreciated the model’s unpretentiousness to fuel quality, its minimal consumption, and a large number of spare parts. Replacing the Kalina rear door handle is not one of the common consumables. The part breaks relatively rarely; repairs are carried out both at a specialized service station and independently.
Causes
Replacing the Kalina door handle in the driver's seat accounts for less than 1% of all body damage to the first generation configuration. The mechanism for opening the rear element is less reliable; craftsmen note that every tenth Kalina has a problem opening the rear left or right door, this is about 10% of all body repairs. Reasons for handle breakage:
- mechanical damage to the latch;
- breakage of the lock cylinder;
- defective components.
In severe frost, due to the ingress and freezing of moisture in the lock drive, it is necessary to apply an inappropriately large force to the outer handle to open the door. As a result, its opening mechanism fails.
It is recommended to spray the lock with anti-freeze or anti-ice spray, which is used to clean the windshield, before opening the door.
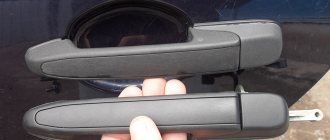
The external elements of opening the rear doors of the Lada Kalina deserve attention. As practice shows, they break much more often than the front ones. And the reason for this is a factory defect in one of the parts of the handle mechanism.
What exactly breaks down in the mechanism?
Before changing the door handle on Kalina, car enthusiasts disassemble the trim and dismantle the assembly. After disassembling the rear door and removing the outer opening handle, it most often turns out that the cause of the breakdown is the tongue that drives the lock rod. Part of it breaks, causing the part to no longer engage with the rod. The reason for this is the incorrectly selected material from which this tongue is made.
The manufacturer claims that the lock mechanisms are made of high-strength steel. Craftsmen who repair cars claim that AvtoVAZ uses silumin as a material, an alloy of aluminum with silicon, which is more susceptible to corrosion than others.
A repair kit for the rear door lock for the Lada Kalina is almost never found on sale, so they purchase the entire unit assembled. The price of the unit is 330-350 rubles. In the event that the metal or chrome plating of the new part does not match the color of the rest of the car handles, disassemble both units and reinstall the tongue from the new handle to the old one.
Removal and installation of the outer handle on Kalina
Regardless of the body configuration or year of manufacture, reinstallation and repair of locks and handles remains the same for hatchbacks and station wagons. The order of work differs when repairing the front and rear elements. The arrangement of the parts is considered simple, so it takes about 30 minutes to reinstall one element. For independent work you will need the following tool:
- crosshead screwdriver;
- flat screwdriver;
- knob;
- head at 8;
- extension;
- sharp knife or awl.
Front door
The procedure for performing the work necessary to remove and install the outer front door lever on the Lada Kalina:
- Disconnect the negative terminal from the battery.
- Remove the inner trim of the outside rear view mirror by first prying it off with a screwdriver.
- Unscrew the locking lock.
- Using an awl or sharp knife, remove the plug.
- Use a Phillips screwdriver to remove the armrest mounting screw.
- Pull the inner handle of the lock and unscrew the screw using a Phillips screwdriver.
- Remove the inner lever.
- Unscrew the armrest mounting bolt located in the niche.
- Unscrew the two pocket screws.
- Wrap a flat-head screwdriver in a rag and insert it between the trim and the door frame. Carefully pulling the screwdriver towards you, unclip the first clip that holds the trim. Also unclip all the other clips, there are 8 of them in total.
- Carefully remove the trim from the iron door frame.
- Disconnect the two wire connectors from the power window assembly.
- Move the trim to the side.
- Disassemble the lower link of the outer door handle drive.
- Unscrew the handle fastening bolt located at the end; for this, use a 8-mm socket and a knob.
- Disconnect the outer arm drive upper link.
- Remove the faulty part and replace it with a new one.
Door opening faults on Lada Kalina
The principle of opening the doors of the Lada Kalina is completely mechanical. By pulling the handle towards you - its stop presses on the lock's support plate, the bolt comes out of the strike plate.
The structure experiences cyclic loads. Therefore, if maintenance is not done in a timely manner, the door handle, most often Lada Kalina 1, jams and does not return to its original position.
The following factors may be the reason for replacing or repairing Kalina's external handles:
- Violation of the geometry of the door, body or freezing leads to an increase in mechanical impact. The result is a breakdown of the mechanism or housing.
- Lock jamming. The mismatch between the position of the crossbar and the strike plate is the cause of partial jamming. This is also what sagging doors lead to.
- Poor quality materials. The handle covers are made of good plastic, but in severe frost they become fragile. Most often, the internal latch of the outer handle, made of silumin, breaks.
Removing the handle is necessary to perform other work, for example, to repair window regulators. Therefore, it is important to study the mechanism removal procedure, minimizing the likelihood of damage.
Interior handles (internal) fail less often. The cause of failure may be a simple and fragile design. A more common cause of interior handle failure is mechanical damage. The return spring is the least likely to be deformed.
Instructions for removing the cladding on Kalina
The first three operations are performed the same way for all Lada Kalina doors. The exception is the trunk hatches of hatchback and station wagon cars, where the disassembly procedure is much simpler. Here's what to do:
- By hand, unscrew and pull out the cap of the latch designed to lock the door lock from the inside.
- Using a Phillips screwdriver, remove the 4 screws holding the music system speaker.
- Remove the speaker and disconnect the wires from it.
Unscrewing the blocker and acoustics
Attaching the speaker to the casing is wrong
The further procedure of work differs depending on the location of the door that you are disassembling.
Front passenger door
Here the decorative panel is held on by 8 clips, 2 screws securing the internal handle and two self-tapping screws located under the plastic pocket. The algorithm for dismantling it is as follows:
- Using an awl, carefully pry the edge of the plastic plug hiding the screw in the door handle and remove it. Remove the second screw cover in the same way.
- Remove both handle screws.
- Pull the door opening handle towards you, unscrew the fastening screw and remove the lever. After which you will be able to remove the entire handle.
- Unscrew the 2 screws at the bottom of the door card, under the plastic pocket.
- Take a flat head screwdriver and pry the top right corner of the trim panel to disengage the first tab. Grab the casing with your fingers and release the remaining pistons manually.
- After separating the panel from the door, disconnect the wires coming from the power window button. To do this, pry the connector tab with a screwdriver and pull the block out of the button block. Dismantling of the cladding has been completed.
Passenger side panel removed
Nuances of disassembling the driver's door
On this side, the decorative panel is removed in the same order as on the passenger side. But due to small differences in the design, it is necessary to take into account the following nuances:
- To make the trim easier to remove, you need to remove the plastic panel covering the rear-view mirror adjustment lever;
- the first screw for securing the armrest is located under the plug, and the second is in the recess of the handle;
- the door opening handle is located on top of the armrest and is removed after unscrewing the fastening screw.
The plastic socket for the mirror drive can be easily removed by hand
The panel on the rear view mirror adjustment is removed using a flat screwdriver, which is used to pry it off from below. On vehicles equipped with electrically controlled mirrors, there is no adjustment lever, and instead there is a plug on the panel.
On the driver's side, the screw is hidden in the armrest
Screw securing the lever for opening the door
Rear door trim
Here the upholstery is pressed to the door by 10 plastic clips and 2 screws securing the handle. The disassembly technology is as follows:
- The first step is to remove the mechanical window lifter handle. Use an awl to pry up the plastic half-ring that secures the lever to the axle. Pull it out and remove the handle.
- Pull out the 2 plastic plugs on the door handle and remove the fastening screws. After this, the element will be easily removed.
- Using a flat-head screwdriver, pull out the lower far corner of the decorative panel and snap out the first piston.
- Grab the door card with your hand and remove it, releasing the remaining clips along the contour. The casing has been successfully dismantled.
Scheme for dismantling the decorative panel
To remove the window lifter handle, you need to pull out the half ring
Otherwise, the upholstery on the doors of the second generation Lada Kalina car is removed in the same way, there are no differences.
This is what the removed rear door trim of Kalina looks like
Stages of dismantling and installing handles on Lada Kalina 1 and Kalina 2
It is recommended to carry out work at an air temperature of at least 0°C. The reason is the fragility of the plastic. Some polymer parts may be damaged during dismantling. Good lighting is necessary. Typically the replacement is done in a garage or similar facility.
Removing and installing interior handles of the Kalina front door
To dismantle you will need a Phillips screwdriver. Removing and installing the right and left door handles is not much different. However, on the 2nd generation Lada Kalina the procedure is slightly different.
Dismantling stages at Klin 1:
- Unscrew the screw securing the handle and remove it.
- Remove the plugs and unscrew the 2 screws of the cover and pull the cover towards you.
- Unscrew the closure cap.
- Unscrew the screws securing the door card.
- Pull out the door trim.
- Disconnect the power window button wire.
- Remove the handle rod.
- Unscrew the screws securing the door.
Stages of dismantling on Klin 2:
- Remove the plug (lining).
- Unscrew the fastening screws.
- Unscrew the closure cap.
- Pull the trim towards you.
- Disconnect the power cord for the power windows.
- Remove the door handle lever.
- Unscrew the fastening screw.
You don’t need to make a lot of effort; when removing the door trim, otherwise it will be difficult to remove.
There is no need to disconnect the fuse box and battery when removing the power window wires. Installation is done in the reverse order, using new clips.
Removal and installation of the rear door interior handle
The mounting pattern for the handles on the Lada Kalina for the rear door is similar to the front ones. But in versions without electric windows, you will additionally have to remove the window lifting handle.
Preparation for dismantling
To unscrew the fasteners and remove the door trim, you need to prepare a simple set of tools:
- screwdriver with cross slots;
- long flat screwdriver;
- a pointed tool, such as an awl.
Door disassembly tool
Since the door card of the Lada Kalina car is held on by plastic fasteners (otherwise known as clips, pistons), there is a warning regarding the working conditions. It is strictly not recommended to dismantle door trim in the cold, when the plastic becomes brittle and easily destroyed. Hence, there is a risk of breaking all the clips during the process of removing the decorative panel. Therefore, in winter, perform this operation in a heated garage or box.
In the summer, there are no requirements for premises; remove the casing even in the open air. There is only one recommendation: in windy weather it is better to drive the car into the garage, otherwise a lot of dust will be brought into the interior when the doors are open.
This is what the door card lock looks like
Adjusting the rear door lock
The doors are difficult to open, the lock is jammed, an extraneous squeak appears when unlocking - the first signs of the need to adjust the door lock. The problem is common among domestic transport.
The left side wears out prematurely due to frequent use.
Inexperienced owners practice eliminating damage by lubricating the mechanism. However, the effectiveness of such a solution is low. Service station technicians recommend the following adjustment:
- Loosen the bracket using an impact screwdriver.
- Move the bracket up (down) a few millimeters, while simultaneously trying to slam the door.
We move the mechanism a few mm and check for functionality
As soon as we achieve the result, we firmly fix the bracket. Lubricate the rod with a thin layer of Litol, graphite lubricant.
This completes the adjustment of the rear door locks.
The above algorithm is effective provided the lock is in good condition. What to do if there is a curvature or deformation on the door frame? In this case, the experts advise making improvements:
- We open the back door.
- We insert a plastic stopper into the lock so that it does not close.
- Using a triangular file, carefully file off the sharp ends of the lock teeth. We do this carefully so as not to break the mechanism.
The place to be filed with a file
We remove the plastic stopper and check that the mechanism is working properly.
Along with adjusting the lock, you have to adjust the door. The reason is the increase in the radius of curvature of the frame. The defect is common and can be corrected by straightening the curvature.
Since 2022, AvtoVAZ has launched mass production of rear door locks of a new type on the Lada Grant. This is a modernized version of the previous locking mechanism.
Work progress
Let us immediately note that before removing the door handle of the Lada Kalina, it is necessary to dismantle the trim.
Front door
First of all, you need to use a flat screwdriver to pry the plastic end of the rod together with the lock switch lever to disengage it.
Next, the lock drive rod is disconnected from the lever of the external handle - it also needs to be pryed off with a screwdriver.
Then you need to unscrew the nut securing the (front) handle.
Behind it, unscrew the mounting bolt (rear).
When this is done, all that remains is to remove the Lada Kalina door handle.
If you need to replace the lock cylinder, you will need to press out the lock cylinder retainer using a flat-head screwdriver.
Backdoor
Removing the rear door handle of the Lada Kalina is even easier.
First you need to unscrew the front handle mounting nut.
Then the rear mounting bolt.
All that remains is to pull the handle forward (in the direction the car is driving) and remove it.
Installation occurs in reverse order.
Note. If you tighten the fastening bolt during installation, the handle will become crooked - there will be a large gap, which is shown in the photo below. In this case, you only need to adjust the tightening force.
The process of replacing the Lada Kalina door handle is demonstrated in more detail in the video.
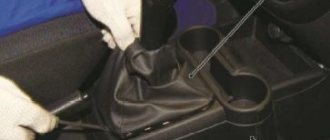
Removing the rear door trim
Places for fastening the trim
The rear door trim is damaged in many Kalinas. In some cases, such defects can be easily eliminated without the need to remove it. In case of more serious damage, the upholstery is dismantled for restoration or complete renewal. Removal of the door trim is also carried out during repair work or replacement of elements located behind it. A similar procedure is necessary for installing speakers, repairing power windows, and laying soundproofing material.
To remove the rear door trim, you will need the following tools:
- curly screwdriver;
- flat screwdriver;
- 10 mm socket wrench.
According to the instructions, the technician must first remove the door lock locking latch. Using a flat-head screwdriver, press out and move the window mechanism lock to the side. After dismantling the device and socket, the lock is pulled back.
Trim removed
The next step is to unscrew the fastening screw and remove the handle. Use any sharp object to dismantle its 2 plugs. Using a Phillips screwdriver, unscrew the fixing screws and remove the handle. A slotted screwdriver is inserted between the cladding and the door. The clips located along the entire perimeter of the structure are snapped off one by one. The upholstery is removed from the Kalina door. Using a special diagram, you can find out how the pistons of this product are located.
DIY repair option
One of the common reasons for replacing handles is play and rattling. This occurs due to a poor-quality plate located inside the structure. A fixation screw is screwed into its hole. After a certain period of operation, the porous metal is damaged and backlash appears.
Option to temporarily eliminate the defect:
- Remove the handle.
- Disassemble it and remove the steel plate.
- Make a hole in it and on the plastic cover for the screw.
- Connect the structures and check for any play.
The screw needs to be cut to 3-4 turns, since the installation depth will be small. The head is semicircular, but does not extend beyond the plane of the plastic cover.
Review of spare parts prices
| Name/article | Price, rub.) |
| 00001003833121 Bolt M5x10 with serrated shoulder | From 100 |
| 00001003831801 M5 nut with serrated shoulder | From 100 |
| 00001002624101 Washer 5 mm | From 50 |
| 00001003275901 Screw M6x10 | From 50 |
| 00001002605371 Lock washer 6 mm | From 50 |
| 21230610542000 Lock cylinder | From 550 |
| 11180610515000 External front right handle | From 650 |
| 11180610515100 External front left handle | From 650 |
| 21900610518000 Inner front right handle assembly | From 950 |
| 21900610518100 Inner front left handle assembly | From 950 |
*prices are current as of November 27, 2018.
When choosing spare parts, always give preference to original ones. Good, high-quality parts are always 10 - 15% more expensive than analogues. At the same time, by purchasing a factory part, you can count on a long service life of the mechanism.
A cheap counterfeit does not provide even a third of the required resource. The final choice is up to the owner of the technical device. The deciding factor is the budget.
Adjustment process
If the gap is smaller, lower the glass all the way down. Then close it with one click, take it by the top edge and push it towards you a couple of times with a little effort. And if the gap on the front door turns out to be wider, then you need to open it with the window down and, resting your foot on the trim, pull the door to the inside several times. Then it will be possible to move on to the main problem associated with the poor functioning of the lock.
- special screwdriver;
- Silicone Grease;
- limiters.
When there is a slight bulging outward, you need to put a soft and durable gasket in the opening and on the central post, in the place where the hinges are, and then try to close the door. If the door is slightly recessed relative to the body itself, then you need to support the outside with your knee in the hinge area and pull the open door towards you. By making such adjustments to the rear doors, you can achieve soft operation without various side effects.
You can install them either on the opening or on the door itself. Due to the presence of springs, closing/opening will be smooth and the sound will not be too loud. Basically, those who are faced with a similar problem most often try to solve it with the help of lubricant. In a way it helps, but only for a short time. And it can only get worse in the future.
The article describes the process of removing the exterior door handle of a car. The handle is removed when replacing it, as well as for the convenience of replacing the lock cylinder.
You will need: an “8” wrench, flat-blade and Phillips-blade screwdrivers.
External handle replacement process
The outer door handle of a Lada Granta car is removed not only for replacement, but also if it is necessary to repair the lock cylinder, lubricate or correct the operation of the locking mechanism. Work order step by step:
- Open the front door.
- Remove the casing.
When working on reinstalling trim elements, it is recommended to purchase additional clips; the cost of one clip is up to 3 rubles. During the repair process, fasteners may
break, the parts are consumer goods, have a bad fixing clip or a hard skirt.
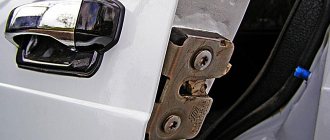
Using a screwdriver, unscrew the three screws that secure the mirror frame to the car body. Remove the retaining clip using pliers. Remove the mirror and remove the hinges through the diagnostic hole. Remove the bolt that secures the outside handle to the end of the door. To do this, you need to use a 8-mm head. If the screw is tight or acidified from rust, it is recommended to spray the fasteners with anti-corrosion lubricant. Remove the bolt holding the lever. It is located in the inner tunnel. Disconnect the rods from the lock using a screwdriver. Moving forward as you move, slightly rocking, remove the outer handle.
All work with lock mechanisms, dismantling handles outside and inside, and reinstalling casings is carried out only with the battery disconnected.
Dismantling and replacing the front door of Lada Kalina
In this article we will fully consider the dismantling and disassembling of the front door of a Lada Kalina car
Removing the outside mirror
Use a slotted screwdriver to pry off the exterior mirror trim
Removing the lining
Using pliers, remove the locking bracket of the ball joint housing of the handle rod
Use a Phillips screwdriver to remove the three mirror mounting screws.
We remove the mirror along with the cables and the ball joint
Install the outside mirror in reverse order
Removing and installing front door trim
We turn off the lock button by hand.
Having turned the inner handle so that the screw securing it to the lever is accessible, use a Phillips screwdriver to unscrew the screw and remove the handle.
Use a screwdriver to pry off the switch block, pressing the fastening latches
We take it out of the hole in the armrest and, unfolding it as shown in the photo, lower the block into the resulting hole so that it does not interfere with the removal of the door trim
Using a Phillips screwdriver, unscrew the two screws for the lower fastening of the upholstery.
Use a screwdriver with a thin blade to pry the plug in the armrest and remove it from the hole.
Using a Phillips screwdriver, unscrew the screw securing the upholstery
Unscrew the self-tapping screw for fastening the upholstery located in the armrest niche
With our hands we move the lower edge of the upholstery away from the inner door panel, overcoming the resistance of the pistons.
We remove the upper edge of the upholstery from the groove of the internal glass seal and, lifting the upholstery, remove it from the front door
Location of the pistons on the inside of the upholstery
If necessary, use a Phillips screwdriver to unscrew the four screws securing the energy-absorbing element of the door
And we take it off
Install the upholstery in reverse order
Removing the front door glass
Removing the glass trim
Install the glass in the upper position
Use a 8mm socket to unscrew the four bolts.
fastening the glass to two sliders.
and take out the glass
If necessary, peel off the protective film from the glass holder. Install the front door glass in reverse order.
Removing the front door power window
Remove the front door glass.
Disconnect the wire terminal from the negative terminal of the battery.
Before disconnecting the power window mechanism wire block from the switch block wire block, unroll the wrapping material on the connection of the blocks and disconnect the blocks
Using a 10mm socket, unscrew the 11 nuts securing the power window mechanism.
We remove the power window mechanism from the door through the lower hole in the interior panel.
Power window mechanism
We install the power window mechanism in the reverse order.
In order to prevent knocking on the doors, we cover the connection of the pads with soft material (foam rubber).
Removal and installation of the external handle and lock of the front door
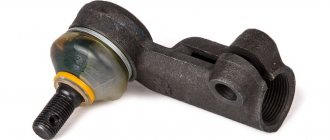
Front door lock with locking drive and outside handle2.
Removing the front door trim
Using a Phillips screwdriver, unscrew the screw securing the base of the inner handle and remove it from the mounting pin.
We bend the edge of the protective material behind the inner door panel.
Using a screwdriver, we disconnect the rod from the cylinder mechanism of the outer handle lock.
Similarly, disconnect the rod of the outer handle.
Use a 8mm socket to unscrew the bolt securing the outer handle.
Use a 8mm socket to unscrew the handle securing nut.
Remove the outer handle.
Using a Phillips screwdriver, unscrew the three screws securing the door lock.
Slide the red block lock up and disconnect the block from the locking drive
Using a screwdriver, press out the rod lock, turning it around its axis.
Having disconnected the rod of the inner handle from the lock, remove the rod.
We remove the front door lock together with the locking drive and rods through the technological opening in the inner door panel
Install in reverse order
Removing and installing the door opening limiter
Remove the door trim.
To avoid damaging the door, do not swing it open after removing the door stop.
Using a 13 mm socket wrench, unscrew the bolt securing the limiter to the body pillar.
Using an 8 mm socket wrench, unscrew the two bolts securing the limiter to the door.
We remove the limiter of the internal cavity of the door.
We install the limiter in the reverse order, and then coat it with any grease
Removing and installing the front door
The door can be removed as an assembly (together with the equipment installed on it).
It is more convenient to disassemble and reassemble the door when it is installed on the car. At the same time, there is less chance of damaging the paintwork. An assistant will be required to complete the work.
We remove the window regulator.
We remove the glass from the door.
Remove the outer door handle.
Remove the door lock.
Unscrew the nut securing the wiring harness and disconnect the wiring harness block from the door harness block.
We release the three latches and remove the wiring harness block from the door hole.
Disconnect the wiring harness from the inner door panel and remove the harness through the hole in the door.
Remove the door stop.
While the assistant holds the door, use a 13 mm spanner to turn out the axis of the lower hinge
Using the same key, unscrew the upper hinge axis and remove the door.
Having coated the working surfaces of the hinges and axles with grease, install and assemble the door in the reverse order.
To ensure reliable contact in the connecting block of the door wiring harness, we treat its terminals with a special agent for cleaning and protecting electrical contacts.
Source: https://avtomechanic.ru/lada-kalina/kuzov-lada-kalina/remont-perednej-dveri-lada-kalina
How to correctly replace the handle on the rear door in a Lada Grant
Replacing the rear door handle of a Lada Granta is indicated when it breaks or wears out. In other situations, the driver's desire to change this item may cause scratches or microcracks on parts that spoil the appearance of the interior. If in the case of passenger structures only the handle needs to be changed, then in the driver’s door the lock that unlocks the door will also need to be changed. Sometimes replacing the opening mechanism is necessary because the lock cylinder has been damaged by an intruder.
What tends to break down in a mechanism?
Sometimes disassembly occurs only to tighten the fasteners. It is also necessary to dismantle the opening mechanism if it does not work correctly. Main causes and options for breakdowns:
- A defect appeared after an accident.
- The part does not close or open the door well. There is insufficient adhesion to the body part.
- Microcracks, scratches, and abrasions appeared on the product.
- Damage to internal components has been detected. If no defects are found during a visual inspection, you will have to unscrew the handle to make sure that the whole problem is in the fastenings.
- In the case of the driver's door, where there is a lock in the handle, the reason for dismantling is an attempt to break into it.
An equally compelling reason: failure of the external door opening manipulator
It is important to understand that the plastic from which the products are made is not as durable as other elements. It may simply crack due to strong pressure on the handle
Is repair possible?
All parts wear out over time. Sometimes it is enough to disassemble, replace the broken fasteners and continue to use the handle. To do this, just use a screwdriver to remove the decor and unscrew two bolts: inside and outside. Repair is impossible if the handle is broken off or has a chip or crack on it.
Replacing the outer handle
To understand how to remove the door handle on a Grant, just study our instructions. From the inventory you will need: a Phillips screwdriver, a socket wrench and a knife. Step-by-step work:
- Decorative trims are dismantled. The plastic latches are removed, then the edge of the casing is picked up using a knife.
- The handle is secured with a nut and bolt on the inside and outside. First, the fastening element is unscrewed in front, then in the back.
- The thrust rods and seals are removed from the closing mechanism.
- The product is removed. To do this you will have to pull the handle a little.
- Before installation, the mounting location is inspected and dirt and dust are removed.
Assembly is carried out in reverse order.
Replacing an internal part
Replacing the internal handles on the rear door of a Granta is slightly different from dismantling the external part. The internal element has more fastenings and is partially hidden by decorative trim. Algorithm of actions:
The cladding is dismantled. To pull it out, you need to pry up the edge. To do this, use the thin edge of a screwdriver or a sharp knife. The rear door card unwinds
There is a rod inside that is important to disconnect. To remove the remains of the broken opening device, the fasteners are unscrewed. The handle is removed and a new part is installed.
Procedure for removing the driver's door handle
Answering the question of how to remove the Lada Granta door handles on the driver's side is a little more difficult
It is important to consider that this plastic item has a lock installed, so the cause of the mechanism malfunction may be due to a broken cylinder. You will need a Phillips screwdriver, an 8mm wrench and a knife
Basic steps for dismantling:
- The fastening fragments are unscrewed from the top and inside.
- Traction is turned off. The handle is removed. If the cylinder needs to be replaced, the lock cylinder latch is released. It can be easily removed with a simple screwdriver.
- A new core is installed after first removing the larva. To do this, the plastic tip of the rod with the lock switch lever is disengaged with a screwdriver.
- The part is fixed with bolts on both sides and tightened.
Internal door handle viburnum
Available payment methods:
- Cash upon receipt
- Credit, installments
- Using cards Sberbank, VTB, Post Bank, Tinkoff
- Yandex money
- QIWI
- ROBOKASSA
Pickup times must coincide with store opening hours.
Replacing door handles. — Lada Kalina Hatchback, 1.4 l., 2010
Not long ago I decided to change the door handles
on my beauty, why I decided, not because of the color, but because of a physical defect.
My little son opened the handle
with all his weight, putting all his love and strength into this process, which made my heart bleed.
The problem of door handles/grants and its solution
Then pull the handle
towards you (as when opening
a door
), and through cunning manipulations, remove it in this position without disconnecting the rod. If you try to disconnect (and during assembly attach) this rod
inside the door
, you can add a lot of unnecessary problems to yourself.
Replacing the outer handle of the front passenger door - Lada
I don’t know what’s so difficult about opening Kalina’s doors
.
It seems that the handles
don’t move too tightly, and you don’t need to do anything supernatural during the opening process, but for some reason everyone strives to pull the front part of
the handle
.
NOT A REPLACEMENT, but a repair of the rear door handle))) - Lada Kalina
Review from the owner of Lada Kalina
hatchback - do it yourself.
Hi all. I broke the outside handle
of the back
door
, still in the winter (it was frozen). I broke the outside
handle
of the back
door
, still in the winter (it froze after the thaw, but I tried to open it) Well, okay, I broke it and broke it...
Replacing the door handle of Lada Kalina
The door handle on Kalina is loose! How to repair the Kalina door handle, what should I do to prevent it from swaying? Thank you.
Modification of the rear handle on the VAZ 1118 Kalina - 1 answer
The handle begins to wobble due to the fact that the metal petal with the “groove” unbends during operation. This is the peculiarity of the mechanism.
To fix this, to repair Kalina’s door handle, you need to remove the door trim, and then tighten the screw with a Phillips screwdriver and then try to bend the shaped petal.
It happens that the thread on the handle breaks off (if you overtighten the nut). To fix it, you need to remove the handle and grind off the screw head, then drill out the remaining parts from the petal into a cone. Next, you need to select a suitable countersunk screw and solder it.
Removing the rear door trim on Kalina is quite simple. To do this you will need: a flat screwdriver, a small piece of rag, a knife or a super thin screwdriver. This work is not very difficult, you can easily do it without outside help, even if you have no experience in car repair.
And so, having obtained everything you need, you can begin to remove the casing. First, let's remove all the decorative trims - two on the handle and the cap on the lock lock. To remove the first ones, it is best to use a thin knife or flat-head screwdriver.
We gained access to the 2nd bolts - unscrew them. Now comes the fun part. You need to remove the window lowering/raising handle. It is secured with a plastic retaining ring. It's up to you to pull it out. This ring has a latch on the back. We insert a knife or screwdriver behind the locking ring, pull it towards you and pull it up.
Often, removing this handle causes difficulty for everyone. But, as you can see, it’s nothing complicated if you know the design.
Now all that’s left to do is to tear off the trim from the door. Wrap the screwdriver in a rag, insert it between the trim and the door itself and pull. The entire rear door trim on Kalina is attached using clips. So push on, don’t be afraid. It’s just advisable to have several of these clips in reserve, in case something goes wrong.
Once the rear door trim has been removed, you can perform basic repair work. This includes replacing the outside door handle.
Selection of spare parts, part numbers and cost for Lada Kalina 1 and 2
To select door handles, you need to know the catalog number. The first models differ from Kalina 2, but they are interchangeable. There is a difference in the design of the interior handles in the cabin. On Lada Kalina 1 you can select individual components (opening mechanism, plastic lever), Lada Kalina has 2 block-type handles.
What is the article number of door handles for Lada Kalina 1:
| Outer left | Outer right | Inner left | Inner right | |
| Front doors | 1118-6105151 | 1118-6105150 | 1118-6105181 | 1118-6105180 |
| Rear doors | 1118-6205151 | 1118-6205150 | 1118-6105181 | 1118-6105180 |
The following catalog numbers are relevant for Kalina 2:
| Outer left | Outer right | Inner left | Inner right | |
| Front doors | 21920-6105151-00 | 21920-6105150-00 | 21920-6105181-00 | 21920-6105180-00 |
| Rear doors | 21920-6205151-00 | 21920-6205150-00 | 21920-6205181-00 | 21920-6205180-00 |
On the model, the driver's door requires a cylinder to open and close. The actual cost of the pen depends on the manufacturer. The price for internal ones is from 400 rubles, for external ones – from 500 rubles. There are no options with lighting for sale; you can make it yourself.
How to remove the front and rear door trim on a Lada Granta
Quite often, Lada Granta owners are not satisfied with the quality of the door trim due to the presence of noises, knocks and creaks inside the door. To fix such problems, you will have to remove the casing. It is not difficult to do this on your own and even a novice motorist can cope with the task.
Removing the door trim yourself is easy
The main reasons why you may need to remove the front or rear door trim:
- creaking, other extraneous sounds inside the door;
- deformation of the door panel due to mechanical or thermal damage;
- defects in the manufacture of door trim;
- wear of clips and latches, which leads to weakening of the fastening;
- window lifter failure;
- failure of the lock or door opening mechanism;
- glass replacement.
Tools and materials
To remove the door trim on a Lada Granta with your own hands, you need to prepare the following tools and materials:
- Phillips and flat screwdriver;
- a special plastic spatula, it makes it easier to remove the panel;
- a set of new latches, as the old ones may break.
The procedure for removing the trim from the front door
Before starting work, you need to place the car on a level area. Be sure to secure it with the hand brake. If you have an electric lock, you must disconnect the power from the battery.
Work order:
- Removing the lock button. To do this, unscrew the button, then use a screwdriver to pry off the plug. After this, unscrew the screw.
- Unscrewing the screws located in the armrest. In addition, you need to remove the plug and unscrew the screw located on the outer part of the handle.
- Removing the two pocket securing screws. They are located at the bottom of the panel.
- Removing the cover from the mirror control knob. To do this, simply pry it off with a screwdriver.
- Removing the panel. Using a spatula, carefully pry up the upholstery and tear it off the fasteners.
- Disconnecting wires. You need to move the panel back a little, and then disconnect the wires going to the column and to the electric lock.
Video: removing the trim from the front door
Removing the rear door trim
The process of removing the panel from the rear door is practically no different from how it was done in the previous case, but there are still certain nuances.
Dismantling procedure:
- Removing the lock button. This is done in the same way as on the front door.
- Removing the window lifter handle. First, press down and remove the socket, and then pull out the latch and remove the handle.
- Removing the handle. First, pry off the plugs, then unscrew the two screws and dismantle the handle.
- Evacuation of the screws located at the bottom of the panel.
- Removing the panel. You need to remove it from the 10 clips, start from the corner and move to the sides.
Installation of the trim on the front and rear doors is carried out in the reverse order of removal. Be prepared for the fact that during dismantling, some of the latches almost always break, so before starting work you should definitely purchase a set of new clips.
Analysis of the condition of door handle assemblies
During the inspection, the appearance and functionality of the opening mechanisms are assessed. A common problem with Lady Kalina handles is that the outer handle dangles, but it works normally. Such a defect can lead to mechanical failure, so it is necessary to dismantle it and check the condition of the entire structure.
- Great efforts are made to open the doors.
- Creaking and other extraneous sounds appear.
- When pressed, the lock does not open the first time.
- The handle does not return to its original position.
It is important to choose the right replacement components and find out the exact scheme for restoring functionality.
For a full analysis, you need to disassemble the door cards and visually assess the condition of the parts. This is necessary for self-repair; in some cases, it is not necessary to contact a car service.