When purchasing a car, the buyer must pay attention to many points. So, for example, you need to choose a car in accordance with the tasks that you intend to set for it. If the purpose of your trips will not go beyond the city limits, then buy a small car, and if you need to cross off-road terrain, then pay attention to SUVs with displacement engines.
Or you can combine both by buying a small car and then making it suitable for crossing bad roads. You can create such a universal car by simply increasing the ground clearance of your existing car. In the conditions of Russian roads, such fraud will always be relevant. So, for example, by increasing the ground clearance on a car like a Priora, you will save a lot of money on its repairs. After all, you won’t have to repair the suspension in vain after encountering a couple of holes.
Replacement of rear springs — Lada Priora Station Wagon, 1.6 l., 2010 on DRIVE2
As I wrote in the description, the car sits on its ass on the left wheel mainly. The springs need to be changed.
General form
So I had some free time and decided to drive the car into a pit and change the springs. What you need: all you need is a strut disassembly key
wrench for removing struts
, VD-40 is a must, keys for 19, and of course new springs, I bought both for 800 rubles, they come from a VAZ 2111, or rather they are from the factory)). First you need to remove the trunk trim
Removing the trim
, then rip off (loosen) all the nuts associated with removing the strut, but within two hours the lower nuts need to be sprayed with VD, otherwise you won’t have any luck. Then we jack up the rear of the car on both sides at the same time; you need to lift a lot, almost the entire VAZ jack, so that there is room to spring the beam. To prevent the car from moving to the side, I placed a couple of wooden blocks under one threshold and lowered them a little so that the car sat on them, so it definitely won’t move to the side. Then we completely unscrew the nut in the glass from the marter rod, the beam springs back.
Marter rod upper nut
Then we unscrew the lower mounts of the marter, and if the car is raised enough, the rack can be easily removed. We remove the strut, check the condition of the rubber bands, bump stops, if everything is fine, then leave the rubber bands as they were, I personally bought new gaskets for the springs, the price is 200 rubles. Before putting the new springs in place, I glued the rubber gaskets for the springs to tape,
Springs
spring gasket
If this is not done, then during installation this rubber band will fall off the spring. I coated all the glasses with a thick layer of stinking Movil using this device.
gun for Movil
And before installation, you definitely need to pull out the marter rod (spread the marter as much as possible), otherwise there will be problems with the installation later. And so everything is ready to install the rack in place. We put the spring on the marter, and try to get the spring into the glass, when the upper part of the spring is in place, we install the lower part of the marter in its place in the beam. On the other hand it is similar. After installing the struts in place, the marter rod will not reach its hole in the glass. When the struts are in place and the springs are in place, it is time to lower the machine. In order for the marter rods to fit into their holes in the glass, I cut off two metal-plastic tubes (like 20) and put them on the marter rods through the holes in the glass to create a kind of guides. After which you can lower the machine until the rods come out into the holes for attaching the nuts. I lowered the car, tightened the upper nuts, tightened the lower ones. You can completely lower the car and assemble the trunk upholstery. The car noticeably rose and began to stop leaning on its left side.
general
www.drive2.ru
Rear springs. — Lada Priora Sedan, 1.6 l., 2008 on DRIVE2
Good day, everyone. Over 10 years, the rear springs sagged and got tired, the arches were already covered by the tire treads, and with two passengers in the back, the tires even touched the fender liners on potholes! I didn’t want to install strut spacers (houses), because... last summer I replaced the rear struts and they were already working in a compressed range. I bought springs, the seller gave them from 2110 (blue marker) and said that they would fit, but in the garage, when I removed the right spring and placed it next to the new one - the difference was 1 turn lower than the original old one! I went to change it, the seller admitted the mistake and offered Priorovskie class B (soft) black marker) or for the Universal class A (hard) yellow marker)! All springs are painted gray, but several coils have different marker colors! The reinforced ones, on the contrary, turned out to be 1 turn higher than the original ones and 100 rubles (1050 rubles) more expensive. But when I installed it in place, it turned out the way I wanted - the arch is slightly higher than the wheel. As a result, the suspension changed for the better, I don’t even know how to explain it yet. About the installation I think it’s too much to write, I didn’t remove the wheels, the keys are 17, two for 19 and an adjustable one, hold the rod. Another piece of hose, as a guide for the rod when lowering the jack, pullers are not needed, together with the removal of the seats it took about 40 minutes. Thank you for reading! A little I didn’t forget: the tip of the lower turn should look towards the wheel! After driving for three days, with a load and empty, I was pleased with the result: the car became more stable in turns, smoother on potholes, and sat down less than usual when loaded! In general, there are many advantages; it would have been necessary to change it earlier and not have to suffer with subsidence!
Price: 1,050 ₽ Mileage: 69,600 km
www.drive2.ru
What materials are used
Before purchasing spacers, you need to decide on the design (type) and material. The following varieties are distinguished:
- Polyurethane. They have a high degree of compression, are very easily deformed, and therefore can lead to damage to the suspension. However, they are very cheap and easy to install.
- Rubber. Very elastic, helping to achieve smooth suspension. Absorbs noise and vibrations. However, they have a limited internal resource and wear out quickly.
- Plastic and composite. Adapts to the car as much as possible. Among the disadvantages is a short service life; the spacer will have to be changed every year.
- Aluminum. Quite reliable and durable, they deform only in the presence of significant mechanical loads. However, they last less than iron.
- Metal. Very durable, do not lose their performance properties over time. Among the disadvantages is the possibility of corrosion when the metal spacer and the body come into contact. They serve only to increase ground clearance.
How to increase clearance yourself
You can increase the clearance yourself. Most often, special devices are used for this - spacers.
Selection of materials
Spacers to increase vehicle clearance are made from the following materials:
Each material has its own advantages and disadvantages.
Rubber spacers
- resistant to external influences in the form of acid, salt, alkali;
- do not affect vehicle handling and comfort in the cabin;
- do not have a corrosive effect on the car body;
- They are inexpensive on the car market.
- rapid wear;
- subject to deformation and damage.
Rubber spacers are secured under the springs.
Polyurethane spacers
In addition to the advantages of rubber, they have in addition:
- higher strength;
- can take a significant load without breaking;
- capable of smoothing out impacts from uneven road surfaces.
These spacers are also suitable for installation under springs. They cost more than rubber ones, but cheaper than metal ones.
Aluminum spacers
All of the above advantages of other materials are more pronounced in aluminum spacers. In addition, they do not wear out for a long time.
The only significant drawback is the possibility of corrosive effects upon contact with the car body. They are usually attached at the junction of the shock absorbers with the car.
ABS plastic
Currently, it is the most acceptable material for spacers in the automotive market. It has all the advantages of previous models, but without their disadvantages.
Plastic spacers are placed under the springs.
Installing spacers on the front of the car
Installation of spacers at the front of the machine is carried out according to the following instructions:
- The car is jacked up and the wheel is removed.
- Disconnect the brake hoses and unscrew a couple of nuts from the front strut, having previously tightened the springs with a tie.
- The stand is removed by unscrewing the nuts from the upper support.
- Old bolts are replaced with new ones of longer length.
- The spacer is bolted and assembled in the reverse order. If there is interference from the transverse pillar, it is supported with a second jack.
- All the same actions are repeated with the second wheel.
Priora front struts and rear shock absorbers: the best solutions
As practice shows, correctly selected front struts on a Priora can significantly improve the car’s behavior on the road. Taking into account the fact that Lada Priora is a budget model, there is no talk of installing expensive shock absorbers such as Bilstein, Koni, Sachs and others.
Some manufacturers simply do not have struts for Priora, others have solutions that are too expensive, and in some cases, modifications, alterations, etc. will also be required to install a new shock absorber. However, among the more affordable and high-quality racks for Priora, SS20, SAAZ or KYB (Kayaba, Kayaba) can be distinguished.
The main difference is the stiffness of the SS20 shock absorbers. These struts are hydraulic and are available in “standard”, “comfort” and “sport” versions. The manufacturer offers both rear and front struts of the Priora, which allows you to select suitable parts and perform the so-called replacement of struts “in a circle”.
The SS20 “standard” struts are the softest and are well suited for a quiet ride. The “comfort” version is more universal, the shock absorbers are a little stiffer, and are better suited for high-speed driving on the highway. Also, these racks work more efficiently on bad roads.
The SS20 “sport” version is the toughest and is designed for high speeds. At the same time, the car's handling improves noticeably, however, when driving on bad roads, the stiffness of the shock absorbers somewhat affects comfort.
Let’s also add that in addition to the struts, the manufacturer offers the Priora support bearing (SS20 support), bump stops, etc. In practice, supports for Priora and other parts allow you to purchase a kit and replace the racks without any modifications. Also, the supports are considered reinforced, the bumpers withstand impacts well, and the pillars do not break through.
If you need imported racks, in this case it is recommended to pay attention to Kayaba racks (KYB for Priora). The manufacturer from Japan is well known all over the world, and also offers spare parts for Russian-made cars
For the Priora, KYB has developed Exel-G gas-oil shock absorbers. This line includes the front and rear pillars of the Priora. In practice, these shock absorbers are in great demand among car enthusiasts. Kayaba on Priora is considered a universal solution, the rigidity is average (it holds the road well on the highway and performs well in the city).
KYB shock absorbers are also distinguished by their long service life and reliability. The only negative is the rather high price. It should also be noted that when comparing which is better, Kayaba or SS20, often the first option is better.
The SAAZ racks complete the list. Let’s note right away that these are Priora’s standard factory struts. In other words, this Priora shock absorber is on the car from the factory. This option can be taken if the car’s behavior on the original shock absorbers is completely satisfactory.
The price is quite affordable, although the service life of SAAZ shock absorbers on the VAZ 2170 is no more than 40 thousand km. It can also be noted that in some cases you can limit yourself to only replacing the racks themselves, leaving the factory supports and bumpers (if they are fully functional).
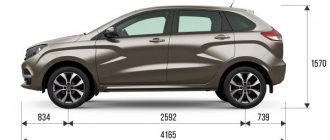
Parameters of Priora bodies
In any Priora body, the characteristics of its wheels and wheelbases will be the same, and therefore it makes no sense to indicate them separately everywhere. These are the parameters:
| Parameter | Description |
Meaning
These dimensions are valid for all bodies except the coupe. Hatchback parameters:
- The distance from the rear to the front point of the car is 4210 mm.
- The front overhang of the car is 770 mm.
- The rear overhang of the car is 660 mm.
Station wagon and sedan parameters:
- The distance from the rear to the front point of the machine is 4350 mm.
- The front overhang of the car is 740 mm.
- The rear overhang of the car is 830 mm.
- The distance from the rear to the front suspension of the car is 440 mm.
- The wheelbase of the car is 2492 mm.
Overhangs for cars of sportier variants are not specified by the manufacturer. Considering that the Priora's ground clearance is 165 mm, we can choose the best body type that allows us to use ground clearance more successfully than others. Having analyzed all the available characteristics, we will definitely come to the conclusion that the hatchback option is much better than all the others.
Dimensions of Lada Priora
The fairly large wheelbase of the body, despite its small length, allows us to call the car a cross-country vehicle. However, it is necessary to remind Priora owners that, even if you own a hatchback, you need to be very careful when parking next to high curbs. This warning is especially relevant when your machine is fully loaded.
But if the Priora hatchback can, with a stretch, be called the conqueror of forest roads and mountain peaks, then the coupe body cannot receive such a title. Such a car has too long a distance between the front and rear wheels and a very large front overhang. Whatever one may say, it will be difficult to drive along rural country roads. This car design is only good for asphalt surfaces.
However, even they will need to be driven very carefully where there are large potholes and there is a need to overcome artificial unevenness. But since there are no unnecessary or protruding parts from under the transmission on the Priora, you can confidently count on the quality of the available ground clearance.
Despite the absence of parts sticking out from under the bottom of the Priora, you can greatly reduce the ground clearance if you put a lot of people in the car and load the trunk with things. Reducing its length by only 20 mm will be enough for the bottom to touch the surface of the speed bump. It is necessary to force such obstacles with special care in order to eliminate the possibility of breakdowns in time.
What is it about
Before you figure out what spacers are to increase ground clearance, you need to figure out what ground clearance is. Ground clearance, in other words ground clearance, is the distance between the lowest point of the car body and the road.
Actually, why does a motorist need to increase the ground clearance? As already mentioned, various situations can lead to the fact that the ground clearance is reduced (damage to springs and fasteners, for example), or the factory one was not high enough. A car is, first and foremost, a means of transportation. A vehicle that sits tightly to the ground will not be able to drive without damaging the underbody. This can have a serious impact and make the car unsuitable for driving, which is why the question arises of increasing the distance to the road. Also, increasing the ground clearance is of interest to people who like to drive off-road.
So, increasing ground clearance is often done using special spacers. This is especially common in the case of subsidence of “native” springs. These spacers are spring mechanisms or additional fasteners. They cope with the task of increasing the clearance very well. Moreover, the procedure for attaching such magnifiers is the most accessible, since they themselves are not expensive - one spacer can be purchased for a price of 1000 rubles.
Air cylinders do just as well as spacers. It turns out even cheaper, and a “healthy” car with working springs does not suffer.
However, to decide whether such a modification is necessary, risk factors must also be taken into account. Of course, this idea has plenty of advantages, but it is not without its disadvantages - one way or another, any change in the “native” design always lies on the conscience of the motorist, and no one gives guarantees for its effectiveness. Before deciding to modify to increase ground clearance, weigh the pros and cons.
General characteristics of the car
Standard wheel clearance
Few passenger cars can match SUVs in terms of ground clearance, but high ground clearance is only important in combination with other vehicle characteristics. If we consider the Priora’s ground clearance, then, on the one hand, everything is very clear here: this figure for this model is 165 mm. But in order to assess its sufficiency, it is necessary to additionally consider the following characteristics:
- total length of the vehicle;
- front and rear overhang length;
- wheelbase;
- vehicle track width;
- the presence of protruding elements under the bottom of the car;
- change in ground clearance for a fully loaded car.
Return to contents
Need help choosing rear springs and struts — Lada Priora Hatchback, 1.6 l., 2010 on DRIVE2
Basically, everyone has questions about how to lower a car, but I have a different question: how to raise and increase the load capacity (Prior Hatch, there is an LPG tank)? By 30t.km the rear left spring sank and the rear right strut began to leak. The springs sagged so that the tire went halfway under the arch. For me this is critical, because... 80% of the mileage is on the highway, with such a suspension, soon all the organs will shift
Questions: 1) I need springs with variable coils (I won’t install spacers)! Whose should I take and why?
There is a lot of information - Gold Progressive rear suspension cold coil springs (variable pitch) SS30128, but they are the most expensive 3500 in our country.
2) Has anyone installed a SOUND INSULER SS20 UNDER THE REAR SPRING FOR VAZ 2108-2110 COLOR (SET OF 2 PCS) (SS64103) - 150 RUR? Is this a scam or will it be of any use? Will this rubber band fall apart after 100 km?
Or tighten the hoses of the VAZ 2101 red expansion tank onto coils, Original code 2103-1303095 (or 2103-1303095-00)?
3) What racks do you recommend that are reliable and moderately hard/soft? I drive mainly on the highway and the combination of the road surface makes you think that you are on a train.
Mileage: 32400 km
Clearance
Ground clearance is the distance between the ground surface and the lowest point of the car. Amateurs measure ground clearance from the edge of the body. But there are a lot of protruding parts on the bottom of the car. The lowest point of the car is located under the engine, which is protected by a “skirt” made of metal or plastic. It is from this point that you need to measure the distance to the ground in order to accurately determine the ground clearance.
Foreign cars are often greatly undervalued. It looks beautiful, but it’s better not to press the belly of the car against Russian roads. And off-road you need to drive with a clearance of at least 200 mm. Ground clearance is also increased on older cars whose springs have noticeably sagged.
Each group of cars has its own optimal ground clearance:
- passenger cars – 140-200 mm;
- SUVs – 180-250 mm;
- SUVs – 200-350 mm.
Having measured the ground clearance of his iron horse and remaining unsatisfied, the car enthusiast begins to improve it - increases the ground clearance of the car.
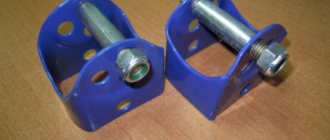
Lada Kalina Station wagon "Kalinka" › Logbook › Installing spacers (houses) under the rear pillars
Good day everyone. It's no secret that if you use the Lada Kalina (and any front-wheel drive VAZ) not only to transport yourself, but also to the dacha, bring building materials, etc. The elasticity of the rear springs leaves much to be desired. How it was for me. I planted two guys 120 kg + me 65 kg + 50 l. in the tank and + 30-40 kg of potatoes and that’s it. I drove 280 km on asphalt and the result was that the rear fender liners were worn out on uneven roads (you know what the roads in Russia are like). I put the patches on. I decided to install spacers (houses. How I did it. 1). I took off the wheel. I cleaned everything that I will unscrew from dirt; 2). Unscrewed the lower bolt and nut securing the strut to the beam; 3). I took a pipe, inserted it into a round hole in the beam, pressed it, installed a spacer and screwed it on with a bolt (it comes included); 4). I secured the stand to the spacer with the original bolt and nut;
5). Installed the wheel. 6). On the other hand, we perform all operations in the same way; 6). I finally tightened the bolt and nut that secures the strut to the spacer (it is necessary to tighten it when the suspension is loaded). 7). Adjusted the brake force distributor (“sorcerer”). Place the car on a flat surface and rock the rear of the car several times to begin the adjustment.
After adjusting the regulator, test the brakes in action. Accelerate the car to 40-50 km/h and brake. If the regulator is adjusted correctly, the front wheels will lock first and the rear wheels should lock immediately, but not vice versa.
Adjustment is needed to set the start of braking of the rear wheels relative to the front wheels at different vehicle loads.
Note on installing spacers. The spacers must be installed correctly, otherwise the rack will break and the lower ear of the rack will come off under load. The spacer must be installed so that the lowest (which is attached to the beam) hole has two (in which the greater distance from the lower end faces the inside of the car, and the shorter distance faces the wheel).
The bolts and the construction must be located on the same line.
source
Modified shock absorbers
As a rule, the factory shock absorber does not have any effect on the ground clearance. But if you are working with an already worn-out unit, then while driving it may be subject to swinging in the forward direction, which greatly increases the possibility of damage not only to the bumper, but also to the components and parts of the Lada located under the bottom of the car.
In order to qualitatively increase the ground clearance on a Priora (this rule is also relevant for any other car), you should use only original shock absorbers, which will differ from the factory ones in a number of characteristics. So, for example, the length of the rod, the length of the spring will be increased and the quality of the spring stiffness will greatly increase. The latter is achieved by adjusting the shock absorbers - thickening the coils.
Communities › VAZ.EE › Blog › VAZ 2115- Front pillar spacer
All the best. After my post about raising the car, I received a lot of questions, how? What? Where? etc. As a result, today I decided to tell you how it was done. The spacer is placed between the front strut support and the engine body. Depending on the make of the car, spacers have different shapes. In any case, the spacer on top follows the shape of the A-pillar support.
This photo shows SS20 spacers, 12 mm thick, which often come complete with supports. Such spacers can be made from different materials, but each material has its own disadvantages. Plastic ones are considered the safest for a car; it is assumed that they do not cause negative consequences. Polyurethane ones have a tendency to deform the body. Metal ones can speed up the corrosion process at the joints with the body, but this effect can actually be neutralized by simply painting (and varnishing) the spacers before installing them. If you have the appropriate tool or friends at the factory with a milling machine, then you can make such spacers yourself, the thickness you need. I bought silumin spacers on the market:
To install the spacers, we will need to remove the struts. There is no need to disassemble the strut, just remove it along with the hub. It seemed to me that this was the simplest option, which also did not affect the alignment. (You still need to do the wheel alignment, because it will eat more rubber, but getting to the service center is still safer). In order to do this, we need to unscrew 4 bolts and unscrew 4 nuts (not counting the removal of the wheel).
First of all, I would recommend looking at the ball mounting bolts; for most domestic cars, this is a 10mm bolt with a 17mm head. If so, then you are lucky and you should not experience problems with them. However, in recent years, our cars have begun to use foreign standards and you can see a smaller bolt head - an asterisk. A 10mm head fits perfectly on it, but most likely you won’t be able to unscrew it; you’ll tear off the corners. Therefore, you should think about buying a head for such bolts in advance. Also, you should take care of a steering rod puller in advance, especially if the car is not very new. My car is 3 years old and without a puller it was already difficult. The puller usually looks like a clamp, one of the pads of which has a cutout (looks like a two-pronged fork):
Types of auto spacers
Each spacer is developed and created for a very specific car model, since all suspensions are structurally different.
They differ in the material used:
- hard plastics like nylon or ABS;
- relatively soft polyurethane;
- rubber;
- metal, usually aluminum and light alloys.
There is no particular difference in the use of different substances; we can only talk about a slight change in the comfort of the suspension depending on the softness of the spacers, but at the same time, the softer ones have less strength and service life.
Sometimes spacers of a different type are used, for example, in the form of enlarged spring pads or interturn pads. Such spring tuning should be avoided, since it is too rough an intervention in the combination of elastic and damping suspension elements.
Each of them has its own rigidity and its own range of stroke. Lengthening the spring or increasing its stiffness leads to overload of the shock absorber and hard shocks at the end of its working stroke. The resource decreases, the probability of breakdown increases. Both springs and shock absorbers break.
Replacing rear springs and shock absorbers — Lada Priora Sedan, 1.6 liter, 2008 on DRIVE2
I changed the shock absorbers at 60 thousand, so they were in good condition, and the springs have been working for the 7th year and have sagged quite a bit. It was decided to change everything together. I changed it myself.
I bought everything stock + shock absorber mounting bolts, spring gaskets, bump stops and cushions, and also new corrugations.
spring gaskets, corrugations, cushions and Z-shaped key 17*19
shocks, springs and bolts
The tool you need is a 17mm Z-shaped wrench to unscrew the nut on the shock absorber rod, or a puller. The rod was held with a small adjustable wrench. The lower fasteners unscrewed normally - they were spilled with VD, the threads were lubricated 3 years ago.
springs covered 125 thousand km, shock absorbers 60 thousand km
To put everything in place I used spring ties and 2 jacks. It’s possible without zip ties, but you’ll have to tinker a little longer.
assembled
The rear of the car has become 1-2 cm higher, the rear suspension has become pleasantly rigid and the rear is more confident in corners. Now 100 thousand km. You don’t have to look there (if the car will last that long) =))
new =)
Price: 4,000 ₽ Mileage: 125,500 km
www.drive2.ru
Stories from our readers
“Fucking basin. "
Hi all! My name is Mikhail, now I’ll tell you a story about how I managed to exchange my two-wheeler for a 2010 Camry. It all started with the fact that I began to be wildly irritated by the breakdowns of the two-wheeler, it seemed like nothing serious was broken, but damn it, there were so many little things that really started to irritate me. This is where the idea arose that it was time to change the car to a foreign car. The choice fell on the melting Camry of the tenth years.
Yes, I had matured morally, but financially I just couldn’t handle it. I’ll say right away that I am against loans and taking a car, especially not a new one, on credit is unreasonable. My salary is 24k a month, so collecting 600-700 thousand is almost impossible for me. I started looking for different ways to make money on the Internet. You can’t imagine how many scams there are, what I haven’t tried: sports betting, network marketing, and even the volcano casino, where I successfully lost about 10 thousand ((The only direction in which it seemed to me that I could make money was currency trading on the stock exchange, they call it Forex. But when I started delving into it, I realized that it was very difficult for me. I continued to dig further and came across binary options. The essence is the same as in Forex, but it’s much easier to understand. I started reading forums, studying trading strategies. I tried it on a demo account, then opened a real account. To be honest, I didn’t manage to start earning money right away, until I understood all the mechanics of options, I lost about 3,000 rubles, but as it turned out, it was a precious experience. Now I earn 5-7 thousand rubles a day. I managed to get the car buy after half a year, but in my opinion this is a good result, and it’s not about the car, my life has changed, I naturally quit my job, I have more free time for myself and my family. You’ll laugh, but I work directly on the phone)) If If you want to change your life like me, then here’s what I advise you to do right now: 1. Register on the site 2. Practice on a Demo account (it’s free). 3. As soon as you get something on the Demo account, top up your REAL ACCOUNT and go to REAL MONEY! I also advise you to download the application to your phone, it’s much more convenient to work from your phone. Download here.
If you think about what affects the ground clearance of a car, it becomes clear that it is a number of ways:
- screw suspension.
- install spacers between the body and the strut support.
- install non-standard strut supports, springs (longer) or shock absorbers.
- install interturn spacers in the springs
- install higher rubber bands under the springs
- replace tires and wheels
If you install “house” spacers under the pillars, you will be able to raise the rear of the car.
As you might have noticed, there are many ways to make a car taller, but how is increasing ground clearance and car performance related?
Shock absorbers and ground clearance, where is the truth?
When the car is standing still, the shock absorbers will not lift the body - after all, it hangs on springs. The role of the struts can be understood in motion, when the car sways and “pecks” on soft or dead shock absorbers. You drive off the curb and your car’s nose hits the asphalt! If the shock absorbers are in good condition, they will “catch” the car halfway. Thus, shock absorbers do not affect ground clearance, but have the same effect as increased ground clearance.
Alternative shock absorbers may have a longer rod, which will provide more suspension travel. We discuss these subtleties in the topic “which shock absorbers are better to choose.”
Replacing springs to increase ground clearance
The car body hangs on springs, so they have a direct impact on ground clearance.
Springs 2108 are installed on the front suspension of the VAZ 2110 car as standard. “Tens” with 16kW internal combustion engines are equipped with reinforced springs 2112. In addition, suspension springs are divided into two classes “A” and “B”. If you prefer to load your car to capacity, then perhaps you should choose class A springs (yellow), because... They hold a little more load.
Pros and cons of houses
The houses have several advantages that will entice every Priora owner to install them.
Pros:
- Increased ground clearance allows you to overcome previously inaccessible obstacles;
- Ability to load heavier cargo into the trunk;
- After installing the houses, the car becomes more versatile;
Minuses:
- The car’s center of gravity shifts slightly and when the trunk is empty, the car’s controllability is lost;
- After installation, headlight adjustment is necessary;
On the left is Priora without houses, on the right with installed houses
Replacing the rear springs of a VAZ 2107
Before starting work, you should decide on consumables and tools. Here's what we need:
- jack;
- a set of new springs;
- hammer;
- set of open-end wrenches;
- socket heads and wrenches.
Sequencing
The optimal conditions for replacing springs are a garage with a small lift, with which you can hang the required wheel without any problems. If there is no lift, you will have to make do with a regular jack, although this is less convenient.
Two more important points should be noted here. Springs are always replaced in pairs. Under no circumstances should you replace just one spring. This will completely disrupt the suspension adjustment, and therefore the car's handling will become completely unpredictable. In addition, the springs cannot be repaired. If the springs “shrink”, this means that the properties of the steel from which they are made have completely changed. Even if the driver decides to slightly stretch the springs and put them back, this will not have any effect: the springs will “sit down” again due to metal fatigue. Therefore, the only rational option is to replace “shrunken” springs.
- The car's wheels are securely fixed using a hand brake and boots. Then one of the rear wheels is jacked up and removed.
- After this, the jack is installed under the lower suspension arm. The lever is raised by a jack by about 10 cm. This must be done so that the spring is compressed.
- There are nuts in the luggage compartment that hold the shock absorber in place. They are unscrewed with a 14-mm open-end wrench, the shock absorber is removed (in this case, it is worth carefully inspecting the shock absorber cups and silent blocks for wear and mechanical damage).
- The next step is to disconnect the ball joint pin and suspension stabilizer. You can knock the finger out of the eye using a small hammer. If the finger is very rusty, you should generously lubricate it with WD40 and wait 20 minutes so that the composition has time to dissolve the rust.
- The stabilizer is moved to the side along with the rod. Now the jack is lowered by 10 cm, as a result the support pin comes out of the eye, and the spring gradually unclenches. After this, the upper suspension arm should be secured in its highest position. You can simply tie it to the body with a rope.
- The fully deflated spring is removed, replaced with a new one, after which the rear suspension of the VAZ 2107 is reassembled.
Video: removing rear springs from a VAZ 2107
So, it is quite possible to change the rear springs on the “seven” in a garage. No special skills are required to carry out such a replacement. You just need to follow the above recommendations and take your time.
Replacement of rear springs — Lada Priora Station Wagon, 1.6 l., 2010 on DRIVE2
As I wrote in the description, the car sits on its ass on the left wheel mainly. The springs need to be changed.
General form
So I had some free time and decided to drive the car into a pit and change the springs. What you need: all you need is a strut disassembly key
wrench for removing struts
, VD-40 is a must, keys for 19, and of course new springs, I bought both for 800 rubles, they come from a VAZ 2111, or rather they are from the factory)). First you need to remove the trunk trim
Removing the trim
, then rip off (loosen) all the nuts associated with removing the strut, but within two hours the lower nuts need to be sprayed with VD, otherwise you won’t have any luck. Then we jack up the rear of the car on both sides at the same time; you need to lift a lot, almost the entire VAZ jack, so that there is room to spring the beam. To prevent the car from moving to the side, I placed a couple of wooden blocks under one threshold and lowered them a little so that the car sat on them, so it definitely won’t move to the side. Then we completely unscrew the nut in the glass from the marter rod, the beam springs back.
Marter rod upper nut
Then we unscrew the lower mounts of the marter, and if the car is raised enough, the rack can be easily removed. We remove the strut, check the condition of the rubber bands, bump stops, if everything is fine, then leave the rubber bands as they were, I personally bought new gaskets for the springs, the price is 200 rubles. Before putting the new springs in place, I glued the rubber gaskets for the springs to tape,
Springs
spring gasket
If this is not done, then during installation this rubber band will fall off the spring. I coated all the glasses with a thick layer of stinking Movil using this device.
gun for Movil
And before installation, you definitely need to pull out the marter rod (spread the marter as much as possible), otherwise there will be problems with the installation later. And so everything is ready to install the rack in place. We put the spring on the marter, and try to get the spring into the glass, when the upper part of the spring is in place, we install the lower part of the marter in its place in the beam. On the other hand it is similar. After installing the struts in place, the marter rod will not reach its hole in the glass. When the struts are in place and the springs are in place, it is time to lower the machine. In order for the marter rods to fit into their holes in the glass, I cut off two metal-plastic tubes (like 20) and put them on the marter rods through the holes in the glass to create a kind of guides. After which you can lower the machine until the rods come out into the holes for attaching the nuts. I lowered the car, tightened the upper nuts, tightened the lower ones. You can completely lower the car and assemble the trunk upholstery. The car noticeably rose and began to stop leaning on its left side.
general
www.drive2.ru
What to choose?
The Seven lends itself very well to tuning; it is relatively cheap, simple and interesting. Even the most minimal modifications can make the car much better and more attractive than the cars produced by the plant. One type of such modifications is replacing parts in the rear suspension. Many owners try to install stiffer parts in the suspension. Let's try to figure out what this gives to the car and the owner. This modification dramatically increases the sensitivity of the steering wheel to movements from the driver. Aerodynamics become such that during a sharp turn, the wheels on the opposite side of the roll may even come off the road, which greatly impairs their grip on the road surface. Most often, springs from the VAZ 2104 are installed in the rear suspension. Such a replacement may not be advisable in all cases. Experts recommend such a replacement with machines that switch to using gas fuel, especially methane. Cylinders for this fuel have a significant weight, so installing such parts will be very useful. For such products, it is recommended to install shock absorbers from Niva, the stroke of which is greater than standard ones.
Fans of sporty travel styles install products with reduced rigidity. They have green markings. I would like to warn you that driving a car with such parts on country roads will add problems to the owners. Many drivers deal with them in a completely radical way. On reinforced products they cut off exactly one turn. You need to approach this very carefully, since if you cut off a little more, the parts may simply fall out of their seats. I would like to warn you that the products should be changed in pairs, that is, both parts are changed on the same axis. It’s up to you to decide which springs to put on the VAZ 2107 to replace the “sagging” ones, but approach this issue in a balanced manner to avoid unnecessary problems.
Increasing the ground clearance of the Lada Priora
In practice, increasing or decreasing ground clearance is usually carried out under specific operating conditions. The decrease may be due to an active driving style. In this way they try to reduce the roll of the car when cornering. But more often the ground clearance of the car is increased.
Increasing ground clearance can be achieved in various ways, both individually and in a set of measures, and depends on what kind of ground clearance the owner ultimately wants to achieve. The main ways to increase ground clearance are given below.
Clearance increased to 175 mm
- Using special spacers is one of the most common methods. The parts are installed between the car body and the strut support. Some manufacturers supply such spacers complete with racks, but they can also be purchased separately. As a rule, the increase in ground clearance is achieved small, in the range of 12-15 mm. But the intervention in the car’s design is minimal and does not negatively affect the car’s behavior. In order to eliminate unpleasant effects on the car body, it is advisable to install plastic spacers.
- Use of modified shock absorbers. Initially, the shock absorber does not affect the ground clearance. However, if a worn unit is in motion, it may be subject to vibration in the longitudinal direction, which increases the likelihood of damage not only to bumpers, but also to vehicle components close to the road surface. To increase ground clearance on the Priora, like on any other car, you can install original shock absorbers, which may differ in a number of parameters:
- rod length;
- increased spring length;
- increased rigidity (due to shock absorber settings and increasing the thickness of the spring coil).
The latter method can be quite expensive and is used less frequently. There are quite a lot of options for purchasing replacement shock absorbers, since you can select such a unit from another model or take advantage of a special offer from various manufacturers.
Replacing struts on a Priora: when is it necessary to repair a car?
Before determining which racks on the Priora are better and more reliable, you should make sure that the elements need to be replaced. There are several main reasons why repair work is required. The best decision would be to visit a car repair shop and examine the spare parts by specialists. You can independently determine the need for installation based on the following phenomena:
1. The car holds the road worse.
2. When turning, vehicles are subject to strong roll.
3. There is a knocking or clicking sound in the area of the racks.
4. Shocks when hitting small holes lead to “jumping” of the car and are transmitted to the cabin.
5. When the body rocked, strong vibration appeared.
Bleeding a car is easy and allows you to accurately identify problems. To perform it, the owner needs to swing the body at the corner front point. The next time you lower the car down, you should release it.
If, after lifting to its original position, the body stops swaying, then the condition of the racks is normal. Otherwise, you need to think about what racks to install on the Priora, and start work as soon as possible.
Installing spacers on the Priora
Lada Priora - everything you need to know about increasing ground clearance. Part 9
Installing spacers yourself is not difficult for anyone who has at least minimal experience in car repairs. In this article we will talk about the sequence of actions that are performed when installing spacers, as well as the most common mistakes made during the work process.
How to install spacers
In one of the previous articles, we talked about the main activities that need to be carried out before installing spacers. If you have replaced sagging springs, changed struts and silent blocks if necessary, and also bought spacers of the required size, then you will need ordinary driver's tools - a jack, a support, wheel chocks, a set of keys, and a steering pin puller. The exception is a spring puller, but this can be purchased at your local auto parts store.
Installing spacers on the front suspension
To replace spacers on the front suspension, chock the rear wheels, raise either side with a jack, and install stands. Do not perform any work under a car that is on a jack, it is deadly. With one of the front sides of the car hanging, remove the wheel and unscrew the hub nut. To do this, you will have to engage first gear with the engine off. If that doesn't work, have someone press and hold the brake pedal. Often you have to use a powerful wrench to unscrew this nut. Then loosen and unscrew the steering pin nut and ball joint bolts. Using a puller, remove the steering pin from the strut.
If you do not have such a puller, visit your local auto parts store. Using a crowbar, press the lower suspension arm so that the ball joint comes off the steering knuckle. Pull the brake disc towards you so that the hub comes off the constant velocity joint shaft (grenade) and support the strut with something
Unscrew the three nuts that secure the support bearing to the body and carefully lower the rack down. Replace the bearing bolts with longer ones, then put a spacer on it and install the strut in place, then reassemble the suspension in the reverse order
Don't forget to adjust the camber and toe.
Installing spacers on the rear suspension
Support the front wheels with chocks, engage first gear, support either rear side with a jack and support it. Remove the wheel. To install the lower spacer, unscrew the lower bolt of the shock absorber, pull it out of the mount, insert the spacer into the mount and secure it with the same bolt and nut. Insert the shock absorber into the spacer and secure with a new bolt and nut in the desired hole. To install the upper spacer, compress the springs using a puller, then hold the shock absorber rod and unscrew the fastening nut. Remove the standard gasket and install a spacer instead. Do not place a spacer on the gasket; it will pop out over time. If necessary, attach an extension to the rod and install the shock absorber, securing it with a nut. Loosen the puller so that the spring takes its place. Put the wheel on and tighten the wheel bolts.
Or you can combine both by buying a small car and then making it suitable for crossing bad roads. You can create such a universal car by simply increasing the ground clearance of your existing car. In the conditions of Russian roads, such fraud will always be relevant. So, for example, by increasing the ground clearance on a car like a Priora, you will save a lot of money on its repairs. After all, you won’t have to repair the suspension in vain after encountering a couple of holes.
Installation
There is nothing difficult in installing houses; you just need to have the necessary tools and a little skill in car repair. The work will take no more than 40 minutes on both sides of the car.
Required tool:
- Set of keys or sockets;
- Penetrating lubricant WD-40 or similar;
- Two jacks
- Hammer and goatee;
Work process
The easiest way to install it is from an inspection hole, but if you don’t have one, you can do without it.
- We lift the car on jacks on both sides and remove the wheels, do not forget to fix the front wheels of the car using a rollback.
- We treat the bolt securing the strut to the beam with WD-40 penetrating lubricant and wait for 5 minutes. Then unscrew it.
- Remove the bolt from the silent block of the rear shock absorber
- We install the houses by first screwing them to the beam, and then insert the shock absorber into the house mount and fix it with a bolt.
TIP: It is recommended to install the stand in the middle hole on the house, this will allow you to achieve the optimal height and center of gravity of the car.
- We carry out similar work on the opposite side of the car.
The process of installing spacers for the rear shock absorbers of the Priora is completed, do not forget to adjust the headlights.
Rear springs from VAZ 2111 on Priora — Lada Priora Hatchback, 1.6 l., 2009 on DRIVE2
Hello =) . And so the crown of the suspension continues, I’m tired of my sagging springs, there’s a shork-shork on every bump, I don’t want to leave the houses because that’s not the point, they won’t improve the characteristics of the spring. I started surfing the Internet, read several posts about springs from 2111, some wrote that the tension strut works, others write that everything is fine and happy, I ordered it on Emex, and now they arrived and today I installed them. The most difficult thing in installing new springs is disassembling them interior, everything else is as per the instructions, I found a certain feature during installation, the memoirs say that when installing the lower coil of the spring should look at the wheel, I installed everything, tightened it. I drove a little, but I can already say that I don’t regret at all that I installed them here what has changed: 1) The car has risen, now there is one and a half centimeters from the wheel to the arch (which excludes the wheel touching the locker) 2) If we swerve sharply in our vazik, then everyone knows that the ass is late, so this feeling has decreased, the rear began to keep up a little faster behind the front.3) The suspension has become more energy-intensive, and not at all harsh.4) A more competent solution to increase the load capacity and ground clearance than houses.
Overall I'm happy =)
Price: 1,000 ₽ Mileage: 125,000 km
www.drive2.ru
How to benefit from increased ground clearance?
Obviously, neither the double nor triple ground clearance of the Priora can be compared with the ground clearance of any jeep. But we should not forget that, in tandem with the improvement of certain other features of the car, the Priora’s ground clearance can give good results. Let's be clear for now.
The distance from the ground to the bottom is 165 mm. But knowing this fact alone is not enough to draw any conclusions. The motorist must certainly take into account the properties indicated below, such as:
- Full length of the machine.
- Distance from front overhang to rear.
- Wheel base.
- Vehicle track width.
- The presence of some parts protruding from the bottom of the car.
- The way the ground clearance changes when the car is 100% loaded.
Only working on the joint improvement of all these features can lead to benefit from the increase in ground clearance of the Priora.
Lowering the car: why and how to do it
Lowering the suspension is usually done to style the car and give it a more daring look. Such tuning makes the car tougher, but nevertheless remains popular. You can lower the VAZ 2170 in the following ways:
- Installing air suspension (the most expensive method). Complete reworking of the chassis. The result is a lowered car that can be raised if desired.
- Chassis with adjustable clearance (also expensive). Here, the degree of compression of the springs is adjusted automatically.
- Installation of low profile tires. Low-profile tires are definitely not suitable for bumps, but you won’t have to modify the chassis.
- Shortening (sawing off) springs. This is a budget method - you only need to saw off 1.5 turns in the front, 2 turns in the back.