Check Features
When checking the generator of a VAZ 2110, 2107 and others for serviceability, the following conditions must be met:
- An accurate multimeter should be used for diagnosis.
- The normal voltage is 12 V.
- If it is necessary to replace the wiring, you must use wires with the same cross-section as the original.
- Before checking, you should check that all fasteners are connected correctly and the belt tension is correct. If necessary, the connections should be adjusted to normal, the belt should be loosened or tightened.
During the verification process it is prohibited:
- short circuit the wires;
- connect terminals that differ in purpose and parameters, connect terminal 30 or B+ to ground;
- diagnose a generator without connected consumers.
General recommendations and nuances
It often happens that the generator stops functioning only when the engine is warm. This phenomenon is due to the natural expansion of the metal with increasing temperature or a change in the properties of semiconductors (diodes) for the same reason. In this case, you should first check the functionality of the generator on a warm car, and if this does not bring results, then dismantle the device and check it after heating it with a hair dryer. In conclusion, it is worth noting that independent replacement of generator components such as stator or rotor windings and bearings in domestic conditions is advisable only if you have the appropriate equipment, tools, and experience. If it is not there, then if the battery is not charging, limit yourself to trying to replace the relay-regulator combined with the brush assembly. To do this, you don’t have to buy a new device: you can install a known good one and evaluate the result.
Main symptoms of a malfunction
There are two main “symptoms” of a relay failure. This is an undercharge or overcharge of the battery. Also, a malfunction of a part can be determined by the dim glow of the headlights or by a change in their brightness when the engine speed increases.
If undercharged, the car will start with great difficulty. However, the manifestation of this “symptom” may not be related to the generator. Therefore, first of all, you should make sure that the battery is in good condition.
If the battery is overcharged, there is no doubt that the problem lies precisely in the damaged relay. There are other possible causes of overcharging, but they are extremely rare. Overcharging may cause the battery to boil over. This can be determined by the decrease in the amount of electrolyte in the jars and the appearance of a white coating on the battery.
If you suspect that the battery is overcharged or undercharged, you should diagnose the generator.
Checking the generator with a multimeter on a car
There is a methodically correct sequence of testing - from simple to complex.
Testing the relay regulator
This module is designed to maintain a constant voltage (as much as possible) at the output of the generator. When the car moves, the rotation speed of the generator shaft constantly changes.
The voltage “jumps” in the range from 12 to 20 volts. The regulator limits the value. Not only battery charging depends on its performance. When there is a surge or lack of voltage, all electronic components of the car are unstable and can simply burn out.
How to check the generator voltage with the engine running? Mode: “DC voltage measurement”, measurement limit: 20-50 volts. Measuring points – output contacts directly on the generator, or battery terminals.
The voltage should be between 14-14.2 V
, at any crankshaft speed. Ask your assistant to press the accelerator several times while you watch the readings.
The main source of power in a car is a generator; it is like a “mini-power station”. Incorrect or unstable operation of this unit can result in a bad battery. A failed generator does not provide charging, therefore, the on-board network of the car will work on a battery that will not last long. As a result, the battery is completely discharged, the engine “stalls” somewhere outside the city, and you have a new “headache” and the need to replace the generator.
In order to prevent such a scenario, it is necessary to regularly monitor the condition of this device, as well as the charging it provides. If you notice any interruptions in operation, you need to check the generator, and you will now learn how to do this.
But before that, I think it is necessary to talk about precautions and certain rules that must be followed when checking this electrical appliance in order not to damage it. !!! It is forbidden:
!!! It is forbidden:
- Check the functionality of the generator by short circuiting, that is, “to spark.”
- Connect terminal “30” (in some cases “B+”) with “ground” or terminal 67 (in some cases “D+”).
- Allow the generator to operate without consumers turned on; operation with the battery disconnected is especially undesirable.
- Perform welding work on a car body with the generator and battery wires connected.
!!! Important: The test is carried out using a voltmeter or ammeter. The valves are checked with a voltage no higher than 12 V. If the wiring of the electric generator is replaced, it is necessary to select wires of the same cross-section and length. Before checking the device, make sure that all connections are working and that the drive belt is properly tensioned. A belt is considered to be correctly tensioned if, when pressed in the middle with a force of 10 kg/s, it bends no more than 10-15 mm.
How much does a generator produce: what to pay attention to
First of all, if there are problems with the battery, you need to check both the battery and the generator. Moreover, it often happens that the generator seems to be working normally, but the battery is not charging enough or the battery charge is high, which leads to the electrolyte boiling
In this case, it is important to determine how much charging from the generator goes to the battery. In other words, you need to know how to test the generator. As for the main symptoms, the signs of a generator malfunction are as follows:
As for the main symptoms, the signs of a generator malfunction are as follows:
- the battery icon is lit on the panel;
- the battery does not charge or boils;
- headlights and sidelights shine dimly;
- noises, whistling or grinding noises have appeared in the generator area.
The check begins with inspecting the generator drive belt and its tension, as well as analyzing the performance of other elements (wiring, terminals, connections, generator belt rollers and pulleys, etc.). If there are no comments, then you should evaluate how the generator itself works, whether there is any extraneous noise when the rotor rotates.
If no deviations from the norm are identified, you can proceed to measuring voltage and current. It is necessary to measure voltage, current, resistance. To take measurements, you should have a multimeter or voltmeter on hand (you can also use a load fork).
So, normally the battery should receive 5-14.5V from the generator. This is the indicator that the generator is required to provide to the battery. If the generator charge is different, then this indicates problems with the unit.
To measure, you need to consider how to check the generator voltage on the battery. There are two ways to do this - you can measure it on the generator, and also through the battery. The fact is that the generator is directly connected to the battery and the potential difference can be measured directly on the battery.
The easiest way is to use a multimeter, which is connected to the battery in any order. If you use a load plug, it must be connected to the battery terminals, and the polarity is strictly observed.
So, the standard voltage in the network should be no lower than 12 volts. If you start the engine, in idling mode and power consumers are turned off, the voltage on the battery should be 13.5-14V. If there is a noticeable decrease in readings (for example, to 13.3-13.8 volts), this is a clear deviation from the norm, indicating a problem.
Another useful information may be how many amperes the generator supplies to the battery. In fact, this is the current strength, and on different cars it differs depending on the electrical consumers. In this case, the charging current must be such as to ensure the operation of the network and charge the battery.
To measure this indicator, it is necessary to create a load in the vehicle’s on-board network (turn on “heavy” energy consumers) after starting the internal combustion engine. After the engine is started and the consumers are turned off, the charging current is 6-10 amperes, then the figure decreases as the battery charges. If you turn on the dimensions, headlights, heated windows, seats, mirrors, then the charging current increases. If this does not happen, again, there is clearly a problem.
Please note that to accurately determine what the current strength should be for a particular load, you can use the table (the table is often found on specialized forums, in specialized literature, etc.). It contains the data that the generator should produce at different loads. The characteristics of the generator are tied to the number of engine revolutions, that is, the device must produce different current at different speeds
The characteristics of the generator are tied to the number of engine revolutions, that is, the device must produce different current at different speeds.
Let us also add that it would also be a good idea to check the resistance of the generator components (rotor, stator and diode bridge). As for the rotor, resistance is measured on the winding. Simply put, the multimeter probes are connected to the slip rings (readings from 2.3 to 5.1 Ohms will indicate that the element is working). If the winding consumes current between 3 and 4.5 amperes, then this is normal. The operating resistance should be 0.2 Ohm.
Currently reading
To check the diode bridge, it is necessary to determine whether resistance is present or absent, and the indicators themselves are not important. The main thing is that there are no “zero” indicators. You need to measure in pairs (plus and all the plates on this side / minus and all the plates on its side).
Types and differences of VAZ ignition coils
A car's gasoline engine operates by burning fuel. To ensure ignition, an electric spark is required, which is formed between the electrodes of the glow plug. They have a small gap that the spark must overcome. This is feasible when high voltage (tens of thousands of volts) is applied to the spark plug.
The vehicle's on-board system is not designed for such loads, and the equipment that supplies electricity is not capable of producing such values.
To solve this problem, a coil is introduced into the car's ignition system, creating a high voltage. A component of the vehicle's ignition system converts low voltage to high voltage (depending on the characteristics of the part from 6-12 V to 35,000 V). The tasks performed by the coil are determined by the structural features of the element. It consists of primary and secondary windings, which are housed in an insulated housing.
Attention! If malfunctions occur, it is recommended to check all engine components: from the valves and cylinder block to the ignition coil or module.
Where is the fog light relay located?
Located on the fender near the battery. Or trace its position through the wires from the fogs themselves.
VAZ 2115: fuse F10 is on
The fusible element is responsible for the left dimensions; it burns out for one reason - the metal frame of the dashboard frays the wiring and a short circuit occurs. To solve the problem, it is necessary to insulate and secure the cable.
VAZ 2115 heater fuse: where is it located?
F7 and rated at 30 Amps is placed in the cabin.
Charger
The battery fuse is installed on the battery.
Fuel pump fuse and relay
Placed in an additional interior mounting block under the glove compartment. The first is marked as F3 and its power is 15 A, and the number of the second is K4.
Low and high beam
4 elements rated 7.5 Amps. Designated - F12, F13, F14, F15 - right and left low beam, and for high beam.
Sources:
https://arskama.ru/remont-i-zamena/gde-nahoditsya-rele-zazhiganiya-vaz-2115.html https://rus-avtomir.ru/predohraniteli/rele-vaz-2115
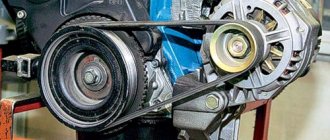
Belt tension
Make sure that the VAZ-2115 alternator belt is installed correctly. If a whistle appears when you turn on the light, this indicates that the tension is insufficient.
To get rid of this problem, you need to follow these steps:
- Using a 17mm wrench, unscrew the nut that secures the generator to the top bar.
- Place the mounting blade between the generator housing and the engine block.
- Pull the blade towards the radiator, increasing the tension.
- Tighten the nut after tensioning the belt.
If the belt tension is insufficient, the charge control lamp on the dashboard will dimly glow when the engine is running. It also happens that the lamp either lights up or goes out. Check the condition of the wiring, brushes and voltage regulator.
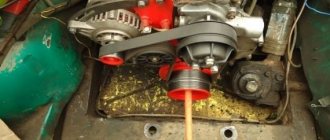
Alternator Removal Tools
A bracket is attached to the engine block (approximately in the middle). The generator housing is secured to the bracket on the block using a special strip. Thanks to it, it becomes possible to adjust the belt tension. To remove the generator, you will need the following tool:
- Wrenches (preferably box and open-end) with sizes “10”, “13”, “17”, “19”.
- Some vehicles may require a "15" socket.
- A small pry bar or short piece of pipe.
The principle of operation of a generator in a car
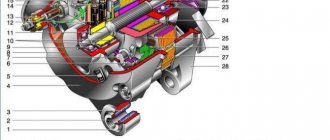
The peculiarity of the generator is that it produces alternating current. Whatever one may say, when operating this electric machine, you can only get alternating current, and only then convert it to direct current. General generator design:
- Back and front covers with pressed bearings.
- Rotor with excitation winding.
- The stator with power windings is where the voltage is removed.
- Diode bridge - three-phase rectifier.
- Electrolytic capacitor - to get rid of the alternating component of current.
- Voltage regulator - necessary for accurately setting the supply voltage of the rotor winding.
- Carbon-graphite brushes are necessary for transmitting voltage from the relay regulator to the rotor winding.
- And the remaining components - brackets, nuts, bolts, belt.
For normal operation of the generator, two components are required:
- Rotation.
- Magnetic field (constant).
It is enough to remember the school physics course - an electric current will appear in the winding only if it is affected by a moving magnetic field. Moreover, the output voltage will depend directly on the magnitude of this magnetic field. This means that the rotor winding is a source of a constant magnetic field, and it is powered through a voltage regulator, therefore, the output will always have the same voltage.
The alternating voltage is removed from the stator winding. Moreover, there are three windings, they are connected in a “star”. Consequently, we get three phases at the output. This is necessary primarily in order to reduce current ripple in the on-board network. With the help of a diode bridge, which contains six semiconductors, the current is rectified. And the capacitor cuts off the entire variable component. According to Kirchhoff's law, an electrolytic capacitor is replaced by a gap when operating in a DC circuit and by a conductor in an AC circuit.
Possible causes of failure of the regulator relay
Modern relay models have a relatively long service life. But some factors can lead to premature failure of the element, namely:
- Low quality of the part itself.
- The occurrence of a short circuit.
- Mechanical damage to the part.
Popular brands:
Acura ZDX, Audi A7, Citroen C4, Infiniti Q60
The problem may also be caused by water ingress.
On some generator models, replacement of the electronic regulator relay will be necessary if the brushes are worn out. Under normal conditions, the life of the voltage regulator exceeds 60,000 km.
How to test a generator with a multimeter
The diode bridge of the generator can be checked with a multimeter, but you can also use the stand that was used to check the regulator.
But before that, first of all, without removing the rectifier bridge from the generator, connect the red wire of the tester to terminal 30 of the generator, and the black wire to the housing. Set the tester operating mode to dial (diode icon). If it is not there, then set it to 1-2 kOhm. The multimeter should show infinity. If the readings are different, the diode bridge is faulty.
Then check the current rectifiers for breakdown. Leave the positive (red) probe on terminal 30, touch the negative one to the bridge mounting bolts one by one. The multimeter display should show infinity in all cases; any others mean a breakdown.
Next, connect the positive probe to the axle mounting bolts, and the negative probe to the generator housing. In this case, the tester should also output infinity.
But in practice, such verification is most often not enough. In most cases, it is necessary to ring the generator in more detail.
Careful testing
Attach one of the tester probes to the diode plate, connect the second to the central terminal of each diode fixed to this plate. Then swap the probes. In one case, the multimeter should show infinity, in the other - a nominal resistance of approximately 570-590 Ohms. Rectifiers are considered faulty if:
- In the first and second measurements (when the polarity was changed), the multimeter readings are the same;
- Diode resistance is greater or less than nominal values.
Perform the same actions with the second plate of the diode bridge. If a fault is detected in one or more diodes, it will be easier to replace the entire rectifier unit. True, there are craftsmen who replace failed diodes individually, but such work requires a certain skill and dexterity.
Checking the armature and stator windings
The armature winding should not clearly smell like burning. The color of the winding must be uniform and free of damage and breaks. To check the armature winding for a break, you will need a multimeter. Set the operating mode to continuity testing or resistance measurement and connect the probes to the brush rings. The winding resistance should be within 3-5 Ohms. Then leave one probe on the ring, connect the other to the body. The multimeter display should show infinity.
The generator stator is diagnosed after removal from the housing. First of all, carry out a visual inspection. There should be no visible damage to the wire or its insulation. Then connect the tester wire to the stator housing. With the second wire, touch the terminals one by one. There are only three of them. The tester must be in dialing mode. If the display shows infinity, this indicates that the stator is working properly.
Further testing consists of diagnosing the windings. The resistance of all three windings must be the same.
Before assembling the generator, you need to check and, if necessary, replace the bearings. When turning, they should not jam or make a creaking sound. This means that they are very worn out and will soon fail. Therefore, it is better to replace them immediately.
Source
The voltage regulator is the basis of the generator
The voltage regulator is located in the car's generator and is responsible for distributing voltage from the generator to the car. This part consists of an armature, an electromagnet and a switch. If it fails, a complete replacement is necessary.
To remove the voltage regulator, you need a few standard wrenches and screwdrivers. You can remove this element in a VAZ car without dismantling the generator. Do not forget to remove the terminals from the battery before starting work. Next, unscrew the contact terminals on the generator - they are located under the cap. After this, remove the protective cover, this must be done carefully so as not to break the spring latches that secure it to the generator.
Then unscrew the fastenings of the voltage regulator and pull it out along with the brushes. Checking the voltage regulator should only be done with brushes. The length of normal working brushes should be at least 4–6 mm. To test the functionality of the voltage regulator at home, we will need a battery, several contact wires and a 12-volt lamp.
The light bulb must be connected to the generator brushes, and the polarity does not matter. Connect the negative contact of the battery to the regulator body, and the positive contact to the power contacts on the regulator. If all elements are properly connected and working, the light should light up. If this does not happen, then the voltage regulator needs to be replaced. There is another way out - give the regulator to an experienced electrician to check, perhaps he will fix the breakdown.
Replacing the voltage regulator in a VAZ 2114 car is a fairly simple procedure. The voltage regulator for the VAZ 2114 can be bought at any auto store, but it will not work with other VAZ models. Car owners have recently replaced the standard regulator with a three-level one. It is better to entrust its installation to an experienced specialist, since it requires minor changes to the generator housing, as well as correct reconnection of the contact terminals to the relay.
The three-level voltage regulator contains an improved relay. It makes the voltage more stable and of higher quality. However, at the VAZ 2114 plant this regulator has not yet begun to be put into mass production for cars. After completing all repair work, reassemble and connect everything in reverse order. It is recommended to charge the battery during repairs.
Home →
Device → Electrical system → Generator →
The car won't start - 5 most common reasons
Imagine getting into your car in the morning to go to work. And suddenly the car won't start. This situation can confuse many drivers. Why did this happen if everything was fine yesterday?
We've collected the 5 most common reasons why a car won't start and told you how to diagnose and fix the problem.
Replacing the ignition relay for a VAZ 2107
relay is used to turn on the power supply for the accounting ignition system on carburetor non-injection modifications of the “Seven”. If this part becomes a cause of machine malfunction, it does not have to be replaced. You can localize the problem without the help of others, without resorting to the services of specialized 100. List of forums autolada.ru - Classic - and where in 2107 is turn signal relay , one on. For this purpose, it will be necessary at the cinema hall level not to know where the relay and how to change it correctly.
READ How to Change the Plug on a VAZ 2106 Block
Candles
Another reason is spark plugs filled with gasoline, whose job is to ignite the fuel. If the elements are installed a long time ago, they gradually become dirty. Each automaker specifies the intervals for checking and replacing spark plugs in the maintenance schedule. In addition, the necessary information is indicated in the service book or in the vehicle’s operating manual.
When the driver tries repeatedly and unsuccessfully to start the car, the spark plugs become heavily flooded with gasoline. After that they definitely won't work anymore. To correct the situation, unscrew and dry them.
Candles can also be filled on a carburetor engine. But the described situation is especially relevant for modern cars with electronic injection, when the driver unknowingly begins to repeatedly press the gas pedal, which in this case only causes harm.
Why does the generator fail?
In fact, the generator has a simple design, if you want, it is an ordinary electric motor (only designed for high-generation current), try to turn the ordinary electric motor and attach a light bulb or LED, it will start to light up - that’s the elementary current of the alternator.
Someday I will have an article where I will tell you what a generator is. Today it is simple and redrawn - the rotor (the moving part), the stator (the static part), the brush assembly, the voltage regulator and, of course, the housing in which it is located.
And now the actual cracks.
- Seized bearings. This is a fairly common problem in already worn-out generators; the rotor in the housing includes bearings; over time and moisture (dirt), the banal wedge or lower clamping ring also wears out. If there is jamming, then one thing is that the rod stops rotating. But if there is wedging, it is hard to see - the rod may or may not rotate. In any case, with these symptoms, the belt that rotates the generator along with the engine is more likely to break. THIS IS THE FIRST WARNING SIGNAL.
- The stator or rotor winding has burned out. It is there in any case, and most likely it will be on the stator, which means that moisture (salt on the roads) can also eat up this banal short circuit or simply burn it, since copper wires are used. Accordingly, the current generation will stop.
- Damage to the hand node. This is also very common, the brushes are graphite (often square) rods that run along the stator tracks. Therefore, from time to time they wear out a lot and need to be replaced.
- The regulator relay is damaged. This relay prevents the alternator from overcharging the battery by ensuring the voltage and current are in the correct range. It also often fails and charging does not reach the battery at all! You should look at this.
Basically, these are the 4 main reasons why an alternator can fail, so you should definitely have it checked before purchasing a new battery. You may have problems with this.
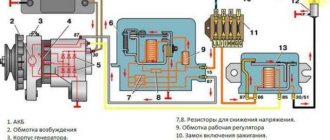
Connection diagram for the “five” generator
Like any other electrical device in a car, the generator has its own connection diagram. If the electrical installation is incorrect, the power source will not only not provide the on-board network with current, but may also fail. Connecting the unit according to the electrical diagram will not be difficult.
Color-coded electrical wires are connected to the VAZ 2105 generator as follows:
- the yellow one from connector “85” of the relay is connected to terminal “1” of the generator;
- orange is connected to terminal “2”;
- two pink ones to terminal “3”.
The battery charging light is on
When you start the engine, many different lights come on on the dashboard, one of them is the battery charging light. Ideally, it lights up as soon as you start the engine and goes out after a while. This indicates that the generator and all its circuits are fully operational and the battery receives a charge of 13.7-14.3 Volts, that is, it is charging. However, various breakdowns often occur due to which the light bulb continues to glow, glows dimly, or does not light at all. To deal with such malfunctions, you need to understand a little about the design of the generator and the principle of its interaction with the battery.
A little theory
On our website Vodi.su we have already described in detail the design of a car generator. Let's just say that electricity is generated in it by the rotation of the crankshaft. As the speed increases, the voltage also increases, but it must be within the limits indicated above, otherwise the battery will be overcharged, which threatens the electrolyte boiling and sulfation of the plates.
To prevent this from happening, a relay regulator is installed in the rotor excitation circuit, thanks to which a stable voltage is supplied to the battery.
The signal from the generator to the warning lamp is transmitted through a fuse, which is also located in the generator itself. Accordingly, the light stays on until the generator starts working and transmits voltage to the battery.
The charge from the generator passes through:
- diode;
- regulator;
- generator brush;
- slip rings;
- winding and wiring.
Thus, if at least one of these elements does not work correctly or fails, the readings of the light bulb cannot be trusted, although charging may be supplied to the battery.
Why is the battery charging light on?
There can be a lot of reasons. So, if after starting the engine the warning light continues to burn at full intensity, most likely the alternator belt has stretched and needs to be replaced. At the same time, you can hear characteristic sounds from the engine. On Vodi.su we have also already told you how to tighten or change a belt.
The second common cause is poor contact at the battery terminals or at the terminals from the generator. Contacts oxidize over time and need to be cleaned.
Failures in the mechanical part of the rotor: the bearing fell apart, the bushings flew off. You will have to completely remove the generator, disassemble it and replace broken parts. Fortunately, you can always find a repair kit of three bushings for a VAZ-2107 or other domestic cars on sale.
Failure of the diode bridge, relay regulator. In this case, you need to check them with a multimeter, or contact a specialist. Repairs often cost more than purchasing a new generator.
Over time, graphite brushes also wear out and need to be replaced regularly. When they are worn out, the charge is not transferred to the winding, and accordingly the light bulb begins to glow dimly, although the charge is transferred, but very weakly. Use a voltmeter as a guide. If the brushes are not changed in time, the battery will constantly be undercharged, which can lead to gradual shedding of the plates.
Generator diagnostics
First of all, the voltage is measured at the battery terminals. If it is lower than required, you need to check the entire circuit step by step:
- belt tension level;
- measure the voltage at each of the generator terminals - at each terminal it should be half as low as at the battery;
- check fuses, relays, diodes;
- check the resistance in the dashboard, the quality of soldering of wires.
If it turns out that the breakdown lies in the generator itself, it will have to be removed and also checked. In particular, they first check the relay regulator, then measure the resistance of the rotor field winding using an ohmmeter. It should not be lower than 4.5 ohms. Also, using the tester, you can determine whether the winding circuit is open.
It is clear that such malfunctions cannot be avoided. However, there are simple tips to help extend the life of the generator:
- first of all, regularly check the quality of its fastening - constant vibrations lead to mechanical damage;
- Clean external surfaces from time to time;
- check the belt tension, tighten if necessary;
- quality of the rotor bearing - remove the belt and spin the rotor, it should rotate smoothly, without play or clicks.
You also need to monitor the quality of the connection of the wires to the generator and voltage regulator.
Thus, a lit battery charging light while the engine is running is a serious reason to carry out diagnostics.
Please note that it can also light up if you have installed a lot of additional equipment - subwoofers, lights, lights
Where is the charging relay located » NaDamkrat
The device contains a rectifier unit that converts three-phase alternating current into direct current. Thanks to this device, surges in the output from the generator are reduced, and the voltage range should be from 13.2 to 14.7 Volts.
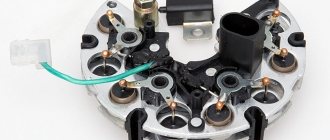
Where is relay ? The unit is located at the rear of the generator, below under a plastic cover. The device is black and has two graphic conductive brushes.
Location of the voltage regulator on the VAZ 2114
Signs of regulator malfunction
Sometimes during the operation of a car it happens that the stabilizer fails. Signs of this may include frequent fluctuations and sudden surges in voltage in the vehicle network, problems with electrical appliances and rapid discharge of the battery. If you notice one or more of the above signs, then relay regulator should be tested using a multimeter.
Checking the VAZ 2114 voltage regulator
- Set the tester to measure DC voltage with a limit of 20 volts.
- Measure the voltage readings at the battery terminals with the engine turned off (the result should be from 12.5 to 13 volts).
- Start the engine and measure the voltage at the terminals again (now it should be between 14 and 14.5 volts).
- Without turning off the engine, turn on the high beam, heater and heated glass (other powerful consumers can also be used). Measure the voltage on the battery a third time. The voltage readings should be in the range of 13.2-13.9 volts - this will mean that the stabilizer is fixed. Otherwise, the device will have to be dismantled and replaced.
READ Replacing Cooling Fan Niva Chevrolet With Air Conditioning
Traveling in a car with a faulty generator regulator is not profitable and even unsafe, as this can lead to increased fuel consumption, breakdowns in the on-board network, and even a car fire.
You can check the correct operation of the regulator without using a multimeter, with the device removed. To do this, you need to connect its “ground” terminal to the negative of the battery, and connect contacts B and C to the positive. After this, you should take a 3-watt car lamp and connect it to the graphite brushes of the regulator. If the latter is working properly, the lamp will light up.
New and damaged voltage regulator
In some cases, you can go even further and check the trigger threshold. To do this, the regulator should be connected as mentioned above, but between its positive terminals and the plus of the battery, connect a pair of AA batteries in parallel in order to increase the voltage in the network to 16 volts. If the regulator is working correctly, it will interrupt the power supply and the light bulb connected to its brushes will not light up.
Multimeter - what is it
A multimeter is a measuring device used to measure resistance, current or voltage. Also, using such a device you can check the wiring for breaks. Each of these measurements involves the use of separate measuring instruments, such as a voltmeter, ammeter or ohmmeter. Therefore, a multimeter is considered a universal tool (mulmeter = voltmeter + ammeter + ohmmeter). In practice, analog and digital multimeters are used.
What is a multimeter
Analog
This multimeter is equipped with a special hand, like on a watch, by the movement of which the measurements are read. The analog multimeter is also equipped with a measuring scale with resistance, current and voltage values. The device is inexpensive, so it is very popular. The disadvantages of an analog multimeter include measurement errors (this mainly applies to products made in China).
Analog multimeter
Digital
Unlike an analog multimeter, a digital multimeter has an LCD or LED screen that displays data. These devices are easier to use and also have high accuracy, which cannot be said about cheaper analogues.
Digital multimeter
Diagnostics of a removed generator
To check the generator removed from the VAZ 21, you should use a multimeter in ohmmeter mode. The probes are pressed against terminal 30 and the body of the unit. If there are contaminants and strong oxides on the case, they should be removed first, as they can affect the readings of the device.
You need to measure the resistance of each generator unit in turn. Parts that do not have the required resistance have become unusable. Most of them can be replaced at home using a minimal set of tools. To replace, you need to buy the same parts as those originally installed in the generator.
If you find an error, please select a piece of text and press Ctrl+Enter.
Source
How to check the generator yourself
You can diagnose it yourself. To do this, you must follow the instructions.
Diagnostic features:
- Check the electronic part with a multimeter.
- When checking the condition of the valves, the voltage should not exceed 12 Volts.
- If the generator wiring is replaced, it should be replaced with wires of the same cross-section.
- To independently diagnose the generator, the generator must be in place, assembled, and the belt must be installed.
What not to do when diagnosing a generator:
- You cannot check whether the generator is working or not using a spark, that is, using the short circuit method.
- Connect different terminals together. You also cannot connect terminal 30 or B+ to ground.
- The generator must be diagnosed after connecting the energy consumer. This should be observed especially when the battery is disconnected.
Method No. 1 for checking the generator
This method is simple. You need to start the engine and turn on the low beam headlights. Disconnect the negative terminal from the battery. If the engine does not stall, that is, it operates stably, the headlights burn evenly, without jumps, then the generator is producing current.
If the headlights start flashing, the engine slows down, then the generator runs intermittently.
Method No. 2. Checking the generator with a multimeter
Without load, the operating battery voltage should be between 12.5-12.7 Volts. When starting the internal combustion engine, there is a load on the battery, so at this moment the normal voltage is considered to be that which is in the range of 13.8-14.8 V. After the battery has received the maximum load, the voltage should drop to 13.8 V. If the voltage has not decreased or decreased significantly lower than 13.8, then the generator must be checked.
How to check the generator relay
To do this, you will need a multimeter in the voltage position or a voltmeter. You only need to check the relay on a warm engine. If the car is parked and the engine is cold, you need to start it, turn on the low beam headlights and let it run for 15 minutes.
You need to measure between the “Ground” terminals and the “30” terminal. The operating relay should produce a voltage within 13.5-14.6 Volts. If it shows less than 13V, then urgent replacement is necessary.
How to check a generator diode bridge
To check it, the diode bridge must be removed. And you will need a battery. Switch the multimeter to the Ohm resistance measurement position.
We connect the ground and the B+ clamp to the battery. The device should show no more than 0.5 mA (miles Ampere). If the resistance is shown higher, then the diodes have failed.
How to check the output current
The point of the test is to measure how much current the switched on devices consume. It is checked only when the internal combustion engine is connected.
- We start the engine.
- We increase engine speed to maximum.
- We install the probe on the wire going to terminal 30 or B+.
- We turn on all the electrical appliances one by one and record the multimeter readings.
- Add the written numbers.
- Now you need to turn on all the devices and compare whether the device readings are equal to the sum of the individually switched on devices measured.
- The norm is when the multimeter shows 5 Amps less than the sum of the measured values. But, if the current difference is large, then there is a problem.
Cost and interchangeability
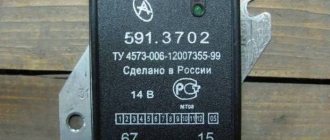
Built-in relay voltage regulator 71.3702 for generator G-222
The average price for a voltage regulator, both built into the brushes and remote, is about 100 rubles.
Models of generators G-221 and G-222 are interchangeable, that is, you can easily install a new generator from the “seven” for a “penny”, but you should pay attention to the correct charge of the battery. To do this, it is necessary to modify the electrical wiring according to the standard connection diagram.
Depending on the situation, either install an external voltage regulator relay, or, conversely, remove the external one and leave one built into the generator.
The normal voltage in the car's on-board network is considered to be in the range of 13.5-14.5 Volts.
Source
Generator repair for VAZ 2113-VAZ 2115
Disassembly
1) First you need to remove the generator; the article will help you understand the procedure: “Replacing the generator on a car.” Then remove the voltage regulator from the generator and the rectifier unit, the publication will help you with this: “Replacing the generator rectifier unit on a VAZ.”
Note! The roller can be removed using an 8mm hex key. If you don't have one, try finding a flat-head screwdriver of the appropriate size. Be careful not to strip the thread when unscrewing the nut. The removal mechanism is as follows: a hex wrench stops the shaft with the installed roller from turning, and the roller fastening nut is unscrewed with a spanner (photo 1). Remove the unscrewed nut and its spring washer. By the way, this washer is of an unusual shape; examine it carefully: on one side it has a convex shape, and on the other it is flat. The convex part must be installed to the nut (photo 2).
2) We proceed directly to the repair. Use a marker or chalk to mark the two generator covers, noting their location relative to each other - you need to install them exactly as they were. Proceed to unscrewing the four bolts located around the circumference of the generator (photo 1). Next, use a flat-head screwdriver to separate both covers from each other (photo 2). Disconnect the cover located on the side of the slip rings (photo 3, rings are indicated by arrows). Now remove one of the important elements of the generator - the stator, by pulling it and removing it (photo 4).
Note! Be sure to check the removed stator for integrity; the condition should be acceptable, the inner surface (indicated by the arrow) without scratches - signs of touching the armature. The presence of marks and damage is a sign of faulty bearings or deformation of the generator cover.
3) Separate the cover from the rotor, and remove the rotor itself - simply grab the rotor with your hand and pull out the shaft (photo 1, the rotor shaft is indicated by a red arrow) from the bearing (indicated by a blue arrow). If the shaft does not pull out, screw the nut that previously secured the roller onto it. There is no need to install the roller, just screw on the nut. Then, having started to knock out the shaft, the rotor will not fly out of the bearing and will not hit the asphalt. Do not tighten the nut all the way, just screw it a little onto the thread. Using a hammer and a wooden spacer, knock the shaft with the rotor out of the bearing, controlling the effort. After removing the rotor, inspect the cover (photo 2)
Pay special attention to the bearing; rotate it by hand: rotate the inner part in the direction where the rotor shaft was inserted. If you notice jamming, play, or rolling, replace the bearing
Take a screwdriver and remove the four screws securing the metal washer (photo 3), remove them from both sides of the cover. The bearing is knocked out using a hammer and a socket or mandrel of suitable diameter (photo 4).
Note! Check the cover for defects and if there is significant damage (large cracks, dents, etc.), replace the cover with a new one.
Battery overcharge
But often there is no “lowering” and “overcharging”. The electrolyte in the battery boils, and the battery also fails; there is nothing good about that.
The first sign will be a white coating on the top of the battery, which means the electrolyte is boiling and evaporating. This means the battery is charged, but the alternator still screws up charging it. Here, most likely, the voltage regulator has failed.
The check here is also elementary - you need to connect a multimeter or tester (whatever you call it) to a running machine and look at the load. If it is much higher than 14.5-14.8V and 15-15.2V, it means overcharging. Urgent replacement of the voltage regulator, otherwise you will constantly boil the battery, NOTHING good. Banal plates can fall apart.