This usually happens when the generator is faulty, when electrical appliances are powered from the battery. Most often, the light comes on for the following reasons: Slipping of the V-belt on the generator pulley.
Horn switch. But still it must be considered part of the structure. GENERATOR AND RELAY 702 FOR INDICATION OF GENERATOR OPERATION
Disassembling the stator and rotor Next, remove the rotor assembly with the rear bearing from the front cover.
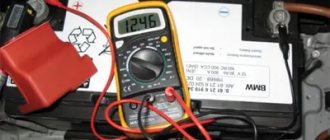
When the engine is not running, the readings should be within 11.6 V. The generator brushes, generator pulley and other structural elements can fail. But still it must be considered part of the structure.
Direction of rotation - right on the drive side Maximum output current at 14 V and rotor speed min - 42 A Maximum rotor speed - 13 min Gear ratio engine-generator - .04 The generator rotor is driven by a V-belt from a pulley mounted on the crankshaft motor shaft. Considering the simplicity of the “penny”, to troubleshoot the problem you only need a multimeter and the ability to use it.
VAZ generator Replacing a VAZ 2101 generator with a VAZ 2109 generator (Excitation connection diagram)
Features of the VAZ 2101 generator
VAZ 2101 has two sources of electricity - a battery and a generator. The first is used when the engine is off, and the second while driving. The operating principle of the VAZ 2101 generator is based on the phenomenon of electromagnetic induction. It produces only alternating current, which is converted into direct current by a special device.
VAZ 2101 is considered one of the longest-living models, largely due to the performance of the generator
The main task of the generator is to uninterruptedly generate electric current to maintain the functionality of all electronic devices in the car, including recharging the battery.
Technical characteristics of the VAZ 2101 generator
The generator is connected to a crankshaft pulley that drives the water pump. Therefore, in the VAZ 2101 it is installed in the engine compartment to the right of the engine. The generator has the following technical characteristics:
- rated voltage - 12 V;
- maximum current - 52 A;
- the direction of rotation of the rotor is to the right (relative to the motor housing);
- weight (without adjustment unit) - 4.28 kg.
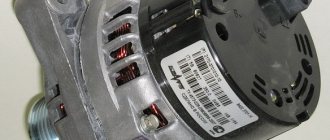
The manufacturer installed G-221 generators on the VAZ 2101
Symptoms of loss of battery charging on a Priora
The very first thing that many people pay attention to is that the battery charging light on the dashboard came on. If you have a multimeter at hand, you can measure the output charging current by connecting the contacts to the “+” and “-” terminals, respectively
If even without a load the device readings are less than 13 Volts, this indicates that there are certain problems with charging.
Of course, it is possible (although it is highly not recommended) to remove the “-” terminal from the battery while the engine is running, thereby checking the functionality of the generator. If the engine stalls, this will indicate that there is actually no charging, and accordingly, the generator is faulty.
Also, the charging lamp may glow at half-glow, which also indicates insufficient charging current. If one of the symptoms listed above occurs, it is necessary to diagnose the generator and its parts. If necessary, replace them with new ones. If you have anything to add to this article, you can comment below.
If the battery discharge indicator lights up in the instrument cluster, it means that current is not flowing from the generator to the on-board network and the battery's energy reserves are being consumed. Once the battery is discharged to its minimum value, the engine management system will stop working and the engine will stall. Let's look at the main reasons why charging from the generator to the battery does not occur.
A car has two power sources: a battery (battery) and a generator. The battery is used when starting the engine (to power the starter), as well as for other consumers when the engine is not running. After starting the engine, the main source of current is the generator. It supplies current to all consumers, including the ignition system, and charges the battery.
How long can you drive without a battery-powered generator?
To save battery energy, turn off unnecessary electricity consumers: audio system, heated seats, etc. Also try not to stop and start the engine unless necessary. Under normal conditions, a fully charged battery in the absence of charging current lasts for approximately one hour of driving. See experiment with Lada Largus.
How to find the reason why the generator does not charge the battery
:
1. Check to see if the accessory drive belt (or alternator belt) is broken. If the belt is intact, check its tension.
2. If the belt tension is normal, but the warning light is still on, check that the wiring harness block and the positive wire terminal are securely connected to the generator
Please note that wires may be broken or broken within the insulation
3. Check the reliability of the wire connections to the battery terminals.
4. Check the integrity of the generator fuse in the engine compartment mounting block. Replace the blown fuse if necessary.
If, after all the measures taken, the charging lamp continues to light up while the engine is running, then most likely the generator is faulty (for example, the voltage regulator is faulty). We told you how to check the generator earlier.
The battery and generator are the two sources of electricity. The battery is used to start the engine and to recharge the vehicle's systems if the generator cannot cope with the load. The role of the generator is to provide power to current consumers in the on-board network when the engine is running and recharge the battery. It is this last function that will interest us. During operation, it is not uncommon for the battery to not charge during a trip or to receive insufficient charge. Let's look at the reasons for this.
Selecting a generator for VAZ 2101
The manufacturer equipped the VAZ 2101 with generators of the G-221 model. The maximum current of 52 A was enough to operate all standard electrical appliances. However, the installation of additional equipment by car owners (powerful acoustics, navigator, additional headlights, etc.) led to the fact that the G-221 could no longer cope with increased loads. There was a need to replace the generator with a more powerful one.
Without any problems, you can install the following devices on the VAZ 2101:
- A generator from a VAZ 2105 with a maximum current of 55 A. The power is enough to operate a conventional speaker system and, for example, an additional LED strip for lighting. It is installed on standard mounts for the VAZ 2101 generator. The only differences are that the regulator relay is built into the generator housing, while on the G-221 it is located separately.
- Generator from VAZ 2106 with a maximum current of 55 A. Withstands slight overloads. Installed on standard G-221 mounts.
- Generator from VAZ 21074 with a maximum current of 73 A. Its power is sufficient to operate any additional electrical equipment. It is installed on standard VAZ 2101 mounts, but the connection diagram is slightly different.
- Generator from VAZ 2121 Niva with a maximum current of 80 A. The most powerful among its analogues. However, its installation on the VAZ 2101 will require significant modifications.
- Generators from foreign cars. The best option is generators from Fiat. Installing such a device on a VAZ 2101 will require noticeable changes in the design of the generator mounting and its connection diagram without guarantees of high-quality operation.
Photo gallery: generators for VAZ 2101
The generator from the VAZ 2105 is installed on the standard mounts of the VAZ 2101
The generator from the VAZ 2106 can withstand slight overloads and is installed on standard G-221 mounts
The generator power from the VAZ 21074 is sufficient to operate any additional electrical equipment
It is quite difficult to install a Niva generator on a VAZ 2101
In fact, it will be enough for the driver of a VAZ 2101 to install a generator from a “six” or “seven” to satisfy all his electricity needs. Even with complex tuning, a power of 60–70 amperes is enough to maintain the operation of all devices.
Removing and installing the voltage regulator
Replacing the external voltage regulator VAZ 2101-2106
1) Using the “8” socket, unscrew the two nuts and remove the regulator.
2) Disconnect the two wires.
3) Attach the new regulator to the mudguard and connect the wires: orange to terminal “15”, and gray to terminal “67”.
Voltage regulator relay connection diagram
ATTENTION! Before starting the engine, make sure that the contact between the voltage regulator housing and the vehicle ground is reliable, and that the wires to terminals “15” and “67” are connected correctly.
It is necessary that the voltage at the output of the generator remains constant, and for this a simple principle is used. If you make sure that the supply voltage to the rotor winding is constant, you will be able to avoid changing the magnitude of the magnetic field. On a VAZ-2101, the generator must operate under a load of 13-14 V. Even two relay regulators of the same design can maintain a different voltage value.
Regulator types:
- Mechanical - based on an electromechanical relay and resistance to reduce voltage.
- Semiconductor - based on a small circuit of low-power transistors or one power switch.
- Mixed - the design contains both a transistor circuit and an electromagnetic relay.
Brushes are exactly the element with which the connection diagram for the VAZ-2101 generator is implemented. Thanks to them, voltage is supplied to the slip rings of the moving rotor.
Installation is carried out in reverse order. If you need to replace the generator with a more powerful one, you can install an analogue from the VAZ-2107 or 2109 car model. They have more power and are able to provide stable charging of the battery. The difference from the “native” VAZ-2101 is that the voltage regulator is combined with the brush assembly.
The main thing is that there are no distortions, otherwise the belt will tear, wear out quickly, and the load on the rotor will increase several times. For normal operation it is necessary that this element have a certain tension. It is adjusted by changing the position of the housing relative to the engine. Fixation is made with a nut at the top of the generator.
Connection diagram for the VAZ 2101 generator
The VAZ 2101 generator is connected using a single-wire circuit - one wire from the generator is connected to each device. This makes it easy to connect the generator yourself.
The VAZ 2101 generator is connected using a single-wire circuit
Features of connecting the VAZ 2101 generator
Several multi-colored wires are connected to the VAZ 2101 generator:
- the yellow wire comes from the warning light on the dashboard;
- a thick gray wire goes from the regulator relay to the brushes;
- a thin gray wire goes to the relay;
- The orange wire acts as an additional connector and is usually connected to a thin gray wire during installation.
Incorrect connection of wires can cause a short circuit or voltage surges in the electrical circuit of the VAZ 2101.
For ease of installation, the wires for connecting the VAZ 2101 generator are painted in different colors
The device of the VAZ 2101 generator
For its time, the design of the G-221 generator turned out to be quite successful. It was installed without modifications on subsequent models of the plant - VAZ 2102 and VAZ 2103. With proper maintenance and timely replacement of failed elements, it could be used for many years.
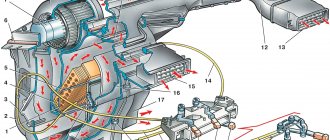
Structurally, the G-221 generator consists of the following main elements:
- rotor;
- stator;
- regulator relay;
- semiconductor bridge;
- brushes;
- pulley.
The G-221 generator is attached to the engine on a special bracket. This allows you to firmly fix the device and at the same time protect it from high temperatures.
The bracket firmly fixes the generator even when driving on uneven roads
Rotor
The rotor is the moving part of the generator. It consists of a shaft, onto the corrugated surface of which a steel sleeve and beak-shaped poles are pressed. This design serves as the core of an electromagnet rotating in two ball bearings. Bearings must be closed type. Otherwise, due to lack of lubrication, they will quickly fail.
The rotor (armature) is the moving part of the generator
Pulley
The pulley can be considered either part of the generator or a separate element. It is installed on the rotor shaft and can be easily removed if necessary. When the engine is running, the pulley rotates by the crankshaft through the belt and transmits torque to the rotor. To prevent the pulley from overheating, there are special blades on its surface that provide natural ventilation.
The generator pulley is driven by the crankshaft through a belt.
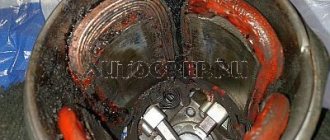
Stator with windings
The stator consists of a number of special plates made of electrical steel. To increase resistance to loads in four places on the outer surface, these plates are connected by welding. A winding of copper wire is laid on them in special grooves. In total, the stator contains three windings, each of which consists of two coils. Thus, six coils are used to generate electricity by the generator.
The stator consists of plates made of electrical steel, on which a winding of copper wire is laid
Regulator relay
The regulator relay is a small plate with an electrical circuit inside, designed to control the voltage at the output of the generator. On the VAZ 2101, the relay is located outside the generator and is mounted on the rear cover from the outside.
The regulator relay is designed to control the voltage at the generator output
Brushes
Generating electricity from a generator is impossible without brushes. They are located in the brush holder and attached to the stator.
Only two brushes are fixed in the brush holder of the G-221 generator
Diode bridge
The rectifier (or diode bridge) is a horseshoe-shaped plate with built-in six diodes that converts alternating current to direct current. It is important that all diodes are in good working order - otherwise the generator will not be able to provide power to all electrical appliances.
The diode bridge is a horseshoe-shaped plate
Diagnostics and troubleshooting of the VAZ 2101 generator
There are a number of signs and signals by which you can determine that the generator is faulty.
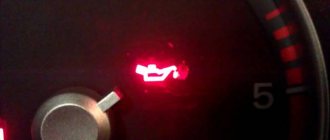
The charging indicator light comes on
On the dashboard of the VAZ 2101 there is a battery charging indicator. It lights up if the battery charge is close to zero. This usually happens when the generator is faulty, when electrical appliances are powered from the battery. Most often the light comes on for the following reasons:
- Slipping of the V-belt on the generator pulley. It is recommended to check the belt tension, and if there is severe wear, replace it with a new one.
- Failure of the battery charging indicator relay. You should check the serviceability of the relay using a multimeter.
- Break in the stator winding. It is necessary to disassemble the generator and clean all its elements.
- Severe brush wear. All brushes in the holder will need to be replaced, even if only one of them is worn out.
- Short circuit in the diode bridge circuit. The burned out diode or the entire bridge should be replaced.
The battery indicator lights up if the battery charge is close to zero.
Battery won't charge
One of the tasks of the generator is to recharge the battery while driving. If this does not happen, you should pay attention to the following points.
- Sagging V-belt. It is necessary to adjust its tension or replace it.
- Loosening of the wire ends connecting the generator to the battery. All contacts should be cleaned or damaged tips should be replaced.
- Battery failure. This can be checked and fixed by installing a new battery.
- Damage to the voltage regulator. It is recommended to clean all contacts of the regulator and check the integrity of the wires.
The problem with the battery not charging is most often associated with a malfunction of the battery itself.
The battery is boiling over
If the battery begins to boil away, then, as a rule, its service life is coming to an end. In order not to risk the new battery, it is recommended to accurately identify the cause of boiling. It could be:
- Lack of permanent contact between the generator voltage regulator housing and ground. It is recommended to clean the contacts and replace them if necessary.
- Short circuit in the regulator. The voltage regulator needs to be replaced.
- Battery failure. A new battery must be installed.
If the battery begins to boil away, it will need to be replaced in the near future.
Loud noise while driving
The VAZ 2101 generator usually operates quite noisily. The cause of the noise is the presence of contacting and rubbing elements in the generator design. If this noise has become unusually loud, knocking, whistling and rumbles have appeared, it is necessary to identify the cause of this situation. This is usually due to the following problems.
- Loosening the fixing nut on the generator pulley. Tighten the nut and check all fastener joints.
- Bearing failure. You will need to disassemble the generator and replace the bearings.
- Short circuit in the stator winding. The stator assembly needs to be replaced.
- Brushes creaking. It is recommended to clean the contacts and brush surfaces.
Any extraneous noise from the generator is a reason to troubleshoot
What happens if you mix up the battery terminals?
In my case, the first thing I saw was that the wires just started smoking. Of course, the starting current from the battery that I added was even higher than it should generally be on a battery installed on such a car. But of course, the main reason that the smoke came out was simply that I threw a plus onto a minus, and a minus onto a plus. It's a stupid situation, but that's how it all turned out.
What happened next? A second later, I realized that I was stupid and threw off the terminals, putting the old battery in place. But when I turned the ignition key, I saw that, along with the oil pressure lamp, the battery charging lamp no longer came on. This was the first thing that puzzled me. Then I checked the fuse - on Kopeechka it is the 10th from the driver's door and the outermost one in the row. My fuse turned out to be normal - there were no signs of burning, just in case I replaced it, but it did not lead to anything. Then I took out the dashboard, pulled out the light bulb that goes to the charging lamp - visually it was normal, but I changed that too - nothing changed) - after turning the ignition key, the lamp still did not light up.
Immediately after that, I went and bought a new chocolate bar, screwed it to the fender and connected the wires, turned the key and again nothing (. In addition to this, already near the car market, I simply could not start on the new battery, which was purchased only the day before yesterday from the described day. Then I realized that, in addition to the fact that the battery charging lamp was not on, the battery itself was not charging. In general, the realization gradually came that there was a problem with the generator itself...
Checking the functionality of the VAZ 2101 generator
The generator going out and breaking down is a rather unpleasant situation. Experts recommend periodically (at least twice a year) assessing its performance to determine the remaining resource.
You cannot check the functionality of the generator on a VAZ 2101 when disconnected from the battery while the engine is running, since there is a high probability of a voltage surge.
This can be done either at a stand in a service station or using an oscilloscope. However, no less accurate results can be obtained in a garage using a conventional multimeter.
Checking the generator with a multimeter
To test the generator, you can use either an analog or digital multimeter.
The specificity of the test does not allow the work to be carried out alone. Therefore, it is necessary to invite a friend in advance, since one person will have to be in the cabin, and the other will have to monitor the readings of the multimeter in the engine compartment of the car.
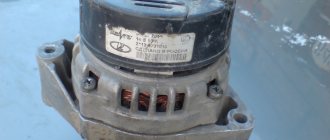
You can check the performance of the VAZ 2101 generator using a multimeter
The verification algorithm is extremely simple and consists of performing the following steps.
- The multimeter is set to DC current measurement mode.
- The device is connected to the battery terminals. With the engine not running, it should show between 11.9 and 12.6 V.
- The interior assistant starts the engine and leaves it idling.
- When the engine starts, the multimeter readings are recorded. If the voltage drops sharply, the generator's life is insignificant. If the voltage, on the contrary, jumps (to about 14.5 V), then the excess charge will lead to the battery boiling in the near future.
Video: checking the VAZ 2101 generator
The norm is a small voltage drop when the engine starts and a quick recovery of performance characteristics.
Do-it-yourself VAZ 2101 generator repair
Repairing a VAZ 2101 generator with your own hands is quite simple. All work can be divided into five stages:
- Removing the generator from the car.
- Disassembling the generator.
- Troubleshooting.
- Replacement of worn out and faulty elements with new ones.
- Generator assembly.
First stage: dismantling the generator
To dismantle the VAZ 2101 generator you will need:
- open-end wrenches for 10, 17 and 19;
- mounting blade.
Before dismantling the generator, you must disconnect the negative cable from the battery.
To remove the generator you will need to perform the following steps:
- Remove the right front wheel from the vehicle.
- Securely secure the car on a jack and additional supports.
- Climb under the car on the right side and find the generator housing.
- Loosen, but do not completely unscrew the housing fixing nut.
- Loosen, but do not completely unscrew the nut on the bracket stud.
- To loosen the V-belt, slightly move the generator housing.
- Disconnect the power cable going to the generator.
- Disconnect all wires and contact connections.
- Remove the fixing nuts, pull the generator towards you and remove it from the studs.
Video: dismantling the VAZ 2101 generator
Stage two: disassembling the generator
The removed generator should be wiped with a soft cloth, removing the main layer of dirt. To disassemble the device you will need:
- open-end and ring wrenches 19;
- extension;
- heads for 8 and 10;
- hammer.
Before disassembling the generator, it is best to prepare small containers for storing washers, screws and bolts. Because there are a lot of small details in the design of the generator, and in order to understand them later, it is better to classify the elements in advance.
Disassembling the VAZ 2101 generator is quite simple
The disassembly itself is carried out in the following order:
- Unscrew the four nuts on the back cover of the generator.
- The nuts securing the pulley to the body are unscrewed.
- The pulley is removed.
- The housing is divided into two parts (one will contain the stator, the other will contain the rotor).
- The winding is removed from the part with the stator.
- The shaft with bearings will be pulled out from the part with the rotor.
Further disassembly involves pressing out the bearings.
Video: disassembling the VAZ 2101 generator
Third stage: generator troubleshooting
At the troubleshooting stage, faults of individual generator elements are identified and eliminated. In this case, some of the work can be performed at the disassembly stage. Particular attention should be paid to:
- signs of wear on the surfaces of parts;
- the appearance of carbon deposits on wires and contacts;
- the presence of dirt and working fluids inside the generator housing;
- cracks, nicks and other mechanical damage to parts.
All damaged and worn elements must be replaced with new ones.
When troubleshooting, you do not need to pay attention to the generator housing: after several years of service, it may have an unsightly appearance, but at the same time it will protect the insides of the device well.
Stage four: generator repair
The difficulty of repairing the G-221 generator is that it is difficult to find spare parts for it. If bearings can still be purchased on the Internet, then choosing a suitable winding or rectifier will be very difficult.
Video: repair of VAZ 2101 generator
"Kopeyka" left the factory assembly line in 1970. Mass production ended in 1983. Since Soviet times, AvtoVAZ has not produced spare parts for repairing the rare model.
Therefore, the list of situations for repairing a VAZ 2101 generator is very limited. So, if bearings jam or brushes wear out, replacement elements can be easily found in car dealerships.
Worth checking out:
Next, the generator is assembled in the reverse order. The rotor is reinstalled using hammer blows
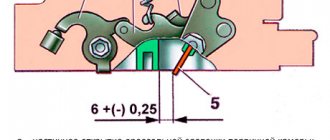
At the very end of assembly it is important to lock the bolts
Recommendation: if the capacitor seating surface is sanded, the contact will improve and become more stable.
Car owners who have an outdated version of the diode bridge installed may encounter difficulties with the output of pin 61, because it is difficult to fit into the hole on the back cover. One way to solve the problem is to enlarge the hole with a file.
After all the above steps have been completed, the repair of the VAZ 2101 generator can be considered complete. Next, you need to install it on the vehicle and test it in action.
Alternator belt VAZ 2101
In classic VAZ models, the generator is driven by a V-belt 944 mm long. On a VAZ 2101 you can also install a belt with a length of 930 mm, but other options are no longer suitable.
The factory equipment of the generator involves the use of a belt 2101–1308020 with a smooth surface and dimensions 10x8x944 mm.
The old-style VAZ 2101 generator belt has a smooth surface
The alternator belt is located in the front of the car and connects three pulleys at once:
- generator pulley;
- water pump pulley;
- crankshaft pulley.
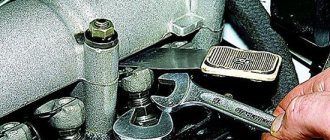
How to properly tension the alternator belt
When replacing the alternator belt, it is extremely important to tension it correctly. Any deviation from the norm will affect the operation of VAZ 2101 electrical appliances.
To tighten the VAZ 2101 generator belt, use a crowbar, spatula or thick screwdriver
Reasons for replacing the alternator belt are:
- the appearance of cracks and signs of severe wear on the belt;
- belt break;
- manufacturing defects.
To replace the belt you will need:
- mounting spatula (or metal crowbar);
- wrenches 17 and 19.
The work is performed in the following order:
- Reinstall the generator by tightening the two mounting nuts halfway. The nuts must be tightened until the stroke of the generator housing exceeds 2 cm.
- Insert a pry bar or pry bar between the generator housing and the water pump housing.
- Place the belt on the pulleys.
- Without releasing pressure from the pry bar, tighten the strap.
- Tighten the top nut securing the generator.
- Check the belt tension. It should not be too tight or, conversely, sagging.
- Tighten the bottom nut.
Video: tensioning the VAZ 2101 alternator belt
To make sure that the belt has a working degree of tension, it is necessary to sell its free space with your finger after completing the work. The rubber should yield no more than 1.5 centimeters.
Thus, even an inexperienced car enthusiast can independently diagnose the malfunction, repair and replace the VAZ 2101 generator. This does not require any special skills or exclusive tools. However, you should not overestimate your strength either. It must be remembered that a generator is an electrical device, and in the event of an error, the consequences for the machine can be quite serious.