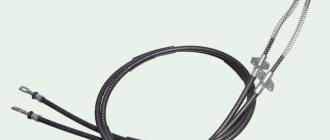
Replacing parking brake cables
The cables must be replaced simultaneously, left and right.
We install the car on a lift or inspection ditch
Unscrew the locknut and adjusting nut from the parking brake lever rod
Remove the cable equalizer from the parking brake lever rod
We take out the cable ends from the equalizer and remove it
- Replacing the Priora parking brake cable
Remove the end of the left cable sheath from the bracket
We disconnect the rear end of the left cable from the parking brake lever (described in the article How to repair the rear wheel brakes of a Lada Granta)
We remove the end of the cable and the brake shield
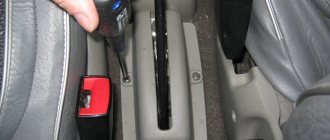
Using a 10mm wrench, unscrew the nut and remove the bracket securing the cable sheath to the rear suspension beam
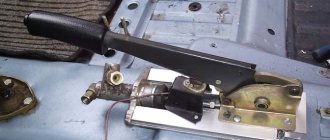
Manual brake lever with rod assembly for Lada Granta / VAZ 2190 from 2011
We remove the cable sheath from the holder on the rear suspension beam mounting bracket
Use a screwdriver to bend the cable mounting bracket on the body and remove the cable from the bracket
Using a 10 mm high socket, unscrew the four nuts securing the heat shield of the tank
Removing the screen
We remove the cable from the holder on the body
How to tighten and adjust the handbrake on a VAZ-2112 with your own hands (+ video)
We remove the left parking brake cable from behind the protective screen of the fuel lines
Installing the parking brake cables
We mount one of the cables in the reverse order and insert its front end into the cable equalizer
Place the parking brake lever rod into the hole in the equalizer and tighten the adjusting nut several turns.
To install another cable, you can make a device from a metal tube about 30 cm long and a hole with a diameter of 15-16 mm.
At one end of the tube we drill a hole and cut a thread in it for a screw (M4-M6).
Cable installation tool
We fix the cable in the holders on the body and the rear suspension beam mounting bracket
We put the tube on the rear end of the cable and fix the cable sheath on the end with a screw
Use a rod (you can use a wrench) to press on the tip of the cable, compressing its spring
In this case, the front end of the cable will come out of the sheath and can be inserted into the equalizer.
Further installation of the cable is carried out in the reverse order.
After replacing the cables, we adjust the parking brake.
The parking brake should hold the vehicle on a 23% grade.
The full travel of the parking brake lever should be from 2 to 4 teeth (clicks) of the ratchet device
Handbrake cable...a radical solution, but not the last
AvtoVAZ was able to distinguish itself even here... in no case do I start swearing like VAZ is crap, etc., it’s just such a banal thing as fastening the handbrake cables... and it was done so stupidly (((it’s just a shame... although my friend has a Kalina sedan. And the cables are secured it seems the same... and for some reason it doesn’t rub anything ((( but oh well... in general, when I was throwing the cables off the fastenings back in the summer... I decided to straighten the fastenings that were from the body. And I screwed the cables to them, to the straightened plates... using clamps from punched paper tape... everything seemed reliable... but somehow in the fall I heard a loud click on one side... I think stones... (while driving through the yard at a speed of 10 km/h)... then recently I heard a click on the other side... well, I think okay... in general when Yesterday I cleaned the rear right drum... I leaned down to look... and here you are! both cables have torn off the fastenings from the body and are dangling from below like ropes... it's a shame (today I went to the garage... I attached the right cable to the ties... I'll see how long it lasts... but on the left... the fastening, which is behind the tank...stands higher than the right one...and the cable, even removed from the fastening (which was torn off), still hangs very close to the body...what did you do?! cut out the platinum 1 mm, trimmed it for a tight fit... drilled a 15 mm hole in the plate, + finished it with a file to 16-17 millimeters, and made a slot on the side... then semi-automatically welded it to the original bracket on the beam, bent it... tucked the cable into the hole in the plate through the slot... I folded everything back... and grabbed the slot so that it would not unbend. I coated the boy and that was it. why is the solution...not the last one? because the idea came a little late that I needed to do it differently... and weld a tube... a piece into the hole in the bracket... so that the cable would not lie on the end of the plate, but on the plane of the tube. Otherwise, I think the tube on the cable will quickly wear out (maybe I’ll redo it after I return from the village from my mother-in-law))) at the same time I’ll check whether the ties on the right will break. For clarity, the diagram...
Some will ask what kind of crap is on the jacks... they are made of sparko burdock... bent with a gas torch... a lot of sand, etc., flies onto the jacks from under the front wheels, because of which the anticorrosive is very quickly knocked out and they become rusty, and then the rust begins to creep on body. these “cutters” eliminate this problem) I travel to Karelia on a primer... there is generally hard sandblasting)!
Source
Self-adjusting hand brake
If you have prepared everything you need to make the adjustment, you can proceed. To begin, make it possible to work under the machine by placing it above the inspection hole. If there is none, use a jack to raise the rear of the car. Next, follow the instructions in which we will tell you how to tighten the handbrake on a Grant to get a result no worse than that of a service station master. So, the process of setting the optimal cable tension is as follows:
To tighten the handbrake cables, you must place the car above the inspection hole
- First, climb inside the vehicle to set the parking brake lever to its full operating position - this will allow you to determine what the result of the adjustment should be. If the lever rises by less than two clicks, then measures should be taken to increase the length of the drive. Although most often it is necessary to shorten it, since due to wear of the pads and stretching of the cable, the number of clicks only increases over time. It is necessary to lengthen the drive only after installing new brake pads.
- Fully lower the handbrake lever and move under the car to remove the cushions from the brackets of the additional muffler.
- Next, using a socket wrench, unscrew the four nuts that hold the protective shield in place.
- Now prepare a wooden block to place it between the muffler pipe and the bottom (you will have to pull it back for this) - this way you can remove the protective screen, which will free up space for work.
- Use a 13mm wrench to loosen the locknut while holding the adjusting nut with a second wrench.
- In order to tighten the handbrake drive, screw in the adjusting nut, and to lengthen it, on the contrary, this nut should be unscrewed. When tightening, it is necessary to check the travel of the handbrake lever.
This is how the Lada Granta's handbrake is adjusted, but the work does not end there. After all, it is necessary to check whether the result meets the current requirements. To do this, you need to lift the car using a lift or hang its rear wheels using a jack. Now, use your hand to turn each wheel and make sure that when the handbrake lever is lowered, the wheels rotate freely. If this is the case and the lever stroke is 2–4 turns, then you have adjusted the handbrake drive on the Lada Grant correctly.
The final stage of the adjustment work consists of installing all the removed parts in the reverse order, after which the parking brake system must be tested under road conditions. To do this, find a suitable section of road with a slope of 23% (or an overpass) and put the car on the handbrake. If the car does not move spontaneously, you can be proud of the result of your work.
And finally, I would like to note that the problem with a non-working hand brake is not always solved by simply tightening the drive. Over time, the cable loses its ability to perform its function due to critical stretching, wear or damage. After all, he has to work in aggressive conditions under the bottom of the vehicle. In such cases, the only solution is to replace the parking brake cable.
How to change the hand brake linkage of a VAZ
So, first, let’s figure out how to replace the handbrake cable on a VAZ 2114 and a VAZ 2115 (the cars are almost the same). We will need:
- wrenches;
- screwdrivers;
- hammer, wooden block;
- penetrating lubricant;
- wheel supports.
We begin repair work if there is an inspection hole.
- First, lower the assembly lever in the cabin.
- Next, at the bottom, loosen the adjusting nut, as well as the lock nut. Unscrew and remove these nuts.
- Having loosened the fastenings of the rear wheels, as well as placing stops under the front ones, we lift the rear part of the car with a jack. We remove the wheels.
- After removing the studs from the brake pads, we knock down the brake drums using a hammer and a wooden block.
- Next, having dismantled the brake pad and unscrewed the bolt on it, you can finally disconnect the end of the handbrake rod from it - each rod from each unit.
- At the rear of each brake unit, we pull out the cable drive in the shell, then remove the shell.
- This releases our treasured part; all that remains is to pull it out of all the fasteners under the body. Then you can install the new one in reverse order.
The handbrake cable on a VAZ 2109 is replaced in the same way. When changing the cable on a VAZ 2110, we also follow the instructions given, but at the same time you will have to unfasten the interfering muffler, or rather, its end part, and then lower it. Otherwise there are no changes. To replace the handbrake cable on a Niva VAZ 2123, we follow the instructions given above, however, before releasing the rods from the wheel brake assemblies, you will have to unscrew the nuts securing the wheel guards.
The same applies to replacing a defective handbrake cable on a Gazelle. There, in the same way, you will have to unscrew two nuts in order to pull the rod removed from the pads out of the wheel guard.
True, on some modifications of the VAZ, the defective part is attached to the underbody using a threaded connection. Then you need to unscrew the nut. By the way, we must first treat all threaded connections with an aerosol-type penetrating lubricant.
What to do with the “manual” assembly of foreign cars
Now let’s discuss the procedure as applied to popular foreign cars. To replace the cable on a Mitsubishi Lancer 10 we will need:
- hammer, wooden block;
- wrenches, screwdrivers;
- wheel chocks;
- penetrating aerosol lubricant.
Also read about replacing the timing chain on an Opel Corse and replacing the license plate light bulb on a Nissan Qashqai. The peculiarity of this car is that part of the assembly, unlike the VAZ, runs inside the cabin. Therefore, the actions here are as follows.
- We unscrew the armrest fastenings, and then remove the armrest.
- We dismantle the rear seat - this is done easily. Then unscrew the handbrake linkage.
- Next, loosen the bolts of the rear wheels, install wheel chocks under the front wheels, and lift the rear of the car using a jack.
- Remove the rear wheels. While in the inspection hole, unscrew the fastening of the part on the rear beam.
- Remove the brake drums using a hammer and a piece of wood.
- We unfasten the brake pads, and then disconnect the ends of the treasured part from them.
- We pull the defective unit into the cabin and disconnect it from the parking system lever.
- We pull the new spare part through and fasten it in the reverse order.
Replacing a broken handbrake cable on a Hyundai Accent is done in much the same way. This car will also have to remove the rear seat.
Interestingly, the German Volkswagen Golf has a similar parking system design. However, to replace the handbrake cable, say, in a Golf 6, you do not need to remove the rear seat. The rods of the wheel mechanisms exit under the bottom through the muffler tunnel. After disconnecting from the equalizer, you just need to pull them down. The handbrake cable of the Volkswagen Passat B4 is replaced in the same way, since the unit here is designed following the example of the Golf.
A necessary tool for tightening the handbrake.
- Two keys for 13. It is advisable that one of them be a socket.
- Head 8.
- A partner, but you can do without him. The truth is it’s more difficult without him.
The principle of adjusting the handbrake
- Fully lower the handbrake lever in the cabin.
- Place the car on a pit or lift it on a lift. Some car owners manage to adjust the handbrake “from the curb” - but this is inconvenient and dangerous.
- Find the resonator from the bottom of the car and remove it from the rubber brackets.
- Using a ratchet, unscrew the 4 bolts securing the protection of the handbrake adjustment mechanism (protective screen).
- Next, you can either remove the protective screen, but it seems to me that it is easier to move it forward behind the muffler, which will free up space that is enough for free work.
- Loosen the first nut with a 13mm wrench.
- By tightening the adjusting nut, tighten the handbrake cable that comes out of the passenger compartment.
- Ask a partner to check the stroke of the lever handle, or check it yourself.
- As soon as the handbrake moves 3-4 clicks, tighten the lock nut.
- Before the final stage of work, it is necessary to check the functionality of the brake mechanism. To do this, hang the rear wheels and watch how they rotate with the hand brake off. They also check how the wheels grip when the handbrake is raised.
- Next, return the protective screen to its place, screw it onto the seats and put rubber fasteners on the resonator.
Instructions for tensioning and replacing the drive
Since the parking brake system mechanism is located under the bottom of the car, an inspection ditch, overpass or lift is needed to perform the work. In extreme cases, you can do without them, but then you will have to hang out the back of the car and lie under it, which is not only inconvenient, but also dangerous. Before tightening the cable, you should securely secure the front wheels of the car with wheel chocks .
Then act in the following sequence:
- Set the handbrake lever to the down position.
- Jack up any of the rear wheels.
- Armed with two open-end wrenches that fit the tensioner nuts, go down into the inspection hole.
- While holding the main nut located on the stud near the rocker arm, loosen the locknut.
- Tighten the tension nut, periodically checking the rotation of the suspended wheel by hand. To prevent the pin from spinning, it must also be held with pliers or a wrench.
- Stop tightening the cable as soon as the pads begin to grip the wheel. Make 1-2 turns of the nut back and check the operation of the handbrake. It should fire after the second click.
- Tighten the locknut, lower the jack and test the handbrake on a slope.
Replacing the cable drive will require more time, especially to disassemble the drum brake system. To hang both rear wheels, prepare wooden blocks, and to replace them, use a standard set of tools; no special devices are required. The algorithm of actions is as follows:
- Place the car on the pit and loosen the cable completely, as described above. Unscrew both nuts and remove it from the rocker arm.
- Lift the rear of the car, place it on blocks and remove the wheels.
- Remove the drums and unscrew the bolts securing the cable to the rear casing.
- Remove the brake pads and spacer bar. When you reach the lever, remove the cable loop from it. Remove it from the casing and repeat the operation on the other side.
Install the new cable drive in the reverse order, starting with the wheel mechanisms. At the end, tighten it and check the operation of the handbrake.
Pull up the handbrake
But if you really know how to tighten the handbrake on a Lada Granta standard, this procedure will not take you much time and effort. The only thing that is required for its implementation is a jack or an inspection hole, because access to adjustable components and assemblies occurs from below and you will have to work under the car. To tighten (adjust) the handbrake you will need 3 tools:
- two open-end wrenches for 13, one of them is preferably a socket one;
- one key head for 8;
- a faithful assistant (although in desperate situations you can get by alone).
The process of directly adjusting the manual braking system of a Lada Granta car is carried out in nine main stages:
- We lower the handbrake lever inside the car.
- We climb under the car, unscrew the rubber cushions (brackets) from the resonator, and remove the muffler from its attachment to the body.
- We remove the protective screen of the parking brake adjustment mechanism. To do this, use a socket wrench to unscrew the 4 nuts from the fastening bolts.
- We remove the protective screen or move it to the side behind the muffler - in this case, the necessary space for work is also quite enough. In this case, the muffler can be pulled back with something, for example, by pushing a block of wood under it.
- We take two 13mm wrenches - the first one is to slightly loosen the locknut, holding the adjusting nut. Then vice versa - hold it, and secondly turn (also loosening) the adjusting nut.
- Actually, we adjust the hand brake as follows: tighten the handbrake cable, for which we tighten the adjusting nut (move the key clockwise).
- Next, you should check the travel of the handbrake lever - this is why you need a partner, or you will have to do it yourself. The lock nut can be tightened when the handbrake stroke is 2-4 clicks (see above).
- Then we test the operation of the parking brake mechanism as a whole. To do this, lift the rear wheels and check how freely they rotate when the handbrake is lowered and how completely they lock when fully raised (in this case they should not rotate at all!).
- If the handbrake is working properly, tighten the locknut and replace the protective screen and muffler. The handbrake adjustment is complete!
As the mileage and life of the vehicle increases, the handbrake becomes less and less adjustable. It happens that even after adjustment, the manual braking system does not work properly and does not “hold” the car. This indicates that the wear on the brake pads is too high or the cable stretch is irreversible.
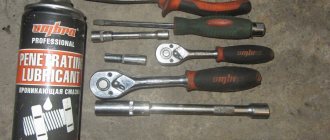
Tools:
- Ratchet wrench
- Extension
- 10 mm head
- 13 mm high head
- Open-end wrench 13 mm
Parts and consumables:
Aerosol lubricant type WD-40
Notes:
The parking brake should hold the vehicle on a 23% grade. The full travel of the parking brake lever should be from 2 to 4 teeth (clicks) of the lever ratchet device.
1. To adjust the parking brake, place the vehicle on an inspection ditch or overpass and lower the parking brake lever.
2. Using a 10 mm socket, unscrew the four nuts securing the rear heat shield of the additional muffler, having previously treated them with WD-40 lubricant.
3. Remove the rubber cushion from the front suspension bracket of the additional muffler.
4. Slide the heat shield forward to expose the parking brake adjustment assembly.
5. Holding the adjusting nut of the cable end with a 13 mm wrench, use a socket of the same size to unscrew the lock nut.
6. Turn the adjusting nut clockwise to tighten the cables.
Note:
It is convenient to adjust the tension of the cables with a high head with a ratchet and an extension. In this case, do not unscrew the lock nut completely, but, aligning its edges with the edges of the adjusting nut, put on a 13 mm high socket and rotate both nuts at once.
7. Use the locknut to secure the adjusting nut. When the lever is lowered, the suspended rear wheels should rotate freely.
The article is missing:
Photos of parts and consumables
Adjusting the handbrake lever on the Lada Grant is necessary if its stroke is more than 6 clicks. The optimal stroke is 2-4 clicks, but during operation it is allowed to increase its stroke to 8 clicks.
An increase in the travel of the parking brake lever occurs for several reasons, the main ones being stretching of the handbrake cable and wear of the brake pads.
Adjusting the parking brake (handbrake).LADA Granta – Fun – watch video
4 years ago
In the video I will show you how to change the front pads, brake discs and calipers yourself.
2 weeks ago
The dealer sold the damaged car as if it were new Prices for the Lada Kalina Cross on Avto.ru – https://goo.gl/BRZ31U – My website – https://avtokriminalist.ru/ – Offer a car for review – The Lada Kalina car was purchased a year ago from an official dealer.
A year later, the owner decided to sell the car and found out that under the guise of a new car, a car dealership had sold him a damaged and repaired car. Comprehensive vehicle inspection and diagnostics. Checking the body, engine and mileage.
Autocriminalist Maxim Shelkov – Car diagnostics before purchase – Checking the car with a visit to the car – Selection of a car to order – Examination of license plates: VIN, body, frame, engine – Checking car documents
4 weeks ago
All details about the car for subscribers: https://www.youtube.com/watch?v=wMgCGHoCqLM Win a car with tuning - https://l.tinkoff.ru/academegcar Management competition “Leaders of Russia”: https://leaders of Russia .rf Many thanks to Boryan and Fedya from LOW CARS MEET, an insider from this filming will soon be released on their channel: https://www.youtube.
com/channel/UCDcdwoIrn2M1mwfEz0NCODg Music: Clams Casino – All I Need What So Not – Touched GooMar – Moscow DROELOE – BACKBONE (feat. Nevve) Hucci – Vision (feat. Dom Sebastian) iBenji & Moon-Sun – Horny devianprod. – drowninginthissea For advertising and cooperation issues: My stream channel: https://www.
youtube.com/c/AcademeGDailyStream Instagram: https://instagram.com/academeg Vkontakte: https://vk.com/AcademeG AcademeG true original groups: https://vk.com/academeg_reviews Ftaroy channel: https:// www.youtube.com/user/AcademeG2ndCH Souvenirs Academeg Store: https://vk.cc/5UNsQJ Auto chemical goods A-PROVED: https://a-proved.
ru #ZIL600SIL #porsche
9 months ago
How to make the car interior quieter https://www.youtube.com/watch?v=wbmNTwACDE8 Oil additive tests https://www.youtube.com/watch?v=fVCxsP71BII My 2nd channel https://www.youtube. com/channel/UC6rJlbPrc07AnG4BYlciPoA Excellent DVR https://ali.pub/204pb1 Continuation of this video https://www.youtube.com/watch?v=Uu1YUAAxRsY
2 years ago
Adjusting the handbrake cable on a VAZ 2114-2115 Since the rear drums and pads tend to wear out, over time the effectiveness of the handbrake decreases and you have to tighten it more and more.
Ultimately, even with the lever at maximum tension, the rear wheels do not lock to the required moment, and you need to resort to adjusting the mechanism. To perform this work on a VAZ 2114-2115 you will need only two 13mm wrenches, one can be a regular one, and the second is convenient to use a ratchet, since there is quite a bit of space for turning the nut.
So, it is most convenient to perform this work in a pit, or with the rear of the car strongly raised with a jack. The first step is to find the adjustment mechanism itself. It is located under the bottom of the car closer to its rear: Now, while holding one nut with a wrench, the second must be tightened until the handbrake efficiency becomes normal.
Some owners check the operation while driving by lifting the lever and making sure that the wheels are completely locked.
3 years ago
Video for those who are planning to buy a Grant with low (or high) mileage and what it looks like after 2 years of operation and 33,000 km. Due to numerous requests and questions about the learnable flip key and temperature indicator - I took it here https://rd-lab.shop
1 month ago
AUTOLIFE HACKS. tips for motorists Download
Causes of malfunction and their elimination
As a rule, the reasons why the handbrake does not work are quite simple and do not require long or expensive repairs:
- torn cable. One of the common causes is a broken cable on the handbrake or under the car. The problem is solved by simply replacing the cable;
- jammed cable. Due to damage to the sheath in which the cable moves, it may become jammed, preventing you from using the handbrake. And the cable itself consists of many steel strands, which, if damaged, can also prevent proper operation. The solution is to replace the cable;
- dirty brakes. If dust, dirt, ice or reagents that are sprinkled on roads in winter get on the pads, this can cause the brakes to not work properly. The solution is to press the brake pedal several times smoothly while the car is moving. Thanks to friction, the pads will be cleaned;
- incorrect adjustment. It may happen that the cable system is not adjusted properly, the bolt is not tightened correctly, or the length of the cables is incorrectly selected. The solution is to adjust the system and correct tension of the cables;
- pad wear. The pads are subject to abrasion during operation. Every time you apply the brakes, the pads gradually become unusable. The solution is to replace the pads;
- oil in the pads. Oil or brake fluid leaks can cause the car to not hold up with the handbrake. The most important thing in this case is to identify the cause of the leak - it could be the rear axle seal or the brake cylinder. The solution is to eliminate the leak and clean the pads. If the pads are very oily, replace them.
New Lada: Stalls when the revs are reduced, when starting off when cold.
The principle of operation of the handbrake on Grant
Why does it need to be tightened frequently?
This is the peculiarity of the mechanism, which is why you often have to tighten the handbrake. Plus low-quality spare parts from the beginning, and a design that has not changed since the time of Tsar Pea!
In foreign cars (not all of course), the rear brake mechanism (drum or disc) has self-tensioning springs, which are tightened depending on the wear of the pads.
How a properly configured handbrake should work
The handbrake movement in a Lada Granta car should be no more than 6 clicks from the moment it is raised. It is possible to increase the handbrake stroke to 8 clicks, but it is not recommended.
Ideally, of course, 3-4 clicks. With this setting of the handbrake, you will have a reserve of movement when the cable weakens and the wheels begin to grip later.
If you experience a situation where the handbrake is “pulled out” to its fullest extent, but the wheels do not grab, then the following reasons are possible:
- rear brake pads are worn out;
- the handbrake cable is broken or stretched/
How to tighten the handbrake on a Lada Granta, when to tighten it
Tightening the handbrake cable is necessary in cases where the parking brake lever does not release the brake pads in the upper position. According to science, the pads should block the wheels at 4-6 clicks and hold the car on a slope of 20-25 degrees. Otherwise, we won’t even be able to pass the technical inspection.
Parking brake design
To tighten the handbrake cable, we need to unscrew and move to the side the protective cover of the muffler resonator. It is attached to four studs welded into the body. The difficulty is that when unscrewing these four nuts with a 10mm socket, there is a danger that the studs will break, since the threads often sour and rust.
In this case, adjusting the handbrake may result in drilling the bottom and welding new 6 mm bolts up to 25 mm long. As a last resort, they can simply be inserted into the hole in the bottom by inserting a powerful washer and placing a grommet under the head of the bolt. In a word, we have already prepared ourselves mentally, all that remains is to consider the process itself.
And yet, it is very important to treat these same casing studs in advance with a penetrating lubricant, for example, WD-40. True, this is also connected with traveling under a car
We adjust the handbrake on Grant with our own hands, video
If we are ready for difficulties, then for adjustment we will need a standard set of tools, grease for processing threads and lubricating the compensator, as well as an inspection hole or overpass. If everything is ready, let's go.
- Release the handbrake completely and go under the car.
- We find the studs with nuts we need and try to unscrew them with a 10mm socket.
- Remove the rubber muffler hanger from the bracket and move the heat shield as far forward as possible.
- We gained access to a 13 mm nut for adjusting the tension of the handbrake cable.
- Use an open-end wrench to hold the locknut, and with another wrench we tighten it several turns, controlling the tension of the cable.
- We tighten the cables until they are lightly tensioned, and then check the tightening force. The suspended rear wheel should rotate freely when the handbrake lever is lowered.
After this, we check the parking brake in accordance with the regulatory data. Below we have attached a video of the process of extreme adjustment of the handbrake on Grant. Good luck to everyone and strong brakes!
LADA GRANTA. TIGHTEN THE HANDBRAKE CABLE
Eliminating rear squeaking on Grant. — logbook Lada Granta MAGMA 2013 on DRIVE2
Almost every owner of a brand new front-wheel drive Lada, regardless of the model, encounters a problem in the first hundred miles. Something starts to creak terribly when the suspension works. The sound is coming from somewhere outside behind.
The squeak sounds like rubber rubbing against each other, or something like that.
And the sound is so loud and disgusting that thoughts immediately creep up that the car is “... aww”, and like the first kilometers of the run, and already the whole suspension is creaking...
So - you are no exception. This manifests itself in probably 90% of new Lada owners. This is a factory defect that they have not paid attention to for a long time.
But don't panic ahead of time. Eliminating this disease will not take much time.
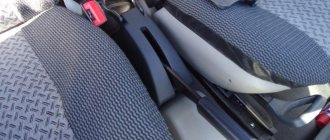
The reason for such a nasty squeak is actually very simple. A handbrake cable runs along the sides of the rear beam. To be more precise, its right side and, accordingly, its left side.
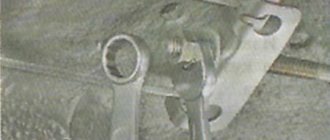
If you look between the rear wheel and the arch, the cable is clearly visible. You will also see a horseshoe-shaped bracket through which the cable is threaded.
In this place, a rubber tube is put on the cable, which is designed to protect the cable from chafing in this place (According to AvtoVAZ).
Cable in bracket (photo from the Internet)
But in reality, everything is not as smooth as it seems to the manufacturer. I’ll tell you in more detail to figure out “who is to blame” and “what to do about it.”
While driving, the rear suspension beam moves intensively and has an impressive stroke. When the beam lever goes up, the handbrake cable moves back a little and moves in the same bracket. And accordingly, when the beam lever moves down, the cable again moves in the bracket, only in the other direction. It turns out that while moving the cable is constantly “playing” back and forth.
And it’s this very rubber tube on the cable that creaks, rubbing against the iron bracket.
Many people ignore this creaking, as if it will go away on its own. In principle, this is what happens after some time. The creaking disappears.
But few people think that it disappears only when this very rubber tube and the protective plastic layer of the cable are rubbed down to its metal braid. Further, metal on metal does not creak.
BUT, water constantly gets in there, the cable begins to rust, and over time it jams. After all, no one wonders why the cable or one half of it jams? They stupidly change it, and everything starts over again.
Well, that's probably enough theory, let's move on to eliminating this defect.
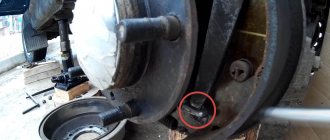
Many people who know the cause of the squeak, but do not know how to eliminate it, simply bend this bracket. That is, they simply hit it from below with a hammer, thereby clamping the cable more tightly. The creaking goes away, but only for 1-2 weeks. Then the creak returns. Plus, the cable wears through to the metal braid faster. This is all wrong, and you don’t need to do this!
There is no need to do this (photo from the Internet)
This is all wrong, and you don’t need to do this!
In fact, this defect is very easy to eliminate: You need to pull the cable out of the bracket by hand and pass it under it. Then take a plastic tie (clamp) and secure the cable to the bracket with it.
Problems will disappear for a long time and will no longer bother you. By the way, a huge number of people who are “armed” in this way do this. Many servicemen and car mechanics also take note of this method.
Just a matter of minutes...
Cable below the bracket (photo from the Internet)
But this method did not suit me. As they say, “We are not looking for easy ways.” I'm just used to doing everything competently and wisely. And this bracket is there for a reason, and must perform certain functions of suspending the cable. I did it as follows.
Since I have access to a lathe at work, I turned it out of 16mm polypropylene. water pipe two bushings. The inner diameter of the tube exactly coincided with the diameter of the cable. I ground the outer diameter down to the minimum, namely the wall thickness was 1.5 mm.
Next, I cut the sleeve lengthwise and put it on the cable. The bracket had to be bent a little to fit the cable with the bushing. I sat in place quite tightly. The pipe material is very durable and slippery. so the cable simply slides in this bushing.
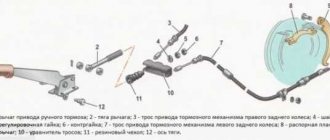
Parking brake device
Before replacing the handbrake cable or tightening it, you need to understand the design of the mechanism. It is designed quite simply and consists of the following main parts:
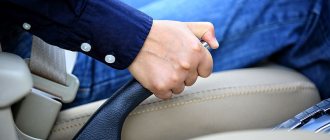
- Lever with spring-loaded button and latch. Located in the cabin on the right hand of the driver.
- A metal rod with a pin at the end and a rocker arm for installing the cable is located under the bottom of the car and attached to the lever. This is the “handbrake” tensioning device.
- The ends of the cable (or two cables), installed on the rocker arm, are attached to the brake levers of the rear wheels - disc or drum.
The parking brake works like this: when the driver lifts the lever in the passenger compartment, the rocker moves forward and acts on the pads through a cable drive. In drum mechanisms, the brake pads move apart, and in disc mechanisms, they converge. The “handbrake” holds only the rear wheels and functions independently of the main brake system, which is activated when the pedal is pressed.
The handle is fixed in several positions thanks to the latch. To unlock it and lower it to its original position, a special button is installed at the end of the handle. If the pads “grab” the wheels on the second click, and after the fourth click they hold the car securely, then the drive is considered to be working well.
Removing elements of the parking brake system
We replace the parking brake cables when they are broken, pulled out, or stuck inside the sheaths, when adjusting the parking brake fails to keep the car stationary on a slope - up to 23% inclusive. We remove the parking brake lever to replace it or to replace the lever rod. The cables should be replaced simultaneously - left and right. We carry out the work on an inspection ditch or overpass. We show the replacement of the left cable. The right cable is removed in the same way, but it is not necessary to remove the fuel tank heat shield. We unscrew the locknut and the adjusting nut from the parking brake lever rod (see “Adjusting the parking brake”).
Remove the cable equalizer from the parking brake lever rod.
We take out the front ends of the cables from the equalizer and remove it.
Remove the end of the left cable sheath from the bracket. Disconnect the rear end of the left cable from the parking brake drive lever (see “Replacing the rear wheel brake pads”).
We remove the cable tip from the hole in the brake shield.
Using a 10mm wrench, unscrew the nut... ...and remove the bracket securing the cable sheath to the rear suspension beam.
We remove the cable sheath from the holder on the rear suspension beam mounting bracket.
Using a screwdriver, bend the cable mounting bracket on the body... ...and remove the cable from the bracket. Remove the heat shield of the fuel tank (see “Removing the fuel tank”).
Remove the cable from the holder on the body.
We remove the left parking brake cable from behind the protective screen of the fuel lines. We install the cables in the following order. We mount one of the cables in the reverse order and insert its front end into the cable equalizer.
We insert the parking brake lever rod into the hole in the equalizer and tighten the adjusting nut several turns. To install another cable, we recommend making a device from a metal tube about 300 mm long and a hole with a diameter of 15–16 mm. At one end of the tube we drill a hole and cut a thread in it for a screw (M4–M6).
Device for installing cable. We secure the cable in the holders on the body and the rear suspension beam mounting bracket.
We put the tube on the rear end of the cable and fix the cable sheath on the end with a screw.
Using a rod (you can use a wrench from a set of socket heads) we press on the tip of the cable, compressing its spring. In this case, the front end of the cable will come out of the sheath and can be inserted into the equalizer. We carry out further installation of the cable in the reverse order. After replacing the cables, we adjust the parking brake. To remove the parking brake lever, unscrew the locknut and the adjusting nut from the parking brake lever rod (see “Adjusting the parking brake”). Remove the cable equalizer from the parking brake lever rod (see above). Inside the car...
... use a Phillips screwdriver to unscrew the three screws...
...and remove the parking brake lever trim.
Disconnect the wiring harness from the parking brake warning switch.
Use a Phillips screwdriver to unscrew the self-tapping screw...
...and remove the switch.
Using a 13mm socket, unscrew the two bolts securing the parking brake lever bracket to the floor tunnel.
Remove the parking brake warning switch bracket.
Remove the parking brake lever with bracket and rod assembly, pulling the rod through the rubber sealing boot.
Use a screwdriver to pry up the fixing bracket of the thrust axis... ...and remove it.
Remove the axle and rod from the parking brake lever. Install the parking brake lever in reverse order. Adjusting the parking brake (see “Adjusting the parking brake”)
Design and location of the hand brake cable for the LADA Granta
The purpose of the LADA Granta handbrake cable is to transmit force from the lever in the cabin to the rear brake pads. It is enclosed in a multi-layer protective shell and has tips for attaching to the handbrake lever and the rear wheel brake drive. The adjusting nut on the cable allows you to adjust the length of the drive, and the return spring returns the system to its original state after lowering the drive lever. The handbrake cable is located under the bottom of the car and is partially covered by the muffler thermal shield.
Causes and signs of failure
The main reason why you have to change the handbrake cable of the LADA Granta is mechanical wear. The constant forces to which the cable is subjected eventually lead to its deformation (stretching) or rupture. The cause of cable breakage can also be wheel bolts of non-standard length, which catch and fray the steel threads of the cable. Signs that the parking brake cable needs to be replaced:
- the cable stretches or breaks, as a result the handbrake lever rises all the way without effort and “does not hold” the car;
- the cable jams in the braid, the pads do not release the brakes, the brake drum heats up when moving.
When a cable jams in the braid, you can try to lubricate it and, if the cause is not frayed threads, the problem may disappear. In all other cases, it is necessary to replace the Grant hand brake cable.
Advice: do not try to “save” the handbrake, using it as little as possible. If the cable moves infrequently in the sheath, it will eventually jam and break.
What is needed to replace the handbrake cable of the LADA Granta
To change the handbrake cable, you need access to the bottom of the car. Therefore, work must be carried out on a lift or inspection pit. In the latter case, you will additionally need a jack. In addition, you need the following tools and materials:
- wheel wrench;
- keys for 10, 12, 13;
- 2 bolts M8x60 mm;
- pliers;
- flat screwdriver;
- WD-40;
- metal brush;
- handbrake cable for LADA Granta.
When to tighten and when to change?
During operation of the machine, the steel cable gradually stretches and begins to sag. Then part of the lever stroke is used to remove this slack (the first 2-3 clicks), and only then the force is transferred to the brake pads of the rear wheels. As a result, they are weakly pressed against the surface of the discs or drums and the car does not brake reliably.
The first sign of a malfunction is that the handbrake stops working on the first two clicks of the handle and is raised by hand without any effort. In this case, it is definitely necessary to tighten the hand brake, or rather the cable drive.
But the operation of the mechanism also depends on other factors:
- on the degree of wear of the brake pads;
- from the depth of excavation on the surface of the steel disk or drum.
Abrasion of the linings does not have much effect on the operation of the main system, since the stroke of the hydraulic pistons is quite large. But the effect of the mechanical “handbrake” gradually weakens. To return it to working condition, it is necessary to compensate for the wear of the elements by tensioning the drive. If the cable itself is in satisfactory condition, the extension of the tension pin will be enough to ensure the operation of the parking brake at any degree of wear on the linings.
The cable is replaced in the following situations:
- The element has stretched to such an extent that at maximum tension the pads do not grip the discs and the car rolls away on any slope.
- Due to the constant ingress of water under the cable casing, it rusted and became tightly jammed. This happens when a motorist rarely uses the handbrake.
Cable jamming also occurs in winter, when water trapped under the casing freezes inside. In this situation, do not rush to change it; first warm up the car in the garage, and then drive out the moisture using WD-40 aerosol lubricant.
Lada Granta: repair, operation, tuning and maintenance
Perhaps checking the brakes of any car is the key to your safety
In my opinion, the car’s brakes need to be prevented and checked at least once every two weeks, this will make your driving comfortable and safe, which is the most important thing, but now we will talk about the brakes of the Lada Granta. So, let's get started!. Take the jack in your hands, lift the rear of the car with it and remove the wheel
Then remove the brake drum and unscrew the guide pins
Take the jack in your hands, lift the rear of the car with it and remove the wheel. Then remove the brake drum and unscrew the guide pins.
Next, we loosen the handbrake cable and remove the cotter pin that holds the block, after all, pull out the lever, then remove both springs, the upper one and definitely the lower one, and then remove the blocks.
First the pads, then the upper tension spring and install the lower tension spring, and of course, don’t forget to put the handbrake cable on the lever! Install the brake drum, it is advisable to clean it and lubricate it with special lubricant. It's called graphite.
After cleaning, we put it in place, then the most basic procedure is bleeding the brakes.
Bleeding the brakes.
For this you will need a partner. One person will sit in the car and press the brake 5-6 times until it hits the floor. And the second one needs to sit near the brake disc.
When you unscrew, the second one should begin to press the brake pedal; when the pedal rises, the screw will need to be tightened. And so 5-6 times.
As a result, air will escape. This will then lead to the release of brake fluid.
Please note that when the liquid pours, it should be free of bubbles. When the procedure is completed, put the wheel in place. Press the brake pedal again 2 times and try to spin the wheel, if the brake drum clings a little to the pads, everything is fine! As soon as we have pumped the front brake, we move along the diagonal to the rear brake pad, and do the same thing.
Press the brake pedal again 2 times and try to spin the wheel, if the brake drum clings a little to the pads, everything is fine! As soon as we have pumped the front brake, we move along the diagonal to the rear brake pad, and do the same thing.
All we can say is that we are almost done with the brakes. Next we tighten the handbrake. Use a special wrench to tighten the handbrake.
Keys are sold in all auto parts stores, so you should not have any difficulties buying a key.
That's all, I wish you good luck and stop breaking your brakes!
‹ Possible malfunctions Up Replacing brake fluid ›
Handbrake cables and mirrors with sealant
Almost all owners of the Lada Granta Liftback immediately after purchasing the car encountered two unpleasant problems: 1. Creaking in the rear of the car; 2.
A piercing whistle at speeds of 90 km/h with the windows open.
Fortunately, in our time, with the help of various forums and car communities, Grantmakers quickly found the sources of these problems and found effective ways to combat them. Let's get started?
Handbrake cable creaking
As you may have guessed, the cause of the first problem (creaking in the rear of the car) is our handbrake cables, which are secured in special eyes under the bottom in the rear wheel arches.
When you lift the handbrake, the cables become tense and, at the slightest vibration, the car begins to creak against the bottom of the body.
The sound is simply terrible and makes you really depressed! You just bought a new car, parked it, put the handbrake on, moved slightly and it creaked like a cart! It's extremely disappointing!
Moreover, this creak will not lead to anything good. What does this friction mean? There are a lot of photos and reviews that these cables almost rubbed the metal to holes. From vibrations of the car when the handbrake is applied, the cables, like a file, begin to polish and erase the bottom of your Granta.
I advise you not to expect such sad consequences and simply remove the handbrake cables from the eyes. By the way, the off-dealer managers themselves advise doing this immediately after purchasing a car